175M+ ethically sourced IPs built for the highest reliability.
High-speed, cost-effective proxies built for any scraping workload.
Premium static residential proxies from trusted ASNs for most difficult targets.
Dedicated IPs from premium ASNs for demanding scraping.

AI-powered proxy solution for optimized web scraping performance.

20M+ IP addresses from real mobile devices for precise targeting.

Free Chrome proxy manager extension that works with any proxy provider.

Free Android proxy manager app that works with any proxy provider.

Free community-driven tools to improve your web scraping projects.
Web Scraper API
All-in-one web data collection platform for every stage of web scraping.
Fast Search API
Ultra-fast organic search results scraper tailored for AI workflows.
Headless Browser
Advanced browser automation solution for AI agents and scraping.
AI Studio
A suite of AI-powered tools for various scraping projects.

Documentation
All features, parameters, and integration details, backed by code samples in every coding language.
Tutorials, samples, and guides.
Latest fixes and features.


How to Configure Proxy Settings in Ubuntu GUI & Terminal
This tutorial explains how to set up Oxylabs Residential and Datacenter Proxies in Ubuntu. We’ll be using Ubuntu 20.04 LTS, but this integration method should also work on similar Linux distributions such as Debian, Xubuntu, etc.


What is Ubuntu?
Ubuntu is an open-source Linux distribution developed by Canonical. It’s a secure and robust operating system with over 10 years of security patching for various CVEs (Common Vulnerabilities and Exposures), making it an ideal Linux distribution for production and enterprise environments. Moreover, Ubuntu’s intuitive GUI (Graphical User Interface) makes it beginner-friendly and popular among Linux users.
Ubuntu proxy server setup
There are multiple ways to set up a proxy server for Ubuntu. The easiest one is using Settings > Networks > Network Proxy.
In this method, we’ll be using Ubuntu Settings to set up a system-wide network proxy. Follow the steps below:
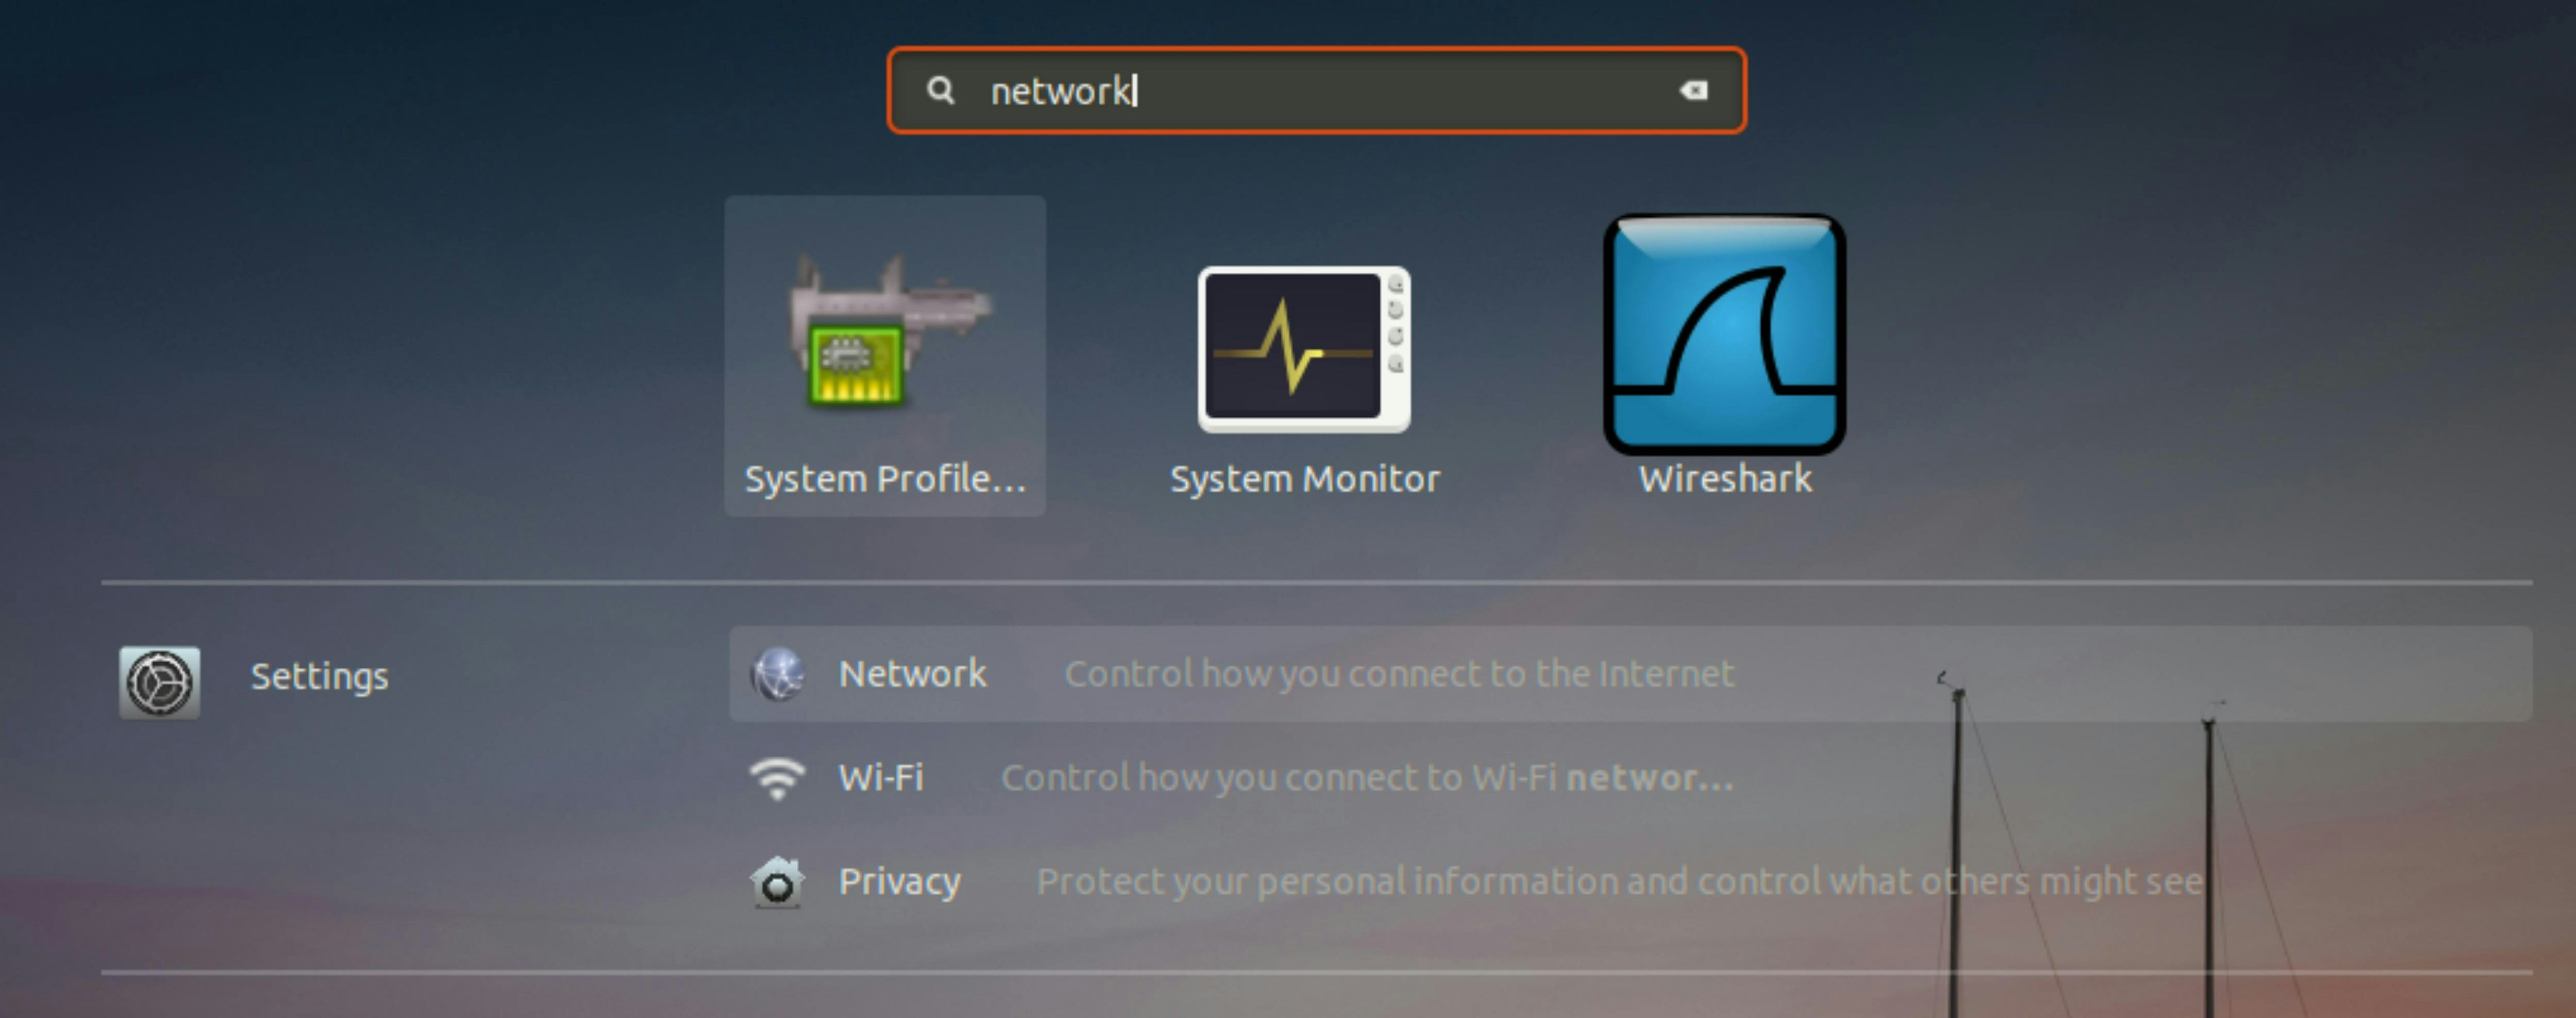
Step 1: From the Ubuntu launcher find Settings and go to the Network tab
The Ubuntu launcher is the dock available on desktop. By default, it’s located on the left side of the screen. From the launcher, click Show applications to toggle the search prompt. In there, type in Network.
Click on Settings > Network.
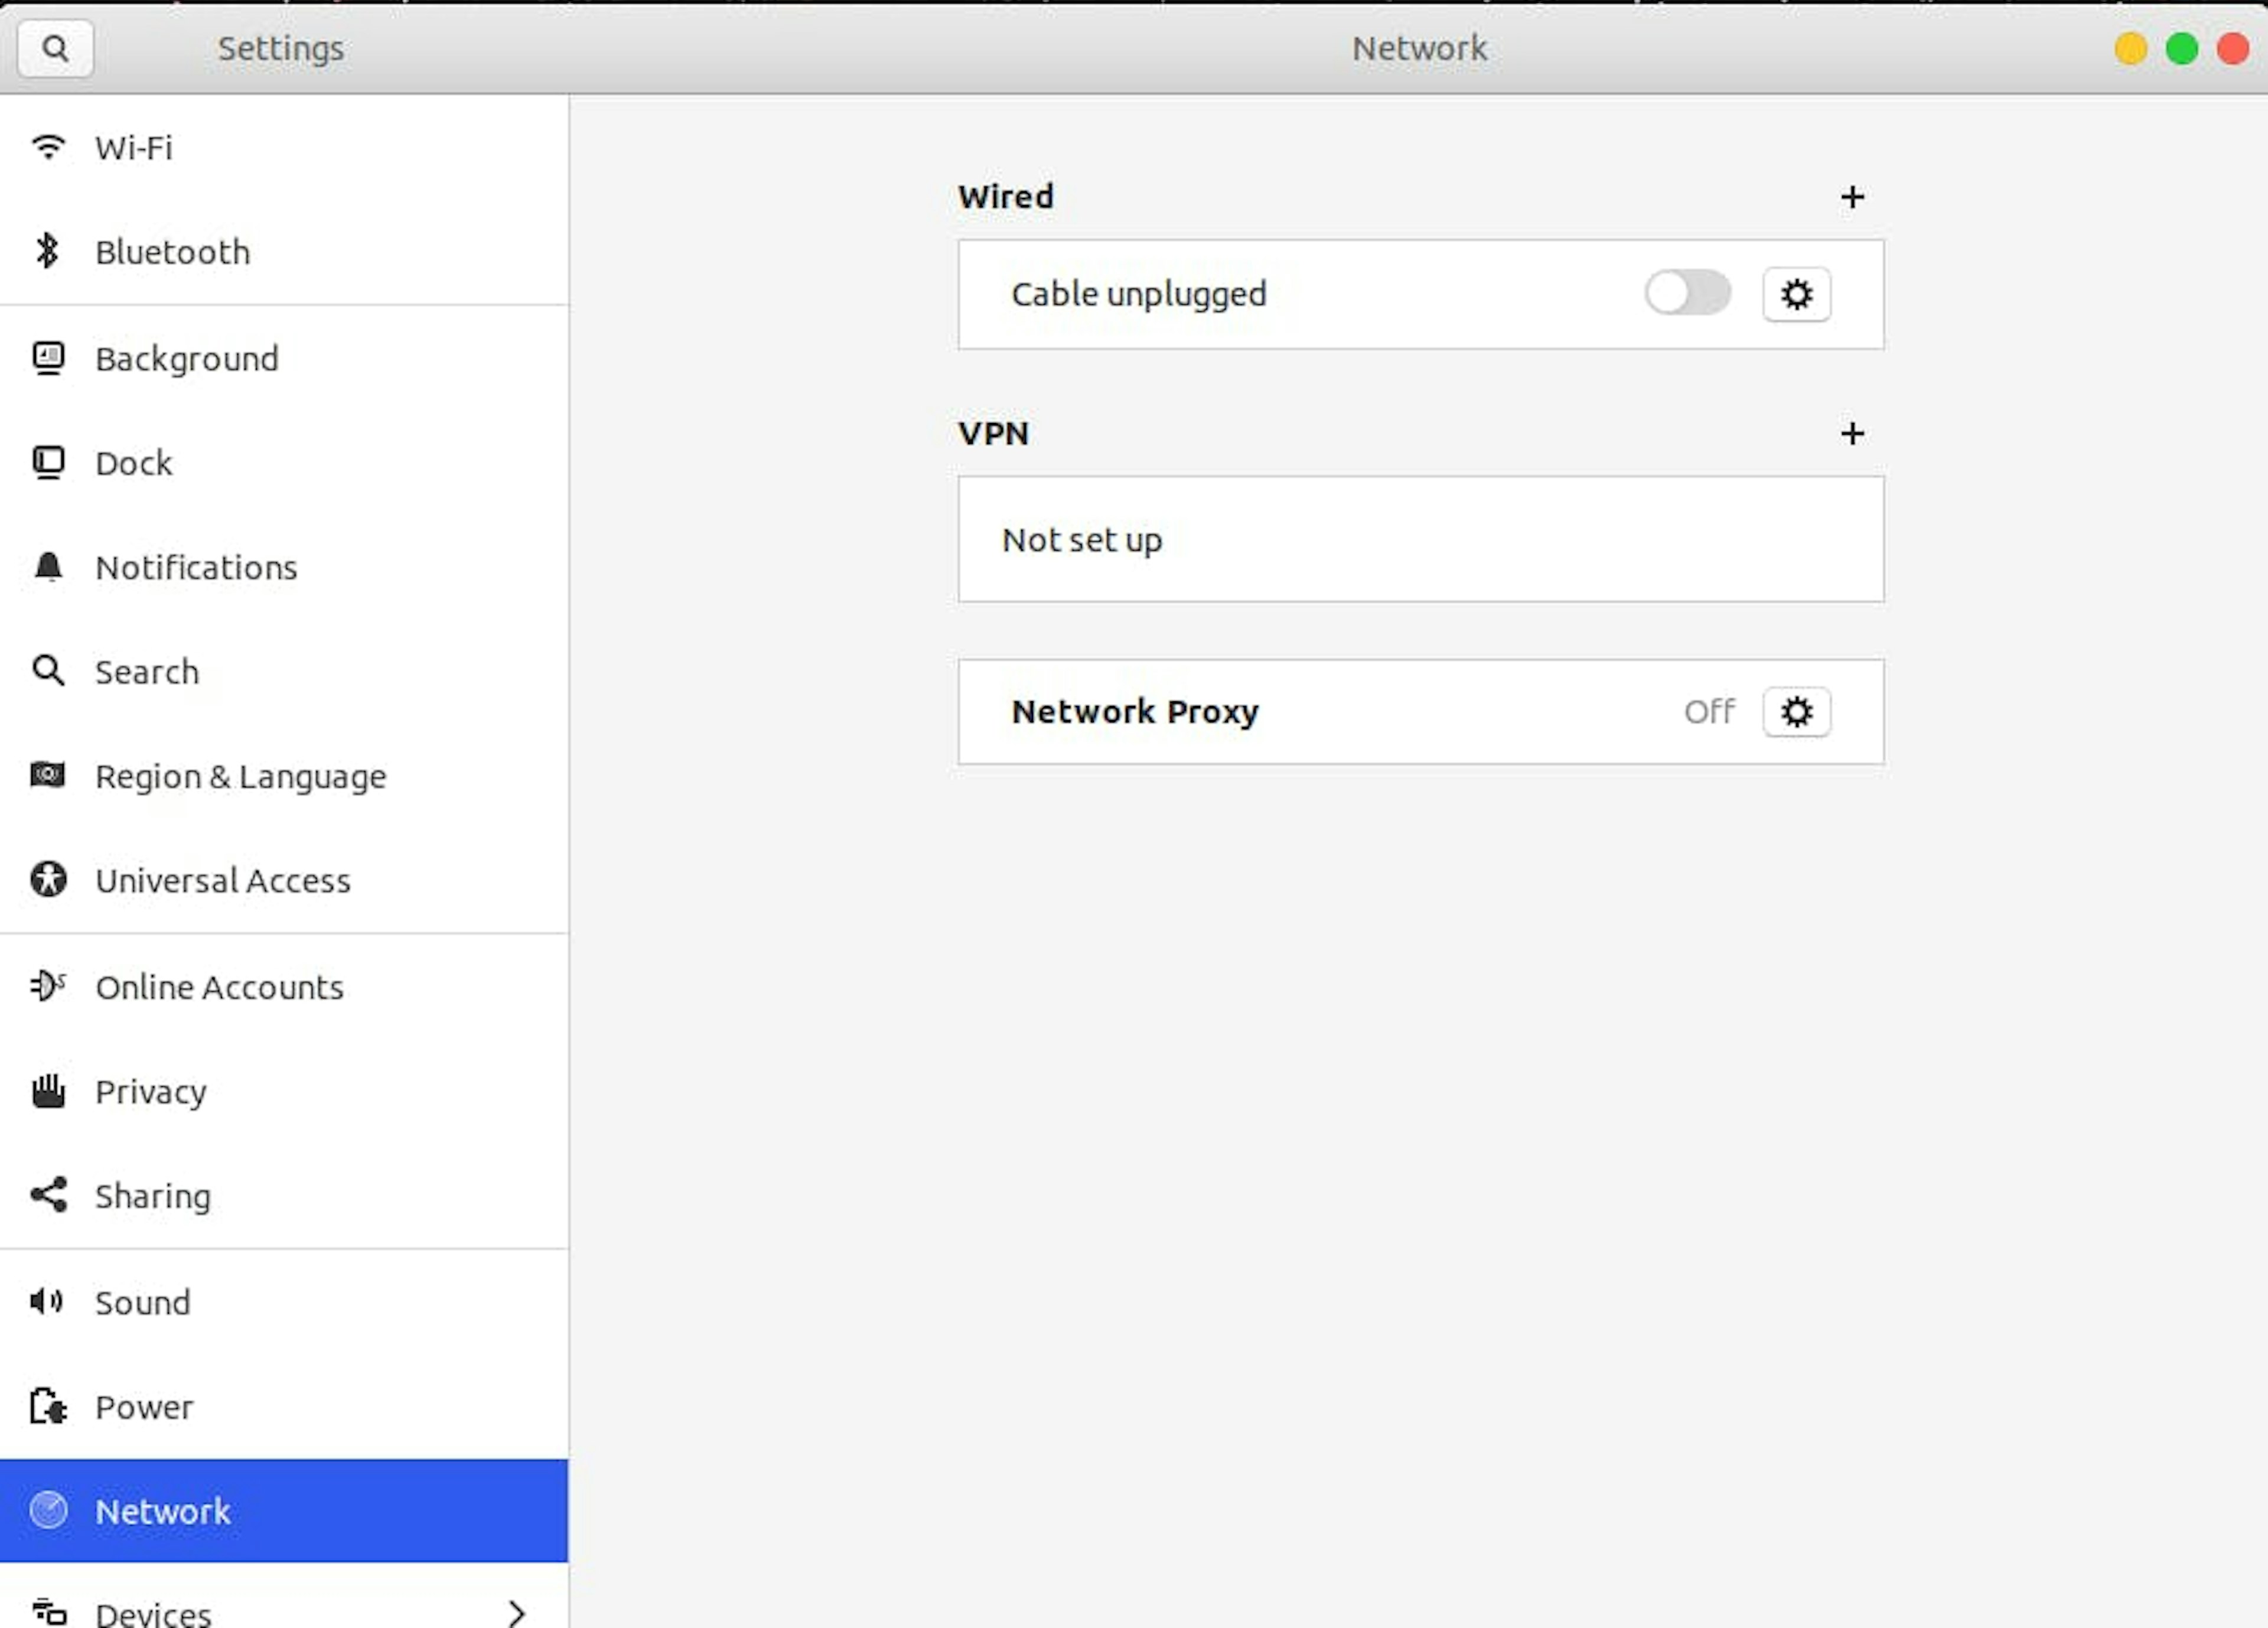
Step 2: Click on Network
Once you click on Network, it’ll open up a new dialog where you’ll find three options: Wired, VPN, and Network Proxy. Click on Network Proxy.
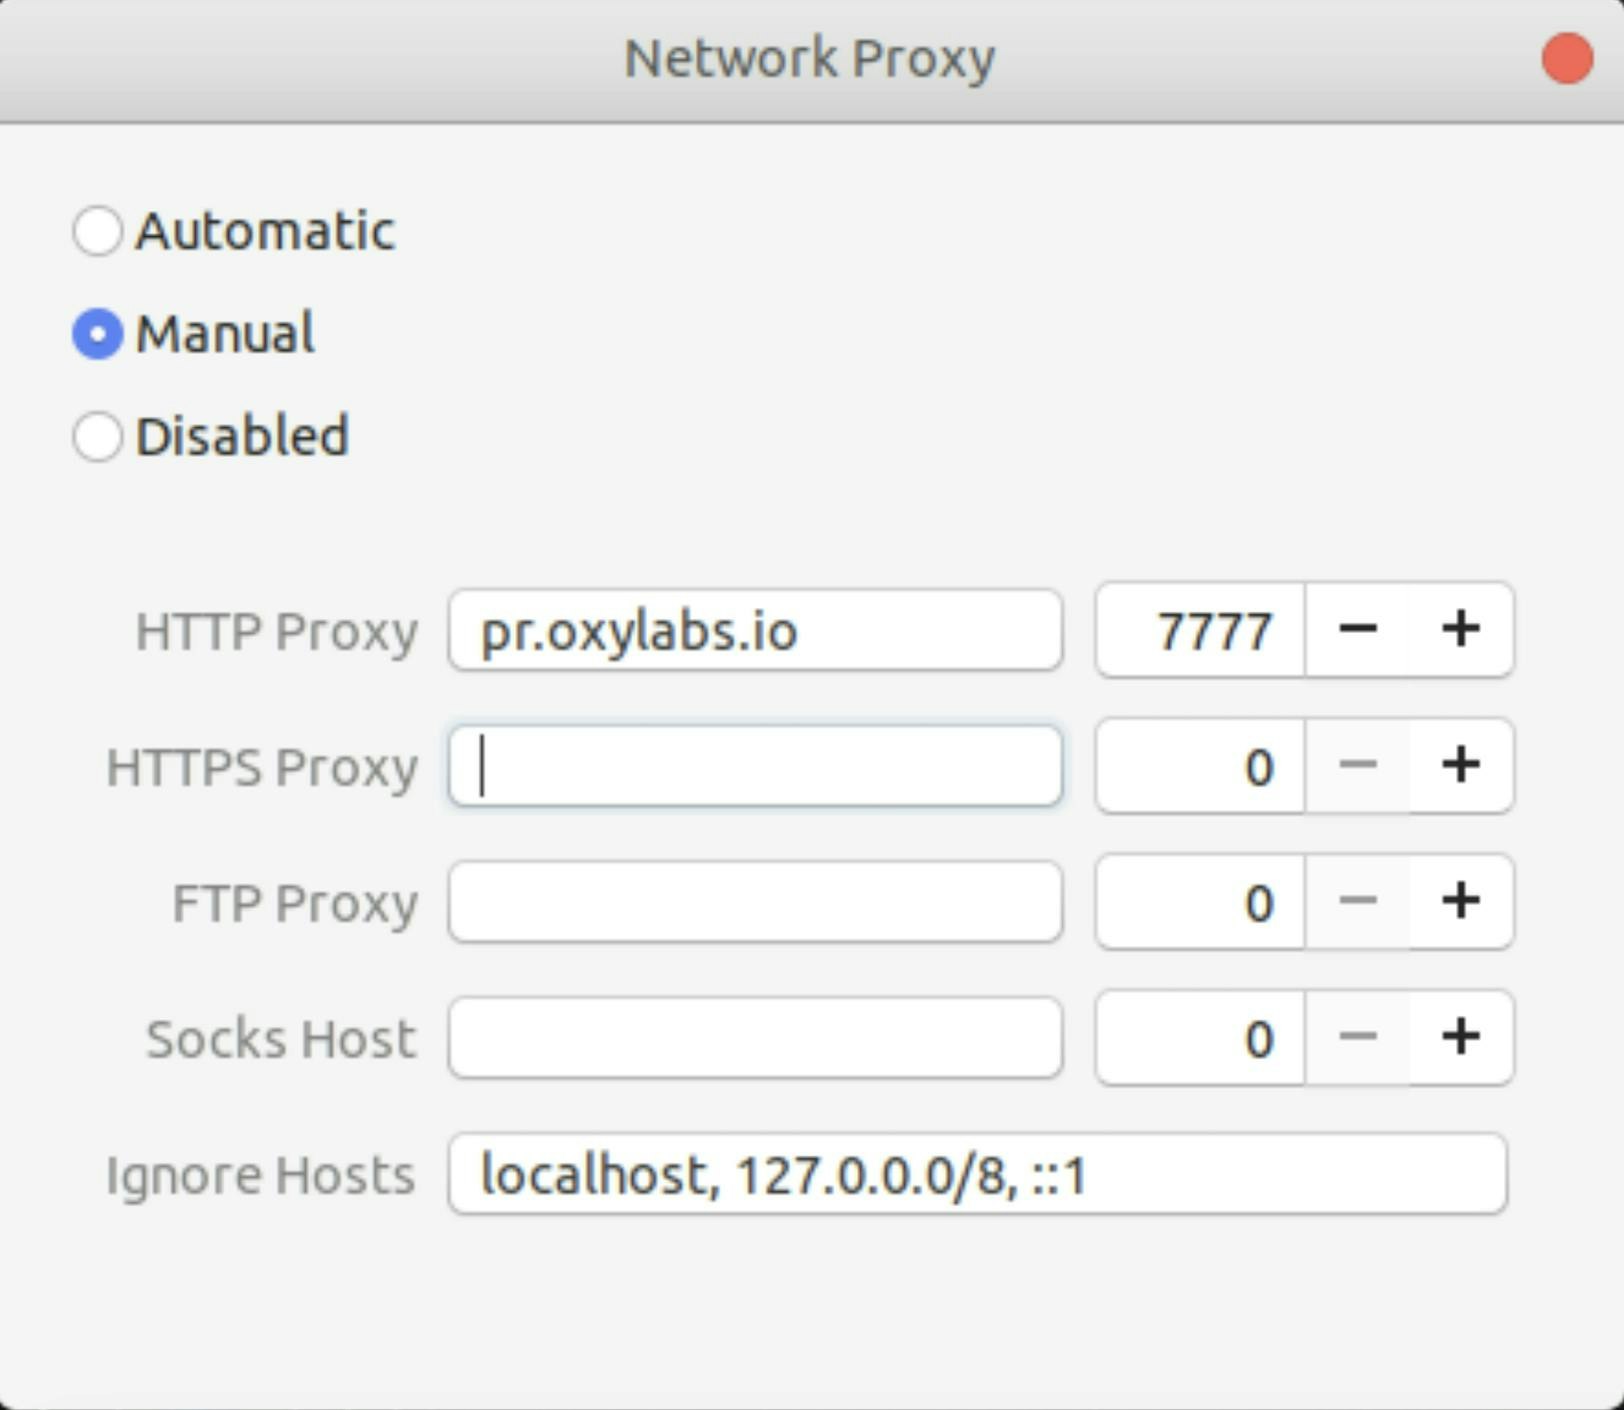
Step 3: Configure Proxy Settings
After you click on Network Proxy, a new window will appear that will contain three options: Automatic, Manual, and Disabled. By default, Disabled will be selected. To configure a proxy server click Manual.
Residential Proxies
Proxy types: HTTP, HTTPS, or SOCKS5
Let’s set up Oxylabs’ Residential Proxy. You need to put the server address pr.oxylabs.io and set the port to 7777.
Note that it’s also possible to use country-specific entries. For instance, if you enter us-pr.oxylabs.io under IP address and 10000 under Port, you’ll acquire a US exit node. You can find the complete list of country-specific entry nodes and sticky session details in our documentation.
Enterprise Dedicated Datacenter Proxies
Specify the following if you purchased Dedicated Datacenter Proxies via sales.
Proxy types: HTTP or SOCKS5
If you want to set Enterprise Dedicated Datacenter Proxies, you’ll have to use a specific datacenter IP as the server address. Set the port to 60000.
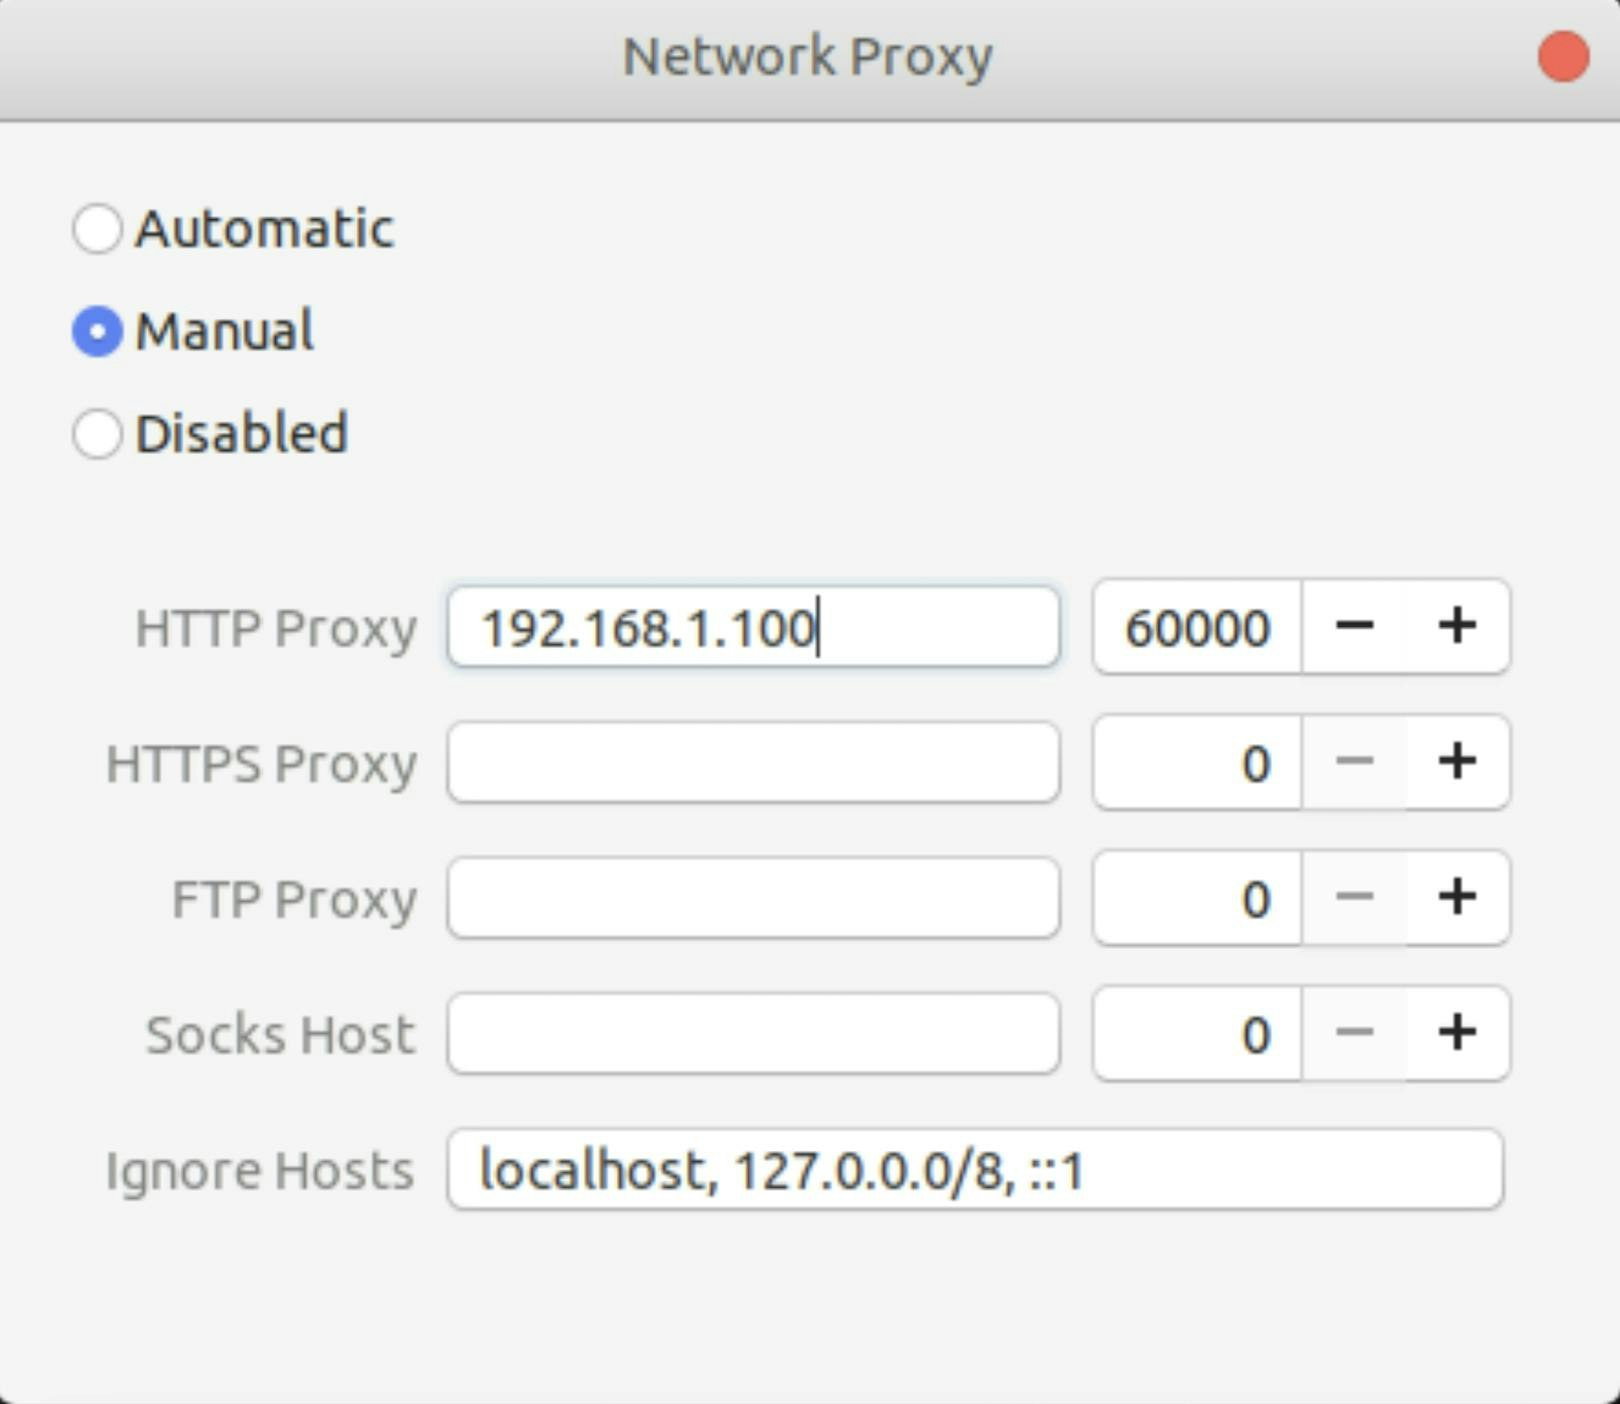
In the above screenshot, we’ve put an example IP address 192.168.1.100. You’ll have to replace it with your own dedicated datacenter IP address.
Self-Service Dedicated Datacenter Proxies
Specify the following if you purchased Dedicated Datacenter Proxies via the dashboard.
Proxy types: HTTP, HTTPS, or SOCKS5
IP address: ddc.oxylabs.io
Port: 8001
For Self-Service Dedicated Datacenter Proxies, the port indicates the sequential number of an IP address from the acquired list. Check our documentation for more details.
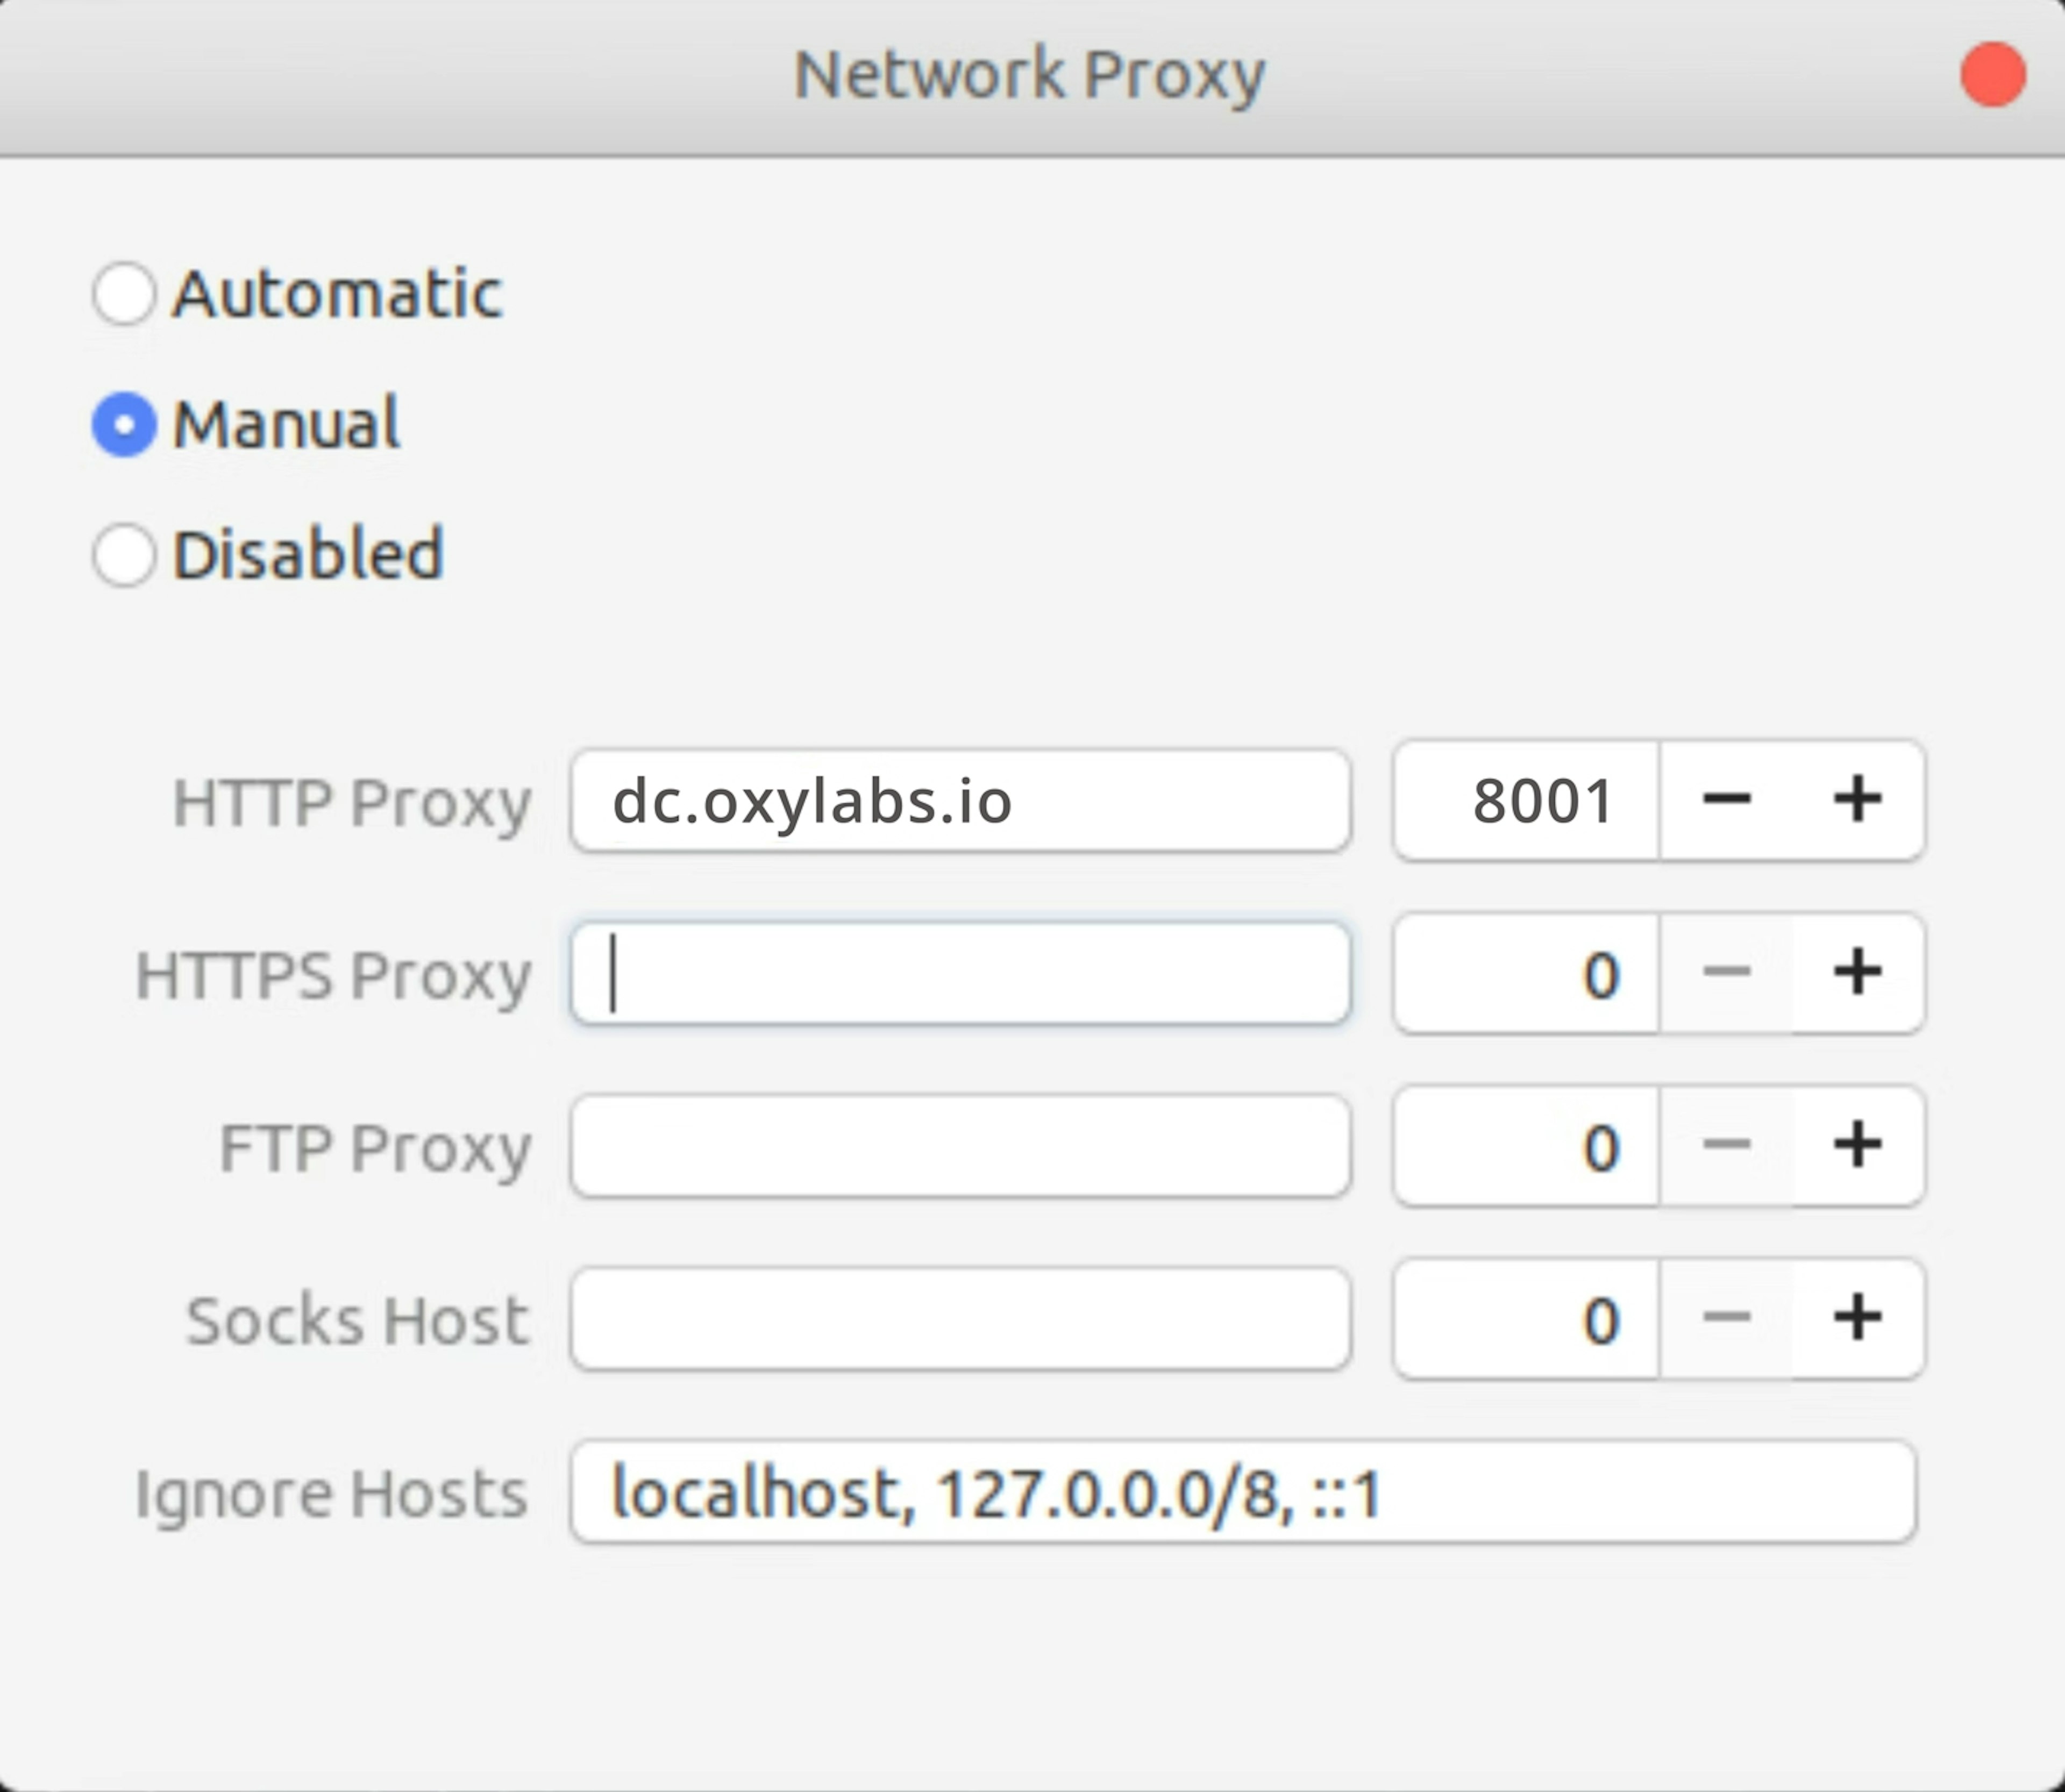
Datacenter Proxies
Proxy types: HTTP, HTTPS, SOCKS5
IP address: dc.oxylabs.io
Port: 8001
For the pay-per-IP subscription method, the port number corresponds to the order of IP addresses in your list. Therefore, port 8001 will use the first IP address. For further information, please check our documentation.
For the pay-per-traffic subscription, port 8001 will randomly select an IP address but will remain consistent for the session duration. You can also specify the proxy's geo-location within the user authentication string, such as user-USERNAME-country-US:PASSWORD, which will connect to a US proxy. Refer to our documentation for more information.
ISP Proxies
Proxy types: HTTP, HTTPS, or SOCKS5
IP address: isp.oxylabs.io
Port: 8001
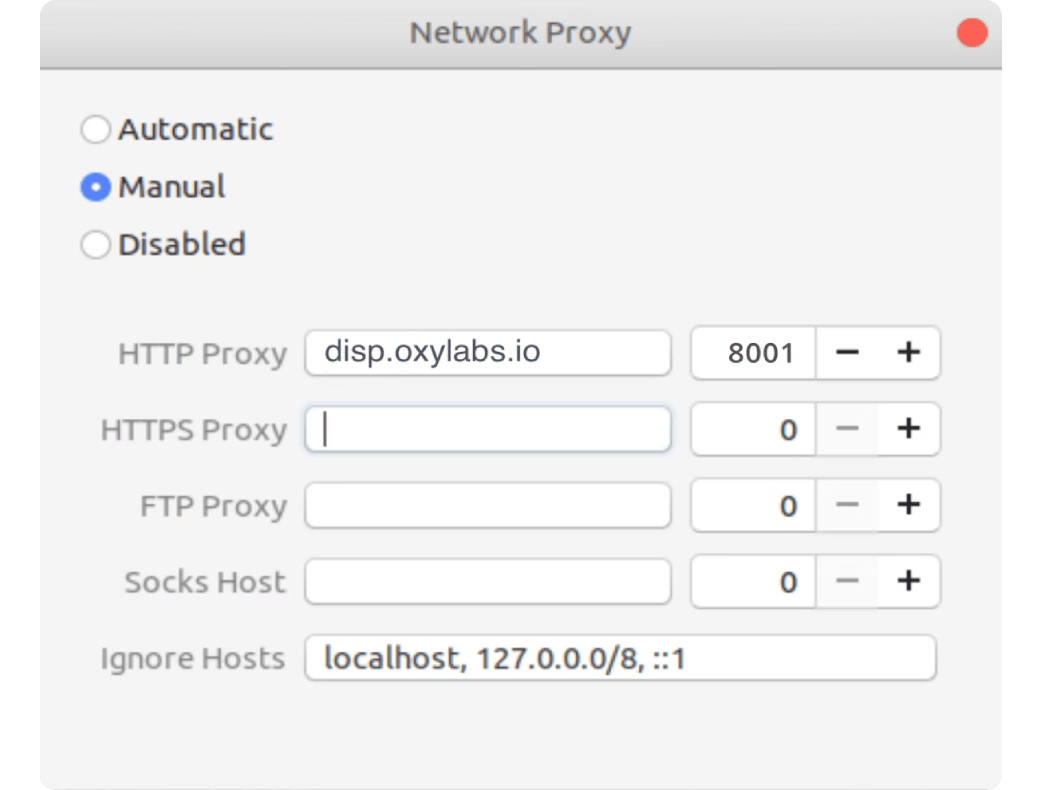
Dedicated ISP Proxies
Proxy types: HTTP, HTTPS, or SOCKS5
IP address: disp.oxylabs.io
Port: 8001
That’s it! Once you close the Network Proxy window, the changes will automatically be saved, and the system-wide proxy will be activated. Each time you make a web request through a browser or other application, a pop-up window will prompt you to enter the credentials of your Oxylabs proxy user for the session.
Now, time to learn how to set up an Ubuntu proxy server from the terminal.
How to set up a proxy in Ubuntu terminal
There are multiple ways to set up a proxy server on Ubuntu. Let’s begin with temporary proxy settings using proxy environment variables.
Set up temporary proxy for the current terminal session
The temporary proxy will only be active for the current terminal session and will reset to default as soon as we close the terminal or end the terminal session.
First, open a new terminal. You can also use the shortcut “CTRL + ALT + T” which will open a new terminal for you. In the terminal, create two new environment variables using the below commands:
export http_proxy="username:password@pr.oxylabs.io:7777"
export https_proxy="username:password@pr.oxylabs.io:7777"
Make sure there are no spaces between the equal signs and variables. The export command sets new environment variables for the current terminal session. You can verify that the environment variables are active by running it.
exportThis will show all the environment variables including http_proxy and https_proxy that are active in the current session. The string username:password@pr.oxylabs.io:7777 has the format <username>:<password@<server_address>:<port>. Also, we are assuming the proxy username and password are the strings “username” and “password” respectively. You can replace this information with the appropriate one.
For the Shared and Dedicated Datacenter proxies only the server_address and port will change. The rest will remain the same. For example, for Shared Datacenter Proxies, add the following lines of code:
export http_proxy="username:password@dc.oxylabs.io:8000"
export https_proxy="username:password@dc.oxylabs.io:8000"
Once you export these environment variables, the proxy will be activated for all the subsequent commands. We can make sure the proxy is activated by running the below command and checking our IP address:
wget -qO- http://httpbin.org/ipIf you don’t have Wget installed on your computer then, you can also run it using cURL.
Permanently configure proxies for all terminal sessions
The downside of temporarily configuring proxy using environment variables is that you’ll have to do it every time you start a new terminal. You can avoid this redundant work by configuring a permanent proxy for all of your terminal sessions. Depending on which shell you are using we need to modify the shell configuration file.
Step 1 - Open shell configuration using an editor
For the ZSH terminal, the shell configuration file is by default located in the home directory. We can edit this file using vim with the below command:
vim ~/.zshrcInstead of vim, you can also use gedit, nano, or any other text editor that you prefer. Also, if you are using Bash instead of ZSH, you’ll have to edit your bash shell configuration file, i.e. ~/.bashrc instead of ~/.zshrc.
Step 2 - Create two new environment variables
At the bottom of this configuration file, you’ll have to define the http_proxy and https_proxy variables:
export http_proxy="username:password@pr.oxylabs.io:7777"
export https_proxy="username:password@pr.oxylabs.io:7777"
The pattern is exactly the same as the temporary proxy. Also, you can modify them for dedicated datacenter or shared datacenter proxies if you want to use those instead of a residential proxy.
Step 3 - Reload the configuration
Now, we can reload the configuration file either by opening a new terminal or by running the following command in the existing terminal:
source ~/.zshrcThe proxy will always be active for the current user. The shell configuration file gets loaded every time you open a new terminal. So, the environment variables will be always available for you even if you restart your computer.
If you want to enable it for all users then you will have to append the above two lines in the /etc/environment.
Set up proxy for APT from terminal
APT is the package manager for Debian, Ubuntu & Linux Mint, etc. It works through the use of repositories or special directories that hold collections of software packages that users can install using a simple command. To use a proxy for the APT package manager some additional work is necessary. We’ll have to edit the /etc/apt/apt.conf file. Go ahead, and open it using vim:
vim /etc/apt/apt.confNow, add the below lines to activate Oxylabs’ Residential Proxy for APT:
Acquire::http::Proxy "http://username:password@pr.oxylabs.io:7777";
Acquire::https::Proxy "http://username:password@pr.oxylabs.io1:7777";
The next time you install or update your existing applications or packages, APT will use the Oxylabs’ Residential Proxy. You can replace it with shared datacenter proxies or dedicated datacenter proxies, just like we did in the other methods. But don’t forget to set the proper server address and port number. Additionally, replace the username and password with the correct credentials. Otherwise, you will get a 407 Authentication Required Error, which you can fix by following this HTTP 407 Proxy Authentication Required Error guide.
Conclusion
In this integration tutorial, we demonstrated how you can easily configure Oxylabs Residential and Datacenter Proxies in Ubuntu 20.04 LTS. The methods shown above will also work on any other Debian-based Linux Distribution. We also explored various ways of proxy setup using GUI and terminal methods. In case you have any questions regarding the steps needed to set up Oxylabs Proxies in Ubuntu or want to learn more about our solutions in general, you can always reach out to us at support@oxylabs.io.
Please be aware that this is a third-party tool not owned or controlled by Oxylabs. Each third-party provider is responsible for its own software and services. Consequently, Oxylabs will have no liability or responsibility to you regarding those services. Please carefully review the third party's policies and practices and/or conduct due diligence before accessing or using third-party services.
Useful resources
How to Use cURL With Proxy?
In this step-by-step guide, you will go through the basics of how to use cURL with proxy. Also, you will get bonus tips on smooth and easy proxy usage.
How to Run Python Script as a Service (Windows & Linux)
From Linux daemons to Windows services, this guide will detail the process of setting up Python script as a service in a few simple steps.
How to Use Wget With Proxy
This article will walk you through the step-by-step process of installing and downloading files using Wget with or without proxies, covering multiple scenarios and showcasing practical examples.

Get the latest news from data gathering world
Proxies
Advanced proxy solutions
Data Collection
Datasets
Resources
Innovation hub