175M+ ethically sourced IPs built for the highest reliability.
High-speed, cost-effective proxies built for any scraping workload.
Premium static residential proxies from trusted ASNs for most difficult targets.
Dedicated IPs from premium ASNs for demanding scraping.

AI-powered proxy solution for optimized web scraping performance.

20M+ IP addresses from real mobile devices for precise targeting.

Free Chrome proxy manager extension that works with any proxy provider.

Free Android proxy manager app that works with any proxy provider.

Free community-driven tools to improve your web scraping projects.
Web Scraper API
All-in-one web data collection platform for every stage of web scraping.
Fast Search API
Ultra-fast organic search results scraper tailored for AI workflows.
Headless Browser
Advanced browser automation solution for AI agents and scraping.
AI Studio
A suite of AI-powered tools for various scraping projects.

Documentation
All features, parameters, and integration details, backed by code samples in every coding language.
Tutorials, samples, and guides.
Latest fixes and features.


How to Change Proxy Settings on MacOS: Set up a proxy for Mac
If a Mac is your device of choice, this guide shows you how to enable, change, and remove a proxy for Mac. Setting up your macOS proxy settings takes only a few minutes and doesn’t require any extra proxy software – you simply enter your proxy server settings directly in the system network panel.
macOS proxies support HTTP proxies, HTTPS proxies, and SOCKS5 proxies, so you can pick whichever protocol best suits your task. In this integration example, we’ll be using Oxylabs Residential and Datacenter Proxies.

Configuring proxy server settings for MacOS
Follow these steps to set up your Mac proxy server through the system network settings. The process is the same whether you connect over Wi-Fi or Ethernet, and you can change proxy settings again at any time.
1. Click on the Apple icon in the top left corner and open System preferences (this panel is called System Preferences on older macOS versions).

2. Select the Network panel icon.
3. Choose the Wi-Fi network you want to configure and click Advanced in the bottom right corner.

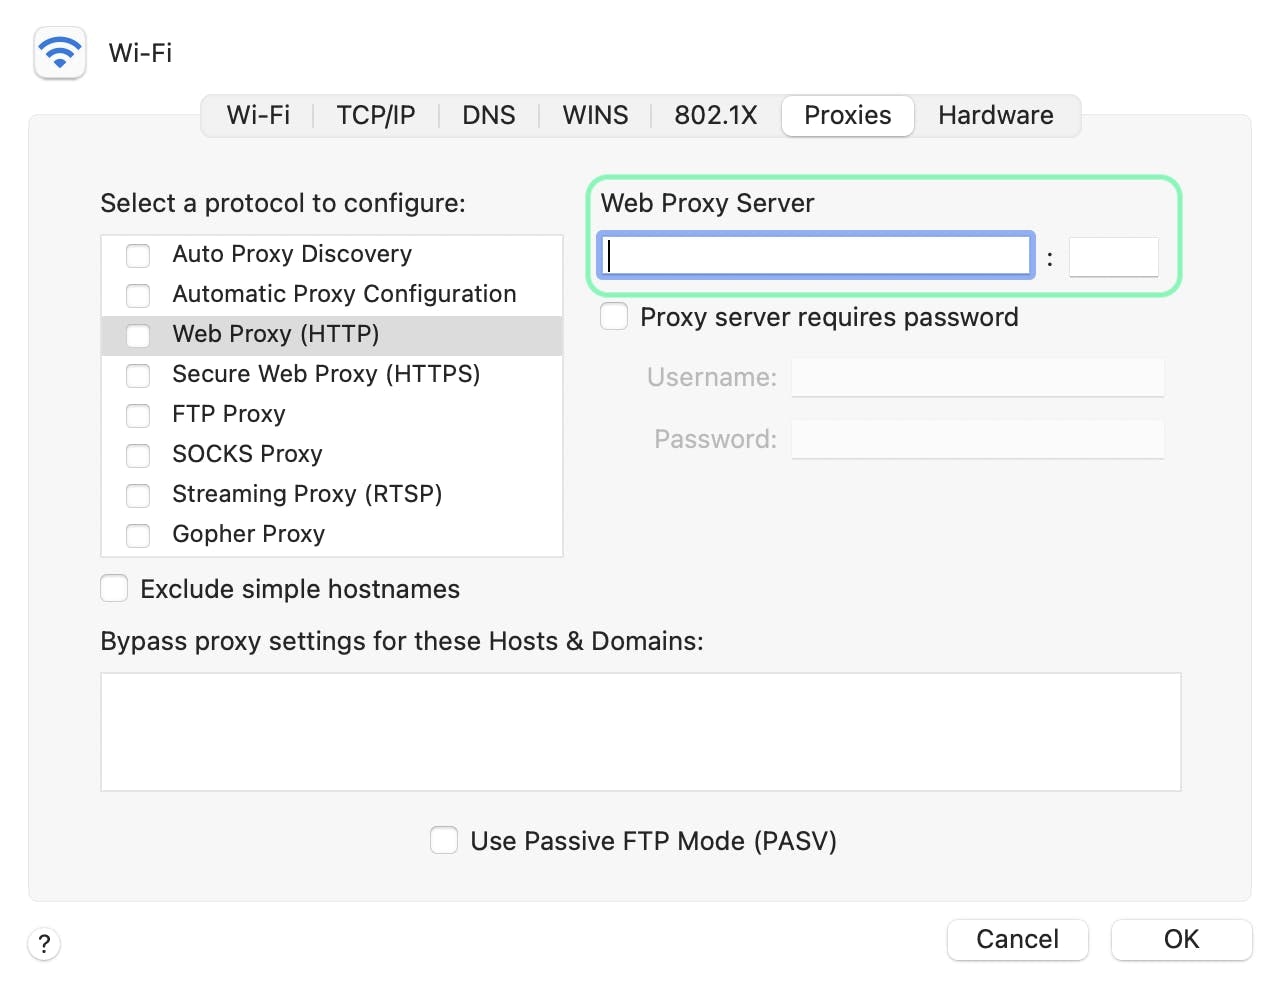
4. Click on the Proxies button and then select a protocol.

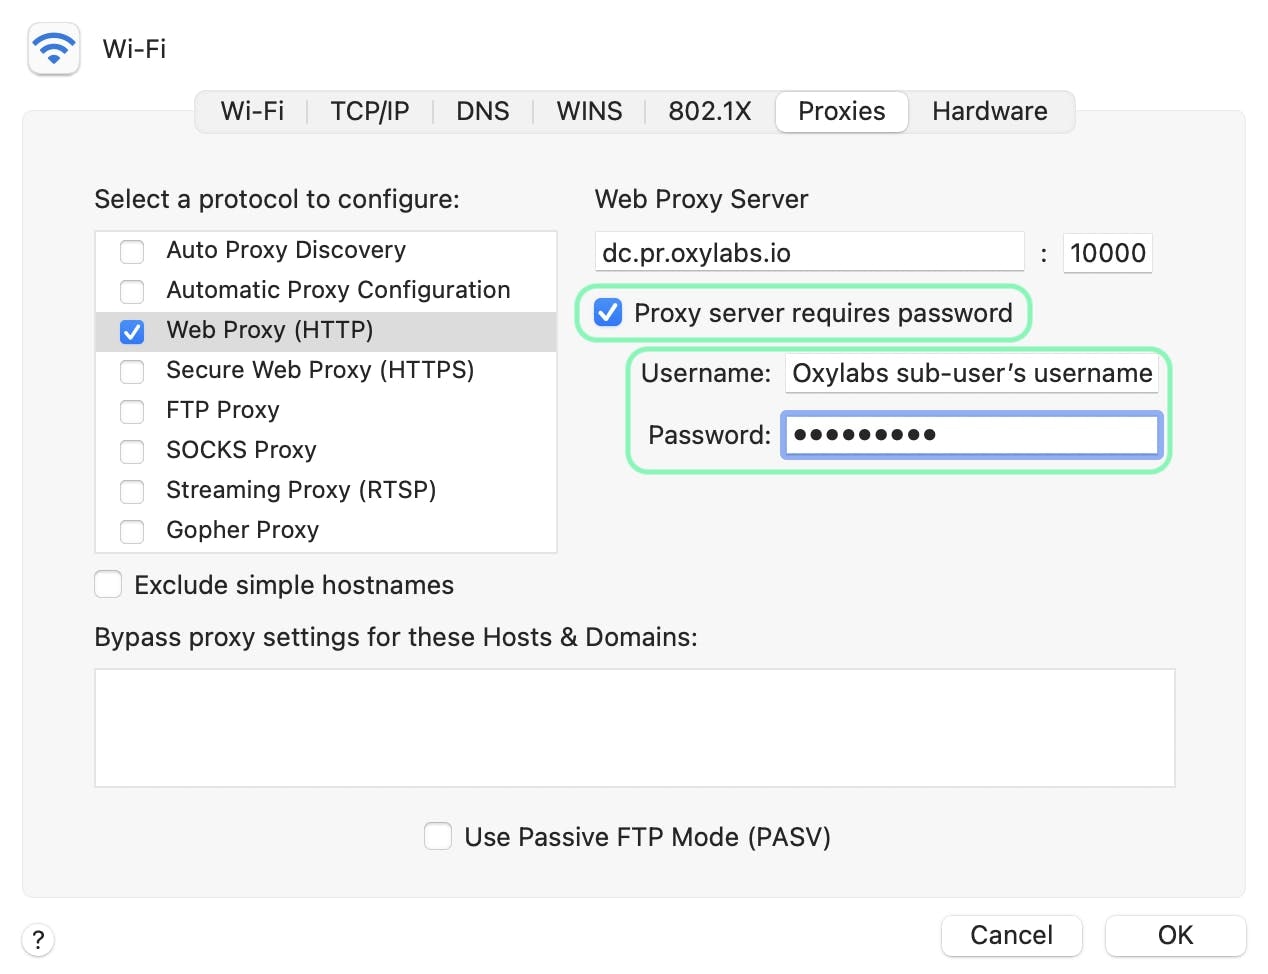
5. Under Web Proxy Server, input your proxy details.
Residential Proxies
To manually configure Residential Proxies, enter the following details.
Type: HTTP, HTTPS, or SOCKS5
Proxy: pr.oxylabs.io
Port: 7777

Additionally, you can use country-tailored entries. For instance, if you enter gb-pr.oxylabs.io in the Web Proxy Server field and 20000 in the Port field, you’ll get a UK exit. For a full list of country-specific entry nodes or if you need a sticky session, please check our documentation.
Enterprise Dedicated Datacenter Proxies
Specify the following if you purchased Dedicated Datacenter Proxies via sales.
Type: HTTP or SOCKS5
Proxy: a specific IP address (e.g., 1.2.3.4)
Port: 60000
For Enterprise Dedicated Datacenter Proxies, you’ll have to choose an IP address from the acquired list. Visit our documentation for more details.

Self-Service Dedicated Datacenter Proxies
Specify the following if you purchased Dedicated Datacenter Proxies via the dashboard.
Type: HTTP, HTTPS, or SOCKS5
Proxy: ddc.oxylabs.io
Port: 8001
For Self-Service Dedicated Datacenter Proxies, the port indicates the sequential number of an IP address from the acquired list. Check our documentation for more details.
Datacenter Proxies
Type: HTTP, HTTPS, SOCKS5
Proxy: dc.oxylabs.io
Port: 8001
In the pay-per-IP subscription, the port represents the sequential number assigned to an IP address from your list, meaning port 8001 will use the first IP address. Please refer to our documentation for more information.
For pay-per-traffic subscription, port 8001 will randomly select an IP address but keep it consistent for the session duration. You can specify the proxy's geo-location using the user authentication string, such as user-USERNAME-country-US:PASSWORD, which will connect to a US proxy. More information can be found in our documentation.
ISP Proxies
Type: HTTP, HTTPS, or SOCKS5
Proxy: isp.oxylabs.io
Port: 8001
Dedicated ISP Proxies
Type: HTTP, HTTPS, or SOCKS5
Proxy: disp.oxylabs.io
Port: 8001

6. Then, check the Proxy server requires a password box and enter your Username and Password. Type in your Oxylabs proxy user’s credentials. Use the same credentials you input while creating a new proxy user in the Oxylabs dashboard.
7. After everything is set up, click OK to confirm and Apply to activate the settings.
This is it, you’re using a proxy now.
Removing a Mac proxy server
Disabling a proxy is just as simple.
Return to the Proxies tab in your Mac proxy settings and make sure every protocol in the list is turned off (unchecked). Click OK to confirm, and your proxy server on Mac is removed.

Now, the proxy server has been removed on your Mac.
What proxy type should I use on MacOS?
Before you open your Mac proxy settings, it helps to know which protocol to choose. Setting up a proxy for macOS gives you a few options, and the right one depends on what you need.
HTTP proxy (Web Proxy)
HTTP proxies handle standard, unencrypted web traffic and appear as the Web Proxy (HTTP) option on macOS. They’re a good fit for everyday browsing and lightweight tasks where you mainly need to route requests through a different IP. Because the traffic isn’t encrypted, a plain web proxy is best avoided for anything sensitive.
HTTPS proxy (Secure Web Proxy)
HTTPS proxies route encrypted traffic and show up as the Secure Web Proxy (HTTPS) option on macOS. Choose this when you want your connection to stay encrypted – for example, when signing in to accounts or working with private data. It offers the same convenience as a web proxy with an added layer of security.
SOCKS5 proxy
A SOCKS5 proxy works at a lower level and forwards any kind of traffic, not just web requests. The SOCKS proxy option on macOS is ideal for high-volume jobs, streaming, gaming, or moving large amounts of data, since it’s fast and protocol-agnostic. If you need flexibility across different applications, a SOCKS5 proxy is usually the strongest choice.
Common proxy problems and how to fix them
If your macOS proxy settings aren’t behaving as expected, these are the most common issues and how to fix them.
The proxy won’t connect or your IP doesn’t change. Double-check the proxy host and port number you entered, then confirm your credentials. If your plan needs authentication, make sure the Proxy server requires password box is ticked and that the username and password match your Oxylabs proxy user.
Settings keep reverting to Off or Auto. A configuration profile installed by an employer or MDM can overwrite a manual macOS proxy. Check System Settings > Privacy & Security > Profiles and remove any profile that controls your network before you change proxy settings again.
Your proxy stops working after enabling iCloud Private Relay. Private Relay can clash with a manual Mac proxy. If you rely on proxy server settings, turn Private Relay off under System Settings > Apple ID > iCloud while the proxy is in use.
Some apps ignore the proxy. System-level Mac proxy settings apply network-wide, but a few applications use their own configuration instead. Set the proxy inside that app, or use dedicated proxy software if the app doesn’t read the system proxy services.
An HTTP proxy is flagged as insecure. Modern macOS can reject unencrypted HTTP proxies. Switch to a Secure Web Proxy (HTTPS) or a SOCKS5 proxy, which keep the connection encrypted and are less likely to be flagged.
The proxy works but shows the wrong location. Open an IP-checker in your browser to confirm the exit IP. If you need a specific country, use a country-targeted entry or switch to residential proxies, which offer far more location options than datacenter IPs.
Summary
As you can see, learning how to use a premium proxy for Mac is straightforward. Once you know where the macOS proxy settings live, you can switch a Mac proxy server on or off in a couple of minutes. Whether you go with HTTP proxies, a Secure Web Proxy, or a SOCKS5 proxy, the steps are the same, and Oxylabs proxy services cover every option from residential proxies to datacenter IPs.
If you’re curious about other integration options, explore more of our tutorials – and reach out if you still have questions about proxy for Mac configuration.
Please be aware that this is a third-party tool not owned or controlled by Oxylabs. Each third-party provider is responsible for its own software and services. Consequently, Oxylabs will have no liability or responsibility to you regarding those services. Please carefully review the third party's policies and practices and/or conduct due diligence before accessing or using third-party services.
Frequently asked questions
What is a proxy, and how does it work on a Mac?
A proxy is a server that sits between your computer and the internet and works as a gateway for your network traffic. Instead of connecting to a website directly, your Mac sends its requests to the proxy gateway, which forwards them on and returns the reply – the process behind proxy forwarding and proxy routing. Because sites see the proxy IP address instead of your own, a proxy hides your real location.
On Apple devices, a system-level server proxy applies to the whole system, so every request from your computer passes through it. Providers run various servers and large pools of IP proxies, letting you rotate between IP address proxies or route through different gateway proxies whenever you need.
How do I set up and use a proxy on my Mac?
What is the best proxy for Mac?
Are there free proxies for Mac, and what are my other options?
Useful resources
How to Handle Flagged IPs: Techniques & Tips
Got your IP flagged from a website? This blog post will walk you through the best solutions on how to prevent IP bans from ever happening again.
How to Use cURL With Proxy?
In this step-by-step guide, you will go through the basics of how to use cURL with proxy. Also, you will get bonus tips on smooth and easy proxy usage.
Python Web Scraping Tutorial: Step-By-Step
We take you through every step of building your first web scraper. Find out how to get started in data acquisition with Python.

Get the latest news from data gathering world
Proxies
Advanced proxy solutions
Data Collection
Datasets
Resources
Innovation hub