175M+ ethically sourced IPs built for the highest reliability.
High-speed, cost-effective proxies built for any scraping workload.
Premium static residential proxies from trusted ASNs for most difficult targets.
Dedicated IPs from premium ASNs for demanding scraping.

AI-powered proxy solution for optimized web scraping performance.

20M+ IP addresses from real mobile devices for precise targeting.

Free Chrome proxy manager extension that works with any proxy provider.

Free Android proxy manager app that works with any proxy provider.

Free community-driven tools to improve your web scraping projects.
Web Scraper API
All-in-one web data collection platform for every stage of web scraping.
Fast Search API
Ultra-fast organic search results scraper tailored for AI workflows.
Headless Browser
Advanced browser automation solution for AI agents and scraping.
AI Studio
A suite of AI-powered tools for various scraping projects.

Documentation
All features, parameters, and integration details, backed by code samples in every coding language.
Tutorials, samples, and guides.
Latest fixes and features.


![]() AI Summary:
AI Summary:
This tutorial outlines how to perform web scraping in Python, covering environment setup and the use of libraries like `requests`, `Beautiful Soup`, `lxml`, and `Selenium`. It explains how to identify HTML elements and save extracted data to CSV or Excel files.
Getting started in web scraping, especially in Python web scraping, is simple except when it's not, which is why you're here. Python is one of the easiest ways to get started, as it's an object-oriented language. Python’s classes and objects are significantly easier to use than in any other language. Additionally, many libraries exist that make building a tool for web scraping using Python an absolute breeze.
In this web scraping tutorial, we'll outline how to run a Python script with a simple application. You’ll learn:
How to prepare a Python environment for web scraping;
How to use a Python library like requests, Beautiful Soup, lxml, Selenium, and pandas;
How to open Developer Tools and find the HTML elements that contain the desired data;
How to save scraped data to CSV and Excel files;
More options for advanced web scraping using Python.
The tutorial below will give you everything you need to know on how to do web scraping in Python, but if you want to save the time and resources with a ready-to-use approach, you may want to check out Web Scraper API. It's an all-in-one solution that integrates proxies, request handling, and parsing into a single, fast-adapting infrastructure designed for easy data scraping at any scale, so feel free to test it out with a free trial.
However, if custom is your way, then the following web scraping using Python tutorial will work for all operating systems. There will be slight differences when installing either Python or development environments but not in anything else.
If you enjoy video content more, watch our simple and easy-to-follow web scraping tutorial right here:

1. Prerequisites
Throughout this entire web scraping tutorial, the Python 3.4+ version will be used. Specifically, we used 3.12.0, but any 3.4+ version should work just fine.
For Windows, make sure to check “PATH installation”. PATH installation adds executables to the default Windows Command Prompt executable search. Windows will then recognize commands like pip or python without requiring users to point it to the directory of the executable (e.g., C:/tools/python/…/python.exe). If you have already installed Python but did not mark the checkbox, just rerun the installation and select “modify”. On the second screen, select “Add to environment variables”.
2. Python web scraping libraries

Web scraping using Python is easy due to the many useful libraries available
One of the advantages of Python is a large selection of libraries for web scraping. These web scraping libraries are part of thousands of Python projects in existence – on PyPI alone, there are over 500,000 projects. There are several types of Python web scraping libraries from which you can choose, most notably:
Requests
Beautiful Soup
lxml
Selenium
Scrapy
Requests library
Web scraping starts with sending HTTP requests, such as POST or GET, to a website’s server, which returns a response containing the needed data. However, standard Python HTTP libraries are difficult to use and, for effectiveness, require bulky lines of code, further compounding an already problematic issue.
Unlike other HTTP libraries, the requests library simplifies the process of making such requests by reducing the lines of code, in effect making the code easier to understand and debug without impacting its effectiveness. The library can be installed from within the terminal using the pip command:
python -m pip install requestsDepending on your Python setup, you may have to run the following command:
python3 -m pip install requestsThe requests library provides easy methods for sending HTTP GET and POST requests. For example, the function to send an HTTP GET request is aptly named get():
import requests
response = requests.get('https://oxylabs.io/')
print(response.text)
If there's a need for a form to be posted, it can be done easily using the post() method. The form data can be sent as a dictionary as follows:
form_data = {'key1': 'value1', 'key2': 'value2'}
response = requests.post('https://httpbin.org/post', data=form_data)
print(response.text)
In general, proxy integration with requests library makes it very easy to use proxies that require authentication:
proxies={
    'http': 'http://USERNAME:PASSWORD@pr.oxylabs.io:7777',
    'https': 'http://USERNAME:PASSWORD@pr.oxylabs.io:7777',
}
response = requests.get('https://ip.oxylabs.io/location', proxies=proxies)
print(response.text)
However, this library has a limitation in that it doesn’t parse the extracted HTML data, i.e., it cannot convert the data into a more readable format for analysis. Also, it cannot be used to scrape websites that are using JavaScript to load content. If you're curious, you can also check out how to send POST requests using requests library.
Beautiful Soup
Beautiful Soup is a Python library that works with a parser to extract data from HTML and can turn even invalid markup into a parse tree. However, this library is only designed for parsing and cannot request data from web servers in the form of HTML documents/files. For this reason, it's mostly used alongside the Python requests library. Note that Beautiful Soup makes it easy to query and navigate the HTML but still requires a parser. The following example demonstrates the use of the html.parser module, which is part of the Python Standard Library. Install the library by opening your terminal and running this line:
pip install beautifulsoup4#Part 1 – Get the HTML using requests
import requests
url = 'https://oxylabs.io/blog'
response = requests.get(url)
#Part 2 – Find the element
import requests
from bs4 import BeautifulSoup

url = 'https://oxylabs.io/blog'
response = requests.get(url)
soup = BeautifulSoup(response.text, 'html.parser')
print(soup.title)
This will print the title element as follows:
<title>Oxylabs Blog | Oxylabs</title>Due to its simple ways of navigating, searching, and modifying the parse tree, Beautiful Soup is ideal even for beginners and usually saves developers hours of work. For example, to print all the blog titles from this page, the find_all() method can be used.
It may require you to use Developer Tools, an in-built function of web browsers that allows you to view the HTML of the page and offers other functionalities for web developers. Open the Developer Tools by navigating to the browser settings or use a keyboard shortcut: on Windows, press F12 or Shift + Ctrl + I, and on macOS, press Option + ⌘ + I.
Then press the element selector button, which is in the top-left corner of the Developer Tools. Alternatively, you can press Shift + Ctrl + C on Windows and Shift + ⌘ + C on macOS. Now, use the element selector to select a blog post title on the page, and you should see the Developer Tools highlighting this element in the HTML source:

Looking at this snippet, you can see that the blog post title is stored within the <a> tag with an attribute class set to oxy-rmqaiq and e1dscegp1.
Note: Since our website uses dynamic rendering, you might not see the class set to css-rmqaiq and e1dscegp1. It's a good practice to print the whole HTML document in Python and double-check the elements and attributes if you receive an empty response.
Looking further, you should see that all the other titles are stored exactly the same way. As there are no other elements with the same class values throughout the HTML document, you can use the value e1dscegp1 to select all the elements that store the blog titles. This information can be supplied to the find_all function as follows:
blog_titles = soup.find_all('a', class_='e1dscegp1')
for title in blog_titles:
    print(title.text)
# Output:
# Prints all blog tiles on the page
Note that you must set the class by using the class_ keyword (with an underscore). Otherwise, you'll receive an error.
You may also use regular expressions (regex) within the find_all() method. For instance, the code below scrapes all blog post titles, as shown previously:
import re
# Send a request and pass the response to Beautiful Soup just like before

blog_titles = soup.find_all('a', class_=re.compile('oxy-rmqaiq'))
for title in blog_titles:
    print(title.text)
This is valuable when you need a more flexible and precise way to find elements.
BeautifulSoup also makes it easy to work with CSS selectors. If a developer knows a CSS selector, there’s no need to learn find() or find_all() methods. The following example uses the soup.select method:
blog_titles = soup.select('a.e1dscegp1')
for title in blog_titles:
    print(title.text)
While broken HTML parsing is one of the main features of this library, it also offers numerous functions, including the fact that it can detect page encoding, further increasing the accuracy of the data extracted from the HTML file.
Moreover, with just a few lines of code, it can be easily configured to extract any custom publicly available data or identify specific data types. Our Beautiful Soup tutorial contains more on this and other configurations, as well as how this library works. Alternatively, take a look at the resources available on our website, that can help you answer questions such as how to use Python type() function or how to use XPath selectors in BeautifulSoup.
lxml
lxml is a fast, powerful, and easy-to-use parsing library that works with both HTML and XML files. Additionally, lxml is ideal when extracting data from large datasets. However, unlike Beautiful Soup, this library is impacted by poorly designed HTML, making its parsing capabilities impeded.
The lxml library can be installed from the terminal using the pip command:
pip install lxmlThis library contains an html module to work with HTML. However, the lxml library needs the HTML string first. This HTML string can be retrieved using the requests library, as discussed in the previous section. Once the HTML is available, the tree can be built using the fromstring method as follows:
import requests
from lxml import html

url = 'https://oxylabs.io/blog'
response = requests.get(url)

tree = html.fromstring(response.text)
This tree object can now be queried using XPath. Continuing the example discussed in the previous section, the XPath expression to get the titles of the blogs would be as follows:
//a[contains(@class, "e1dscegp1")]The contains() function selects <a> elements only with a class value e1dscegp1. This XPath can be given to the tree.xpath() function. This will return all the elements matching this XPath:
blog_titles = tree.xpath('//a[contains(@class, "e1dscegp1")]')
for title in blog_titles:
    print(title.text)
Suppose you're looking to learn how to use this library and integrate it into your web scraping efforts or even gain more knowledge on top of your existing expertise. In that case, our detailed lxml tutorial is an excellent place to start.
Selenium
As stated, some websites are written using JavaScript, a language that allows developers to populate fields and menus dynamically. This creates a problem for Python libraries that can only scrape data from static web pages. In fact, as stated, the requests library isn't an option when it comes to JavaScript. This is where Selenium web scraping comes in and thrives.
This Python web library is an open-source browser automation tool (web driver) that allows you to automate processes such as logging into a social media platform. Selenium is widely used for the execution of test cases or test scripts on web applications. Its strength during web scraping derives from its ability to initiate rendering web pages, just like any browser, by running JavaScript – standard web crawlers cannot run this programming language. Yet, it's now extensively used by developers. Moreover, Selenium can help handle CAPTCHA challenges since HTTP requests are made through a real web browser, providing a standard browser environment that makes scraping less detectable.
Selenium requires three components:
Web Browser – Supported browsers are Chrome, Edge, Firefox and Safari;
Driver for the browser – As of Selenium 4.6, the drivers are installed automatically. However, if you encounter any issues, see this page for links to the drivers;
The Selenium package.
The Selenium package can be installed from the terminal:
pip install seleniumAfter installation, the appropriate driver for the browser can be imported. Here's how the code would look for the Chrome browser:
from selenium import webdriver
from selenium.webdriver.common.by import By
driver = webdriver.Chrome()
Now, any page can be loaded in the browser using the get() method.
driver.get('https://oxylabs.io/blog')Selenium allows the use of CSS selectors and XPath to extract elements. The following example prints all the blog titles using a CSS selector:
blog_titles = driver.find_elements(By.CSS_SELECTOR, 'a.e1dscegp1')
for title in blog_titles:
    print(title.text)
driver.quit()  # closing the browser
Basically, by running JavaScript, Selenium deals with any content being displayed dynamically and subsequently makes the web page’s content available for parsing by built-in methods or even Beautiful Soup. Moreover, it can emulate browser behavior.
The only downside to using Selenium in Python scraping is that it slows the process because it must first execute the JavaScript code for each page before making it available for parsing. As a result, it's unideal for large-scale data extraction. But if you wish to extract data at a lower scale or the lack of speed isn't a drawback, Selenium is a great choice.
Scrapy
As a framework, Scrapy provides a complete package for large-scale Python scraping and crawling, including request handling, parsing responses, and managing data pipelines with minimal code.
Scrapy has great integration capabilities with other Python libraries and tools. Modularity and extensibility make it suitable for tasks beyond simple scraping, including data processing pipelines, API interaction, and automation workflows.
With asynchronous network operations, it’s fast and capable of handling multiple HTTP requests simultaneously. Request concurrency suits websites that contain a large number of web pages. Scrapy offers built-in handling of cookies and sessions, support for proxies, and data export in JSON, CSV, or XML.
It supports the creation of middleware that can modify requests and responses, add custom headers, or handle retries, making it easier to adapt to the complexities of modern websites.
Web scraping Python libraries compared
| PYTHON LIBRARIES | Requests | Beautiful Soup | lxml | Selenium | Scrapy |
| Purpose | Simplify making HTTP requests | Parsing | Parsing | Simplify making HTTP requests | Complete scraping framework |
| Ease of use | High | High | Medium | Medium | High |
| Speed | Fast | Fast | Very fast | Slow | Very fast |
| Learning curve | Very easy (beginner-friendly) | Very easy (beginner-friendly) | Easy | Easy | Difficult |
| Technical docs | Excellent | Excellent | Good | Good | Excellent |
| JavaScript support | None | None | None | Yes | None |
| CPU and memory usage | Low | Low | Low | High | Low |
| Project size | Large and small | Large and small | Large and small | Small | Medium and large |
For this Python web scraping tutorial, we'll be using three important libraries – BeautifulSoup v4, Pandas, and Selenium. Further steps in this guide assume a successful installation of these libraries. If you receive a “NameError: name * is not defined” it's likely that one of these installations has failed.
3. WebDrivers and browsers
Every web scraper, be it a general-purpose one or a SERP scraper, uses a browser as it needs to connect to the destination URL. For testing purposes, we highly recommend using a regular browser (or not a headless one), especially for newcomers. Seeing how written code interacts with the application allows simple troubleshooting and debugging and grants a better understanding of the entire process.
Headless browsers can be used later on as they’re more efficient for complex tasks. Throughout this web scraping tutorial, we'll be using the Chrome web browser, although the entire process is identical for Firefox.
4. Choosing a coding environment
One final step needs to be taken before we can get to the programming part of this web scraping tutorial: using a good coding environment. There are many options, from a simple text editor, with which simply creating a *.py file and directly writing the code down is enough, to a fully-featured IDE (Integrated Development Environment).
If you already have Visual Studio Code installed, picking this IDE would be the simplest option. Otherwise, we highly recommend PyCharm for any newcomer as it has very little entry barrier and an intuitive UI. We'll assume that PyCharm is used for the rest of the web scraping tutorial.
In PyCharm, right-click on the project area and then New > Python File. Give it a nice name!
5. Importing and using libraries
Let’s use the pandas library to export the data into a file. In your terminal, run the following:
pip install pandas pyarrowNow it’s time to put all those modules you have installed to use:
import pandas as pd
from bs4 import BeautifulSoup
from selenium import webdriver
PyCharm might display these imports in gray as it automatically marks unused libraries. Don't accept its suggestion to remove unused libs (at least yet).
You should begin by defining your browser. Depending on the webdriver you picked, you should type in the following:
driver = webdriver.Chrome()

OR

driver = webdriver.Firefox()
6. Picking a URL
Web scraping using Python requires looking into the source of websites
Before performing your first test run, choose a URL. As this web scraping tutorial is intended to create an elementary application, we highly recommend picking a simple target URL:
Avoid data hidden in Javascript elements. These sometimes need to be triggered by performing specific actions in order to display the required data. Scraping data from Javascript elements requires more sophisticated use of Python and its logic.
Avoid image scraping. Images can be downloaded directly with Selenium.
Before conducting any scraping activities, ensure that you're scraping public data and are in no way breaching third-party rights. Also, don't forget to check the robots.txt file for guidance.
Select the landing page you want to visit and input the URL into the driver.get(‘URL’) parameter. Selenium requires that the connection protocol is provided. As such, it's always necessary to attach “http://” or “https://” to the URL.
driver.get('https://sandbox.oxylabs.io/products')Here, we’re using Oxylabs’ scraping sandbox as an e-commerce target website, which we’ll use for the following steps. Try doing a test run by clicking the green arrow at the bottom left or by right-clicking the coding environment and selecting Run.
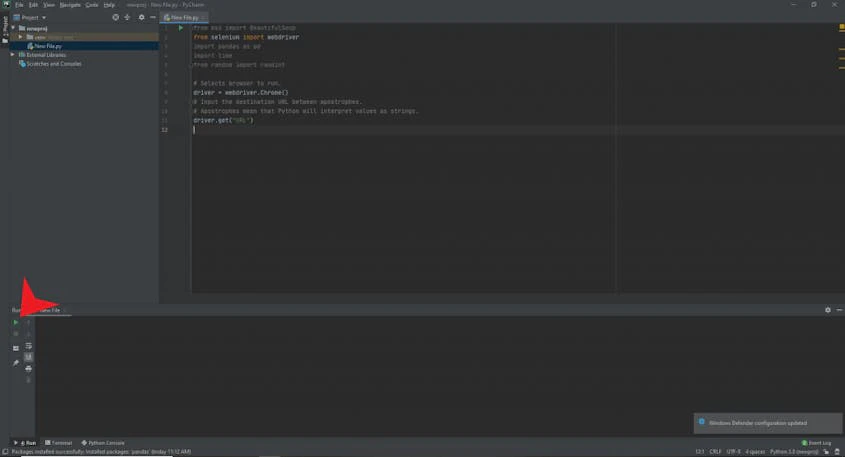
Follow the red pointer
7. Defining objects and building lists
Python allows coders to design objects without assigning an exact type. An object can be created by simply typing its title and assigning a value:
# Object is “results”, brackets make the object an empty list.
# We will be storing our data here.
results = []
Lists in Python are ordered and mutable and allow duplicate members. Other collections, such as sets or dictionaries, can be used, but lists are the easiest to use. Time to make more objects!
# Add the page source to the variable `content`.
content = driver.page_source
# Load the contents of the page, its source, into BeautifulSoup
# class, which analyzes the HTML as a nested data structure and allows to select
# its elements by using various selectors.
soup = BeautifulSoup(content, 'html.parser')
Before you go on, let’s recap on how your code should look so far:
import pandas as pd
from bs4 import BeautifulSoup
from selenium import webdriver

driver = webdriver.Chrome()
driver.get('https://sandbox.oxylabs.io/products')
results = []
content = driver.page_source
soup = BeautifulSoup(content, 'html.parser')
Try rerunning the application again. There should be no errors displayed. If any arise, a few possible troubleshooting options were outlined in earlier chapters.
8. Extracting data with a Python web scraper
You have finally arrived at the fun and difficult part – extracting data out of the HTML file. Since, in almost all cases, you're taking small sections out of many different parts of the page and the goal is to store data into a list, you should process every smaller section and then add it to the list:
# Loop over all elements returned by the `findAll` call. It has the filter `attrs` given
# to it in order to limit the data returned to those elements with a given class only.
for element in soup.findAll(attrs={'class': 'list-item'}):
    ...
soup.find_all accepts a wide array of arguments. For the purposes of this tutorial, we only use attrs (attributes). It allows you to narrow down the search by setting up a statement, “if the attribute is equal to X is true then…”. Classes are easy to find and use; therefore, you should use them.
Let’s visit the chosen URL in a real browser before continuing. Open the page source by using CTRL + U (Chrome) or right-click and select “View Page Source”. Find the “closest” class where the data is nested. Another option is to open Developer Tools, as shown previously, to select elements. For example, the product titles of the scraping sandbox website are nested like this:

The attribute class of the entire listing would be product-card, while the product titles are wrapped with <h4> HTML tags. If you’ve picked a simple target, in most cases, data will be nested in a similar way to the example above. Complex targets might require more effort to get the data out. Let’s get back to coding and add the class found in the source:
# Change ‘list-item’ to ‘product-card’.
for element in soup.findAll(attrs={'class': 'product-card'}):
  ...
The loop will now go through all objects with the class product-card in the page source. We'll process each of them:
name = element.find('h4')Let’s take a look at how the loop goes through the HTML. The first statement (in the loop itself) finds all elements that match tags whose class attribute contains product-card. It then executes another search within that class, which finds all the <h4> tags in the document. Finally, the object is assigned to the variable name.
You could assign the object name to the previously created list array results, but doing this would bring the entire <h4 class="title css-7u5e79 eag3qlw7">The Legend of Zelda: Ocarina of Time</h4> element with the text inside it. In most cases, you would only need the text itself without any additional tags:
# Add the object of “name” to the list “results”.
# `<element>.text` extracts the text in the element, omitting the HTML tags.
    results.append(name.text)
The loop will go through the entire page source, find all the occurrences of the classes listed above, and then append the nested data to the list if it's not there yet:
import pandas as pd
from bs4 import BeautifulSoup
from selenium import webdriver

driver = webdriver.Chrome()
driver.get('https://sandbox.oxylabs.io/products')

results = []
content = driver.page_source
soup = BeautifulSoup(content, 'html.parser')

for element in soup.find_all(attrs={'class': 'product-card'}):
    name = element.find('h4')
    if name not in results:
        results.append(name.text)
Note that the two statements after the loop are indented. Loops require indentation to denote nesting. Any consistent indentation will be considered legal. Loops without indentation will output an “IndentationError” with the offending statement pointed out with a caret (^).
9. Exporting data
Web scraping using Python requires constant double-checking of the code
Exporting data to a CSV file
Even if no syntax or runtime errors appear when running our program, there still might be semantic errors. You should check whether we actually get the data assigned to the right object and move it to the array correctly.
One of the simplest ways to check if the data you acquired during the previous steps is being collected correctly is to use print. Since arrays have many different values, a simple loop is often used to separate each entry into a separate line in the output:
for x in results:
   print(x)
Both print and for should be self-explanatory at this point. We're only initiating this loop for quick testing and debugging purposes. It's completely viable to print the results directly:
print(results)So far, your Python code should look like this:
driver = webdriver.Chrome()
driver.get('https://sandbox.oxylabs.io/products')
results = []
content = driver.page_source
soup = BeautifulSoup(content, 'html.parser')
for a in soup.find_all(attrs={'class': 'product-card'}):
    name = a.find('h4')
    if name not in results:
        results.append(name.text)
for x in results:
    print(x)
Running your program now should display no errors and display acquired data in the debugger window. While print is great for testing purposes, it's not all that great for parsing and analyzing data.
You might have noticed that import pandas as pd is still grayed out so far. We'll finally get to put the library to good use. Remove the print loop for now, as you'll be doing something similar by moving the data to a CSV file:
df = pd.DataFrame({'Names': results})
df.to_csv('names.csv', index=False, encoding='utf-8')
The two new statements rely on the pandas library. The first statement creates a variable df and turns its object into a two-dimensional data table. Names is the name of the column while results is the list to be printed out. Note that pandas can create multiple columns, you just don't have enough lists to utilize those parameters (yet).
The second statement moves the data of variable df to a specific file type (in this case, CSV). The first parameter assigns a name and an extension to the soon-to-be file. Adding an extension is necessary as pandas will otherwise output a file without one, and it'll have to be changed manually. index can be used to assign specific starting numbers to columns. encoding is used to save data in a specific format. UTF-8 will be enough in almost all cases.
import pandas as pd
from bs4 import BeautifulSoup
from selenium import webdriver

driver = webdriver.Chrome()
driver.get('https://sandbox.oxylabs.io/products')
results = []
content = driver.page_source
soup = BeautifulSoup(content, 'html.parser')

for a in soup.find_all(attrs={'class': 'product-card'}):
    name = a.find('h4')
    if name not in results:
        results.append(name.text)

df = pd.DataFrame({'Names': results})
df.to_csv('names.csv', index=False, encoding='utf-8')
No imports should now be grayed out and running the application should output “names.csv” in your project directory.
Exporting data to Excel
Pandas library features a function to export data to Excel. It makes it a lot easier to move data to an Excel file in one go. But it requires you to install the openpyxl library, which you can do in your terminal with the following command:
pip install openpyxlNow, let's see how you can use pandas to write data to an Excel file:
df = pd.DataFrame({'Names': results})
df.to_excel('names.xlsx', index=False)
The new statement creates a DataFrame - a two-dimensional tabular data structure. The column label is Name, and the rows include data from the results array. Pandas can span more than one column, though that’s not required here as we only have a single column of data.
The second statement transforms the DataFrame into an Excel file (“.xlsx”). The first argument to the function specifies the filename - “names.xlsx”. This is followed by the index argument set to false to avoid numbering the rows:
import pandas as pd
from bs4 import BeautifulSoup
from selenium import webdriver

driver = webdriver.Chrome()
driver.get('https://sandbox.oxylabs.io/products')
results = []
content = driver.page_source
soup = BeautifulSoup(content, 'html.parser')

for a in soup.find_all(attrs={'class': 'product-card'}):
    name = a.find('h4')
    if name not in results:
        results.append(name.text)

df = pd.DataFrame({'Names': results})
df.to_excel('names.xlsx', index=False)
To sum up, the code above creates a “names.xlsx” file with a Names column that includes all the data we have in the results array so far.
Of course, CSV and Excel outputs are only examples of how you can save your scraped data. Among other methods, you could save data to JSON files for easy parsing or use databases when performing large-scale Python web scraping. Additionally, if you're interested in handling JSON files using JavaScript, check out this read JSON files in JavaScript tutorial.
10. Extracting multiple data points
Web scraping using Python often requires many data points
Many web scraping operations will need to acquire several sets of data. For example, extracting just the titles of items listed on an e-commerce website will rarely be useful. In order to gather meaningful information and to draw conclusions from it at least two data points are needed.
For the purposes of this tutorial, we'll try something slightly different. Since acquiring data from the same HTML element would just mean appending the same results to an additional list, we should attempt to extract data from a different HTML element but, at the same time, maintain the structure of the table.
Obviously, you'll need another list to store the data in. So, let’s extract the prices of each product listing:
import pandas as pd
from bs4 import BeautifulSoup
from selenium import webdriver

driver = webdriver.Chrome()
driver.get('https://sandbox.oxylabs.io/products')

results = []
other_results = []

content = driver.page_source
soup = BeautifulSoup(content, 'html.parser')

for b in soup.find_all(attrs={'class': 'product-card'}):
# Note the use of 'attrs' to again select an element with the specified class.
    name2 = b.find(attrs={'class': 'price-wrapper'})
    other_results.append(name2.text)
Since you'll be extracting an additional data point from a different part of the HTML, you'll require an additional loop. If needed, you can also add another if statement to control the duplicate entries:
for b in soup.find_all(attrs={'class': 'product-card'}):
    name2 = b.find(attrs={'class': 'price-wrapper'})
    if name2 not in other_results:
        other_results.append(name2.text)
Finally, you need to change how the data table is formed:
df = pd.DataFrame({'Names': results, 'Prices': other_results})So far the newest iteration of your code should look something like this:
import pandas as pd
from bs4 import BeautifulSoup
from selenium import webdriver

driver = webdriver.Chrome()
driver.get('https://sandbox.oxylabs.io/products')
results = []
other_results = []
content = driver.page_source
soup = BeautifulSoup(content, 'html.parser')

for a in soup.find_all(attrs={'class': 'product-card'}):
    name = a.find('h4')
    if name not in results:
        results.append(name.text)

for b in soup.find_all(attrs={'class': 'product-card'}):
    name2 = b.find(attrs={'class': 'price-wrapper'})
    if name2 not in other_results:
        other_results.append(name2.text)

df = pd.DataFrame({'Names': results, 'Prices': other_results})
df.to_csv('products.csv', index=False, encoding='utf-8')
If you're lucky, running this code will produce no error. In some cases, pandas may output a “ValueError: arrays must all be the same length” message. Simply put, the length of the results and other_results lists is unequal. Therefore, pandas cannot create a two-dimensional table.
There are dozens of ways to resolve that error message. From padding the shortest list with “empty” values to creating dictionaries to creating two series and listing them out. We shall do the third option:
series1 = pd.Series(results, name='Names')
series2 = pd.Series(other_results, name='Categories')
df = pd.DataFrame({'Names': series1, 'Categories': series2})
df.to_csv('names.csv', index=False, encoding='utf-8')
Note that data will not be matched as the lists are of uneven length, but creating two series is the easiest fix if two data points are needed. Your final code should look something like this:
import pandas as pd
from bs4 import BeautifulSoup
from selenium import webdriver

driver = webdriver.Chrome()
driver.get('https://sandbox.oxylabs.io/products')
results = []
other_results = []
content = driver.page_source
soup = BeautifulSoup(content, 'html.parser')

for a in soup.find_all(attrs={'class': 'product-card'}):
    name = a.find('h4')
    if name not in results:
        results.append(name.text)

for b in soup.find_all(attrs={'class': 'product-card'}):
    name2 = b.find(attrs={'class': 'price-wrapper'})
    if name2 not in other_results:
        other_results.append(name2.text)

series1 = pd.Series(results, name='Names')
series2 = pd.Series(other_results, name='Prices')
df = pd.DataFrame({'Names': series1, 'Prices': series2})
df.to_csv('products.csv', index=False, encoding='utf-8')
Running it should create a CSV file named “names” with two columns of data.
11. Web scraping using Python: full code example
Now that you have a solid understanding of Python web data extraction let’s put your knowledge to work. Below, you'll find a code that demonstrates a simple two-step scraper designed to:
Crawl through 5 search result pages to gather product URLs.
Visit each product URL, scrape and parse the relevant data, and save it to a CSV file.
In the first step, the requests library and BeautifulSoup handle basic crawling and extraction. The second step leverages Selenium to load each product page fully, ensuring you capture all dynamic content. A progress tracker is also included to help monitor the scraper’s status.
To get started, create a new .py file in your project directory and paste the following code:
import requests
from bs4 import BeautifulSoup
from selenium import webdriver
from selenium.webdriver import ChromeOptions
import pandas as pd


# Generate 5 URLs of search results.
pages = ['https://sandbox.oxylabs.io/products?page=' + str(i) for i in range(1, 6)]

# Crawl all URLs and extract each product's URL.
product_urls = []
for page in pages:
    print(f'Crawling page \033[38;5;120m{page}\033[0m')
    response = requests.get(page)
    soup = BeautifulSoup(response.text, 'lxml')

    for product in soup.select('.product-card'):
        href = product.find('a').get('href')
        product_urls.append('https://sandbox.oxylabs.io' + href)

print(f'\nFound \033[38;5;229m{len(product_urls)}\033[0m product URLs.')


# Initiliaze a Chrome browser without its GUI.
options = ChromeOptions()
options.add_argument('--headless=new')
driver = webdriver.Chrome(options=options)

# Scrape all product URLs and parse each product's data.
products = []
for i, url in enumerate(product_urls, 1):
    print(f'Scraping URL \033[1;34m{i}\033[0m/{len(product_urls)}.', end='\r')
    driver.get(url)
    soup = BeautifulSoup(driver.page_source, 'lxml')

    info = soup.select_one('.brand-wrapper')

    product_data = {
        'Title': soup.find('h2').get_text(),
        'Price': soup.select_one('.price').get_text(),
        'Availability': soup.select_one('.availability').get_text(),
        'Stars': len(soup.select('.star-rating > svg')),
        'Description': soup.select_one('.description').get_text(),
        'Genres': ', '.join([genre.get_text().strip() for genre in soup.select('.genre')]),
        'Developer': info.select_one('.brand.developer').get_text().replace('Developer:', '').strip() if info else None,
        'Platform': info.select_one('.game-platform').get_text() if info and info.select_one('.game-platform') else None,
        'Type': info.select('span')[-1].get_text().replace('Type:', '').strip() if info else None
    }
    # Append each product's data to a list.
    products.append(product_data)
driver.quit()

# Save results to a CSV file.
df = pd.DataFrame(products)
df.to_csv('products.csv', index=False, encoding='utf-8')
print('\n\n\033[32mDone!\033[0m Products saved to a CSV file.')
After running this code, your console should print the following scraper progress information:

Python scraper progress information
Finally, the saved products.csv file should look like this once opened in a program that supports CSV files:

Scraping result
Data cleaning and normalization (optional)
Optionally, parsed data can be cleaned and normalized to ensure input is accurate and ready for analysis. These processes make data more valuable for downstream applications like data analysis and machine learning models.
Due to varying web structures and coding practices, raw data from websites often contains missing values, duplicate entries, or irregular formats. Data cleaning involves correcting or removing corrupt records and irrelevant parts of the data, such as HTML tags or JavaScript snippets.
Normalization standardizes the data into a uniform format, including formatting dates, structuring numerical data, converting currencies, and translating foreign language texts.
Web scraping using Python: best practices
Your first web scraper should now be fully functional. Of course, it's so basic and simplistic that performing any serious data acquisition would require significant upgrades. Check out this advanced web scraping with Python tutorial to master complex data extraction techniques and upgrade your scraper. Before moving on to greener pastures, we highly recommend experimenting with some additional features:
Create matched data extraction by creating a loop that would make lists of an even length.
Scrape several URLs in one go. There are many ways to implement such a feature. One of the simplest options is to simply repeat the code above and change URLs each time. That would be quite boring. Build a loop and an array of URLs to visit.
Create several arrays to store different sets of data and output it into one file with different rows. Scraping several different types of information at once is an important part of e-commerce data acquisition.
Once a satisfactory web scraper is running, you no longer need to watch the browser perform its actions. Run headless versions of either Chrome or Firefox browsers and use those to reduce load times.
Create a scraping pattern. Think of how a regular user would browse the internet and try to automate their actions. New libraries will definitely be needed. Use import time and from random import randint to create wait times between web pages. Add scrollto() or use specific key inputs to move around the browser. It’s nearly impossible to list all of the possible options when it comes to creating a scraping pattern.
Create a monitoring process. Data on certain websites might be time (or even user) sensitive. Try creating a long-lasting loop that rechecks certain URLs and scrapes data at set intervals. Ensure that your acquired data is always fresh.
Make use of the Python requests library. Requests is a powerful asset in any web scraping toolkit as it allows to optimize HTTP methods sent to servers.
Configure a Python requests retry strategy that automatically retries failed requests with specified error status codes.
Once you get the hang of the basics, utilize an asynchronous Python library to make multiple requests simultaneously. Two common asynchronous libraries come to mind – asyncio and aiohttp.
Finally, integrate proxies into your web scraper. Using location-specific request sources allows you to acquire accurate data that might otherwise be inaccessible.
Common errors
Some of the common overlooks when web scraping using Python.
Not handling HTTP exceptions and errors properly. Neglecting to account for HTTP status codes like 404 (Not Found) or 500 (Internal Server Error) can cause your scraper to crash or miss critical data. Implementing error handling using the try and except blocks ensures that your scraper can manage unexpected responses.
Not accounting for dynamic content loaded via JavaScript. Requests and Beautiful Soup retrieve only the static HTML, excluding content that renders after the initial page load. To scrape dynamic websites, consider using Selenium, Scrapy, or similar, which can execute JavaScript and render the page as a browser would.
Ignoring rate limiting and making too many requests in a short time frame can lead to your IP address being blocked. Websites often have mechanisms to detect and prevent scraping activities that burden their servers. Implement delays between requests and respect the website's robots.txt file to avoid being flagged as malicious traffic.
Not setting an appropriate User-Agent header. Many websites block HTTP requests that come with the default Python requests User-Agent, as these are clear indicators of bot traffic. Always set a realistic User-Agent string to emulate a regular browser behavior.
Mishandling data extraction due to incorrect HTML parsing. Websites frequently update their layouts and HTML structures, breaking your parsing logic. Write adaptable and resilient parsing code and regularly update your scraper to accommodate website structure changes, using libraries like Beautiful Soup or lxml.
Overlooking legal and ethical considerations. Always ensure you have permission to scrape the data and comply with the website's terms of service and relevant laws, such as GDPR. Neglect can lead to legal consequences and a damaged reputation.
Python scraping use cases
Some of the most prominent applications of web scraping include:
Conclusion
So, now you've learnt how to web scrape with Python. From here onwards, you're ready to go bigger. Building web scrapers in Python, acquiring data, and drawing conclusions from large amounts of information is inherently an interesting and complicated process.
If you need a more powerful and scalable approach, our Web Scraper API offers an all-in-one web scraping solution. The fast-adapting infrastructure handles the entire scraping pipeline – including proxy management, web access management, and parsing – to deliver real-time data at scale. Alternatively, you can look into free proxies or paid proxy servers for your custom scraping tools.
If you want to find out more about how residential proxies or advanced data acquisition tools work or about specific web scraping use cases, such as web scraping job postings, news scraping, Web Scraping with C++ or building a yellow page scraper, check out our blog. We have enough articles for everyone: a more detailed guide on how to maintain reliable connection when scraping and tackle pagination, is web scraping legal, PHP vs Python, JavaScript vs Python compared, an in-depth walkthrough on what is a proxy server, best web scraping courses, how to scrape HTML tables, how to use Python cache effectively, Python web crawler, and many more!
Frequently asked questions
Is Python good for web scraping?
Yes, the Python programming language is generally considered good for web scraping. It’s open-source, relatively easy, and intuitive to learn (learning Python basics takes 1-2 months), and offers plenty of powerful libraries that streamline web scraping processes. Follow the link to learn more about the best web scraping languages.
Is Python better than R for web scraping?
What are the disadvantages of web scraping in Python?
Is Selenium better than Beautiful Soup?
Which Python library is best for web scraping?
Is data scraping illegal?
What is web scraping?
Can websites detect web scraping?
About the author

Adomas Sulcas
Former PR Team Lead
Adomas Sulcas was a PR Team Lead at Oxylabs. Having grown up in a tech-minded household, he quickly developed an interest in everything IT and Internet related. When he is not nerding out online or immersed in reading, you will find him on an adventure or coming up with wicked business ideas.
All information on Oxylabs Blog is provided on an "as is" basis and for informational purposes only. We make no representation and disclaim all liability with respect to your use of any information contained on Oxylabs Blog or any third-party websites that may be linked therein. Before engaging in scraping activities of any kind you should consult your legal advisors and carefully read the particular website's terms of service or receive a scraping license.
Related articles


![Automated Web Scraper With Python AutoScraper [Guide]](https://oxylabs.io/oxylabs-web/ZpBhlx5LeNNTxEcW_eba26704-d9e7-4562-aaf4-0375a6bb9693_Python-Web-Scraping-1200x600.png?auto=format%2Ccompress&rect=0%2C0%2C1200%2C600&w=3840&h=600&q=75)
Simplify your work with low-code solutions
AI Studio apps for data scraping, crawling, and parsing.
Buy Web Scraper API
Collect structured, ready-to-use data from multiple domains without managing infrastructure, maintenance, or downtime.

Get the latest news from data gathering world
Scale up your business with Oxylabs®
Proxies
Advanced proxy solutions
Data Collection
Datasets
Resources
Innovation hub
Simplify your work with low-code solutions
AI Studio apps for data scraping, crawling, and parsing.
Buy Web Scraper API
Collect structured, ready-to-use data from multiple domains without managing infrastructure, maintenance, or downtime.