175M+ ethically sourced IPs built for the highest reliability.
High-speed, cost-effective proxies built for any scraping workload.
Premium static residential proxies from trusted ASNs for most difficult targets.
Dedicated IPs from premium ASNs for demanding scraping.

AI-powered proxy solution for optimized web scraping performance.

20M+ IP addresses from real mobile devices for precise targeting.

Free Chrome proxy manager extension that works with any proxy provider.

Free Android proxy manager app that works with any proxy provider.

Free community-driven tools to improve your web scraping projects.
Web Scraper API
All-in-one web data collection platform for every stage of web scraping.
Fast Search API
Ultra-fast organic search results scraper tailored for AI workflows.
Headless Browser
Advanced browser automation solution for AI agents and scraping.
AI Studio
A suite of AI-powered tools for various scraping projects.

Documentation
All features, parameters, and integration details, backed by code samples in every coding language.
Tutorials, samples, and guides.
Latest fixes and features.


![]() AI Summary:
AI Summary:
This tutorial demonstrates how to perform web scraping using the Scrapy Python framework. It guides users through setting up a Scrapy project, creating spiders, extracting data, handling pagination, and running Scrapy from the command line or within a Python script.
Scrapy is a Python web crawling and web scraping framework offering an extensive package for developers without having to maintain the code. Scrapy is mainly designed for large-scale web scraping projects and has the necessary toolkit to extract data, process it, and store it in your preferred format.
In this Scrapy tutorial, we’ll walk you through the key steps of web scraping with Scrapy:
Installing and creating Scrapy project;
Extracting product information;
Handling pagination;
Running Scrapy from within a Python script;
Scrapy is written in Python, and if you’re unfamiliar with this programming language, check out our practical Python tutorial first.
How to use Scrapy
In this section, we’ll explain how to set up a Scrapy project for web scraping use cases. Creating a Scrapy project for web scraping in Python is a simple three-step procedure.
Install Scrapy;
Create a Scrapy project;
Generate a new Spider for your web-scraping target.
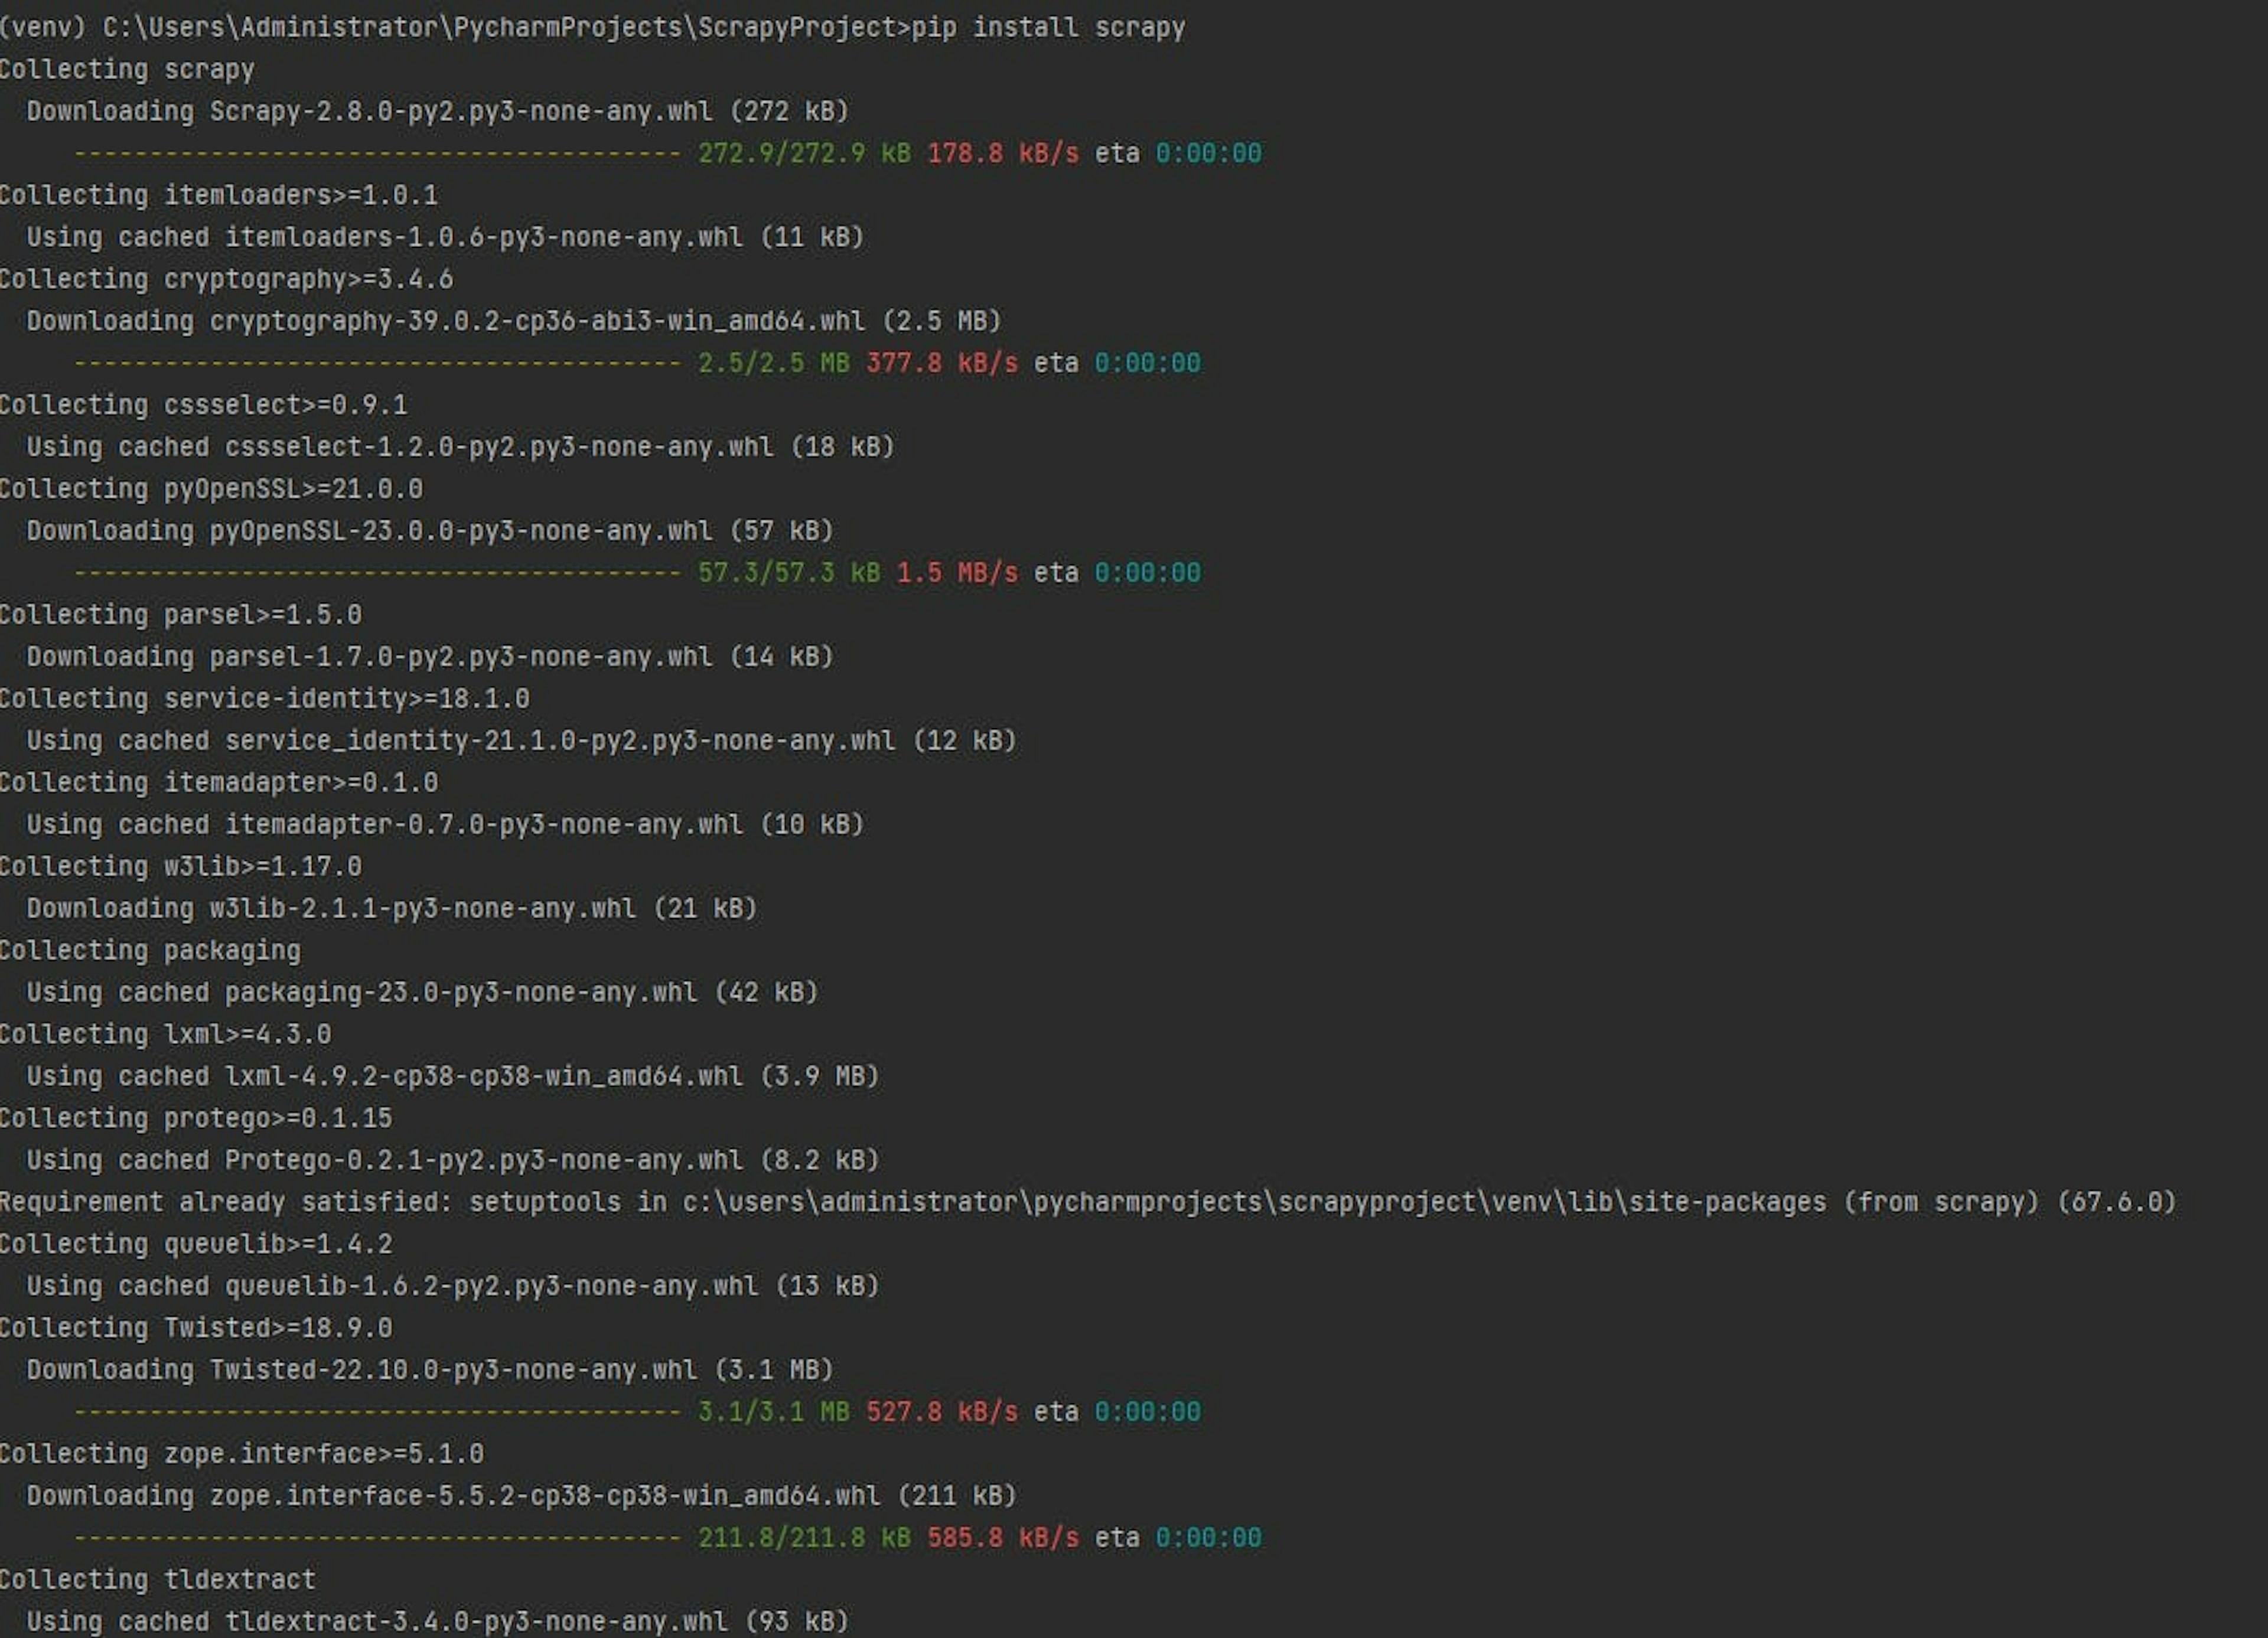
Let’s start by installing Scrapy. Open your Python command terminal and type the following pip command:
pip install scrapyScrapy would take a few minutes to complete the installation, depending on your internet connection speed.
Once the installation is complete, you can start creating Scrapy projects using the following command:
scrapy startproject <project_name>You need to replace <project_name> with the actual name of your project. For example, the next command will create a new Scrapy project named "scrapyproject".
scrapy startproject scrapyprojectExecuting the above command creates a new folder named “scrapyproject” in the current directory context and places all the project files in it.
To generate your first spider, you need to change your current directory to this “scrapyproject” folder using the cd scrapyproject command. Now, you can generate a new spider with the following command:
scrapy genspider <spider_name> <url_domain>Replace <spider_namer> and <url_domain> with the actual name for the spider and the web scraping target, respectively. For example, the following command will generate a “books” spider with a target URL books.toscrape.com.
scrapy genspider books books.toscrape.comCongratulations! We just completed the initial setup for our Scrapy web scraper. Here is what the project folder looks like:
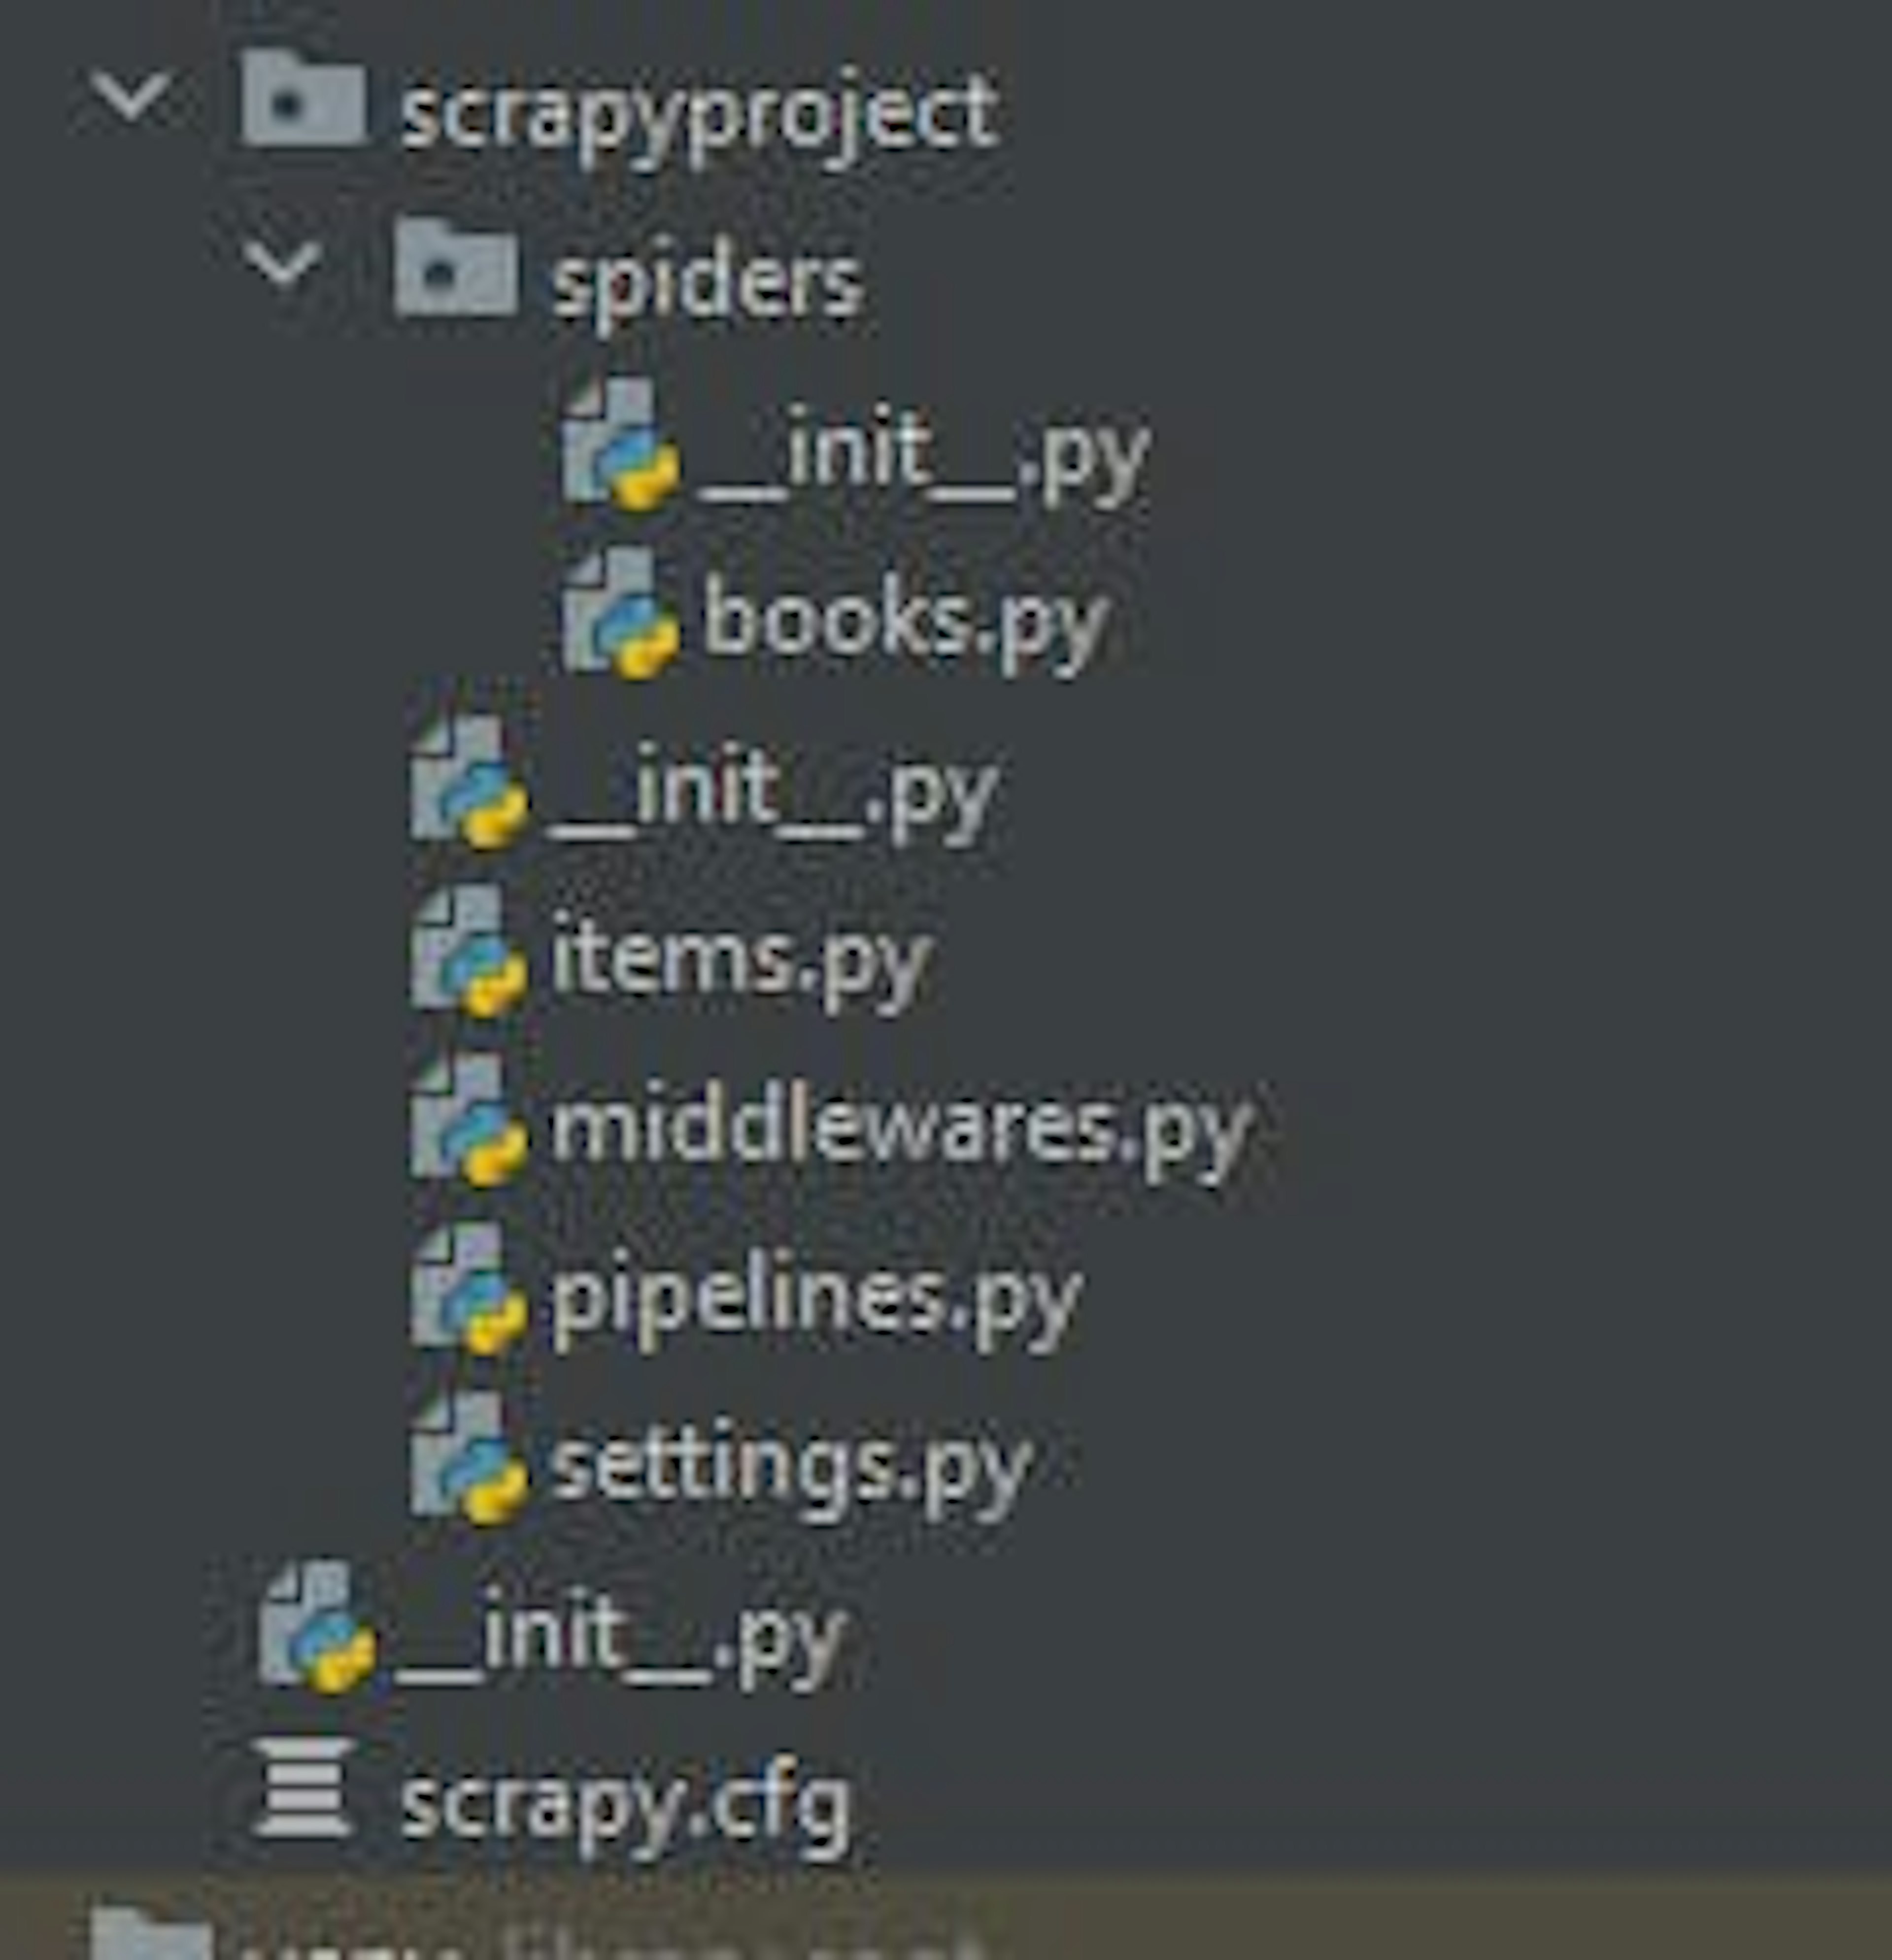
Scrapy project structure
Each Scrapy project has the following files and folders:
spiders folder: Contains spiders for defining how to extract data from specific websites. Each spider is designed to target a specific website or set of websites. Typically, a spider contains a set of rules that dictate how to navigate the site and extract the desired data.
items.py: Contains objects that represent the data a spider is trying to extract. Items are defined using Python classes and help organize the data in a structured format.
middleware.py: This file contains middleware information for request routing. You can also write the custom proxy middleware in this file.
pipelines.py: Once the spider completes the data extraction, we need to process and store the data in a structured format. Pipelines define a set of processing steps on data while it is being extracted.
settings.py: It contains various configuration settings that control the behavior of the Scrapy framework. For example, you can set a user agent string, configure download delay, limit maximum concurrent requests, configure middleware, etc.
Scrapy.cfg: A plain text file that contains a series of configuration directives. For example, it includes directives for the project name, the location of the spider modules, and the settings to be used when running the web spiders.
You are encouraged to read Scrapy’s documentation page for more information on the basic project structure. Let’s now see how to customize the Scrapy project to serve our web scraping needs.
Customizing Scrapy spider
This section discusses customizing a Scrapy project to scrape all the books’ information on the Books Store. Before jumping into the coding, let’s look at our initial target page.
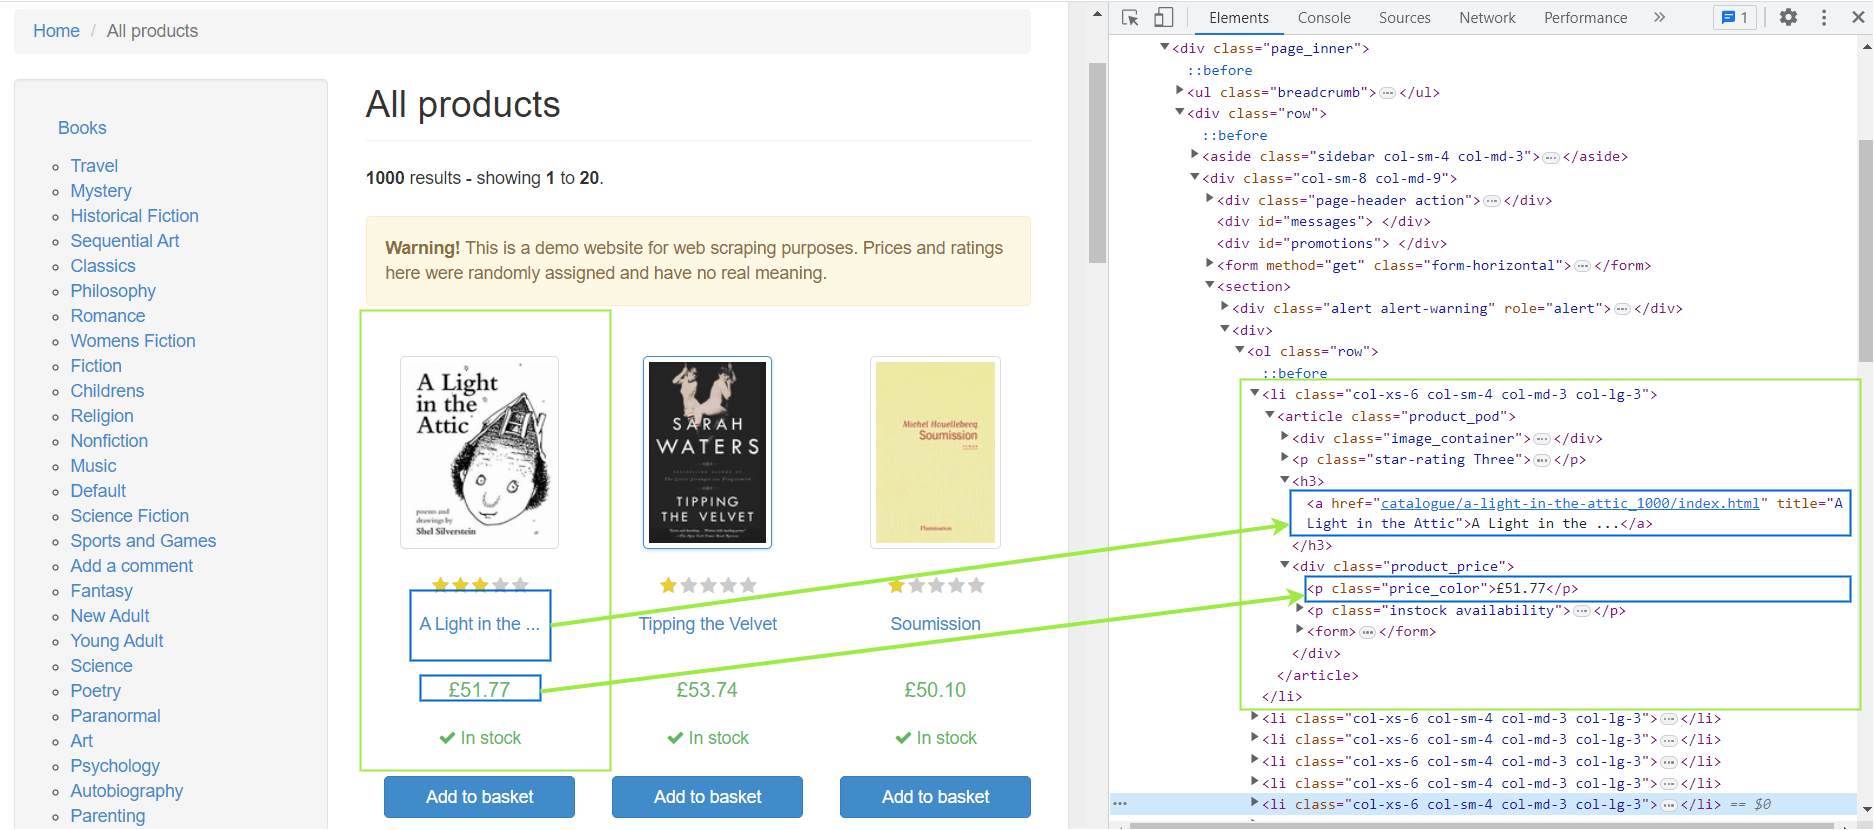
Notice the book title is in the title attribute of the <a> tag inside an <h3> element. This <h3> element is enclosed by an <article> tag with the product_pod class. Similarly, the book price resides in a <p> tag with the price_color tag.
The target page lists only the first 20 books out of 1000 books. Therefore, there would be a total of 50 pages. Let’s see the bottom of the same page to know the CSS selector for the next page link.
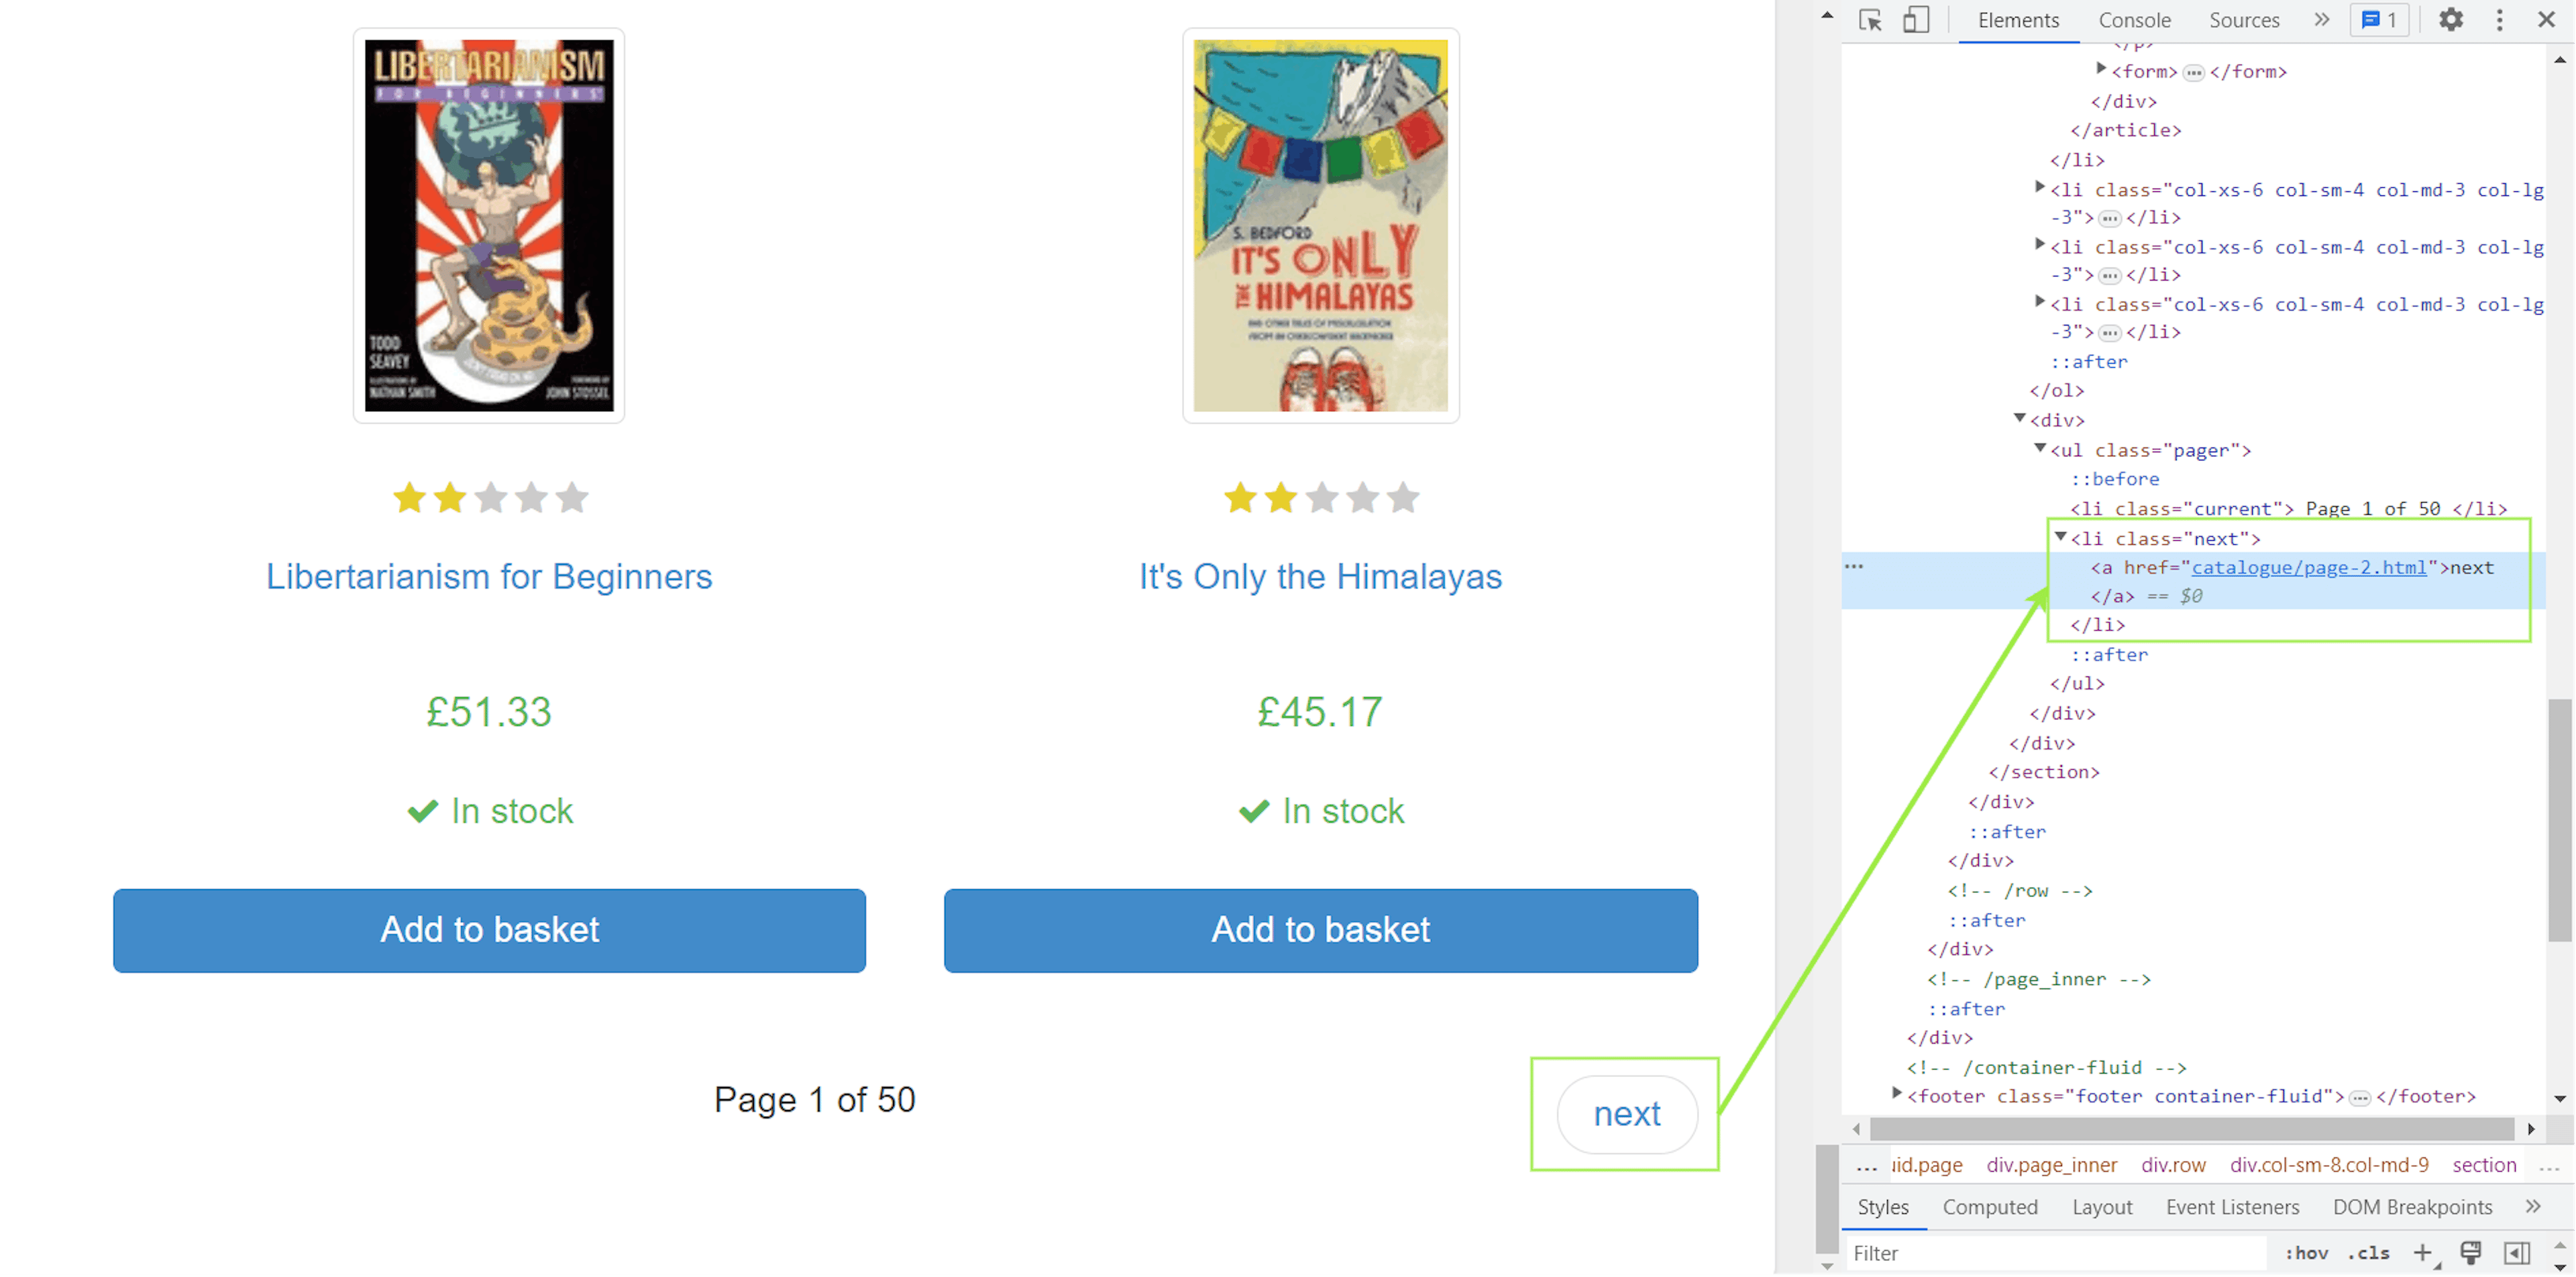
The URL for the next page is available in the href attribute of the <a> tag. This <a> is enclosed by an <li> tag with the next class. Mind this information; we will use it in the subsequent section.
Scrapy spider customization in action
Open the books.py spider file in an IDE of your choice. Replace the original template script with the following code:
class BooksSpider(scrapy.Spider):
    name = 'books'

    def start_requests(self):
        URL = 'https://books.toscrape.com/'
        yield scrapy.Request(url=URL, callback=self.response_parser)

    def response_parser(self, response):
        for selector in response.css('article.product_pod'):
            yield {
                'title': selector.css('h3 > a::attr(title)').extract_first(),
                'price': selector.css('.price_color::text').extract_first()
            }

        next_page_link = response.css('li.next a::attr(href)').extract_first()
        if next_page_link:
            yield response.follow(next_page_link, callback=self.response_parser)
The above script contains two generators: the start_requests() and the response_parser(). The start_requests() generator automatically executes whenever a crawl command is issued to this spider. Here, it retrieves the contents from the URL and issues a call back to the response_parser().
The response_parser() generator, when executed, extracts the desired product information from the iterable response. When yields for all the 20 products in the current response are completed, it uses the response.follow() method to retrieve the contents of the next page. The follow() method calls back to the reponse_parser() again to extract and yield products from the new page. The cycle continues until the next_page_link becomes NULL or empty.
You can execute the Scrapy project by issuing a crawl command from the command terminal:
scrapy crawl booksWe can also give a file name with the -o option to write the output to a file.
scrapy crawl -o out.csv booksRunning a Scrapy project from within the Python script
You might find it inconvenient to issue a crawl command from a command terminal to execute the project. Luckily, you can execute a Scrapy project from within the Python script.
The following spider script, when executed, automatically issues a crawl command and saves the output in the “books_data.csv” file.
import csv
import scrapy
from scrapy import signals
from scrapy.crawler import CrawlerProcess
from scrapy.signalmanager import dispatcher

class BooksSpider(scrapy.Spider):
    name = 'books'

    def start_requests(self):
        URL = 'https://books.toscrape.com/'
        yield scrapy.Request(url=URL, callback=self.response_parser)

    def response_parser(self, response):
        for selector in response.css('article.product_pod'):
            yield {
                'title': selector.css('h3 > a::attr(title)').extract_first(),
                'price': selector.css('.price_color::text').extract_first()
            }

        next_page_link = response.css('li.next a::attr(href)').extract_first()
        if next_page_link:
            yield response.follow(next_page_link, callback=self.response_parser)


def book_spider_result():
    books_results = []

    def crawler_results(item):
        books_results.append(item)

    dispatcher.connect(crawler_results, signal=signals.item_scraped)
    crawler_process = CrawlerProcess()
    crawler_process.crawl(BooksSpider)
    crawler_process.start()
    return books_results


if __name__ == '__main__':
    books_data=book_spider_result()

    keys = books_data[0].keys()
    with open('books_data.csv', 'w', newline='') as output_file_name:
        writer = csv.DictWriter(output_file_name, keys)
        writer.writeheader()
        writer.writerows(books_data)
The start_requests() and response_parser() are the same as our previous code. The __main__ serves as a starting point for direct execution. It calls the book_spider_result() function and waits for it to return a value.
The book_spider_result() works as follows:
Sets control dispatcher to execute the crawler_results() function on the encounter of an item_scraped signal. The item_scraped is generated whenever the spider scrapes an item from the target.
Creates a crawler process for the BooksSpider and starts it.
Whenever the BookSpider completes scraping an item, it emits the item_scraped signal. This causes the crawler_results() function to execute and append this scraped item to the books_results list.
Once the crawler process finishes scraping the items, the book_spider_result() returns the books_results list.
The __main__ function on return writes the returned books_data to the “books_data.csv” file.
The book spider is now self-contained, making it straightforward to execute it. Just navigate your “spiders” folder in the Scrapy project and double-click the `books.py` file. Alternatively, you can open the command terminal in the “spiders” folder and run the scrapy runspider books.py command to run the spider.
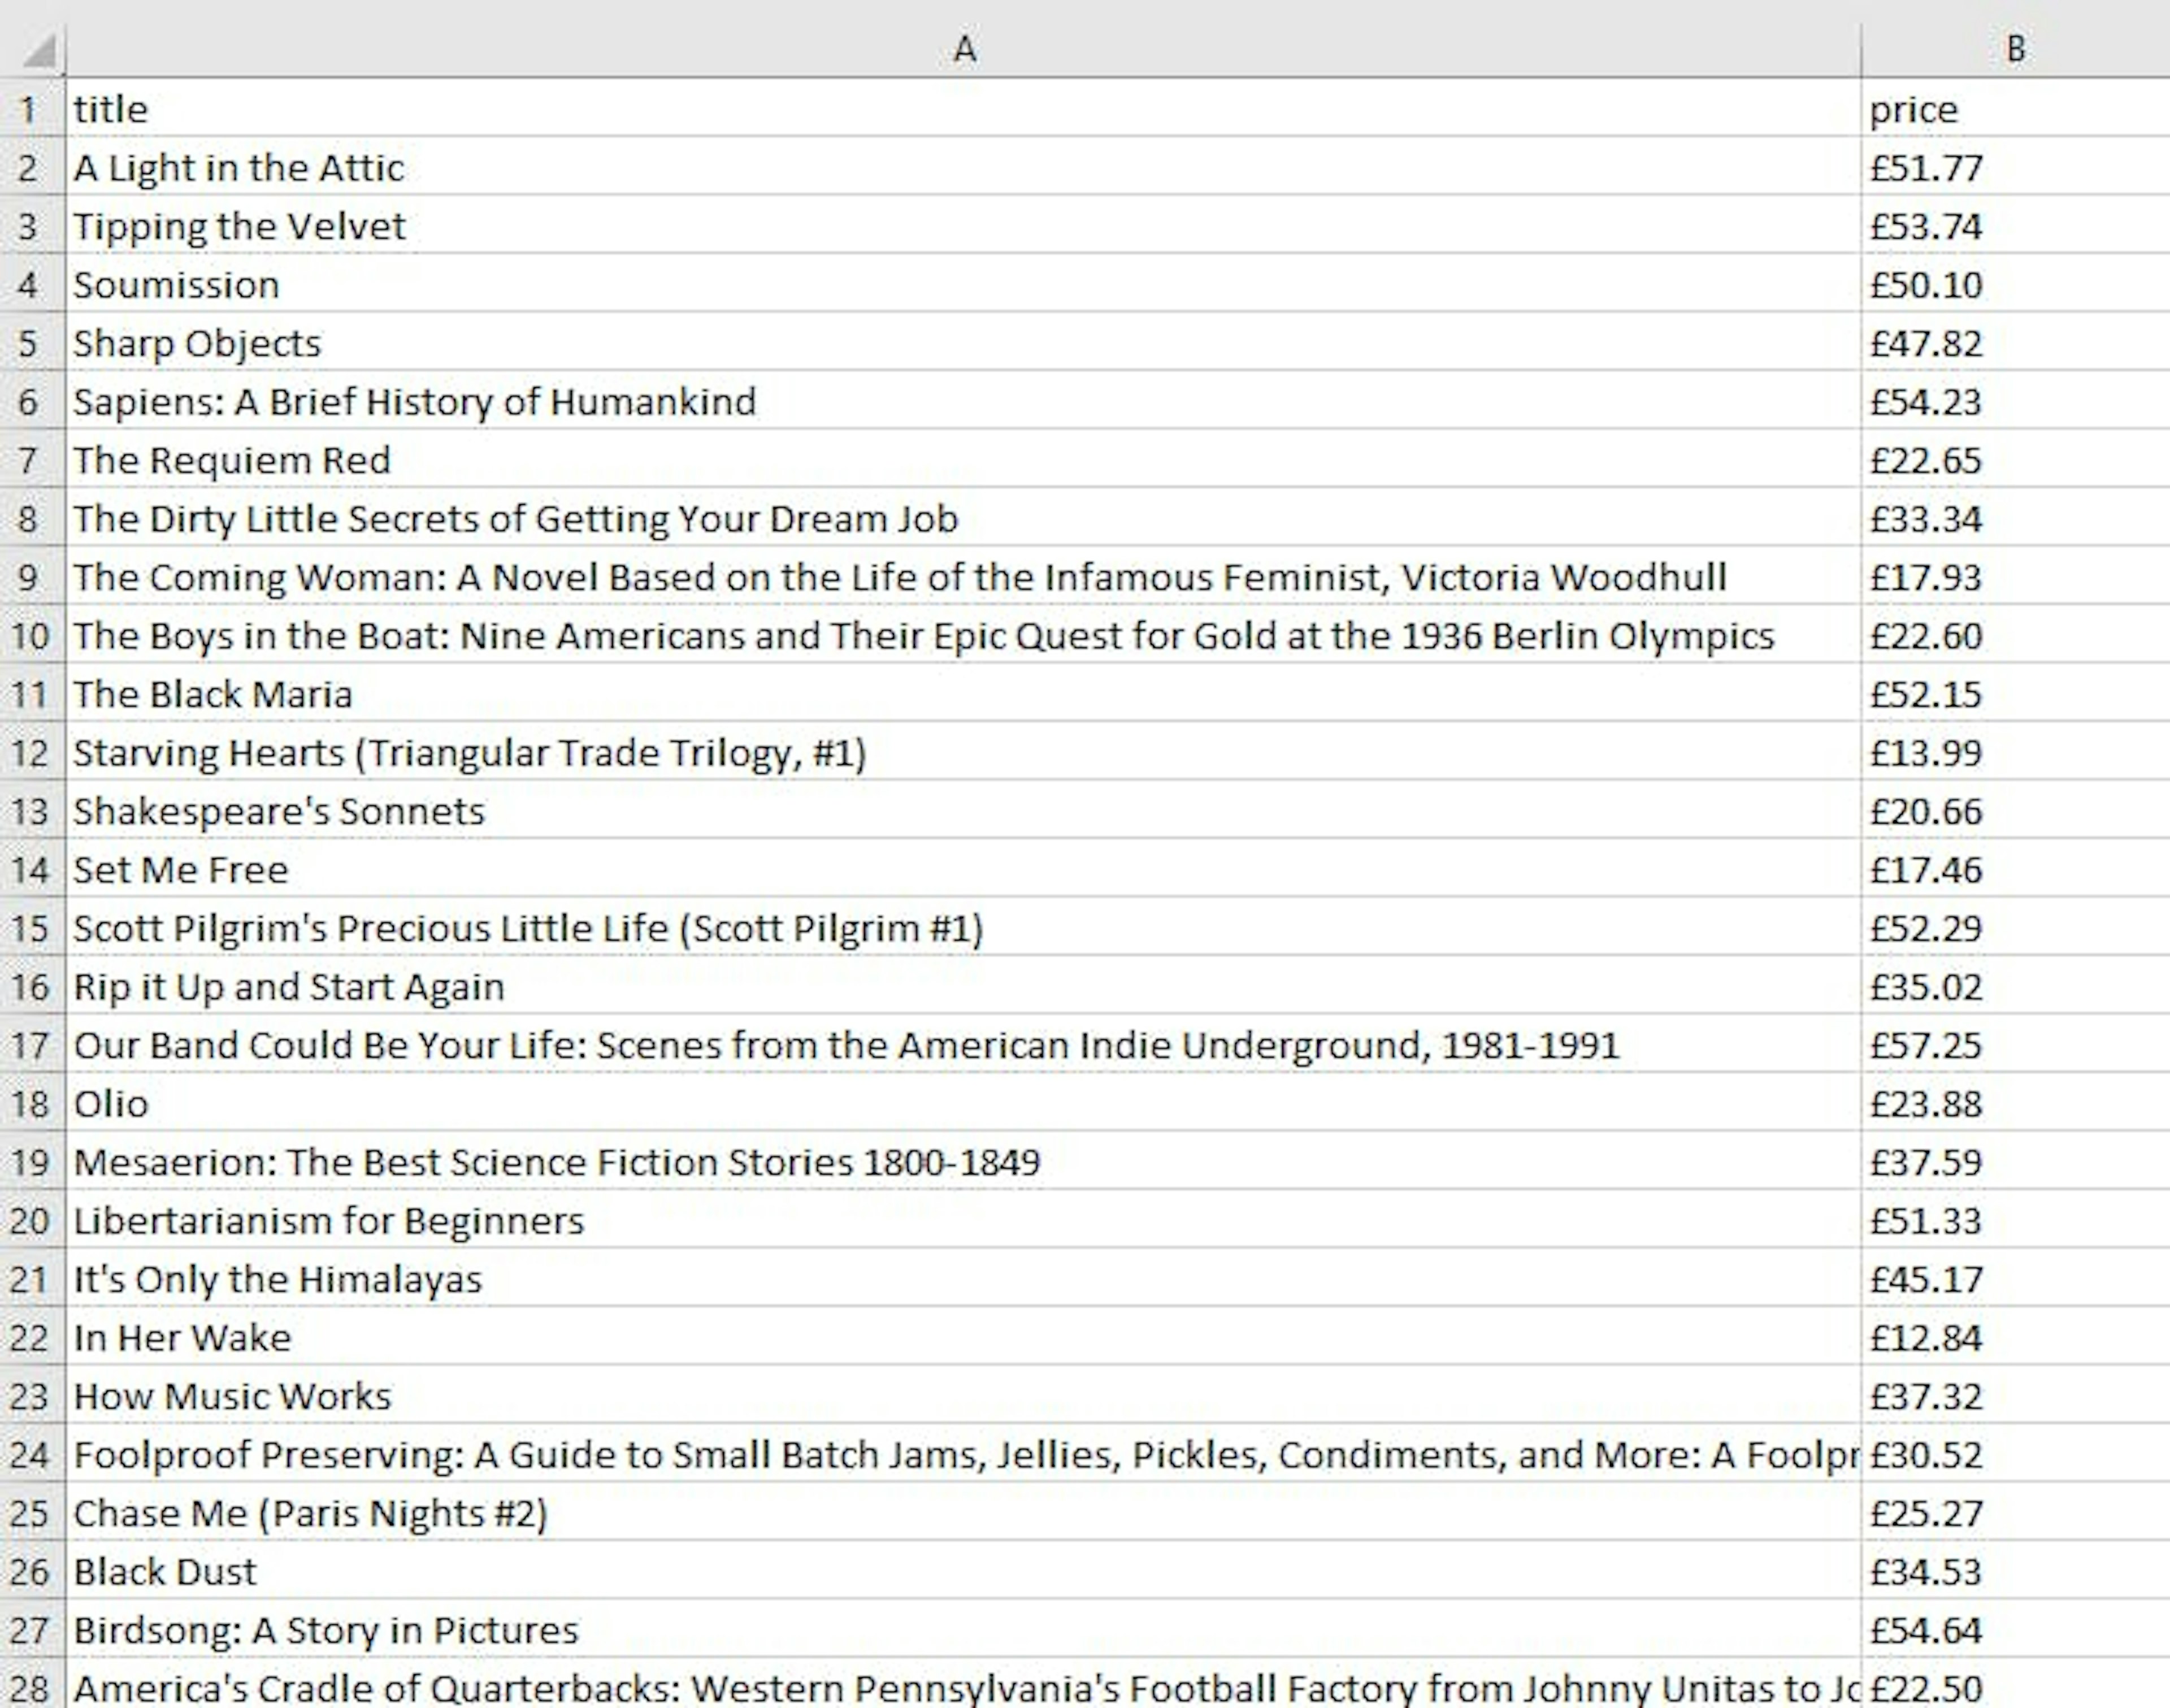
Here is what the output file (i.e., books_data.csv) looks like:
Conclusion
Hopefully, this detailed tutorial with real coding samples helped you grasp the basics of web scraping with Scrapy. For scaling your Scrapy operations, consider a serverless solution by integrating Scrapy and AWS Lambda. If you'd like to get more information check out Scrapy proxy integration tutorial, or check alternative methods in our Python web scraping with Nodriver guide.
Frequently asked questions
Is Scrapy better than Beautiful Soup?
It depends on the web scraping project. Scrapy is generally better for large-scale web scraping with more complicated data retrieval methods in place, while Beautiful Soup is better suited for smaller projects with fewer capabilities.
Is Beautiful Soup faster than Scrapy?
Is Scrapy better than Selenium?
Forget about complex web scraping processes
Choose Oxylabs' advanced web intelligence collection solutions to gather real-time public data hassle-free.
About the author

Maryia Stsiopkina
Former Senior Content Manager
Maryia Stsiopkina was a Senior Content Manager at Oxylabs. As her passion for writing was developing, she was writing either creepy detective stories or fairy tales at different points in time. Eventually, she found herself in the tech wonderland with numerous hidden corners to explore. At leisure, she does birdwatching with binoculars (some people mistake it for stalking), makes flower jewelry, and eats pickles.
All information on Oxylabs Blog is provided on an "as is" basis and for informational purposes only. We make no representation and disclaim all liability with respect to your use of any information contained on Oxylabs Blog or any third-party websites that may be linked therein. Before engaging in scraping activities of any kind you should consult your legal advisors and carefully read the particular website's terms of service or receive a scraping license.
Related articles

Cheerio vs. Puppeteer: Which Should You Use for Web Scraping?

Shinthiya Nowsain Promi
2026-06-23


List Crawling in Python: Tools, Tips, and Techniques

Danielė Virinaitė
2026-06-17

Get the latest news from data gathering world
Scale up your business with Oxylabs®
Proxies
Advanced proxy solutions
Data Collection
Datasets
Resources
Innovation hub
Forget about complex web scraping processes
Choose Oxylabs' advanced web intelligence collection solutions to gather real-time public data hassle-free.