175M+ ethically sourced IPs built for the highest reliability.
High-speed, cost-effective proxies built for any scraping workload.
Premium static residential proxies from trusted ASNs for most difficult targets.
Dedicated IPs from premium ASNs for demanding scraping.

AI-powered proxy solution for optimized web scraping performance.

20M+ IP addresses from real mobile devices for precise targeting.

Free Chrome proxy manager extension that works with any proxy provider.

Free Android proxy manager app that works with any proxy provider.

Free community-driven tools to improve your web scraping projects.
Web Scraper API
All-in-one web data collection platform for every stage of web scraping.
Fast Search API
Ultra-fast organic search results scraper tailored for AI workflows.
Headless Browser
Advanced browser automation solution for AI agents and scraping.
AI Studio
A suite of AI-powered tools for various scraping projects.

Documentation
All features, parameters, and integration details, backed by code samples in every coding language.
Tutorials, samples, and guides.
Latest fixes and features.


![]() AI Summary:
AI Summary:
This guide demonstrates how to use Selenium with Python for web scraping by automating browser interactions. It covers setting up Selenium, locating web elements, handling dynamic content, executing JavaScript, and extracting data from multiple URLs, effectively simulating user behavior to collect web data.
In order to understand the fundamentals of data scraping with Python and what web scraping is in general, it's important to learn how to leverage different frameworks and request libraries. By understanding various HTTP methods (mainly GET and POST), web scraping can become a lot easier.
For instance, Selenium is a well-known and often-used Python library that's primarily a web automation tool. By using it together with other technologies (e.g., Beautiful Soup), you can get a better grasp of web scraping basics.
How does Selenium work? It automates your written script processes, as the script needs to interact with a browser to perform repetitive tasks like clicking, scrolling, etc. As described on Selenium's official web page, it's “primarily for automating web applications for testing purposes, but is certainly not limited to just that.” Hence, by using Selenium's ability to control a browser, navigate a DOM, and utilize Developer Tools, you can also scrape data by building a Python web scraper.
In this guide on how to perform Selenium web scraping, we'll be using Python 3.x. as our main input language (as it's not only the most common web scraping language but the one we closely work with as well).
For your convenience, we also prepared this tutorial in a video format:

Selenium web scraping setup
Firstly, to download the Selenium WebDriver package, execute this pip command in your terminal:
pip install selenium Before moving on, make sure you have a preferred web browser installed on your device, as it’s one of the essential components of Selenium. In this article, we’ll use the Chrome browser. Selenium will automatically install the corresponding browser driver, which will enable Python to control the browser on OS-level interactions.
A common error can happen during installation where a browser driver, such as a Chrome driver, can’t be found. In this scenario, you can download the drivers for Chrome, Firefox, Edge, and other web browsers from here. Once completed, copy the PATH of the folder where you’ve installed the driver and paste it into a PATH variable in Python:
service = webdriver.ChromeService(executable_path='/path/to/driver')
driver = webdriver.Chrome(service=service)
1. Launch a browser instance
Let's begin the automatization process by starting up your browser:
Open up a new browser window (in this instance, Chrome)
Load the web page of your choice (our provided URL)
import time
from selenium import webdriver
driver = webdriver.Chrome()
driver.get("http://oxylabs.io/")
time.sleep(5)
driver.quit()
This will launch it in the headful mode. In order to run your browser in headless mode and run it on a server, the code can be written like this:
from selenium import webdriver
from selenium.webdriver import ChromeOptions

options = ChromeOptions()
options.add_argument("--headless=new")

driver = webdriver.Chrome(options=options)
driver.get("https://www.oxylabs.io/")
print(driver.page_source)
driver.quit()
While Selenium simulates real user behavior to trigger fewer CAPTCHAs during web browsing, this approach alone is often not enough. A more robust solution involves using a proxy server to change the IP address with each request, effectively reducing the likelihood of encountering CAPTCHAs. See this Selenium proxy integration to get started.
2. Locate elements
find_element
Locating elements in web pages can be tricky. Thankfully, Selenium provides two methods that you can use to extract data from one or multiple elements. These are:
find_element
find_elements
As an example, let’s locate the h1 tag on a dummy E-Commerce website, https://sandbox.oxylabs.io/products. Selenium offers various methods to select HTML elements, such as by tag names, class names, XPath expressions, CSS selectors, and others:
from selenium import webdriver
from selenium.webdriver.common.by import By
from selenium.webdriver import ChromeOptions

options = ChromeOptions()
options.add_argument("--headless=new")
driver = webdriver.Chrome(options=options)

driver.get("https://sandbox.oxylabs.io/products")

h1_tag = driver.find_element(By.TAG_NAME, "h1").text
h1_class = driver.find_element(By.CLASS_NAME, "css-1128ess").text
h1_xpath = driver.find_element(By.XPATH, "//h1").text
h1_css = driver.find_element(By.CSS_SELECTOR, "h1").text

print('\n'.join([h1_tag, h1_class, h1_xpath, h1_css]))
driver.quit()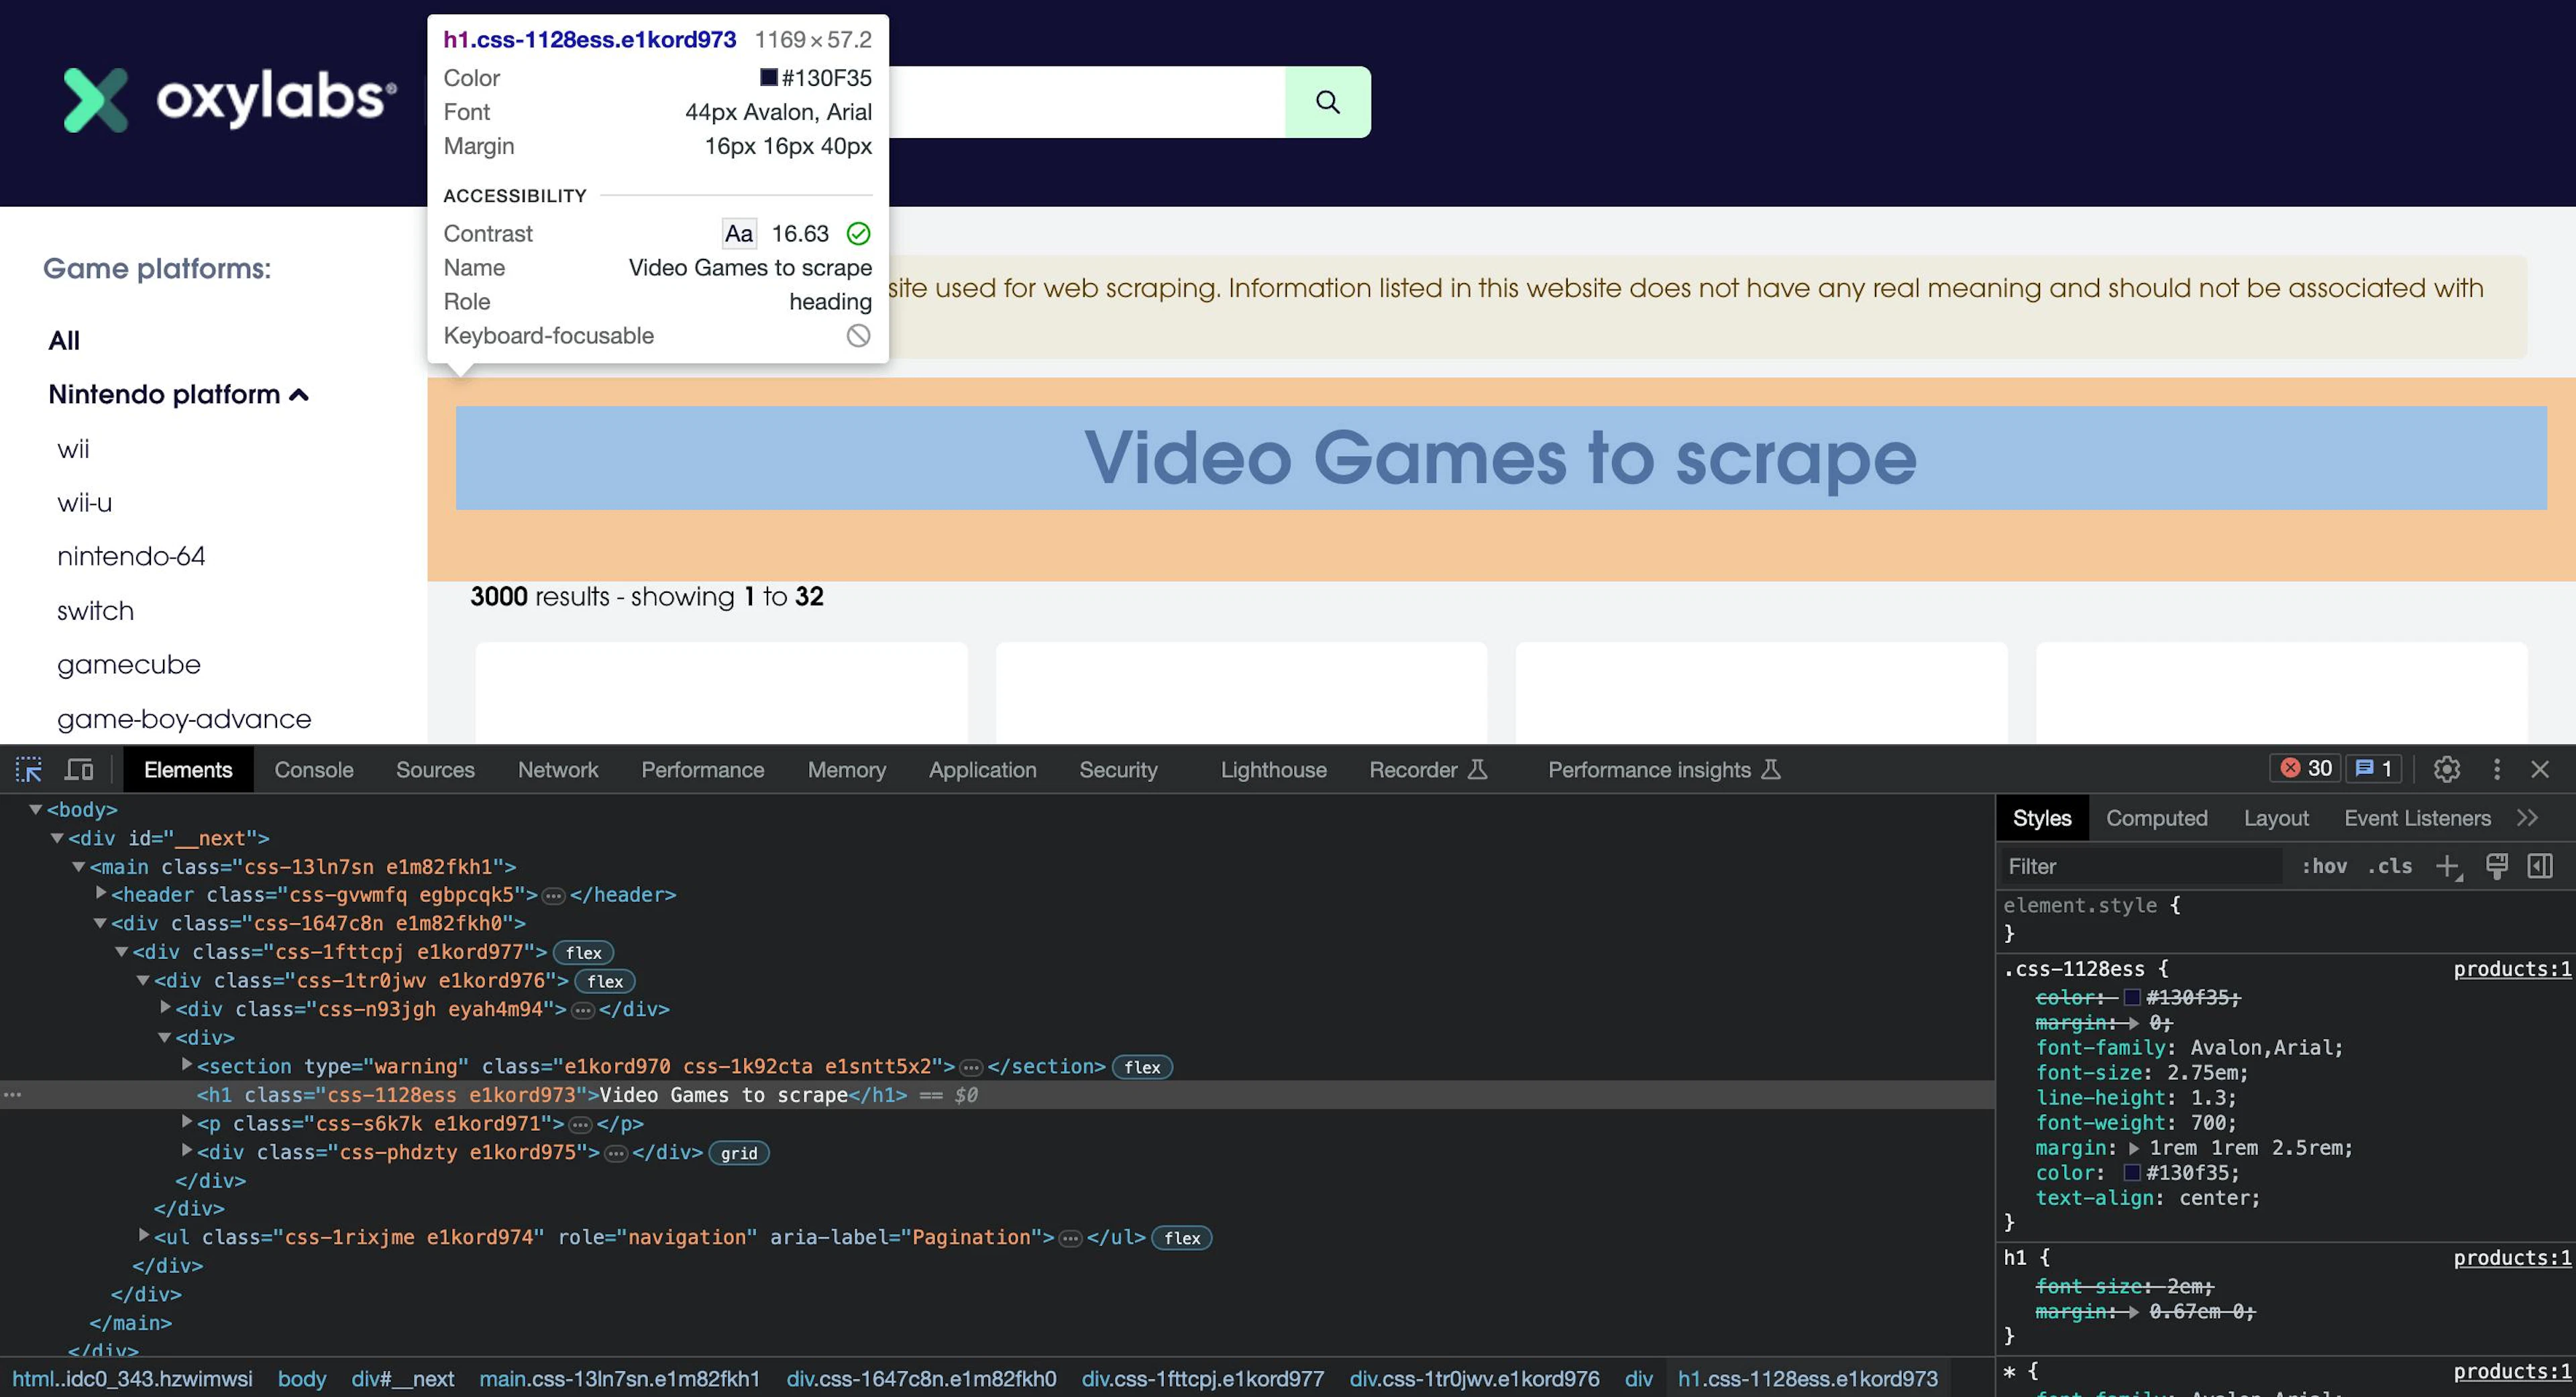
You can also use the find_elements (plural form) to find and return a list of all elements. For example:
all_h4 = driver.find_elements(By.TAG_NAME, "h4")
for h4 in all_h4:
    print(h4.text)
This way, you’ll get all product titles that are under the h4 tag on the web page.
However, some elements aren’t easily accessible with an ID or a simple class. This is why you’ll need XPath.
XPath
XPath is a syntax language that helps find a specific object in DOM. XPath syntax finds the node from the root element either through an absolute path or by using a relative path. e.g.:
/ : Select a node from the root. /html/body/div[1] will find the first div
//: Select a node from the current node no matter where they are. //form[1] will find the first form element
[@attributename='value']: a predicate. It looks for a specific node or a node with a specific value.
Example:
//input[@name='email'] will find the first input element with the name "email".

<html>
 <body>
   <div class = "content-login">
     <form id="loginForm">
         <div>
            <input type="text" name="email" value="Email Address:">
            <input type="password" name="password"value="Password:">
         </div>
        <button type="submit">Submit</button>
     </form>
   </div>
 </body>
</html>
WebElement
WebElement in Selenium represents an element from HTML code. Here are the most commonly used actions:
element.text – access text element in Selenium;
element.click() – click on the element;
element.get_attribute('class') – access a specific attribute;
element.send_keys('mypassword') – send a text to an input.
Slow website render solutions
Some websites use a lot of JavaScript to render dynamic web page content, and they can be tricky to deal with as they use a lot of AJAX calls. There are a few ways to solve this:
time.sleep(ARBITRARY_TIME)
WebDriverWait()
Example:
from selenium import webdriver
from selenium.webdriver.common.by import By
from selenium.webdriver import ChromeOptions
from selenium.webdriver.support.wait import WebDriverWait
from selenium.webdriver.support import expected_conditions as EC

options = ChromeOptions()
options.add_argument("--headless=new")
driver = webdriver.Chrome(options=options)

driver.get("https://sandbox.oxylabs.io/products")

try:
    element = WebDriverWait(driver, 10).until(
        EC.presence_of_element_located((By.TAG_NAME, "h1"))
    )
    print(element.text)
finally:
    driver.quit()
This will instruct the driver to wait 10 seconds for the element to load. To dig deeper into this topic, go ahead and check out the official Selenium documentation or read more on how to wait until element is visible in Selenium or how to wait for page load.
3. Execute Javascript with Selenium
To execute JavaScript, we can use the execute_script method of the WebDriver module. We can pass the JavaScript code as a string argument to the method as shown below:
import time
from selenium import webdriver
driver = webdriver.Chrome()
driver.get("https://sandbox.oxylabs.io/products")
time.sleep(2)
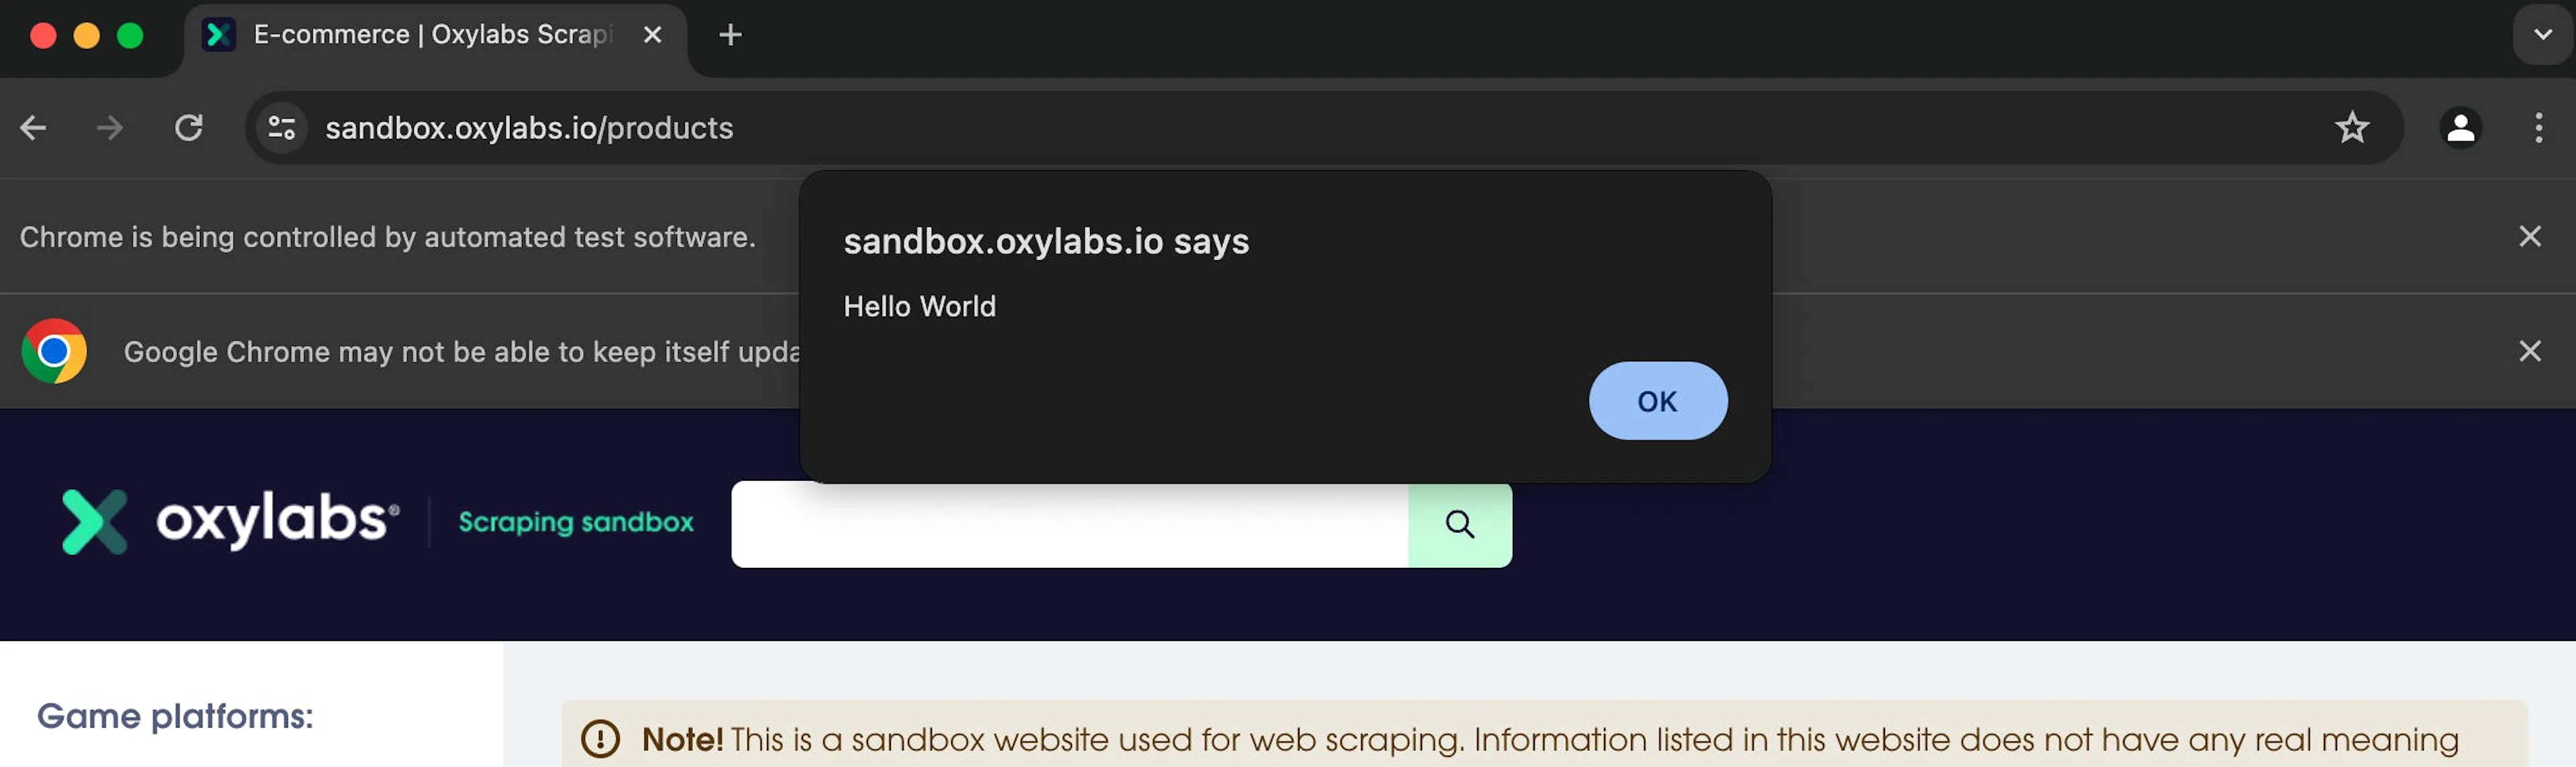
driver.execute_script('alert("Hello World")')
time.sleep(5)
driver.quit()In the above code, we initiate a WebDriver instance of a Chrome browser. Then, we navigate to our desired website. Once the website loads, we then use the execute_script parameter to run a simple JavaScript snippet that shows an alert box with the text “Hello World” on a website. Here’s how it looks:
The execute_script method also accepts additional arguments passed to the JavaScript. So, for example, if we want to click a button using JavaScript to handle pagination, we can do it with the following code snippet:
import time
from selenium import webdriver
from selenium.webdriver.common.by import By

driver = webdriver.Chrome()
driver.get("https://sandbox.oxylabs.io/products")
button = driver.find_element(By.CSS_SELECTOR, '[aria-label="Next page"]')
time.sleep(3)
driver.execute_script("arguments[0].click();", button)
time.sleep(5)
driver.quit()
As you can see, we’re simply grabbing the button element using the tag name and then passing it to execute_script, which uses JavaScript to click the button. Note that we’re using arguments[0] inside the JavaScript to reference the first argument passed to execute_script.
Alternatively, you can achieve the same by using Selenium’s click() command:
button = driver.find_element(By.CSS_SELECTOR, '[aria-label="Next page"]').click()These steps can also help you handle single-page applications with Selenium, where some content isn’t available until you click a specific button.
4. Capture screenshots
Selenium WebDriver also provides an option to capture screenshots of websites. These screenshots can be stored in the local storage for later inspection. For example:
import time
from selenium import webdriver

driver = webdriver.Chrome()
driver.get("https://sandbox.oxylabs.io/products")
time.sleep(2)
driver.save_screenshot("screenshot.png")
driver.close()
The whole process of taking a screenshot of a webpage in Python is pretty straightforward. We use the save_screenshot() method to take a screenshot of the website. We also pass the argument "screenshot.png" to name the image file that'll be saved in the current folder. Selenium will automatically save this image in the PNG format based on the file extension used.
5. Scrape multiple URLs
We can leverage Selenium to scrape multiple URLs with Python. This way, we can use the same WebDriver instance to browse multiple websites or web pages and extract data in one go. Let’s take a look at the following example:
from selenium import webdriver
from selenium.webdriver.common.by import By

driver = webdriver.Chrome()
urls = ["https://sandbox.oxylabs.io/products?page={}".format(i) for i in range(1, 11)]
for url in urls:
    driver.get(url)
    all_h4 = driver.find_elements(By.TAG_NAME, "h4")
    print("\n" + f"\033[0mProduct titles for: \033[33m{url}\033[0m" + "\n")
    for h4 in all_h4:
        print(f"\033[32m{h4.text}")
   # do something else
driver.quit()
We want to browse the first ten pages of the website, so we use Python’s list comprehension to create a list of 10 URLs. After creating the list, we can simply iterate over it and use Selenium to navigate to each URL using Python’s for loop.
While this works well for websites that use pagination in their URLs, you would want to click the “Next page” button when web scraping websites without pagination:
import time
from selenium import webdriver
from selenium.webdriver.common.by import By

driver = webdriver.Chrome()
driver.get("https://sandbox.oxylabs.io/products")

for i in range(1, 11):
    time.sleep(1)
    all_h4 = driver.find_elements(By.TAG_NAME, "h4")
    print("\n" + f"\033[0mProduct titles for page: \033[33m{i}\033[0m" + "\n")
    for h4 in all_h4:
        print(f"\033[32m{h4.text}")

    button = driver.find_element(By.CSS_SELECTOR, '[aria-label="Next page"]').click()
driver.quit()
Store data in a CSV file
One of the easiest ways to save scraped public data is to use a library like pandas, which can programmatically save information in CSV, Excel, JSON, TXT, and other file formats. Open up your terminal and install pandas and pyarrow (a necessary dependancy) with this command:
pip install pandas pyarrowNext, let’s reuse the previous code that scrapes the product titles and adjust it to save the data to a CSV file. Additionally, the code joins all the titles into a single string and separates them with a new line:
import time
from selenium import webdriver
from selenium.webdriver.common.by import By
import pandas as pd

driver = webdriver.Chrome()
driver.get("https://sandbox.oxylabs.io/products")

data = []
for i in range(1, 11):
    time.sleep(1)
    all_h4 = driver.find_elements(By.TAG_NAME, "h4")

    titles = "\n".join([h4.text for h4 in all_h4])
    data.append({"Page": i, "Titles": titles})

    button = driver.find_element(By.CSS_SELECTOR, '[aria-label="Next page"]').click()

df = pd.DataFrame(data)
df.to_csv('data.csv', index=False)

driver.quit()
After running the code, the saved CSV file should look something like this:
When it comes to large scale web scraping for business purposes, the ideal option would be to store the data to a database instead of dealing with separate CSV files.
6. Scroll pages
Selenium enables users to interact with a page as in a browser, which can be done by clicking buttons, inputting text into fields, and scrolling the pages. To scroll down a website using Selenium and Python, we can take advantage of Selenium’s JavaScript support and use the execute_script parameter to execute a JavaScript code that scrolls the page. See the following example:
import time
from selenium import webdriver

driver = webdriver.Chrome()
driver.get("https://sandbox.oxylabs.io/products")

time.sleep(2)
driver.execute_script("window.scrollBy(0, 1000);")
time.sleep(3)
driver.execute_script("window.scrollTo(0, document.body.scrollHeight)")
time.sleep(3)

driver.quit()
The scrollBy method takes two arguments. So, in this example, we’re first instructing Selenium to scroll the page 1000 pixels down and later to scroll to the bottom of the page.
Similarly, you can scroll pages with Selenium by sending keys:
import time
from selenium import webdriver
from selenium.webdriver.common.by import By
from selenium.webdriver import Keys

driver = webdriver.Chrome()
driver.get("https://sandbox.oxylabs.io/products")

time.sleep(2)
driver.find_element(By.TAG_NAME, 'body').send_keys(Keys.END)
time.sleep(3)

driver.quit()
This command will scroll to the bottom of the page. You can also use PAGE_DOWN instead of END to scroll down by one frame.
Alternatively, you can use Seleniums’s Actions API and utilize its Scroll wheel actions, such as scroll_to_element to scroll the page to your desired HTML element:
import time
from selenium import webdriver
from selenium.webdriver.common.by import By
from selenium.webdriver.common.action_chains import ActionChains

driver = webdriver.Chrome()
driver.get("https://sandbox.oxylabs.io/products")

time.sleep(2)
ActionChains(driver)\
    .scroll_to_element(driver.find_element(By.CLASS_NAME, "pagination"))\
    .perform()
time.sleep(3)

driver.quit()
This command scrolls to the bottom of the page where the pagination buttons are located. Remember that you can use CSS and xPath selectors here to scroll to any element.
7. Stop content from loading
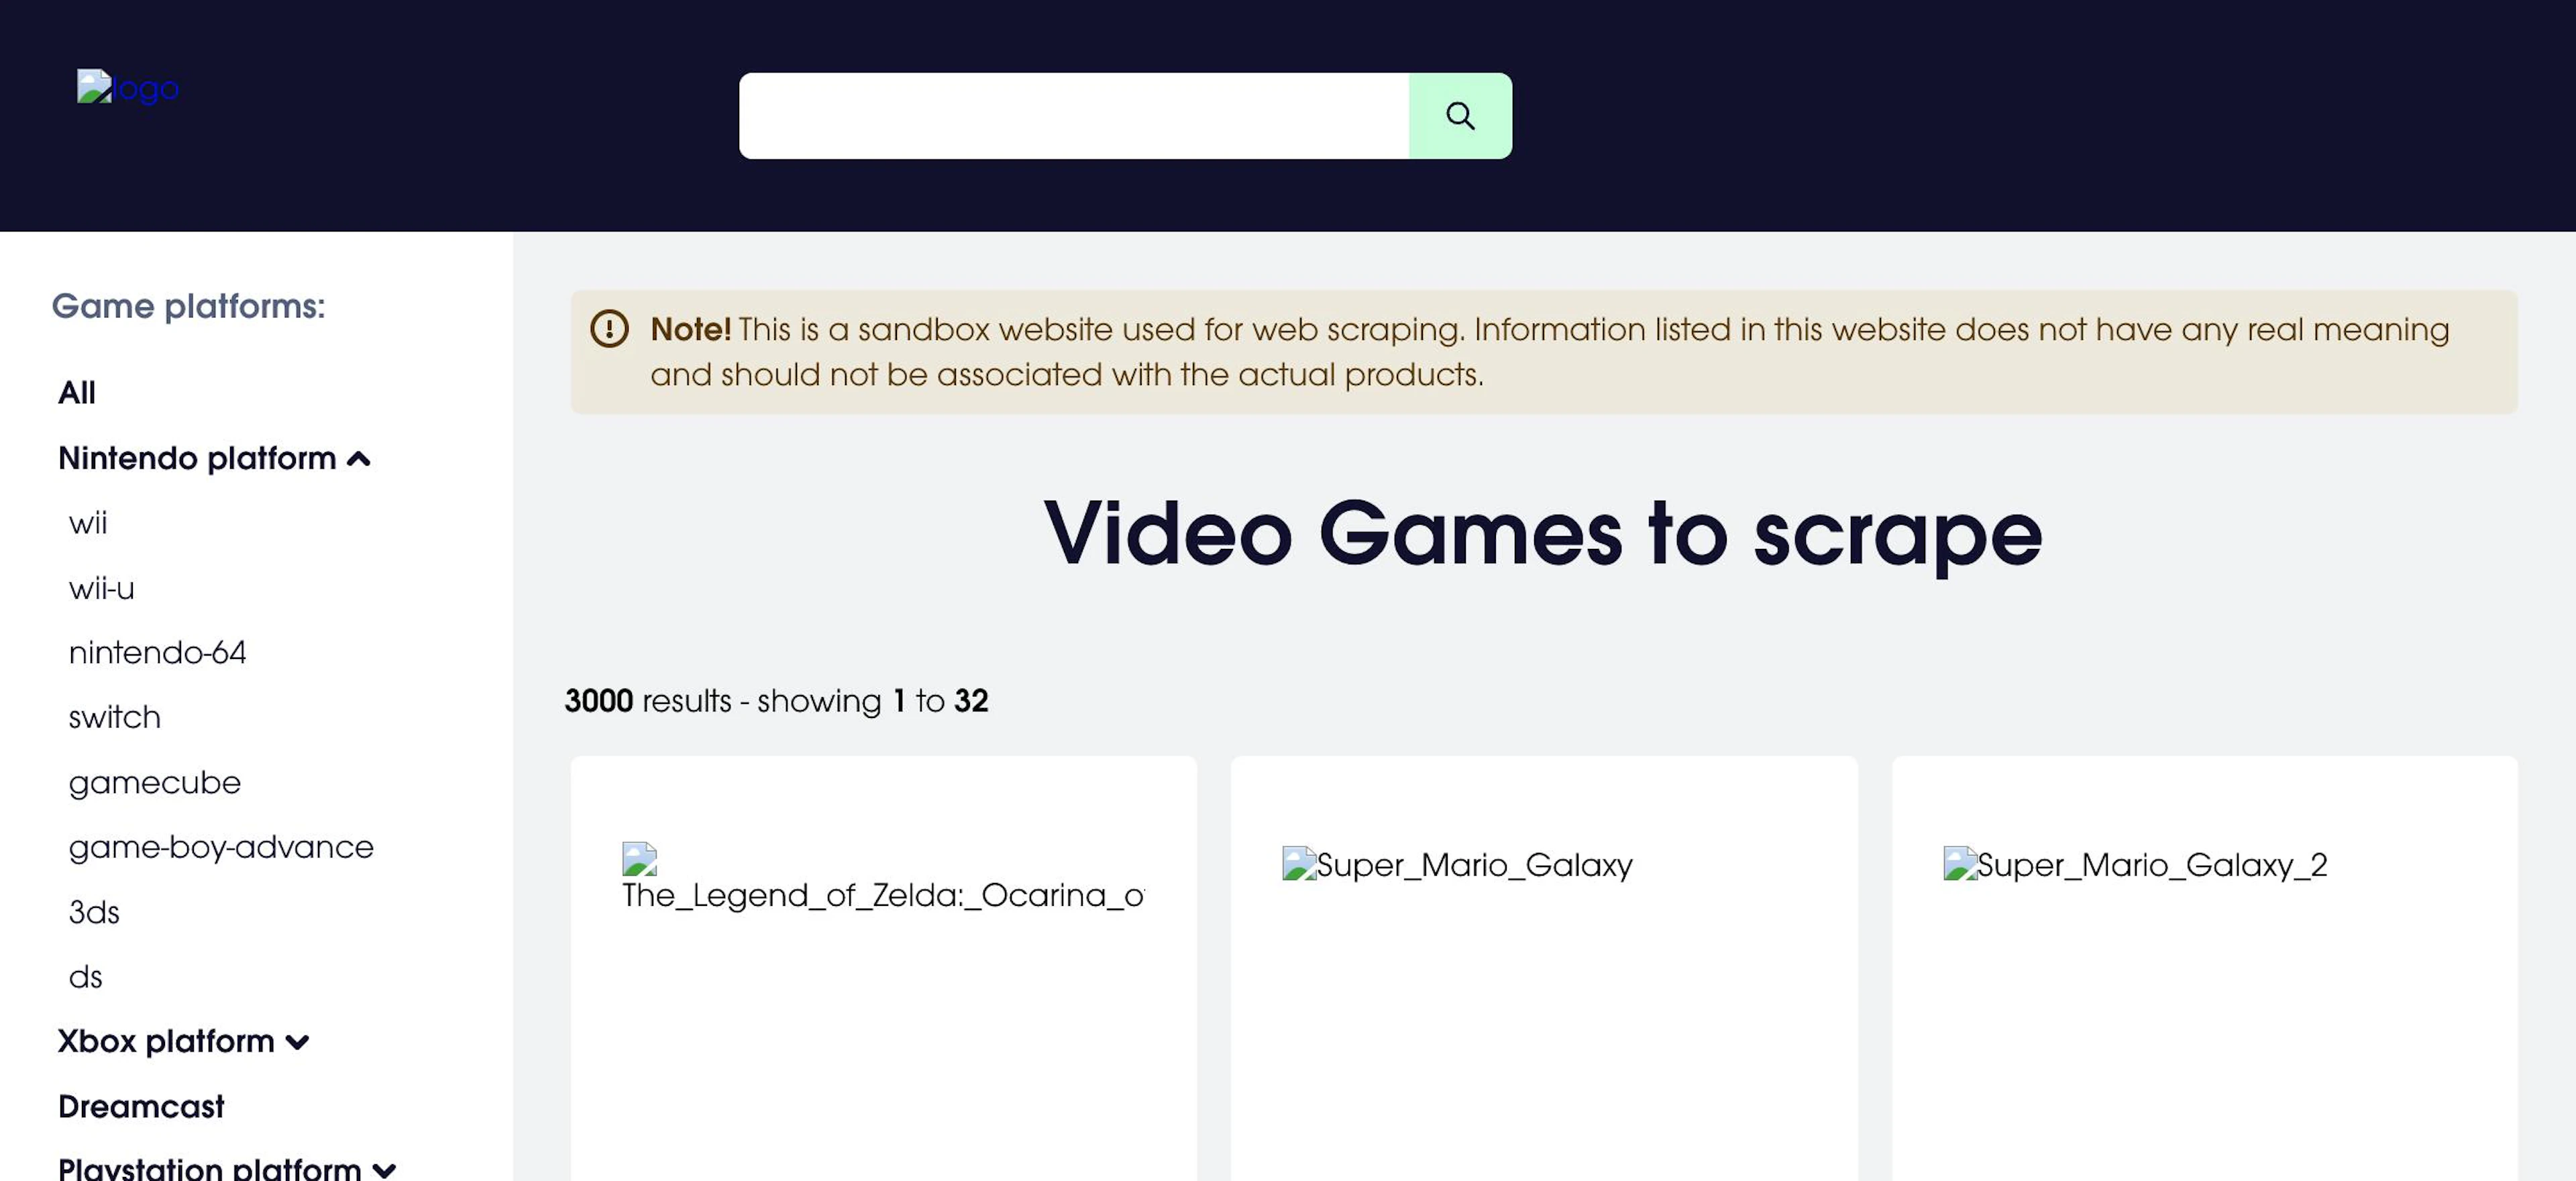
To optimize your Selenium scraper for better performance when scaling web scraping operations, not only you can employ Selenium wait commands, but you also can instruct the browser to stop unnecessary requests that the website sends to fetch content. For example, you can stop images from loading by utilizing the .execute_cdp_cmd() function and executing the Network.setBlockedURLs command:
import time
from selenium import webdriver

driver = webdriver.Chrome()
driver.execute_cdp_cmd('Network.setBlockedURLs', {"urls": ["*.jpg", "*.png", "*.gif", "*.svg"]})
driver.execute_cdp_cmd('Network.enable', {})

driver.get('https://sandbox.oxylabs.io/products')
time.sleep(5)
print(driver.page_source)
driver.quit()
Here’s a screenshot of the page with skipped images:
Selenium vs. Puppeteer
The biggest reason for Selenium's popularity and complexity is that it supports writing tests in multiple programming languages. This includes C#, Groovy, Java, Perl, PHP, Python, Ruby, Scala, and even JavaScript. It supports multiple browsers, including Chrome, Firefox, Edge, Internet Explorer, Opera, and Safari.
However, web scraping with Selenium is perhaps more complex than it needs to be. Remember that Selenium's real purpose is functional testing. For effective functional testing, it mimics what a human would do in a browser. Selenium thus needs three different components:
A driver for each browser
Installation of each browser
The package/library depending on the programming language used
In the case of Puppeteer, though, the node package includes Chromium. It means no browser or driver is needed. It makes it simpler. It also supports Chrome browser if that’s what you need.
On the other hand, multiple browser support is missing. Firefox support is limited. Google announced Puppeteer for Firefox, but it was soon deprecated. As of writing this, Firefox support is experimental. So, to sum up, if you need a lightweight and fast headless browser to perform web scraping, Puppeteer would be the best choice. You can check our Puppeteer tutorial for more information.
Selenium vs. scraping tools
Selenium is great if you want to learn web scraping. We recommend using it together with Beautiful Soup as well as focus on learning HTTP protocols, methods on how the server and the browser exchange data, and how cookies and headers work. Another option is to use Selenium together with Scrapy for larger-scale projects that require dynamic rendering. To learn more, check out this blog post on Scrapy vs. Selenium.
However, Selenium has its limitations, such as slow speed, intensive resource consumption, visibility to bot monitoring systems, and poor scalability. If you're seeking easier methods for scraping data, there are various tools to help you out with this process. Depending on the scale of your scraping project and targets, implementing a web scraping tool will save you a lot of time and resources.
Get a free trial
Claim a free trial to test Oxylabs' Web Scraper API.
Up to 2K results
No credit card is needed
Our Web Scraper API solution also have easy integration, here's for Python:
import requests
from pprint import pprint

# Structure payload.
payload = {
    'source': 'universal',
    'url': 'https://stackoverflow.com/questions/tagged/python',
    'user_agent_type': 'desktop',
}

# Get response.
response = requests.request(
    'POST',
    'https://realtime.oxylabs.io/v1/queries',
    auth=('USERNAME', 'PASSWORD'),
    json=payload,
)

# This will return the JSON response with results.
pprint(response.json())
Claim your free trial of Oxylabs' Web Scraper API by registering a free account on the dashboard.
More integration examples for other languages are available (shell, PHP, cURL) in the documentation, and you can learn how to use cURL with proxy in our blog post.
The main benefits of the Web Scraper API when comparing with Selenium are:
All web scraping processes are automated
No need for extra development
Easily scalable
Returns parsed data for supported targets
Has built-in proxy servers with automatic rotation
Conclusion
Web scraping using Selenium is a great practice, especially when learning the basics. But, depending on your goals, it's sometimes easier to choose an already-built tool that does web scraping for you. Building your own scraper is a long and resource-costly procedure that might not be worth the time and effort.
Learn how to get class names in Python, or deal with infinite scroll and dive deeper with Nodriver web scraping guide. You can also check out our quick start guide for Web Scraper API, or if you have any product-related questions, contact us at hello@oxylabs.io.
Frequently asked questions
What is Selenium?
Selenium is a set of three open-source tools: Selenium IDE, Selenium WebDriver, and Selenium Grid.
Selenium IDE is a browser automation software that allows you to record browser actions and play them back. You can use it for web testing or automation of routine tasks.
Selenium WebDriver also allows you to control and automate actions on a web browser. However, it’s designed to do so programmatically through the OS. In turn, the WebDriver is faster and can remotely control browsers for web testing.
Selenium Grid is a tool that allows web testing and browser automation through Selenium WebDriver to be run on multiple devices simultaneously, on different browser versions, and across various platforms.
What is Selenium used for?
How to use proxies with Selenium?
Is Selenium better than BeautifulSoup?
About the author

Gabija Fatėnaitė
Former Director of Product & Event Marketing
Gabija Fatėnaitė was a Director of Product & Event Marketing at Oxylabs. Having grown up on video games and the internet, she grew to find the tech side of things more and more interesting over the years. So if you ever find yourself wanting to learn more about proxies (or video games), feel free to contact her - she’ll be more than happy to answer you.
All information on Oxylabs Blog is provided on an "as is" basis and for informational purposes only. We make no representation and disclaim all liability with respect to your use of any information contained on Oxylabs Blog or any third-party websites that may be linked therein. Before engaging in scraping activities of any kind you should consult your legal advisors and carefully read the particular website's terms of service or receive a scraping license.
Related articles

Puppeteer vs Selenium: Which to Choose

Yelyzaveta Hayrapetyan
2025-05-27


Web Scraper API for smooth data gathering
Collect data at scale from any target with reliable access and top success rates.

Get the latest news from data gathering world
Scale up your business with Oxylabs®
Proxies
Advanced proxy solutions
Data Collection
Datasets
Resources
Innovation hub
Web Scraper API for smooth data gathering
Collect data at scale from any target with reliable access and top success rates.