175M+ ethically sourced IPs built for the highest reliability.
High-speed, cost-effective proxies built for any scraping workload.
Premium static residential proxies from trusted ASNs for most difficult targets.
Exclusive high-performance proxies for data-intensive tasks.
Dedicated IPs from premium ASNs for demanding scraping.

AI-powered proxy solution for optimized web scraping performance.

20M+ IP addresses from real mobile devices for precise targeting.

Free Chrome proxy manager extension that works with any proxy provider.

Free Android proxy manager app that works with any proxy provider.

Free community-driven tools to improve your web scraping projects.
Web Scraper API
All-in-one web data collection platform for every stage of web scraping.
Fast Search API
Ultra-fast organic search results scraper tailored for AI workflows.
Headless Browser
Advanced browser automation solution for AI agents and scraping.
AI Studio
A suite of AI-powered tools for various scraping projects.
Data for AI
From RAG to autonomous agents, fuel your AI applications with precise, real-time, and multimodal data pipelines at scale.
Instant search results data
Gather top 10 organic search results for AI agents in milliseconds.
Video & audio data
Collect massive volumes of multimodal video and audio data for model training.
Web data from any website
Scrape rich and structured web data for model training or RAG pipelines.
Browser automation
Let AI agents navigate, automate, and extract web data from the toughest targets.
Web index data
Retrieve up-to-date, pre-indexed web content for RAG and agentic workflows in sub-second.


Documentation
All features, parameters, and integration details, backed by code samples in every coding language.
Tutorials, samples, and guides.
Latest fixes and features.


![]() AI Summary:
AI Summary:
This tutorial demonstrates how to build a data scraping pipeline using a commercial web scraper API and PostgreSQL for job tracking. It uses Apache Airflow to orchestrate scraping tasks, enabling scheduled execution, dependency management, and conditional task skipping.
Organizing your workflow when building a Python data scraper is often a challenge.
In this tutorial, we're going to take a look at two industry standard tools that help us make day-to-day scraping easy. First off, we’ll demonstrate how to use our E-Commerce Scraper API (now part of Web Scraper API) for scraping data from e-commerce marketplaces. In the second part of the tutorial, we’ll go through the steps of setting up recurring jobs using the Apache Airflow tool.
Overview of data
For this tutorial, we’re going to acquire data from Oxylabs Scraping Sandbox – a mock e-commerce website built specifically for refining your scraping skills. More specifically, we’re going to focus on the HTML of the product page, as it contains the most valuable info: product name, description and price.

Using the scraping API
Oxylabs has a wide variety of tools depending on your project and scraping goals; for today’s tutorial, we’re specifically going to be using Web Scraper API for scraping e-commerce marketplaces.
We would be using the Custom Parser feature to get the specific data we need.
Also, we recommend using the Push-Pull approach – it’s known as the most reliable data delivery method out there.
To use this approach effectively, you have to:
Submit a URL of a website you want to scrape
Check whether the URL has been scraped
Fetch the content
Let's start by building a class that will serve as a wrapper for the API.
**src/oxylabs.py:**
```python

import requests


JOB_STATUS_DONE = "done"

HTTP_NO_CONTENT = 204

class Client:
    def __init__(self, username, password):
        self.username = username
        self.password = password

    def create_jobs(self, urls):
        payload = {
            "source": "universal",
            "url": urls,
            "parse": True,
            "parsing_instructions": {
                "title": {
                    "_fns": [
                        {"_fn": "css_one", "_args": ["h2"]},
                        {"_fn": "element_text"},
                    ]
                },
                "price": {
                    "_fns": [
                        {"_fn": "css_one", "_args": [".price"]},
                        {"_fn": "element_text"},
                    ]
                },
                "availability": {
                    "_fns": [
                        {"_fn": "css_one", "_args": [".availability"]},
                        {"_fn": "element_text"},
                    ]
                },
            },
        }

        response = requests.request(
            "POST",
            "https://data.oxylabs.io/v1/queries/batch",
            auth=(self.username, self.password),
            json=payload,
        )

        return response.json()

    def is_status_done(self, job_id):
        job_status_response = requests.request(
            method="GET",
            url="http://data.oxylabs.io/v1/queries/%s" % job_id,
            auth=(self.username, self.password),
        )

        job_status_data = job_status_response.json()

        return job_status_data["status"] == JOB_STATUS_DONE

    def fetch_content_list(self, job_id):
        job_result_response = requests.request(
            method="GET",
            url="http://data.oxylabs.io/v1/queries/%s/results" % job_id,
            auth=(self.username, self.password),
        )
        if job_result_response.status_code == HTTP_NO_CONTENT:
            return None

        job_results_json = job_result_response.json()

        return job_results_json["results"]
The client provides 3 methods:
create_jobs uses the batch query to submit URLs for scraping.
is_status_done checks the status of the previously submitted URL.
fetch_content_list retrieves the content of the URL that has been scraped.
Keep in mind that once we push the URL to the API, we’ll receive a job ID for fetching the content later. Hence, the job ID needs to be stored somewhere – we'll use PostgreSQL for it.
Let's design a simple table that will represent queued jobs:
sql
create sequence queue_seq;

create table queue (
  id int check (id > 0) primary key default nextval ('queue_seq'),
  created_at timestamp(0) not null DEFAULT CURRENT_TIMESTAMP,
  updated_at timestamp(0) not null DEFAULT CURRENT_TIMESTAMP,
  status varchar(255) not null DEFAULT 'pending',
  job_id varchar(255)
)
Our new table contains the following fields:
id: a numerical value that uniquely identifies the record.
created_at: a timestamp that shows when the record was created.
updated_at: a timestamp that shows when the record was last updated.
job_id: Oxylabs E-Commerce API job identifier.
status: a value that describes what the current state of the job is.
pending status means that the job is still processing.
completed means that the job is already done.
deleted means that we took too long to fetch the data, and the job has been deleted in Oxylabs API.
Now let's create a Queue class for interacting with the database:
**src/messenger.py:**
```python
import atexit
import psycopg2.extras


STATUS_PENDING = 'pending'
STATUS_COMPLETE = 'complete'
STATUS_DELETED = 'deleted'

class Queue:
    def __init__(self, connection):
        self.connection = connection

        atexit.register(self.cleanup)

    def setup(self):
        cursor = self.connection.cursor()

        cursor.execute('''
            select table_name
              from information_schema.tables
            where table_schema='public'
              and table_type='BASE TABLE'
        ''')
        for cursor_result in cursor:
            if cursor_result[0] == 'queue':
                print('Table already exists')
                return False

        cursor.execute('''
            create sequence queue_seq;

            create table queue (
              id int check (id > 0) primary key default nextval ('queue_seq'),
              created_at timestamp(0) not null DEFAULT CURRENT_TIMESTAMP,
              updated_at timestamp(0) not null DEFAULT CURRENT_TIMESTAMP,
              status varchar(255) not null DEFAULT 'pending',
              job_id varchar(255)
            )
        ''')

        return True

    def push(self, job_id):
        self.__execute_and_commit(
            'insert into queue (job_id) values (%s)',
            [job_id]
        )

    def pull(self):
        cursor = self.connection.cursor(cursor_factory=psycopg2.extras.RealDictCursor)

        cursor.execute('start transaction')
        cursor.execute(
            '''
            select * from queue where status = %s and
            updated_at < now() - interval '10 second'
            order by random()
            limit 1
            for update
            ''',
            [STATUS_PENDING]
        )
        return cursor.fetchone()

    def delete(self, job_id):
        self.__change_status(job_id, STATUS_DELETED)

    def complete(self, job_id):
        self.__change_status(job_id, STATUS_COMPLETE)

    def touch(self, job_id):
        self.__execute_and_commit(
            'update queue set updated_at = now() where job_id = %s',
            [job_id]
        )

    def __change_status(self, job_id, status):
        self.__execute_and_commit(
            'update queue set status = %s where job_id = %s',
            [status, job_id]
        )

    def __execute_and_commit(self, sql, val):
        cursor = self.connection.cursor()
        cursor.execute(sql, val)

        self.connection.commit()

    def cleanup(self):
        self.connection.commit()
The most important methods of the Queue class are as follows:
setup: asks the database whether the table queue already exists. If it doesn't, it creates the queue table.
push: pushes the job to the database. The job id is retrieved from the Oxylabs Batch Query Endpoint.
pull: fetches a single job that is ready to be checked for content.
Let's focus on the pull part:
sql
select * from queue where status = 'pending' and
updated_at < now() - interval '10 second'
order by random()
limit 1
for update
We fetch records that haven't been updated in the last 10 seconds so as not to spam the API with irrelevant requests.
The order by random() clause ensures no single record blocks our queue.
for update locks the row and prevents other processes from picking it up in case parallelism is needed in the future.
Since we use transactions to lock the row, we also register a commit method in atexit.register to perform a commit at the end of the script at all times.
python
    def __init__(self, connection):
        self.connection = connection

        atexit.register(self.cleanup)

    # ...

    def cleanup(self):
        self.connection.commit()
Now that we have `Queue` and `Client` classes, we’re likely to use them in nearly all of our scripts. In addition, we need certain configuration options.
For that purpose, let's create the following bootstrap file:
**src/bootstrap.py:**
python
import os
import psycopg2
from messenger import Queue
from oxylabs import Client


DB_HOST = os.getenv('DB_HOST', 'postgres')
DB_USER = os.getenv('DB_USER', 'airflow')
DB_PASS = os.getenv('DB_PASS', 'airflow')
DB_NAME = os.getenv('DB_NAME', 'scraper')
OXYLABS_USERNAME = os.getenv('OXYLABS_USERNAME', 'your-oxylabs-username')
OXYLABS_PASSWORD = os.getenv('OXYLABS_PASSWORD', 'your-oxylabs-password')


connection = psycopg2.connect(
    host=DB_HOST,
    user=DB_USER,
    password=DB_PASS,
    database=DB_NAME
)

queue = Queue(
    connection
)

client = Client(
    OXYLABS_USERNAME,
    OXYLABS_PASSWORD,
)
Here, we fetch the Oxylabs API and PostgreSQL configuration variables from the environment – it’s a standard industry practice encouraged by the twelve-factor app principles. Additionally, we create the Queue and Client classes, and their dependencies.
Now that we have all the main classes initialized, let's create a script that makes the schema for our queue.
**src/setup.py:**
python
from bootstrap import queue

success = queue.setup()
if not success:
    exit(1)
The exit(1) on failure is extremely important, as it signifies that the process has not completed successfully. Once the schema is created, we can **push** a collection of jobs in the Oxylabs Batch Query endpoint.
**src/pusher.py:**
```python
from bootstrap import queue, client


jobs = client.create_jobs([
        "https://sandbox.oxylabs.io/products/1",
        "https://sandbox.oxylabs.io/products/2",
        "https://sandbox.oxylabs.io/products/3",
        "https://sandbox.oxylabs.io/products/4",
        "https://sandbox.oxylabs.io/products/5",
])


for job in jobs['queries']:
    queue.push(job['id'])
    print('job id: %s' % job['id'])
The script creates a bunch of jobs using the Oxylabs Client we created earlier. It then goes through each and every result and pushes it into the database using the Queue service.

The submitted jobs will soon be processed. In the meantime, we can use the job ID in our database to fetch the content – let’s create a file that will do exactly that.
**src/puller.py:**
python
from pprint import pprint
from bootstrap import queue, client


queue_item = queue.pull()
if not queue_item:
    print('No jobs left in the queue, exiting')
    exit(0)

if not client.is_status_done(queue_item['job_id']):
    queue.touch(queue_item['job_id'])
    print('Job is not yet finished, skipping')
    exit(0)

content_list = client.fetch_content_list(queue_item['job_id'])
if content_list is None:
    print('Job no longer exists in oxy')
    queue.delete(queue_item['job_id'])
    exit(0)

queue.complete(queue_item['job_id'])

for content in content_list:
    pprint(content)
We first use queue.pull() to fetch a single pending job and exit if none is found.
python
queue_item = queue.pull()
if not queue_item:
    print('No jobs left in the queue, exiting')
    exit(0)
Then, we check the status. If the status says the URL is not yet scraped, we use the touch method to renew the updated_at field in the database. That way, the record will not be checked for at least 10 more seconds (to prevent spamming the API).
python
if not client.is_status_done(queue_item['job_id']):
    queue.touch(queue_item['job_id'])
    print('Job is not yet finished, skipping')
    exit(0)
Once the status is done, we try to fetch the content. If no content is returned, it means we fetched an old record that has already been deleted.
python
content_list = client.fetch_content_list(queue_item['job_id'])
if content_list is None:
    print('Job no longer exists in oxy')
    queue.delete(queue_item['job_id'])
    exit(0)
And finally, we go through the content and print it.
python
queue.complete(queue_item['job_id'])

for content in content_list:
    pprint(content)
Note: in a real production application, you would likely save the content to files or a database, but this part is beyond the scope of this tutorial.
Here's what we have so far:
text
|-- src
|   |-- bootstrap.py
|   |-- messenger.py
|   |-- oxylabs.py
|   |-- puller.py
|   |-- pusher.py
|   |-- setup.py
Now that we're done with the coding part, it's time to run the scripts using Apache Airflow!
Setting up Apache Airflow
Apache Airflow is a platform created by the community to programmatically author, schedule, and monitor workflows. Let’s set it up following their official tutorial and using the official Docker Compose file.
Before you run docker-compose up, you need to expose the files we created. To do that, change the docker-compose.yaml file to include the src folder as a volume.
Here’s how it looks before:
yaml
volumes:
    - ./dags:/opt/airflow/dags
    - ./logs:/opt/airflow/logs
    - ./plugins:/opt/airflow/plugins
And after:
yaml
volumes:
    - ./src:/opt/airflow/src
    - ./dags:/opt/airflow/dags
    - ./logs:/opt/airflow/logs
    - ./plugins:/opt/airflow/plugins
Once you set it up, a bunch of Airflow specific files and folders are created.
text
|-- dags
|-- docker-compose.yaml
|-- .env
|-- logs
|-- plugins
|-- src
|   |-- bootstrap.py
|   |-- messenger.py
|   |-- oxylabs.py
|   |-- puller.py
|   |-- pusher.py
|   |-- setup.py
Now visit http://localhost:8080 and use the default credentials (`airflow:airflow`) to access the Airflow UI.

Airflow uses a concept called DAG (Directed Acyclic Graph), which is a collection of all the tasks you want to run, organized in a way that reflects their relationships and dependencies.

A DAG is defined in a Python script, which represents the DAGs structure (tasks and their dependencies) as code.
To create a DAG file, we have to create a python script in the dags folder of the airflow project.
Let's call it scrape.py.
Here's what the final file structure looks like:
text
|-- dags
|   |-- scrape.py
|-- docker-compose.yaml
|-- .env
|-- logs
|-- plugins
|-- src
|   |-- bootstrap.py
|   |-- messenger.py
|   |-- oxylabs.py
|   |-- puller.py
|   |-- pusher.py
|   |-- setup.py
Creating a DAG
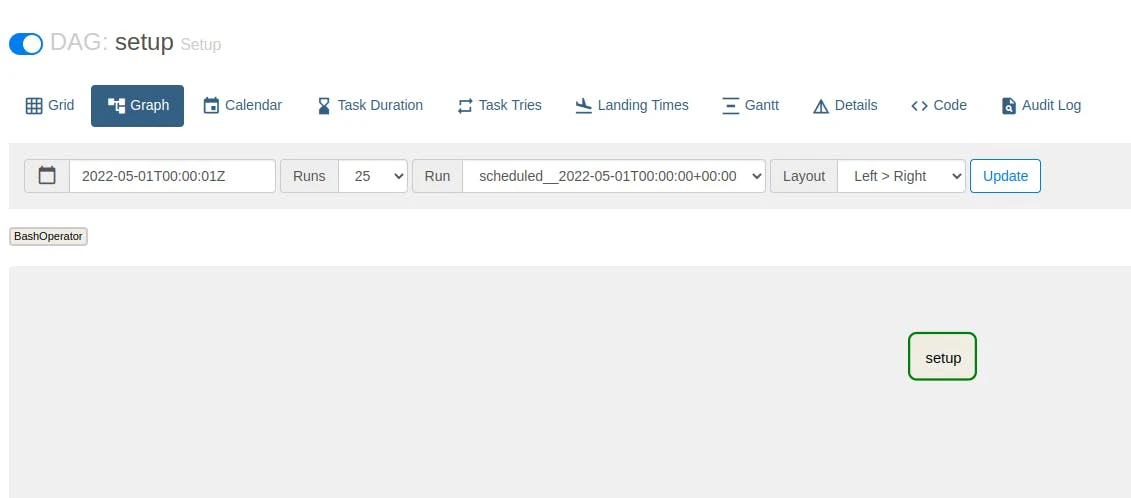
Let's create a simple DAG that sets up the table by calling the `setup.py` script we created earlier.
**dags/setup.py:**
```python

from datetime import timedelta
import pendulum
from airflow import DAG
from airflow.operators.bash import BashOperator


default_args = {
    'owner': 'airflow',
    'depends_on_past': False,
    'retries': 2,
    'retry_delay': timedelta(hours=3),
}
with DAG(
        'setup',
        default_args=default_args,
        schedule_interval='@once',
        description='Setup',
        start_date=pendulum.datetime(2022, 5, 1, tz='UTC'),
        dagrun_timeout=timedelta(minutes=1),
        tags=['scrape', 'database'],
        catchup=False
) as dag:
    setup_task = BashOperator(
        task_id='setup',
        bash_command='python /opt/airflow/src/setup.py',
    )
Every DAG has a bunch of arguments that allow you to configure execution.
python
default_args = {
    'owner': 'airflow',
    'depends_on_past': False,
    'retries': 2,
    'retry_delay': timedelta(hours=3),
}
The owner property describes the system user that owns this DAG.
retries determines how many additional attempts to run this script will be made if it fails.
retry_delay tells us how often to retry (related to the previous parameter).
depends_on_past is extremely important for multi-stage workflows – it determines whether the previous task needs to be successful to run our setup script.
Next come the DAG parameters:
yaml
with DAG(
        'setup',
        default_args=default_args,
        schedule_interval='@once',
        description='Setup',
        start_date=pendulum.datetime(2022, 5, 1, tz='UTC'),
        dagrun_timeout=timedelta(minutes=1),
        tags=['scrape', 'database'],
        catchup=False
) as dag:
Here are the most important parameters:
The first parameter (setup) always signifies the name of the DAG, which you will see in the Airflow UI.
schedule_intervalmuses cron-like format to determine how often to run the task.
start_date describes when the task has to be started.
catchup determines whether Airflow needs to catch up to the current date by running the scripts for earlier dates
Next comes the most important part: every DAG defines what tasks need to be done.
python
    setup_task = BashOperator(
        task_id='setup',
        bash_command='python /opt/airflow/src/setup.py',
    )
Tasks are defined using Operators, which allow you to describe what needs to be done. For us, the easiest way is to simply run the `setup.py` file using a bash command.
Our file is automatically registered and displayed in the Airflow UI.
Defining multiple tasks
We previously defined a DAG with a single task. While that is a great achievement, the main power of Airflow comes from managing multiple tasks. Let's leverage that by creating a push-pull workflow:
**dags/push-pull.py:**
```python

from datetime import timedelta
import pendulum
from airflow import DAG
from airflow.operators.bash import BashOperator


default_args = {
    'owner': 'airflow',
    'depends_on_past': True,
    'retries': 2,
    'retry_delay': timedelta(hours=3),
}
with DAG(
        'push_pull',
        default_args=default_args,
        schedule_interval='@daily',
        description='Push-Pull workflow',
        start_date=pendulum.datetime(2022, 5, 1, tz='UTC'),
        dagrun_timeout=timedelta(minutes=1),
        tags=['scrape', 'database'],
        catchup=False
) as dag:
    task_push = BashOperator(
        task_id='push',
        bash_command='python /opt/airflow/src/pusher.py',
    )

    task_pull = BashOperator(
        task_id='pull',
        bash_command='python /opt/airflow/src/puller.py'
    )

    task_push.set_downstream(task_pull)
Most of the code remains the same. There is a major difference though: we now have two tasks: task_pull and task_push. Once we create them, we use the set_downstream to tell Airflow that task_pull needs to be executed after task_push.

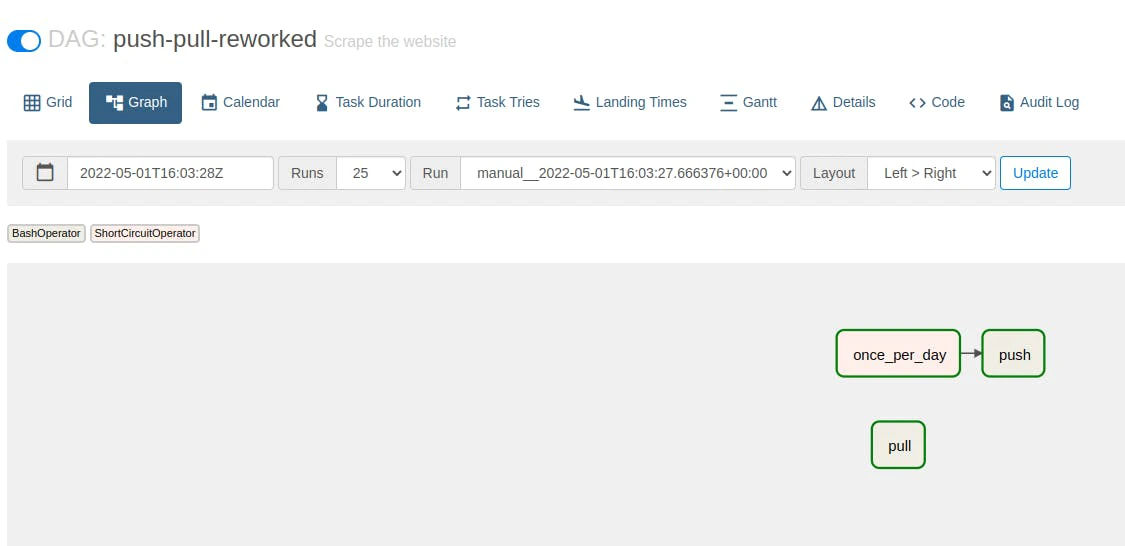
Using ShortCircuitOperator
Our previous DAG has a glaring issue: we want to execute push once as it uses the batch endpoint. The pull task, however, needs to run multiple times. Unfortunately, tasks in the same dag cannot use different intervals.
python
    task_push = BashOperator(
        task_id='push',
        bash_command='python /opt/airflow/src/pusher.py',
        schedule_interval='daily',  # not allowed!
    )

    task_pull = BashOperator(
        task_id='pull',
        bash_command='python /opt/airflow/src/puller.py',
        schedule_interval='@hourly', # not allowed!
    )
While it is indeed possible to solve that by creating multiple DAGs, it ruins many advantages Airflow provides in managing the dependencies of the tasks. Let’s take a look at how this can be fixed.
Enter ShortCircuitOperator. This powerful operator can skip tasks if conditions are not met.
python
from datetime import timedelta

import pendulum
from airflow import DAG
from airflow.operators.bash import BashOperator
from airflow.operators.python import ShortCircuitOperator

default_args = {
    'owner': 'airflow',
    'depends_on_past': True,
    'retries': 2,
    'retry_delay': timedelta(hours=3),
}
with DAG(
        'push-pull-reworked',
        default_args=default_args,
        schedule_interval='* * * * *',
        description='Scrape the website',
        start_date=pendulum.datetime(2022, 5, 1, tz='UTC'),
        dagrun_timeout=timedelta(minutes=1),
        tags=['scrape', 'oxylabs', 'push', 'pull'],
        catchup=False
) as dag:
    def is_midnight(logical_date):
        return logical_date.hour == 0 and logical_date.minute == 0

    trigger_once_per_day = ShortCircuitOperator(
        task_id='once_per_day',
        python_callable=is_midnight,
        provide_context=True,
        dag=dag
    )

    task_push = BashOperator(
        task_id='push',
        bash_command='python /opt/airflow/src/pusher.py',
    )
    trigger_once_per_day.set_downstream(task_push)

    task_pull = BashOperator(
        task_id='pull',
        bash_command='python /opt/airflow/src/puller.py'
    )
Even though the schedule interval is set to * * * * *, which means execute every minute, but we add an additional once_per_day task, that prevents the push task from running unless the current hour is '0'.
The main player here is the is_midnight function, that checks whether the current time is 00:00 (the only time when the push command is allowed to run!)
Combining all tasks
You might be curious whether combining all our tasks into a single workflow is possible. Luckily, it is – let’s look at how it’s done.
Again, by using `ShortCircuitOperator` we’re able to circumvent the task limitations.
**dags/scrape.py:**
```python
from datetime import timedelta

import pendulum
from airflow import DAG
from airflow.operators.bash import BashOperator
from airflow.operators.python import ShortCircuitOperator

default_args = {
    'owner': 'airflow',
    'depends_on_past': True,
    'retries': 2,
    'retry_delay': timedelta(hours=3),
}
with DAG(
        'scrape',
        default_args=default_args,
        schedule_interval='* * * * *',
        description='Scrape the website',
        start_date=pendulum.datetime(2022, 5, 1, tz='UTC'),
        dagrun_timeout=timedelta(minutes=1),
        tags=['scrape', 'oxylabs', 'push', 'pull'],
        catchup=False
) as dag:
    trigger_always = ShortCircuitOperator(
        task_id='always',
        python_callable=lambda prev_start_date_success: prev_start_date_success is not None,
        provide_context=True,
        dag=dag
    )

    trigger_once = ShortCircuitOperator(
        task_id='once',
        python_callable=lambda prev_start_date_success: prev_start_date_success is None,
        provide_context=True,
        dag=dag
    )

    setup_task = BashOperator(
        task_id='setup',
        bash_command='python /opt/airflow/src/setup.py',
    )

    trigger_once.set_downstream(setup_task)
def is_midnight(logical_date):
        return logical_date.hour == 0 and logical_date.minute == 0

    trigger_once_per_day = ShortCircuitOperator(
        task_id='once_per_day',
        python_callable=is_midnight,
        provide_context=True,
        dag=dag
    )

    task_push = BashOperator(
        task_id='push',
        bash_command='python /opt/airflow/src/pusher.py',
    )
    trigger_once_per_day.set_downstream(task_push)

    task_pull = BashOperator(
        task_id='pull',
        bash_command='python /opt/airflow/src/puller.py'
    )

    trigger_always.set_downstream(task_pull)
    trigger_always.set_downstream(trigger_once_per_day)
Here we add three helper tasks:
always - executed everytime
once - executed one time
once_per_day - executed daily
The implementation of the new tasks depends on a special variable called prev_start_date_success. It contains the start date from the previous run (if available). It allows us to determine whether any previous runs exist.
Here's how our final workflow looks like:

Summary
Scraping data back in the day was cumbersome and stressful. However, with the advent of powerful industry standard tools such as our Web Scraper API and Apache Airflow, scraping is becoming increasingly easy.
Here's a visual representation of what the entire process looks like from the beginning to an end:

About the author

Vytenis Kaubrė
Technical Content Researcher
Vytenis Kaubrė was a Technical Content Researcher at Oxylabs. Creative writing and a growing interest in technology fueled his work, where he researched and crafted technical content while honing his skills in Python. Off duty, he could often be found working on personal projects, learning about cybersecurity, or relaxing with a book.
All information on Oxylabs Blog is provided on an "as is" basis and for informational purposes only. We make no representation and disclaim all liability with respect to your use of any information contained on Oxylabs Blog or any third-party websites that may be linked therein. Before engaging in scraping activities of any kind you should consult your legal advisors and carefully read the particular website's terms of service or receive a scraping license.
Related articles

Cheerio vs. Puppeteer: Which Should You Use for Web Scraping?

Shinthiya Nowsain Promi
2026-06-23


List Crawling in Python: Tools, Tips, and Techniques

Danielė Virinaitė
2026-06-17
Web Scraper API for successful scraping
Extract valuable data points from e-commerce marketplaces, search engines, and other websites at scale and without IP blocks.

Get the latest news from data gathering world
Scale up your business with Oxylabs®
Proxies
Advanced proxy solutions
Data Collection
Datasets
Resources
Innovation hub
Web Scraper API for successful scraping
Extract valuable data points from e-commerce marketplaces, search engines, and other websites at scale and without IP blocks.