
Web Scraping With n8n and Web API
n8n is a workflow automation platform that pairs a visual builder with code-level control, letting you compose multi-step workflows and AI agents on self-hosted or cloud setups.
In this guide, you’ll find three ways to scrape websites in n8n using Oxylabs Web API: via direct API calls, via agents with MCP server access, or via the n8n Assistant. Plus a troubleshooting guide for common errors.

Project requirements
n8n running on cloud or self-hosted (setup guides) (this guide uses v2.44.6)
Oxylabs Web API key – get a free API key here
If you’re new to Oxylabs, follow our Web API guide for a quick start.
Try Oxylabs Web API
$5 welcome credit
No credit card needed
Add Web API credentials in n8n
Before you start, save your Web API key in n8n as a Bearer Auth credential. All three integration methods shown in this guide will reuse it.
1. Go to Overview → Credentials → Create credential.
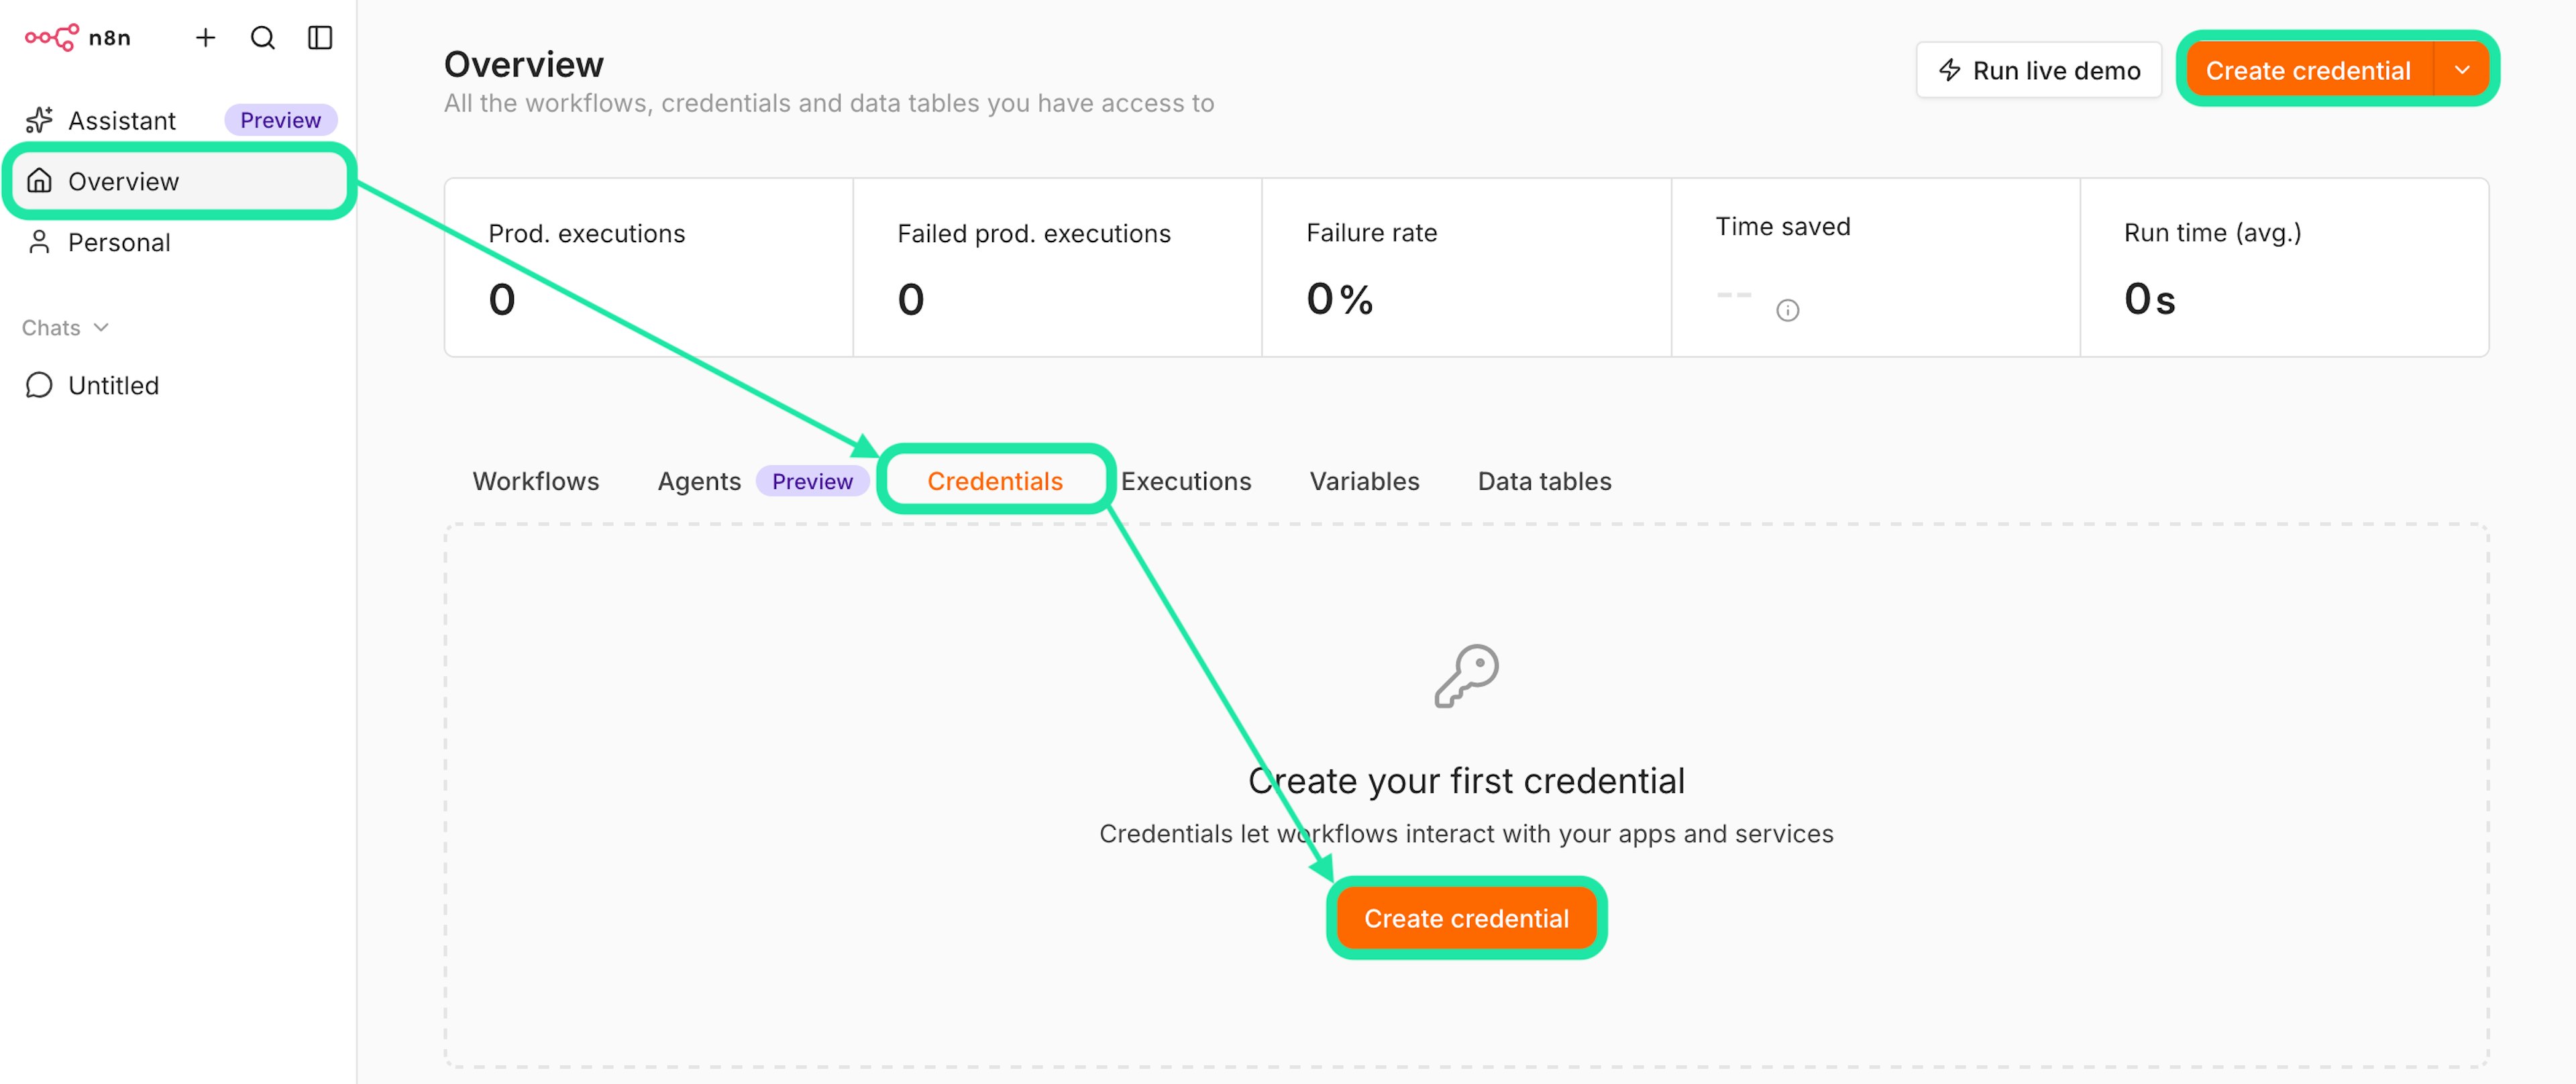
2. Search for Bearer Auth and click Continue.
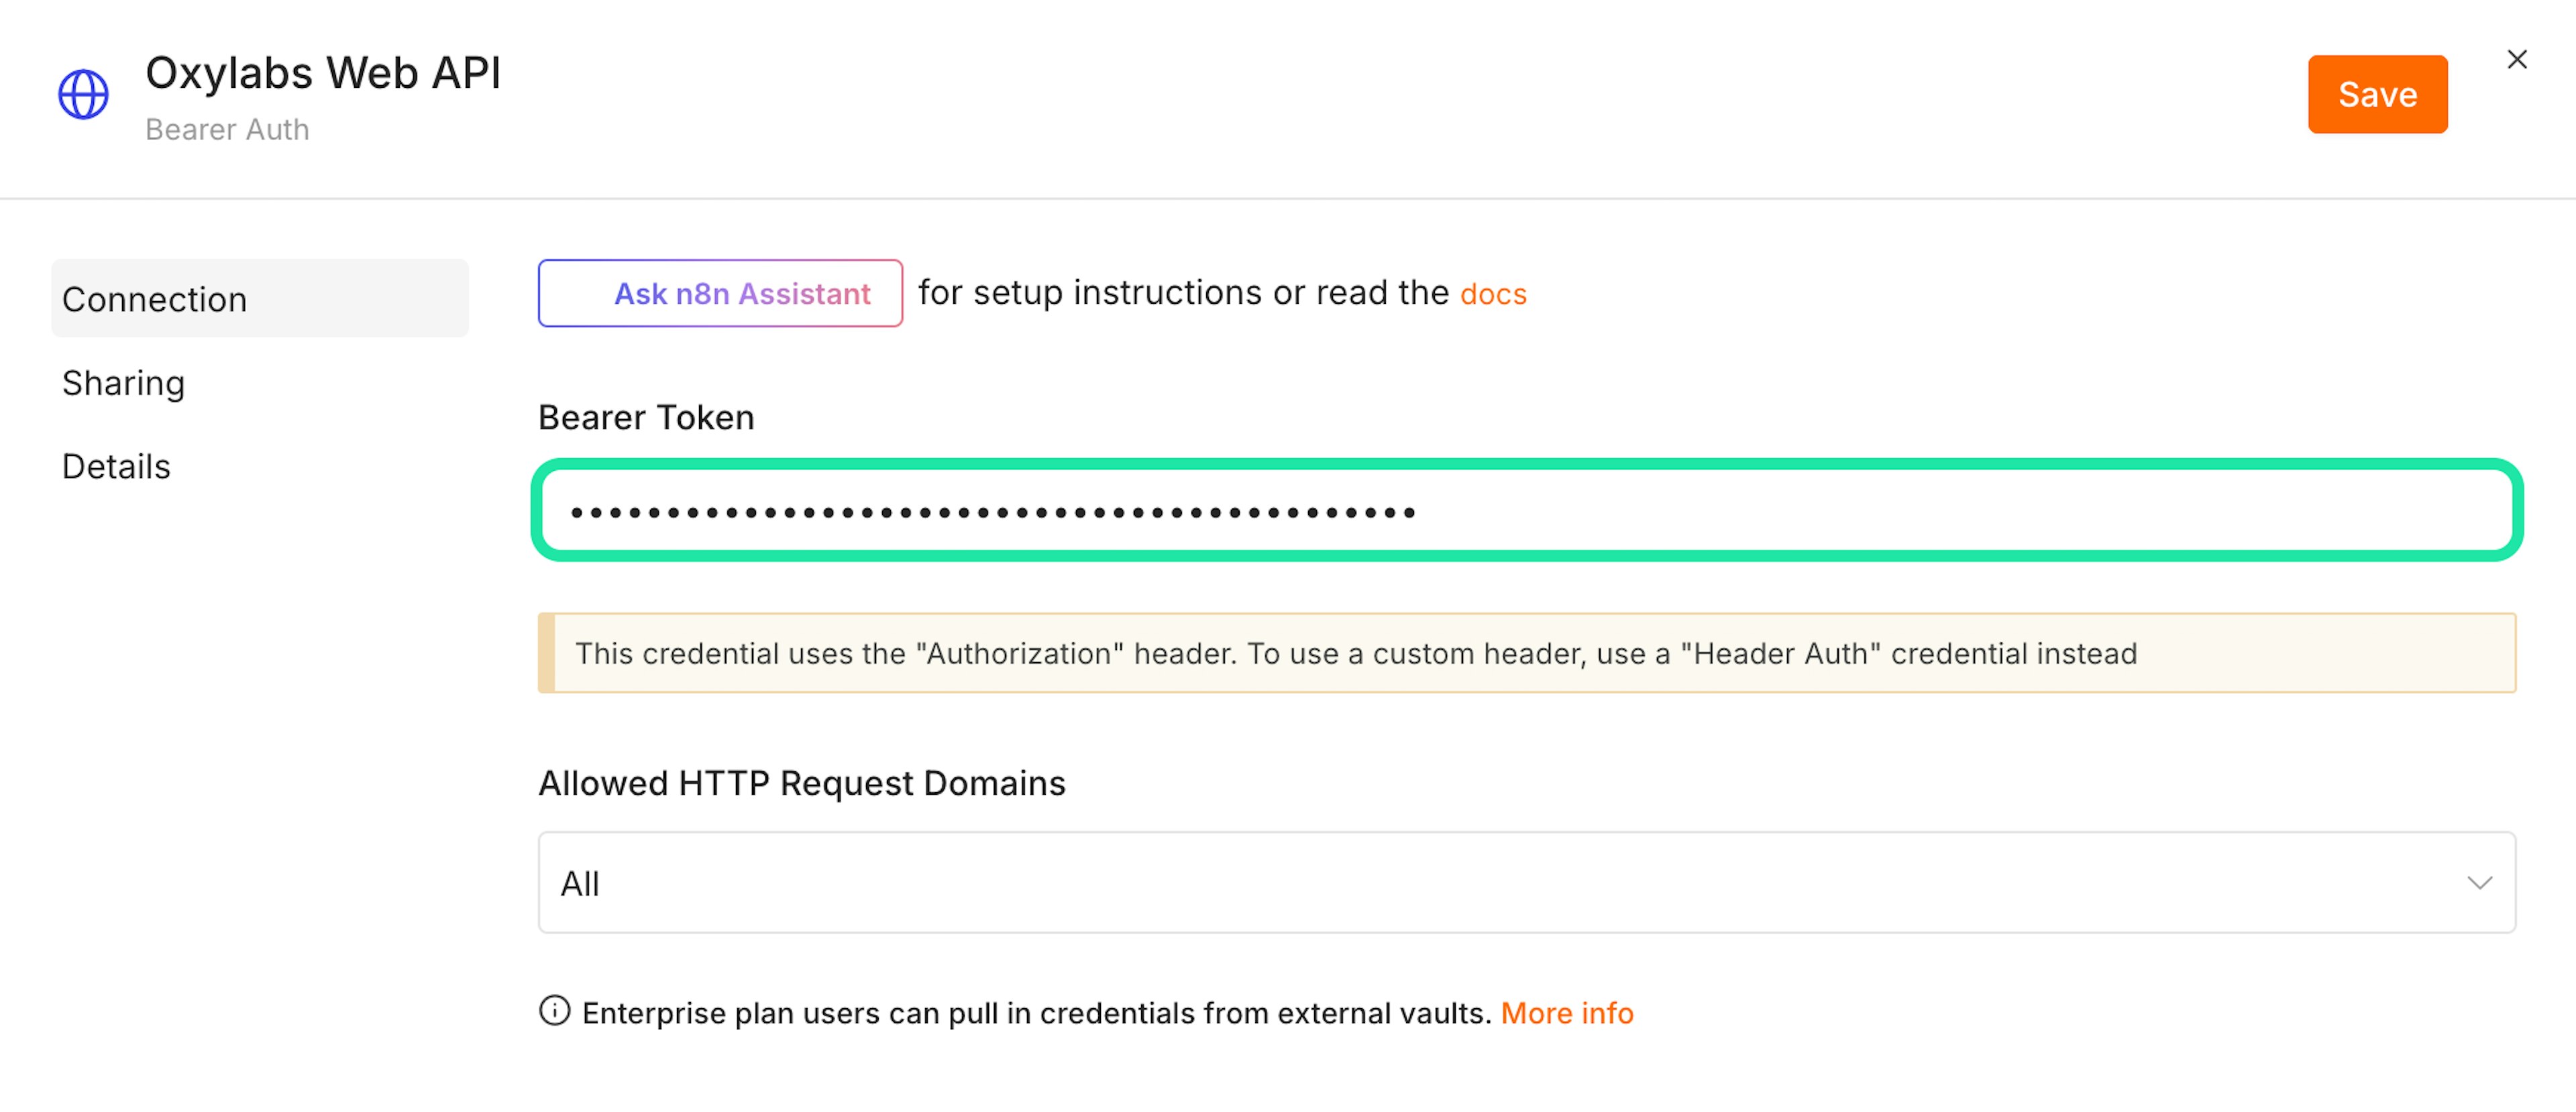
3. Paste your Web API key in the Bearer Token field.
Tip: Get your Web API key from the Oxylabs dashboard.
Then pick the method that fits your goals:
Using the HTTP Request node
If you only want the finished setup, import this JSON workflow into n8n. If you want to follow custom implementation process, follow the steps below:
{
  "name": "Oxylabs Web API integration - workflow",
  "nodes": [
    {
      "parameters": {},
      "type": "n8n-nodes-base.manualTrigger",
      "typeVersion": 1,
      "position": [
        0,
        0
      ],
      "name": "When clicking ‘Execute workflow’"
    },
    {
      "parameters": {
        "method": "POST",
        "url": "https://webapi.oxylabs.io/v1/search",
        "authentication": "genericCredentialType",
        "genericAuthType": "httpBearerAuth",
        "sendBody": true,
        "specifyBody": "json",
        "jsonBody": "{\n  \"query\": \"best running shoes\",\n  \"location\": \"US\"\n}",
        "options": {
          "timeout": 180000
        }
      },
      "type": "n8n-nodes-base.httpRequest",
      "typeVersion": 4.5,
      "position": [
        224,
        0
      ],
      "name": "HTTP Request",
      "credentials": {
        "httpBearerAuth": {
          "name": "Oxylabs Web API"
        }
      }
    }
  ],
  "pinData": {},
  "connections": {
    "When clicking ‘Execute workflow’": {
      "main": [
        [
          {
            "node": "HTTP Request",
            "type": "main",
            "index": 0
          }
        ]
      ]
    }
  },
  "active": false,
  "settings": {
    "executionOrder": "v1",
    "binaryMode": "separate"
  },
  "nodeGroups": [],
  "tags": []
}
If you want to follow custom implementation process, follow the steps below:
1.1 Create a Workflow
Go to Overview → Workflows → Create workflow and give it a name.
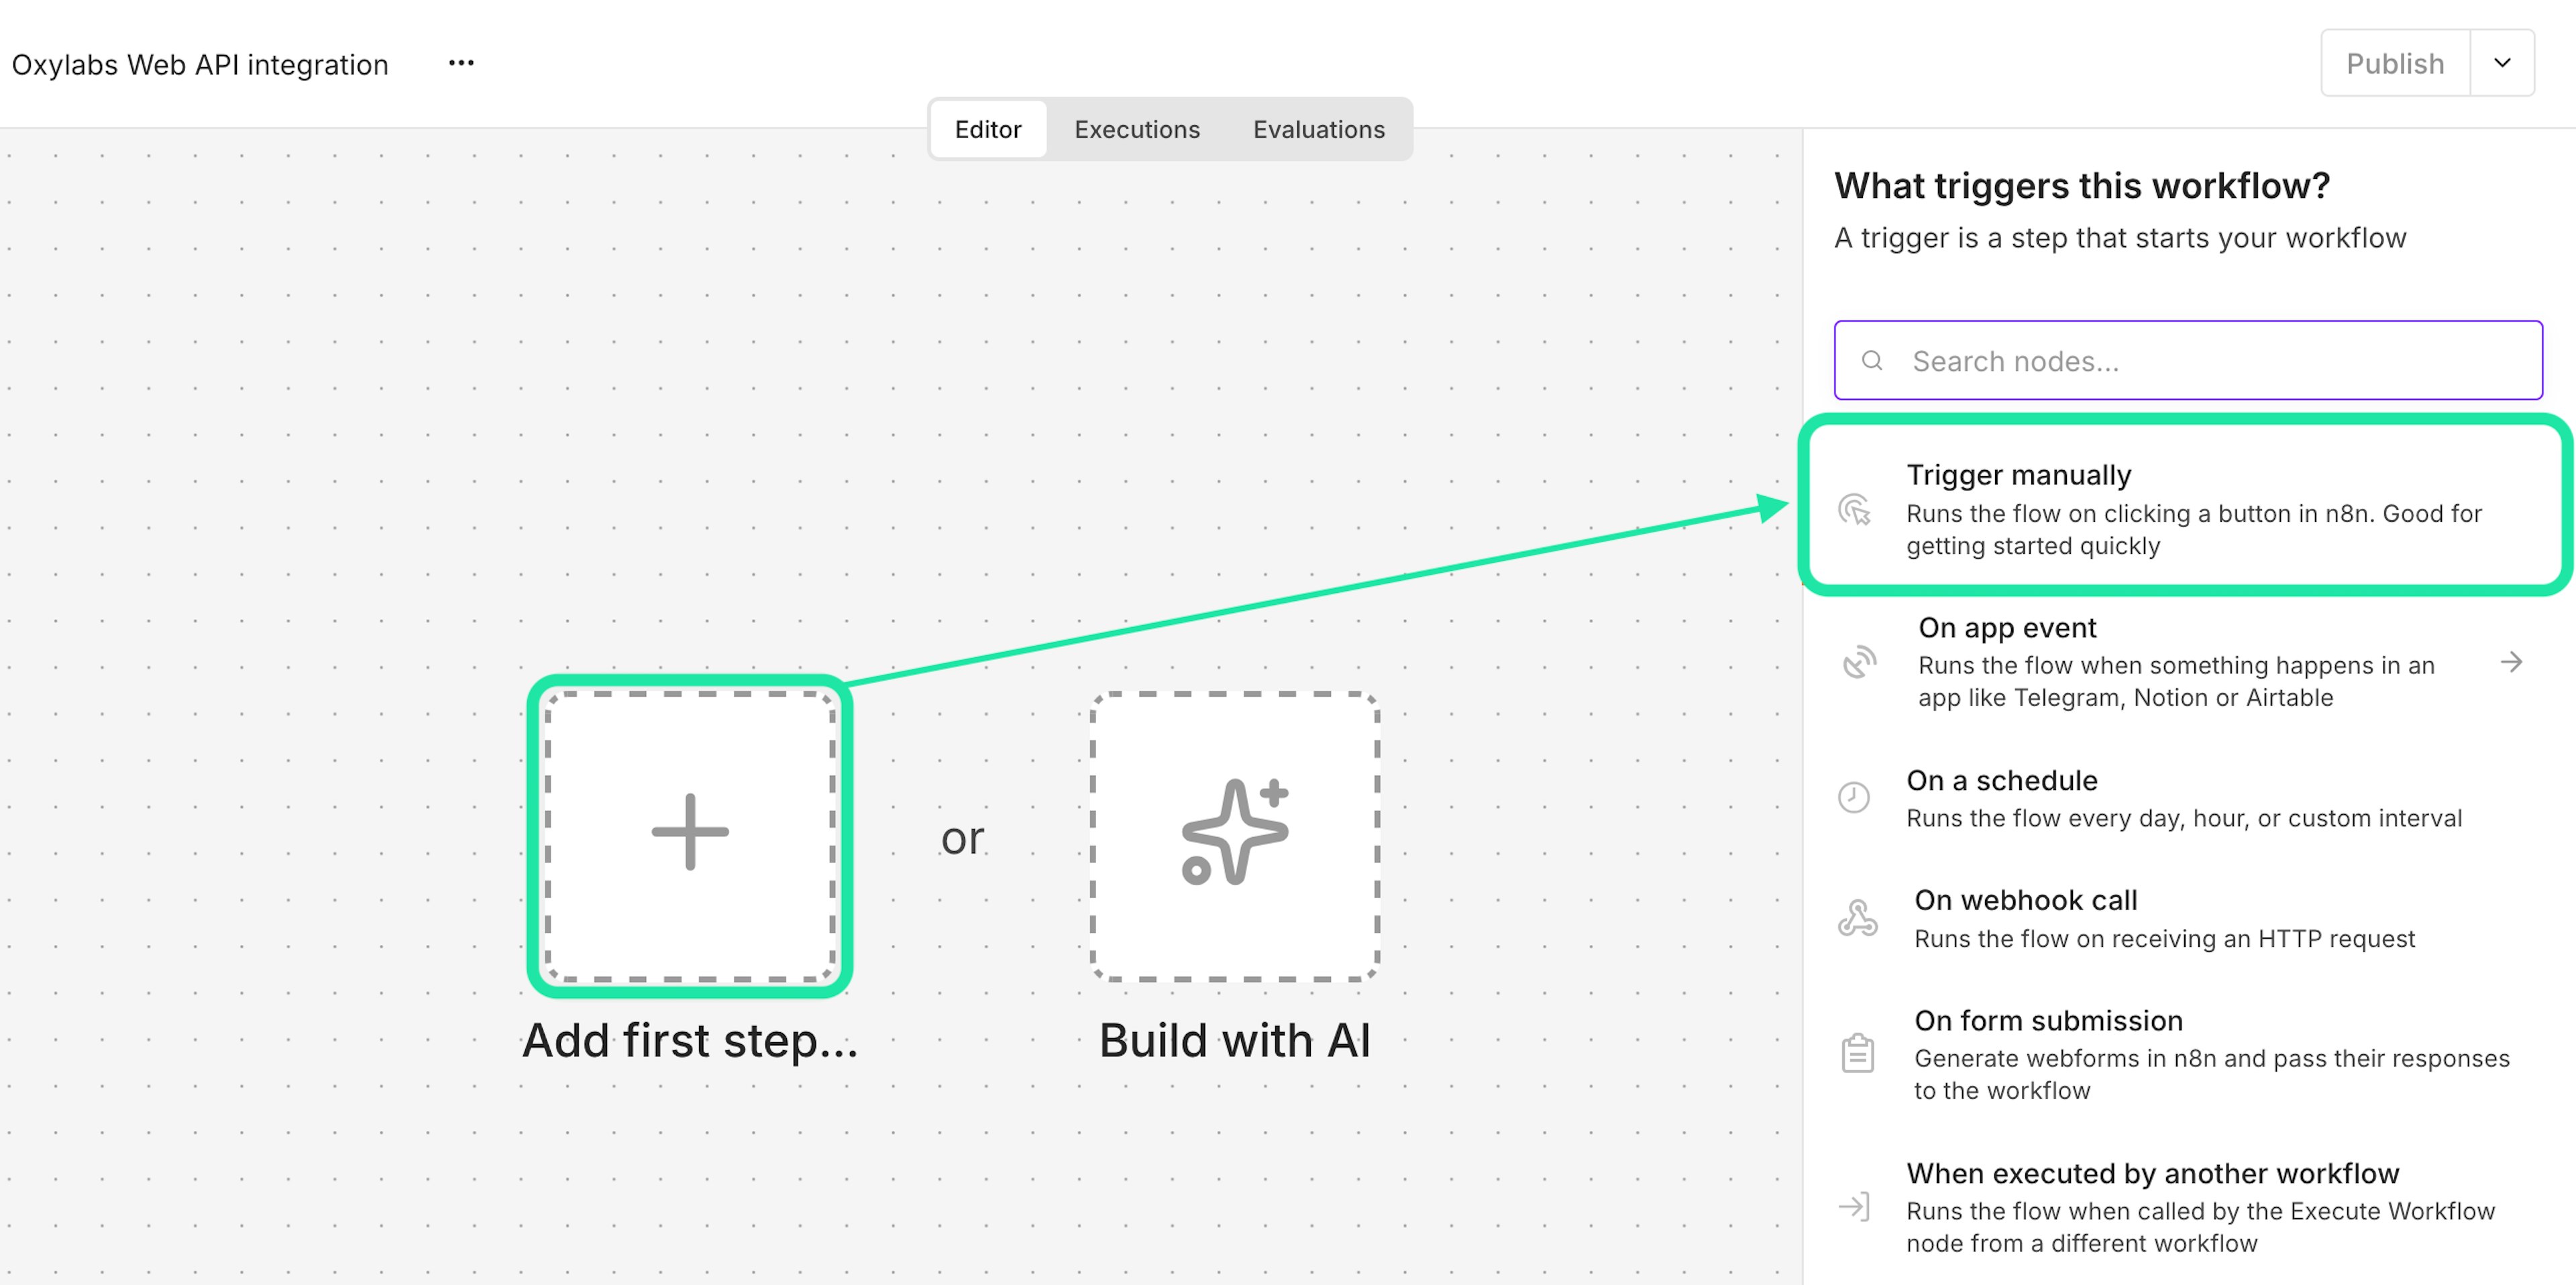
1.2 Add a Trigger
Add a trigger that defines how and when the workflow should be executed. Let’s use the Trigger manually node.
You may also use other available triggers, such as “On app event”, “On a schedule”, and others.
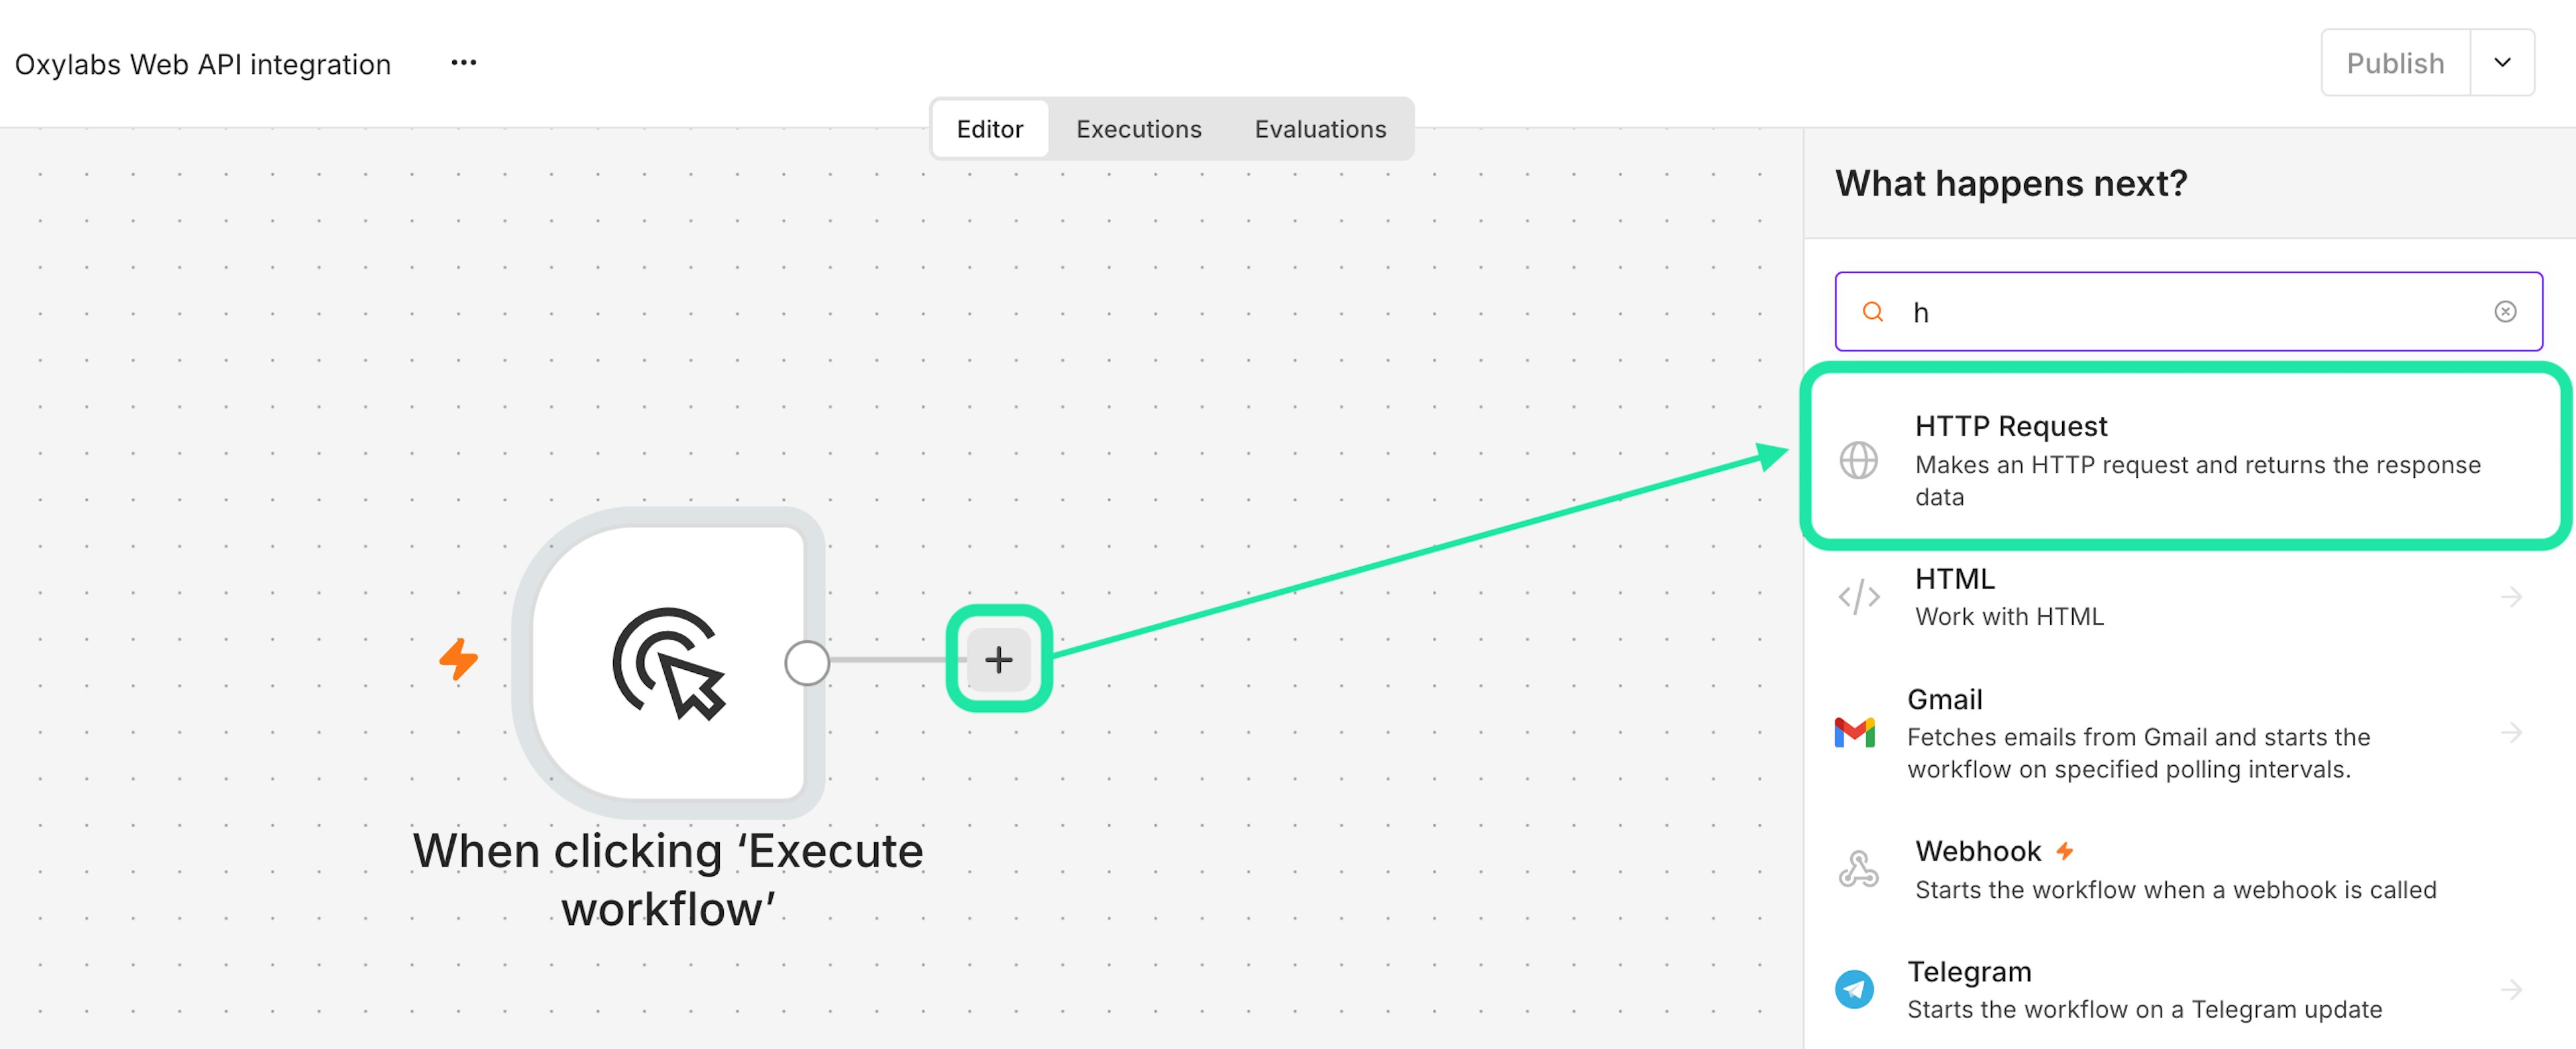
1.3 Add an HTTP Request node
In n8n, you can make direct REST API calls and scrape public web data by using an HTTP Request node.
1.4 Set up the API call
Use these node parameters for Web API:
| Method | POST |
| URL | A specific Web API endpoint (e.g., https://webapi.oxylabs.io/v1/search) |
| Authentication | Generic Credential Type |
| Generic Auth Type | Bearer Auth |
| Bearer Auth | Select your Oxylabs Web API credential |
| Send Body | ✓ Enabled |
| Body Content Type | JSON |
| Specify Body | Using Fields Below or Using JSON |
| Timeout | Add option → Timeout → set it to 180000 ms (180 seconds) |
Using Fields Below lets you add parameters one by one. Using JSON lets you paste a full JSON payload, for example:
{
  "query": "best running shoes",
  "location": "US"
}
Web API automatically parses the scraped HTML, so you don't need an HTML extract node for further processing. Dedicated scrapers come with their own scraping and parsing logic built-in. For any other site, use Markdown output or AI parsing to send a natural-language prompt or a JSON schema that extracts data from any page.
Run the workflow, and the HTTP Request node returns the scraped data as structured JSON, ready for the next step.
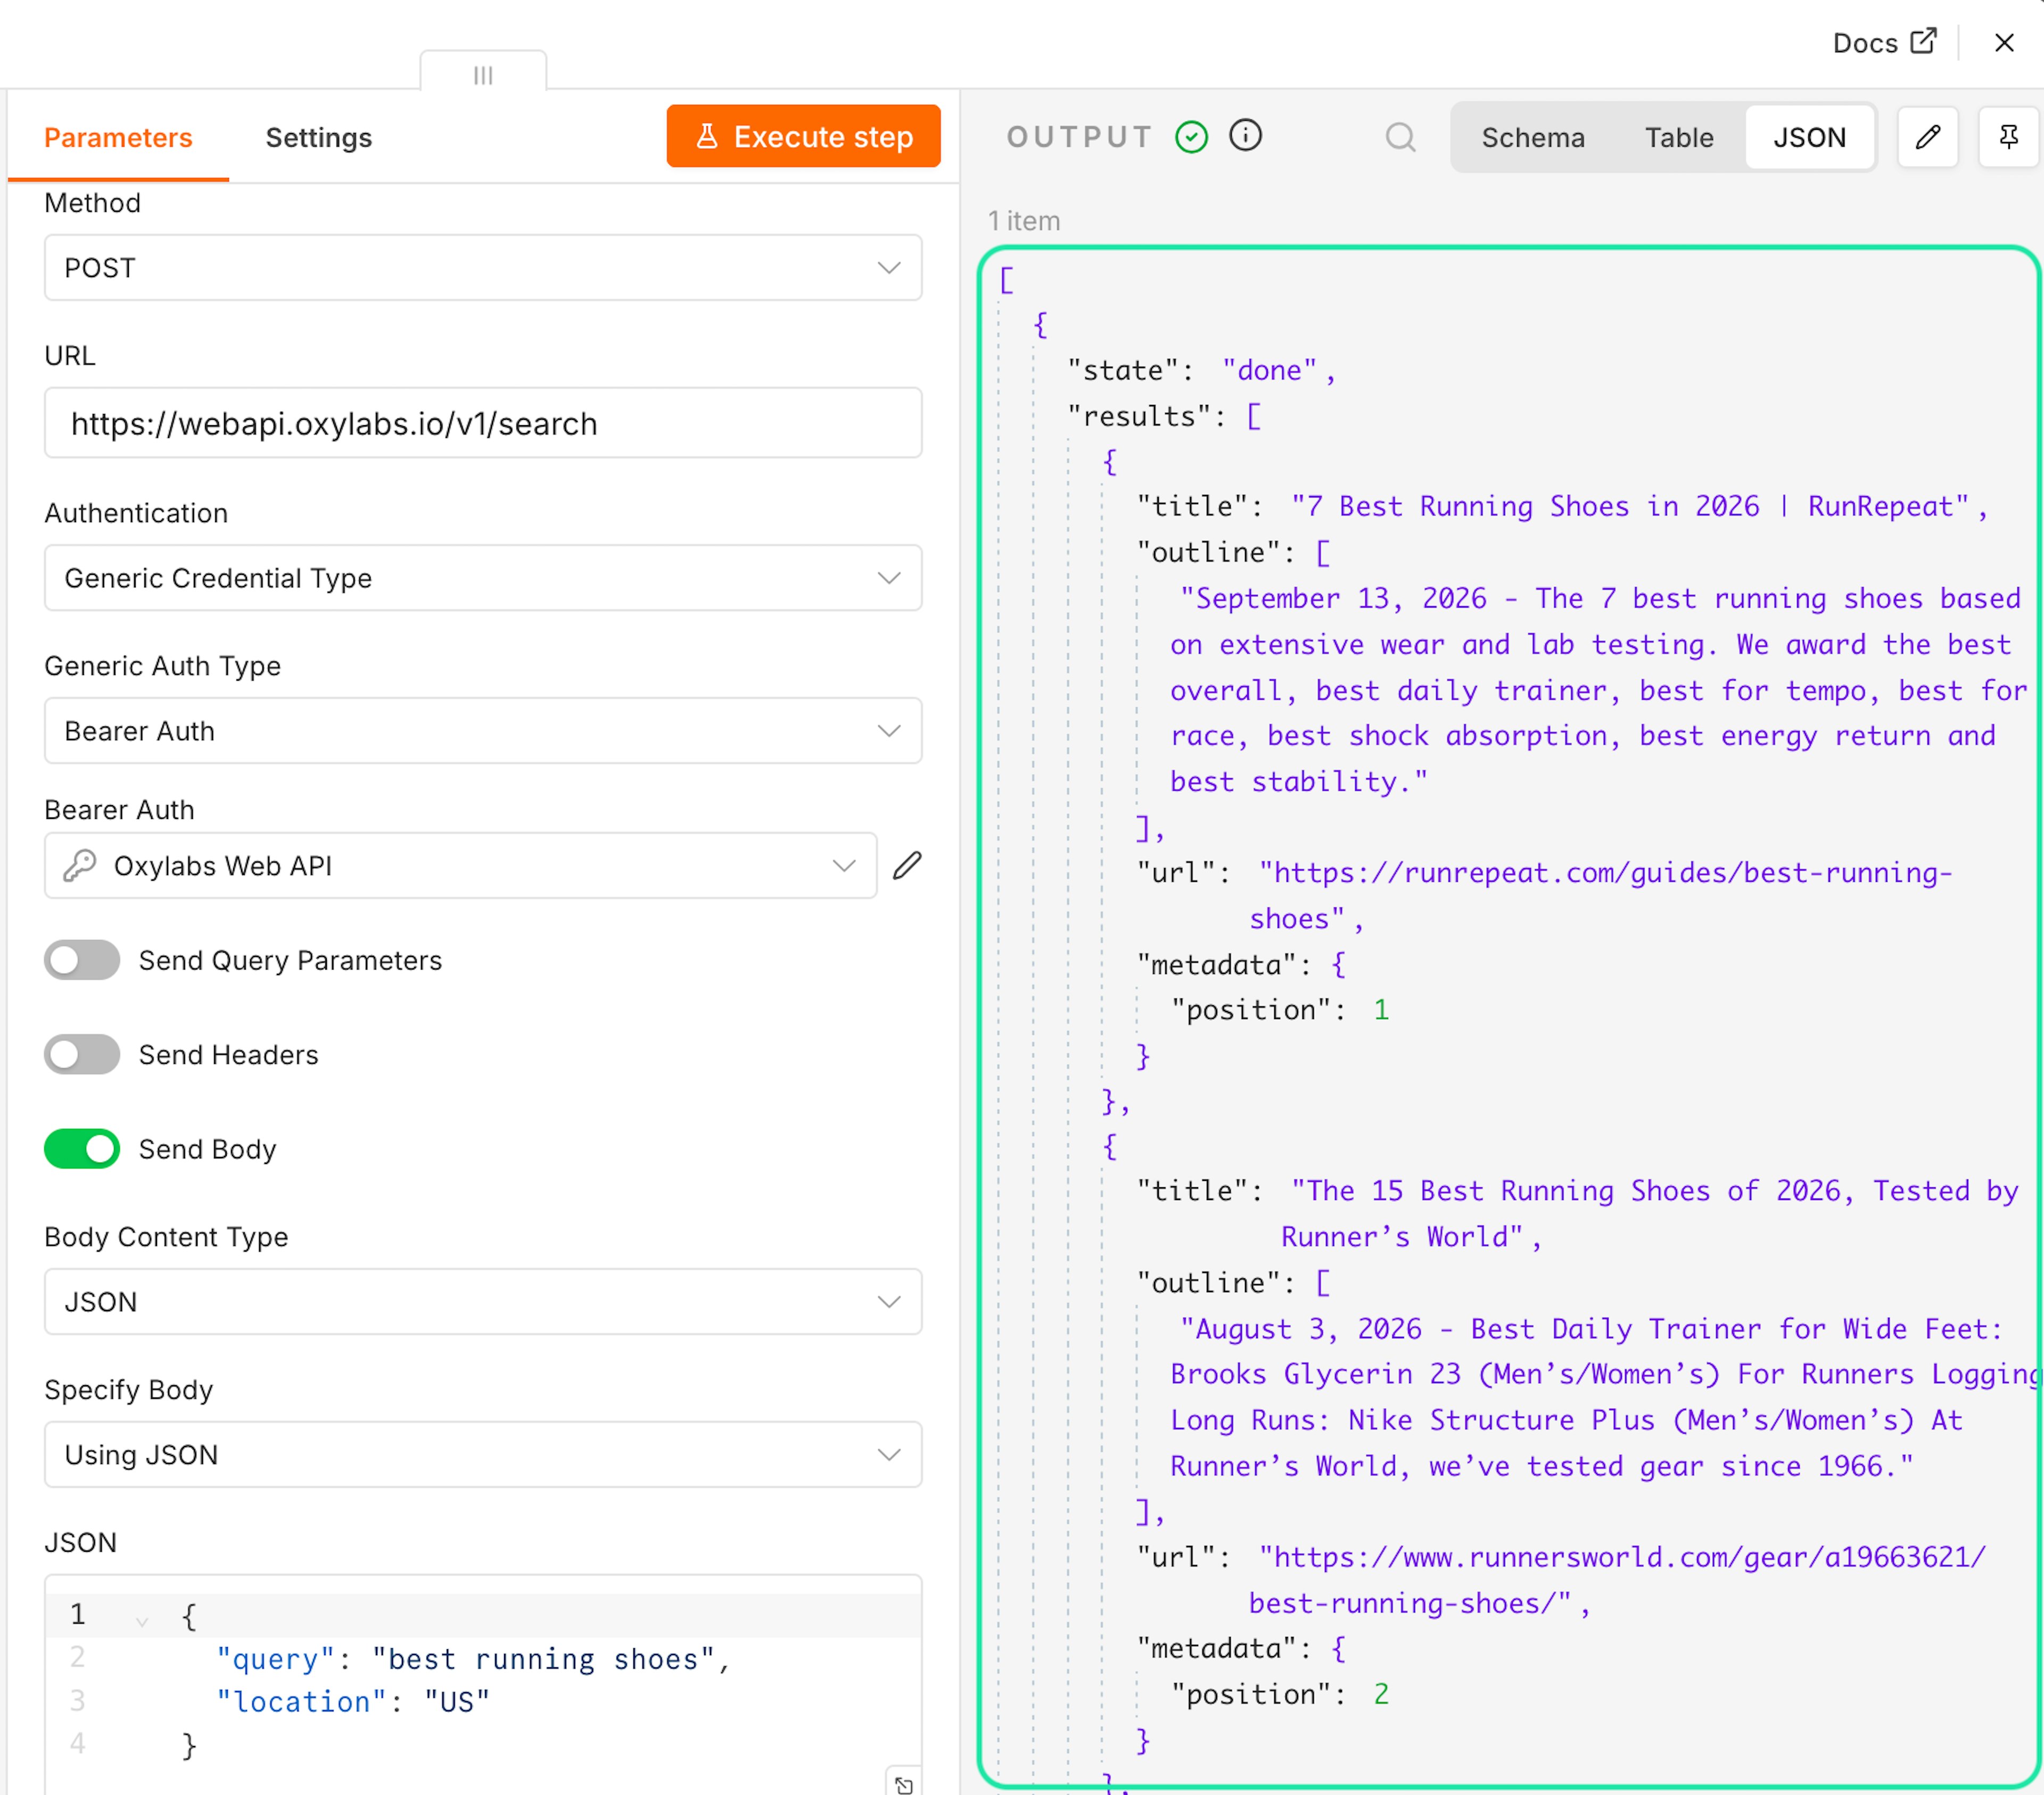
The /scrape endpoint also lets you set the output format to Markdown, screenshot, or raw HTML instead of JSON.
Using agents with MCP
Connect the Web API Model Context Protocol server in n8n to let an AI agent call Web API tools directly. This guide uses the Agents panel, but the same configuration works with any MCP-compatible node in n8n workflows.
If you only want the finished setup, import this JSON into the n8n Agents panel. Otherwise, follow the steps outlined below.
{
  "name": "Oxylabs MCP – Agent",
  "model": "openai/gpt-6-luna",
  "instructions": "Answer questions with live web data from the Oxylabs MCP tools.\nUse /search to find relevant pages, then /scrape the 3 most useful results to read them.\nKeep answers very short and list the source URLs.",
  "credential": "__AI_GATEWAY_MANAGED__",
  "tools": [],
  "personalisation": {
    "icon": "bot",
    "gradient": {
      "from": "#00AC92",
      "to": "#FC6BC0",
      "angle": 285,
      "fromStop": 15,
      "toStop": 94
    }
  },
  "memory": {
    "enabled": true,
    "storage": "n8n"
  },
  "config": {
    "promptCaching": {
      "enabled": true
    }
  },
  "mcpServers": [
    {
      "name": "mcp-client",
      "url": "https://mcp.oxylabs.io/web-api-mcp",
      "transport": "streamableHttp",
      "authentication": "bearerAuth",
      "connectionTimeoutMs": 120000
    }
  ],
  "skills": [],
  "integrations": []
}
2.1 Create an Agent
Navigate to Overview → Agents → Create agent and give your agent a name.
2.2 Select the AI model and add instructions
Pick any AI model you like, such as GPT-6 Luna, and add instructions describing the task, for example:
Answer questions with live web data from the Oxylabs MCP tools.
Use /search to find relevant pages, then /scrape the 3 most useful results to read them.
Keep answers very short and list the source URLs.Optional: add the Oxylabs Web API skill to the agent’s Skills section for more detailed tool guidance.
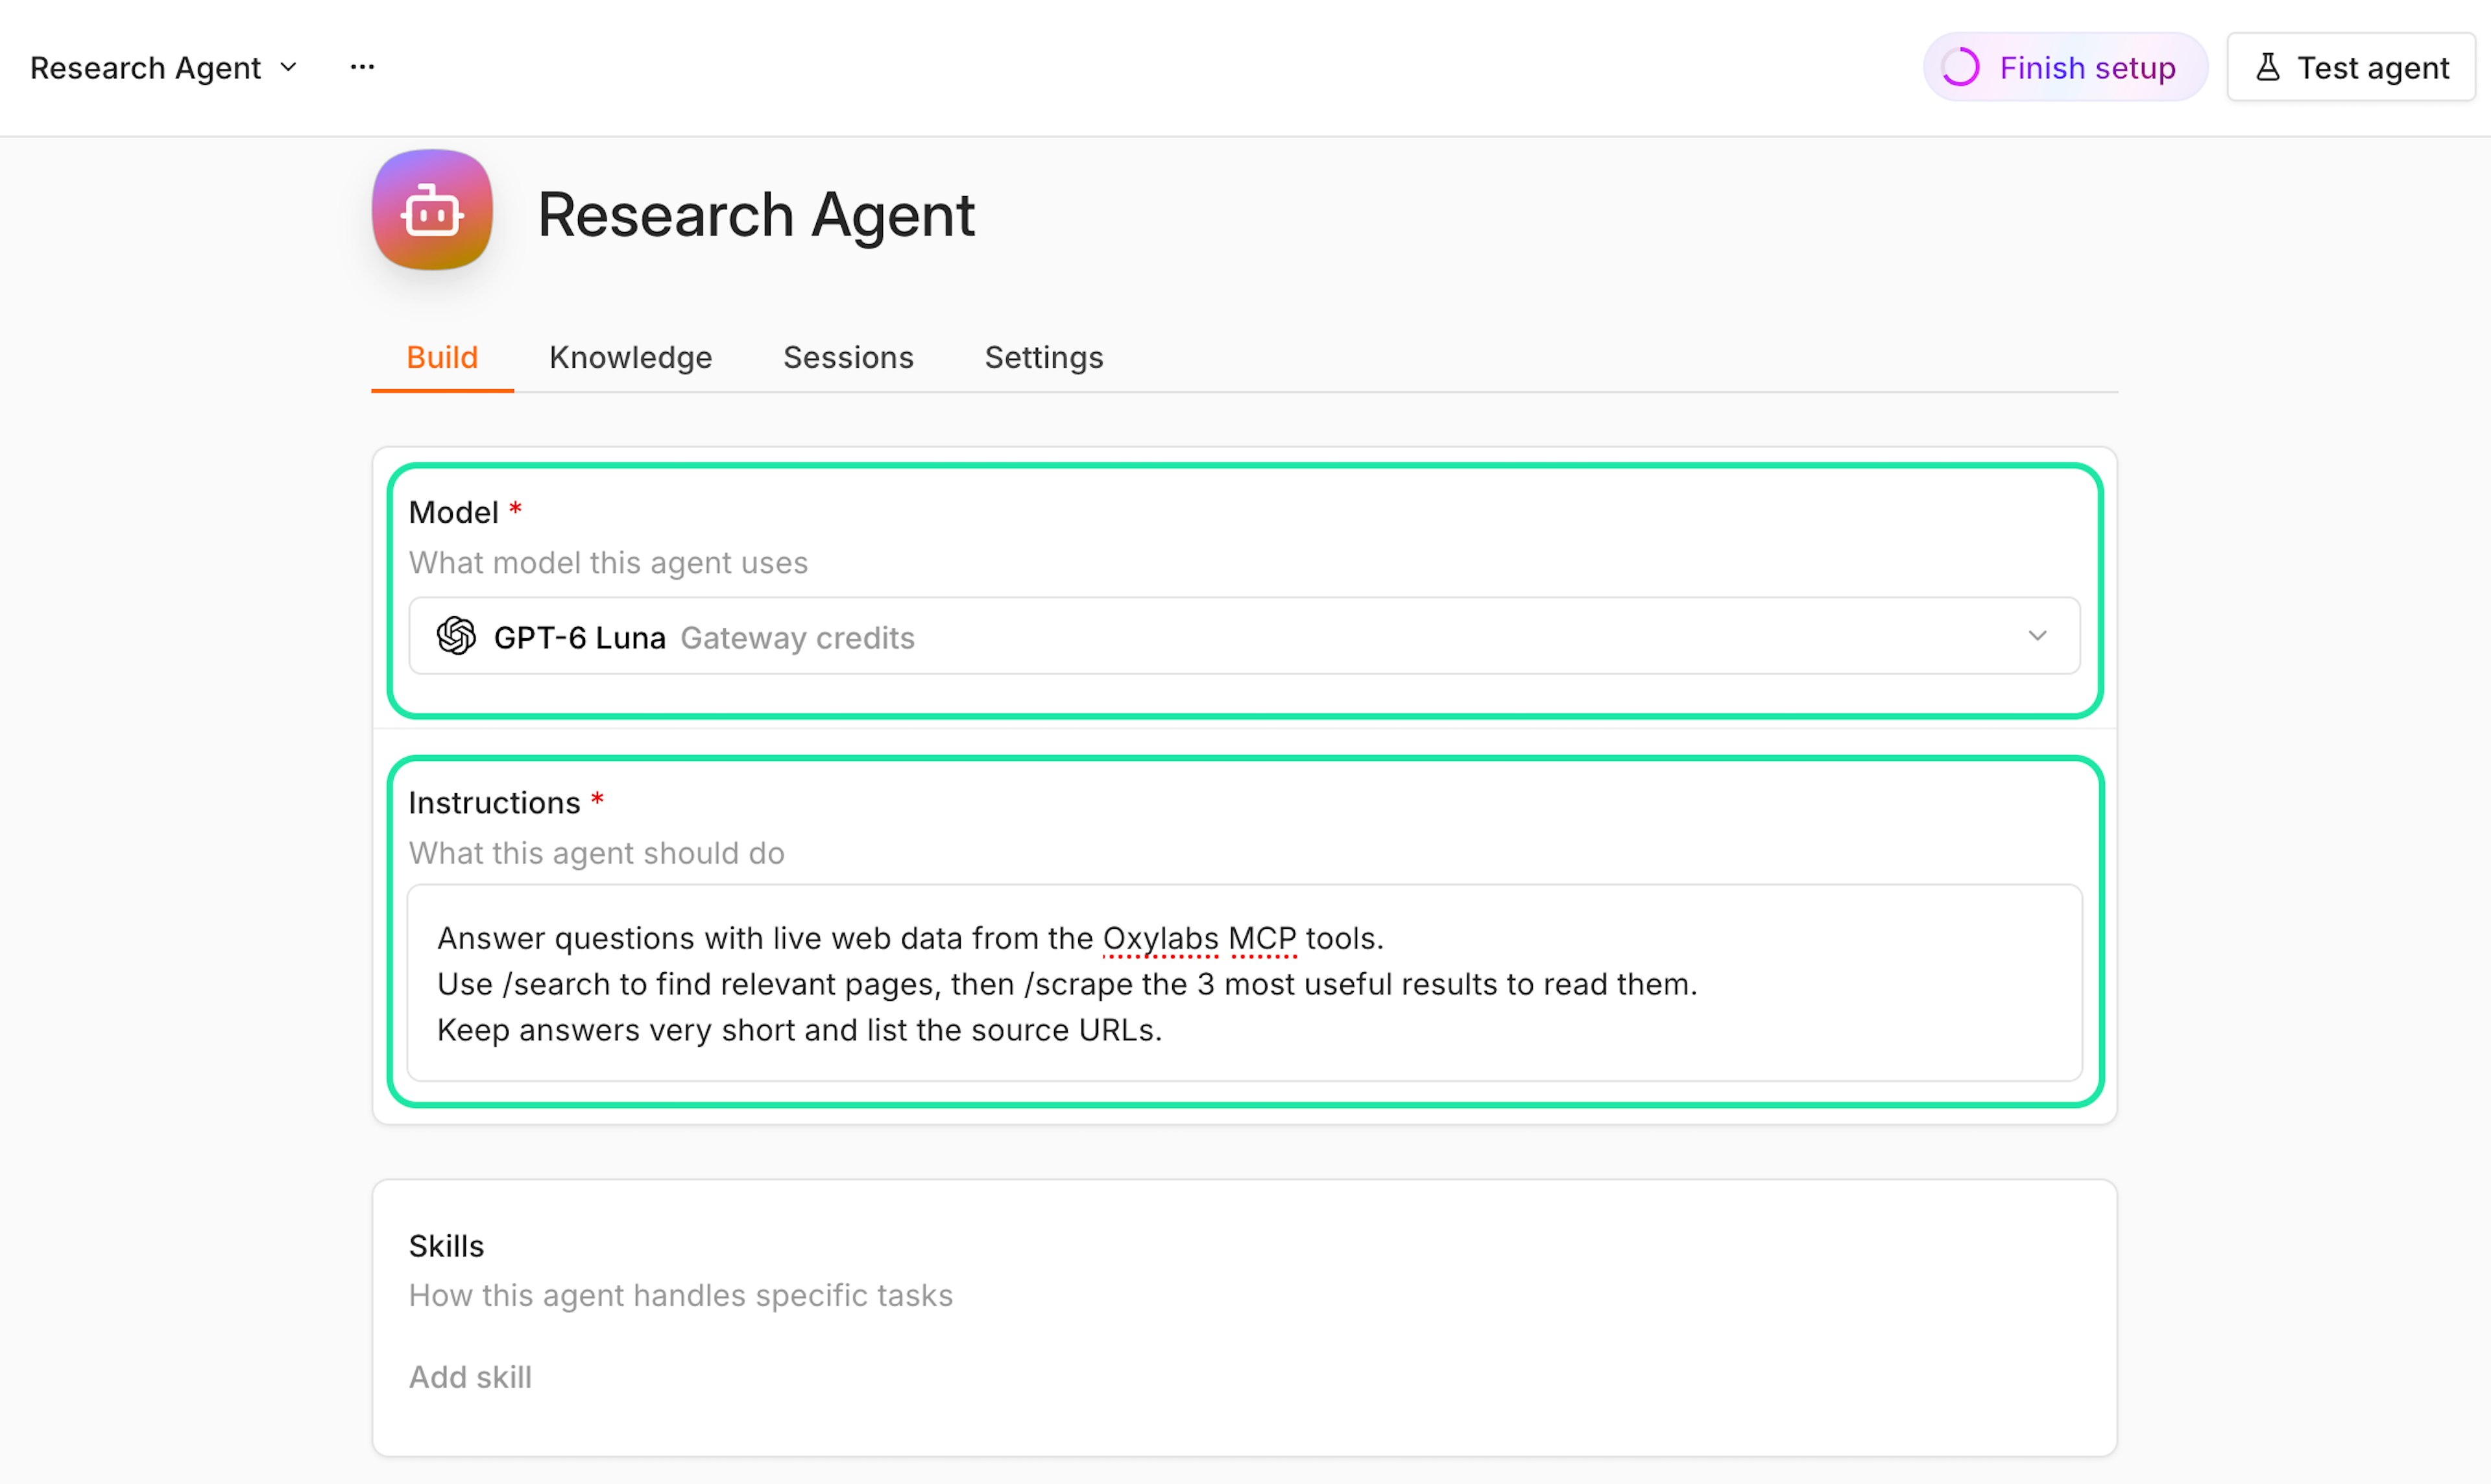
2.3 Connect Web API via MCP
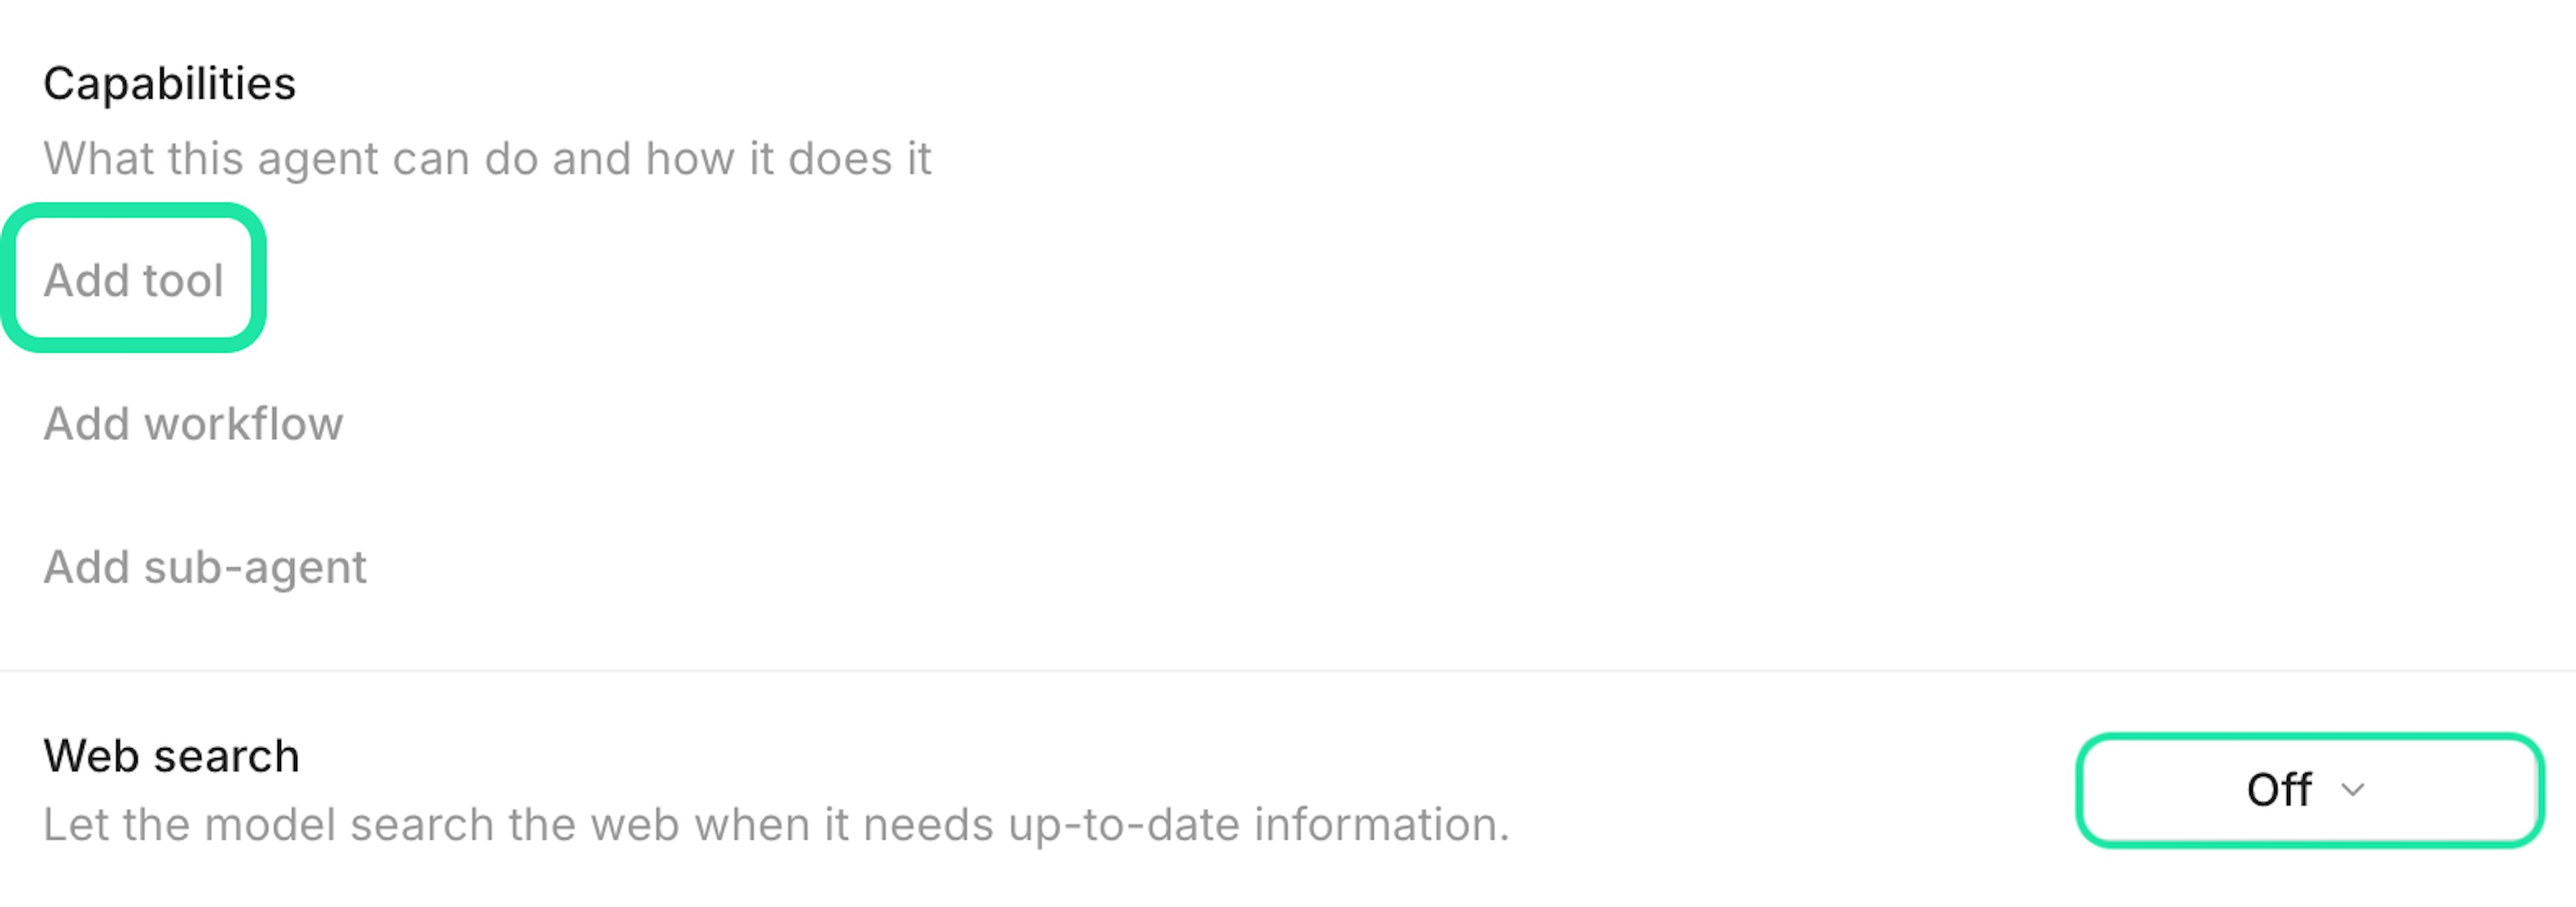
Scroll down to the Capabilities section and select Add tool. Make sure to turn off the built-in model’s web search so the agent uses MCP instead.
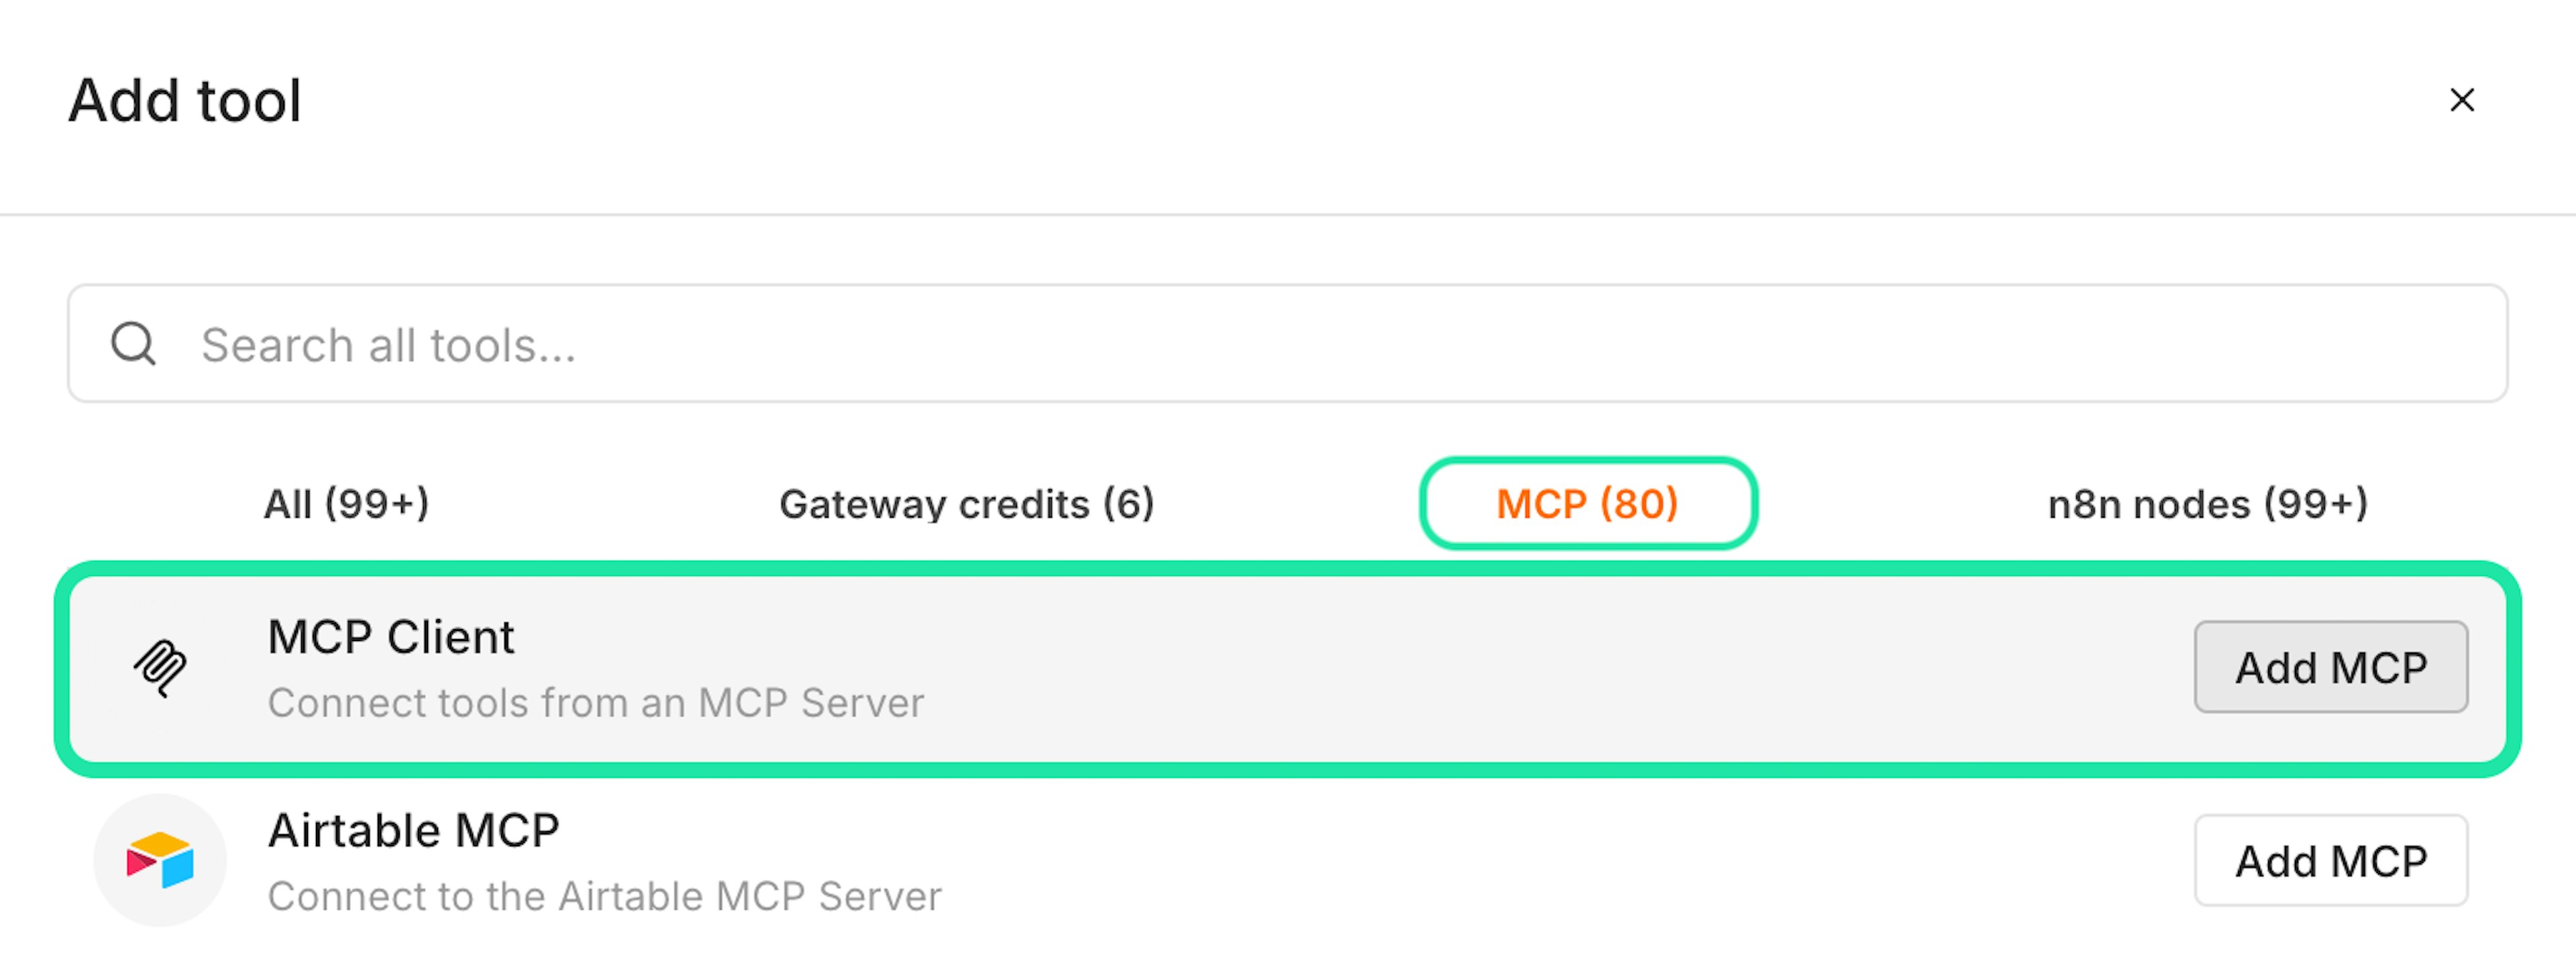
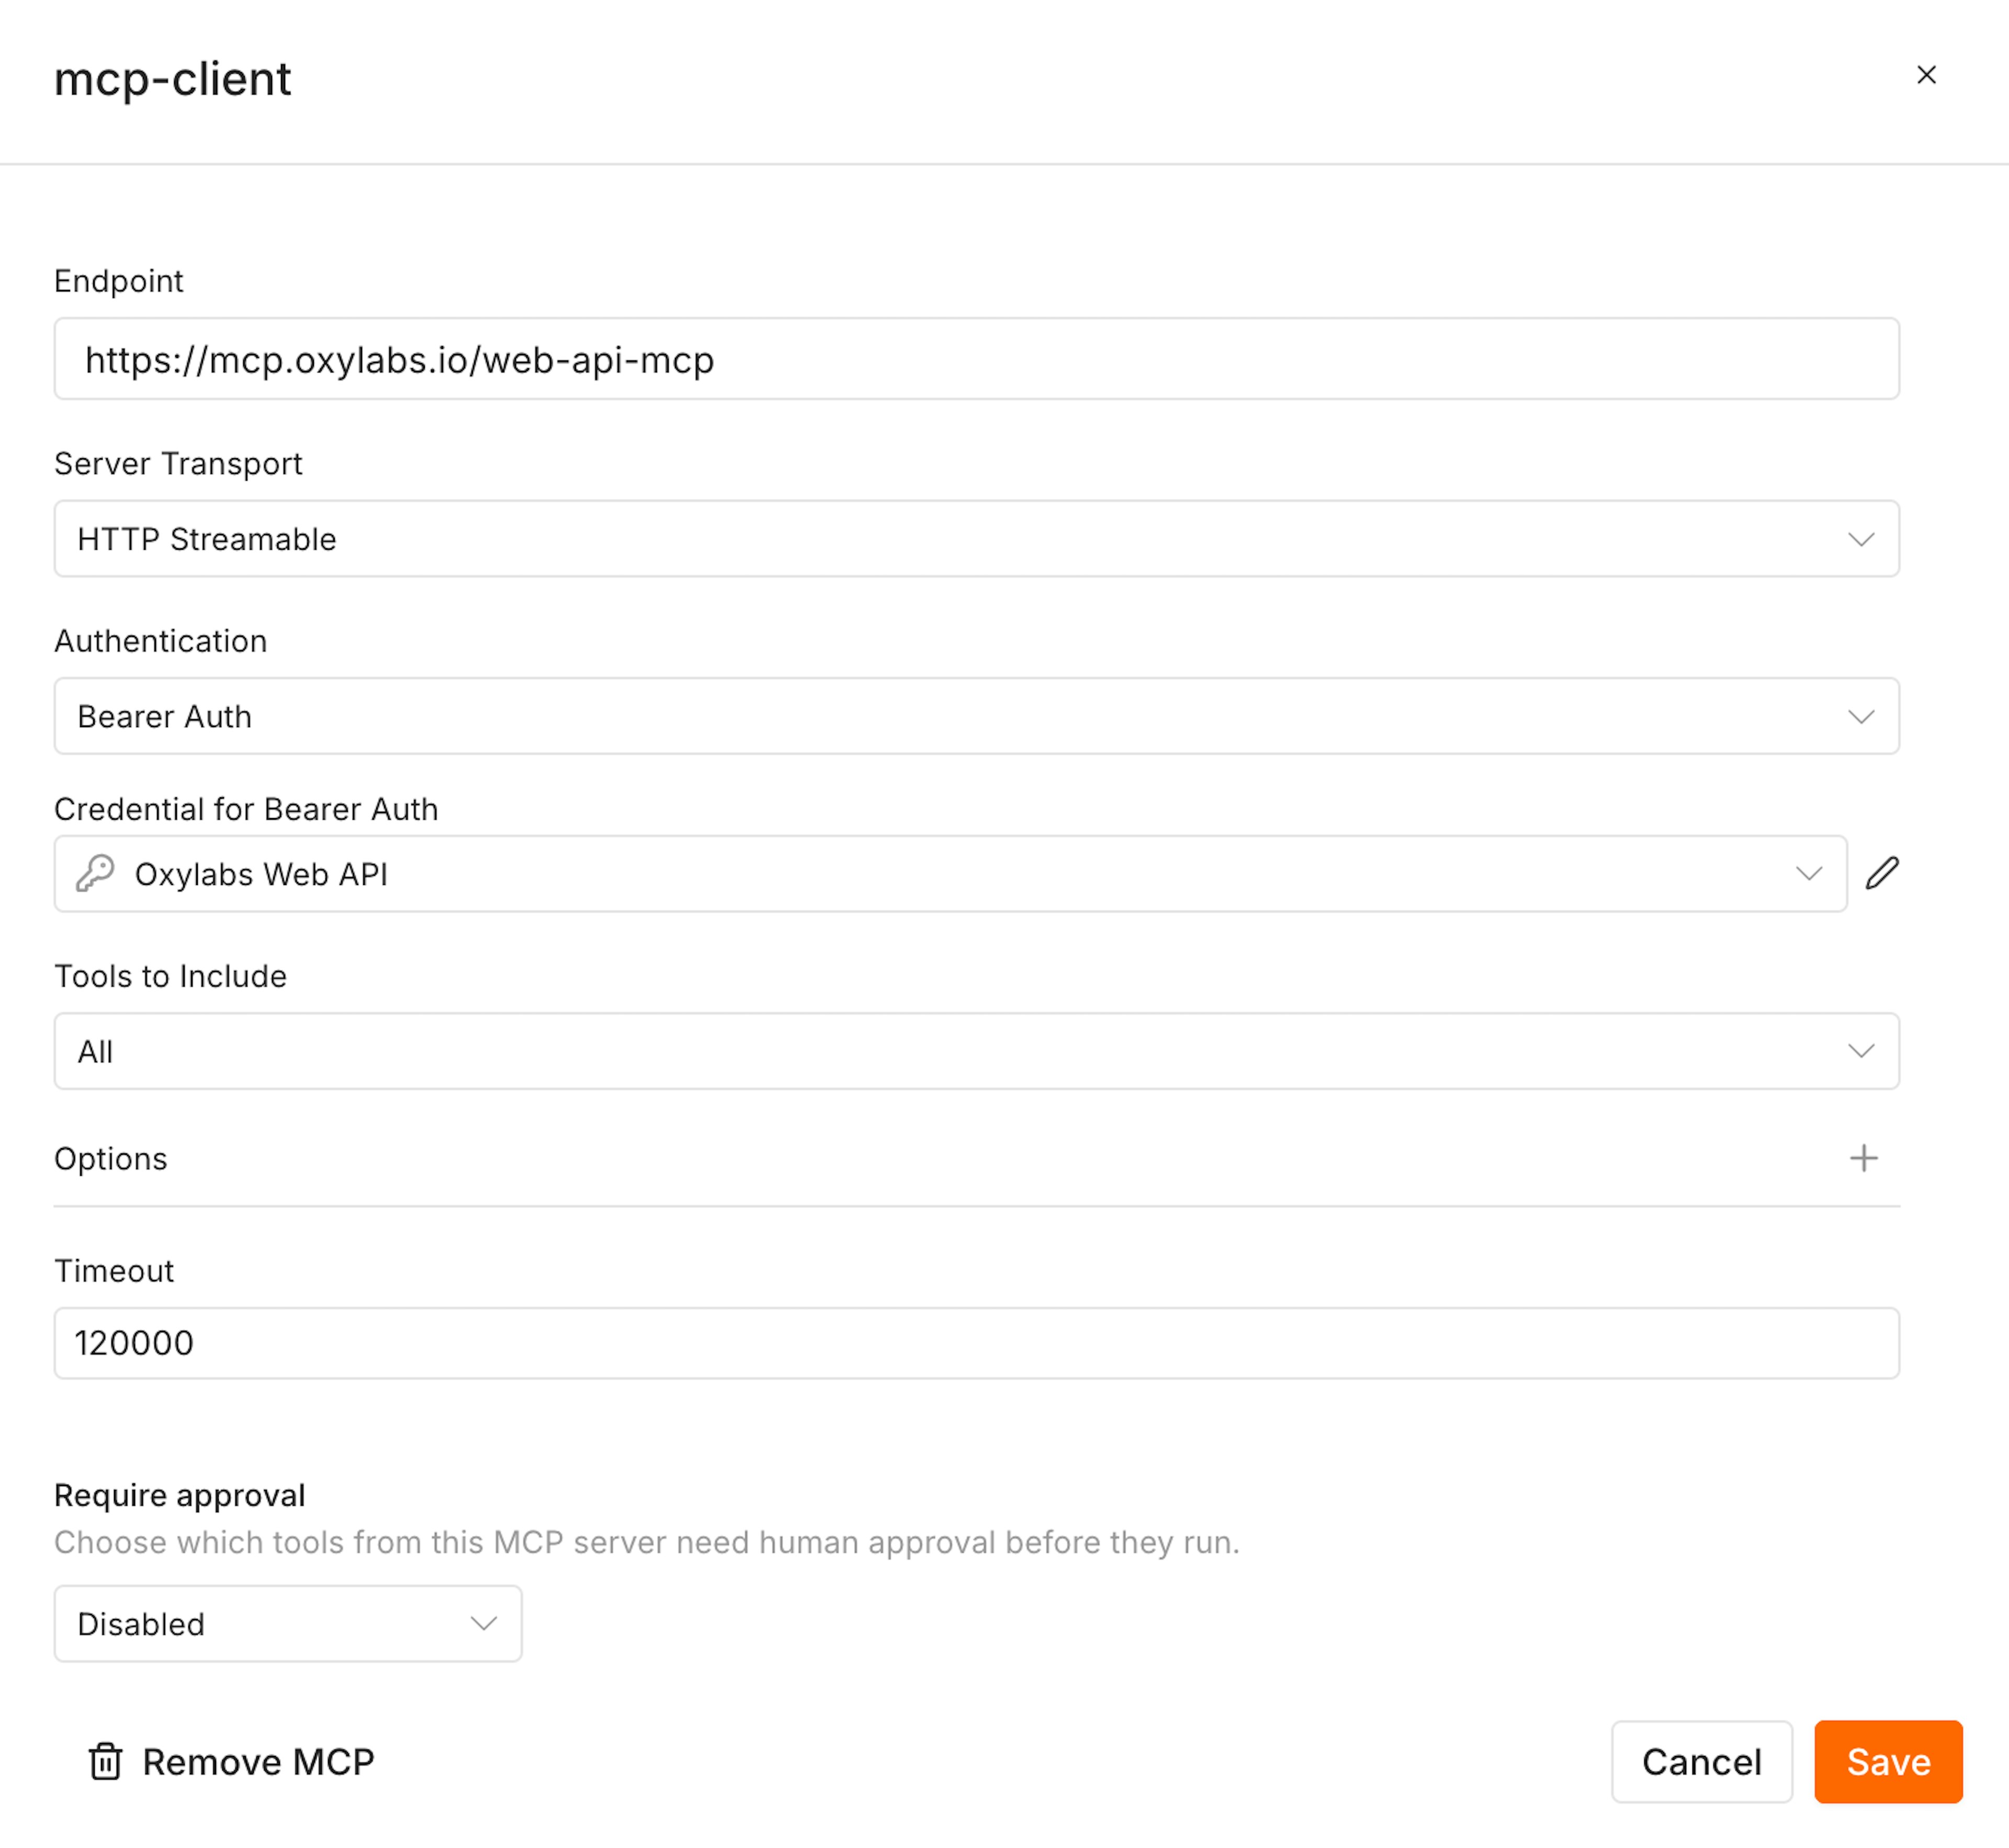
Next, open the MCP tab, find the MCP Client in the list, and click Add MCP.
Then, use the following MCP client configuration to connect to the Oxylabs Web API:
| Endpoint | https://mcp.oxylabs.io/web-api-mcp |
| Server Transport | HTTP Streamable |
| Authentication | Bearer Auth |
| Credential for Bearer Auth | Oxylabs Web API |
| Tools to Include | All, Selected, or All Except |
| Timeout | 120000 |
| Require approval | Disabled, Ask all, or Ask selected |
On self-hosted n8n, you can also run the Web API MCP server yourself in HTTP mode and point the client at the local URL instead.
2.4 Test the agent
Click Test agent at the top-right corner and send the following prompt:
Find the best running shoes in the US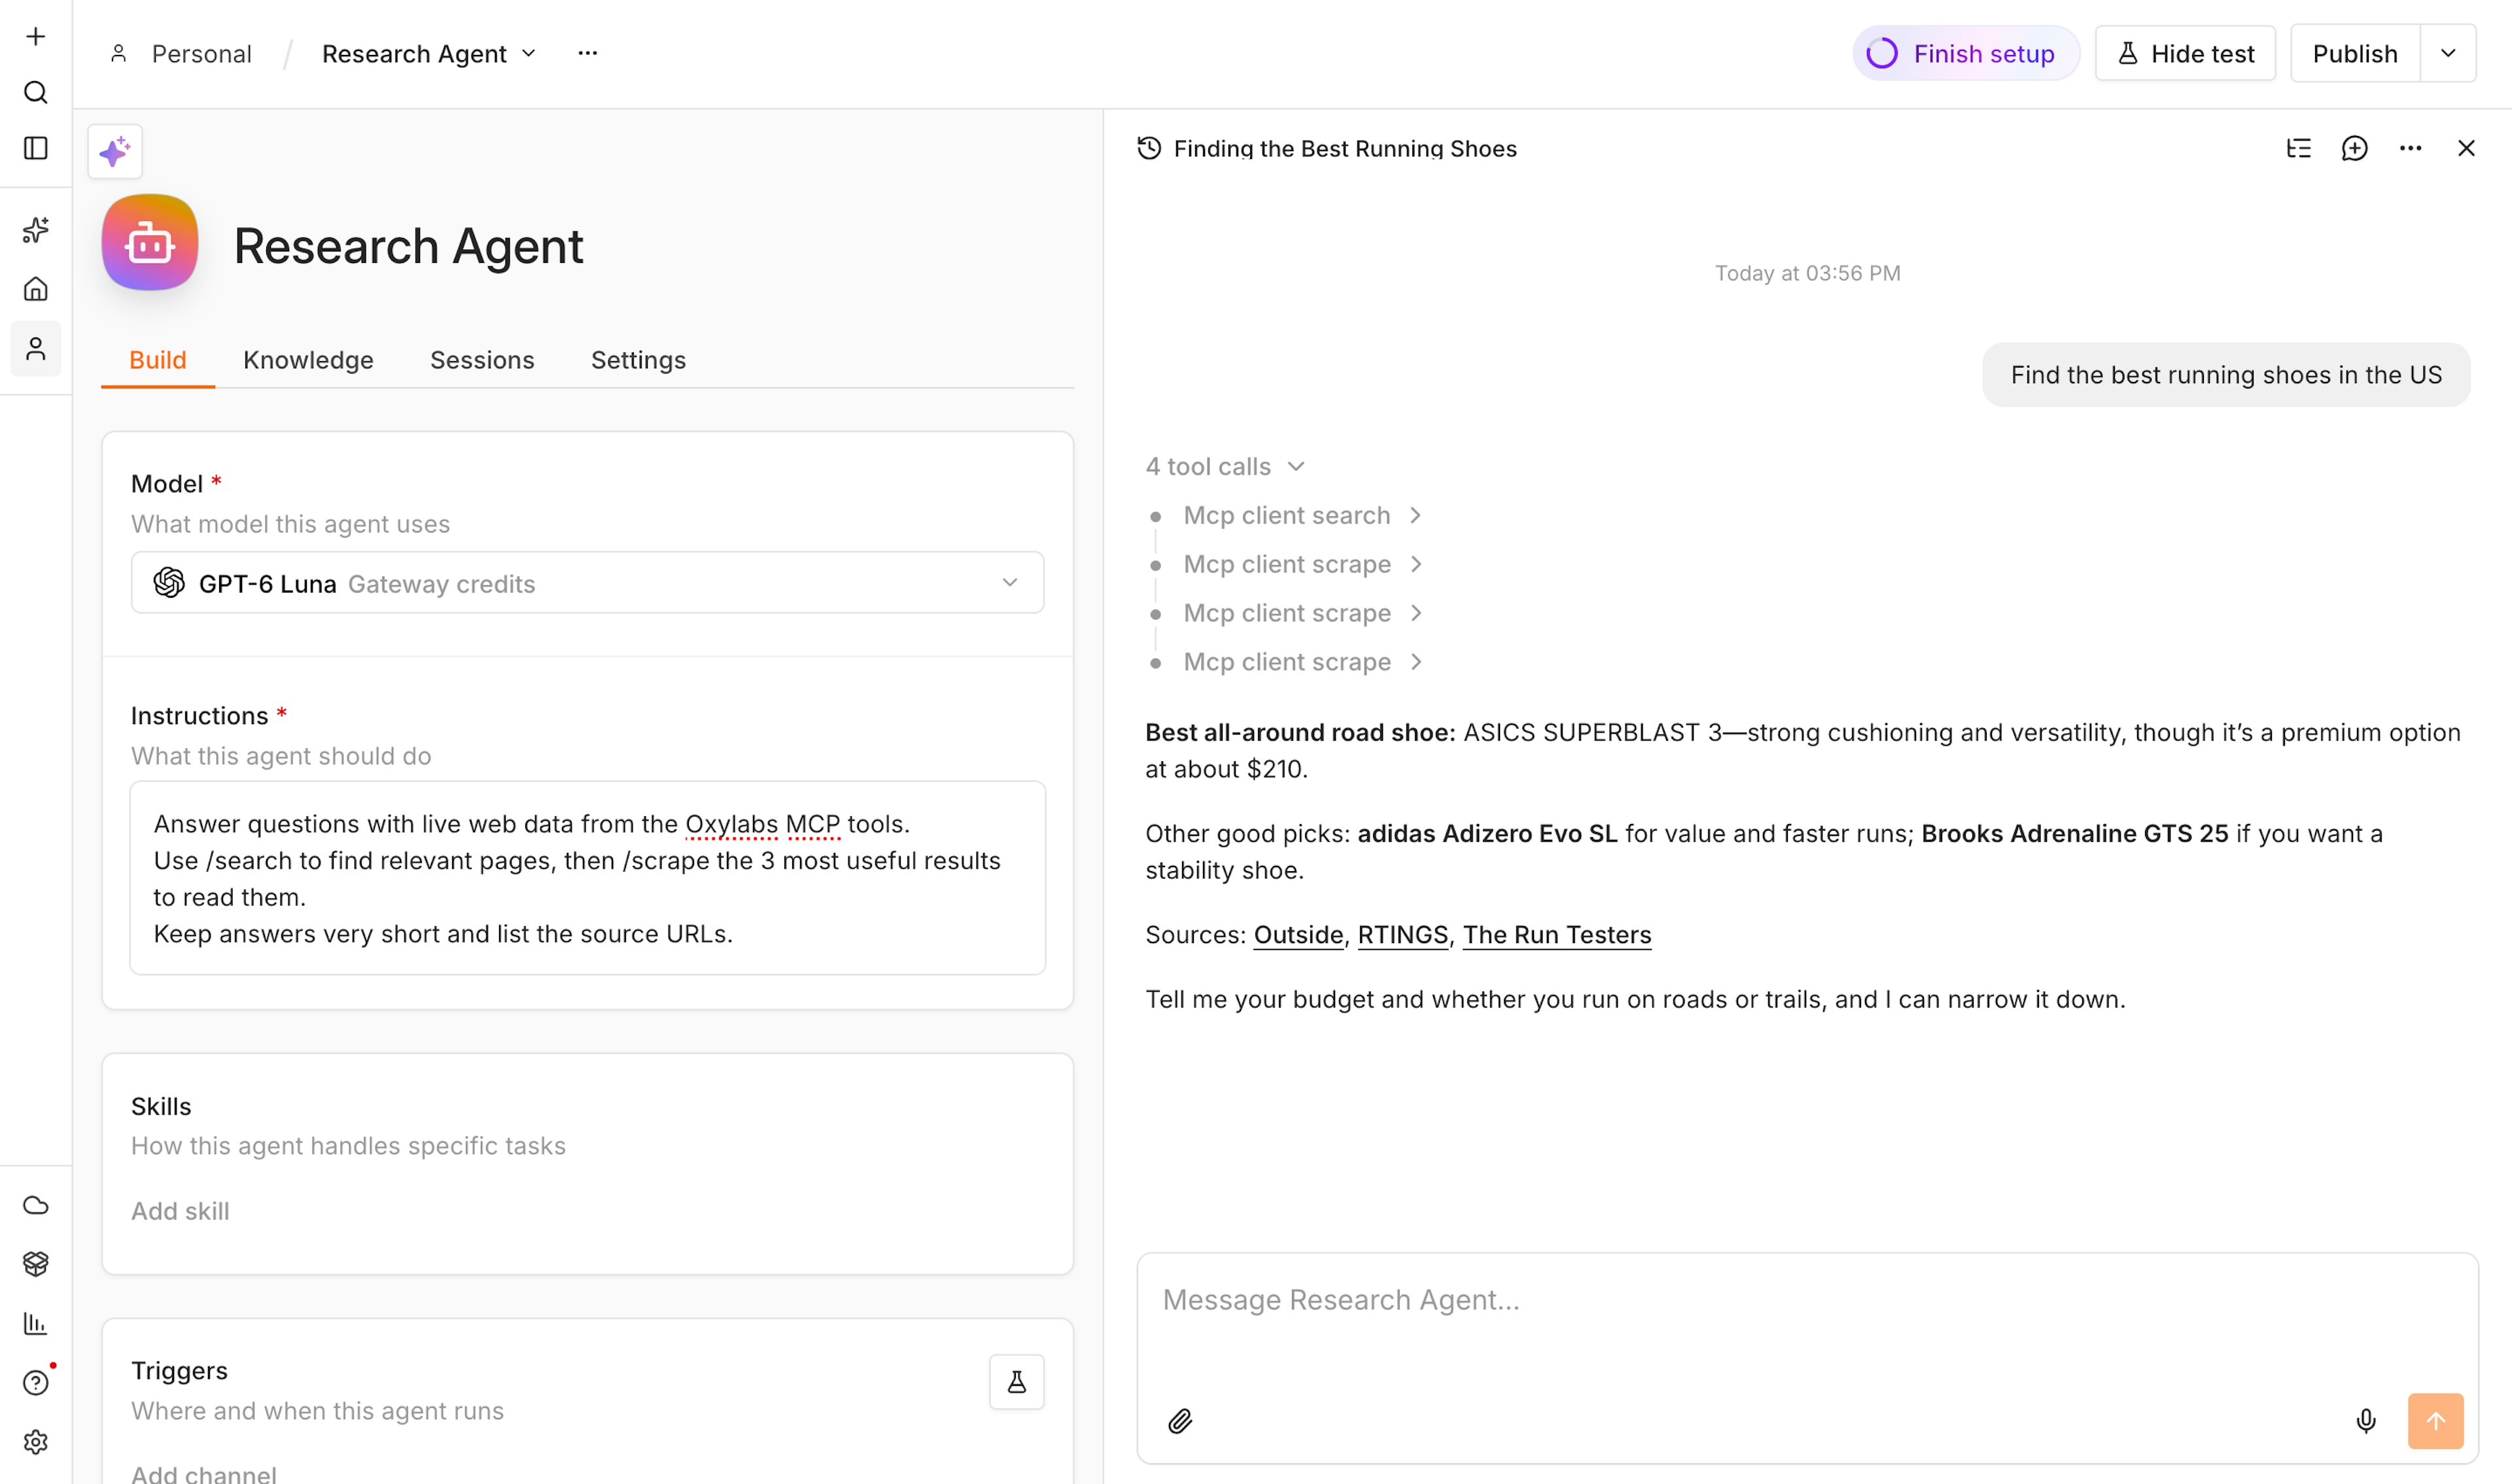
You can then use the published agent in your n8n workflows by adding the Message an Agent node.
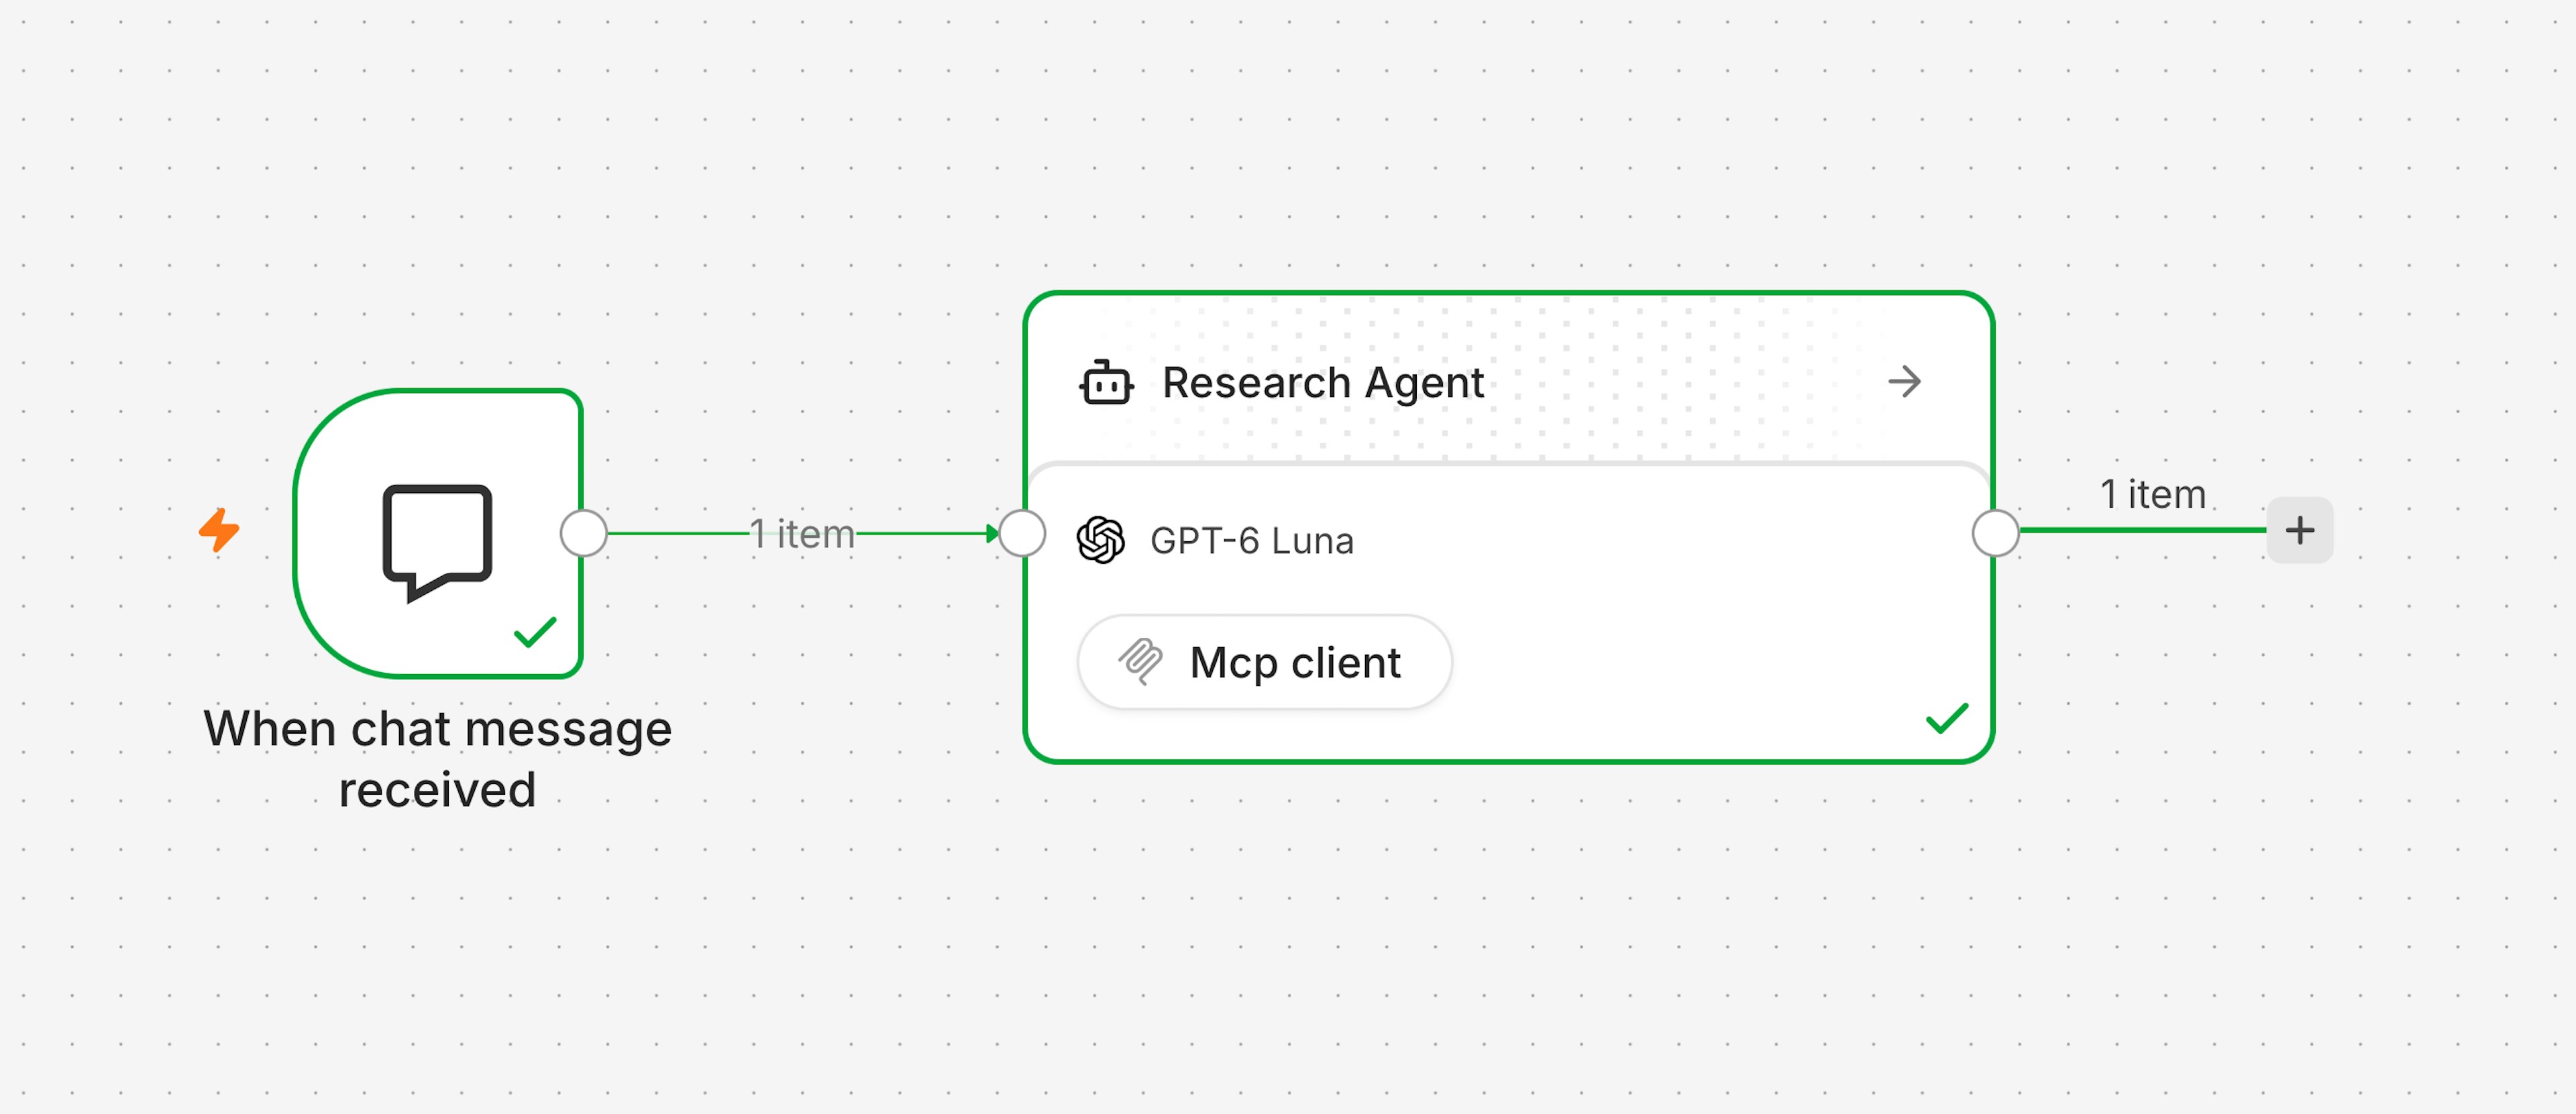
2.5 Other agent nodes
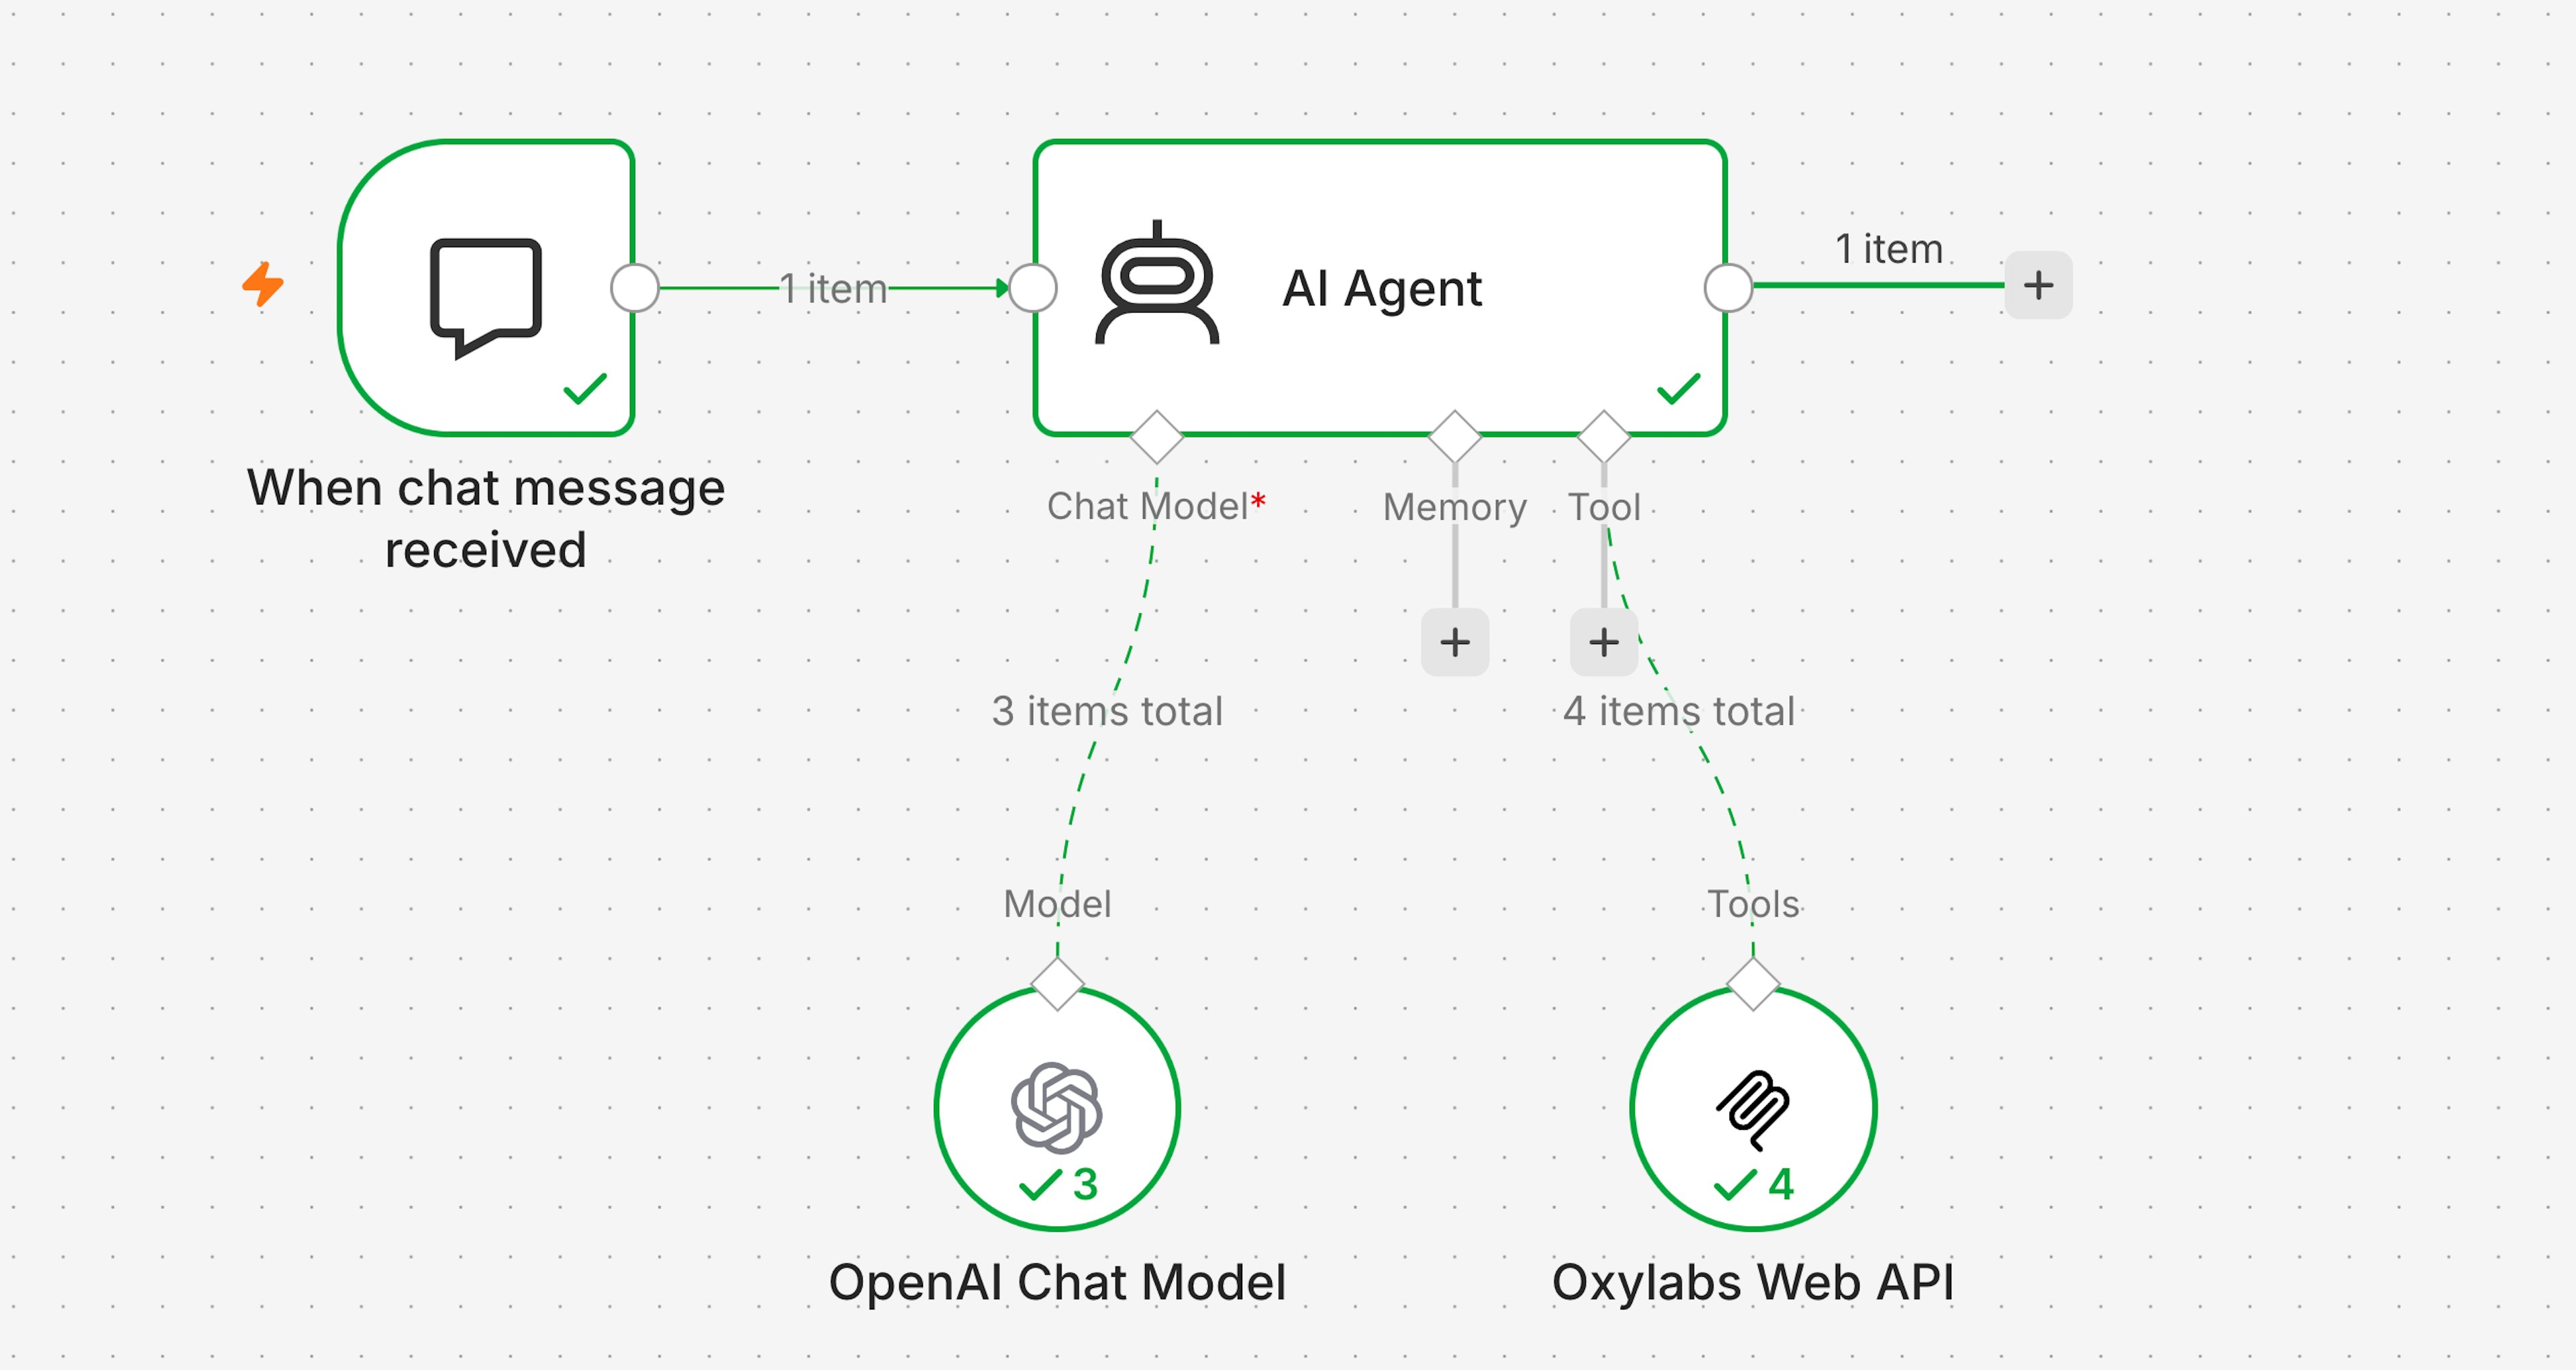
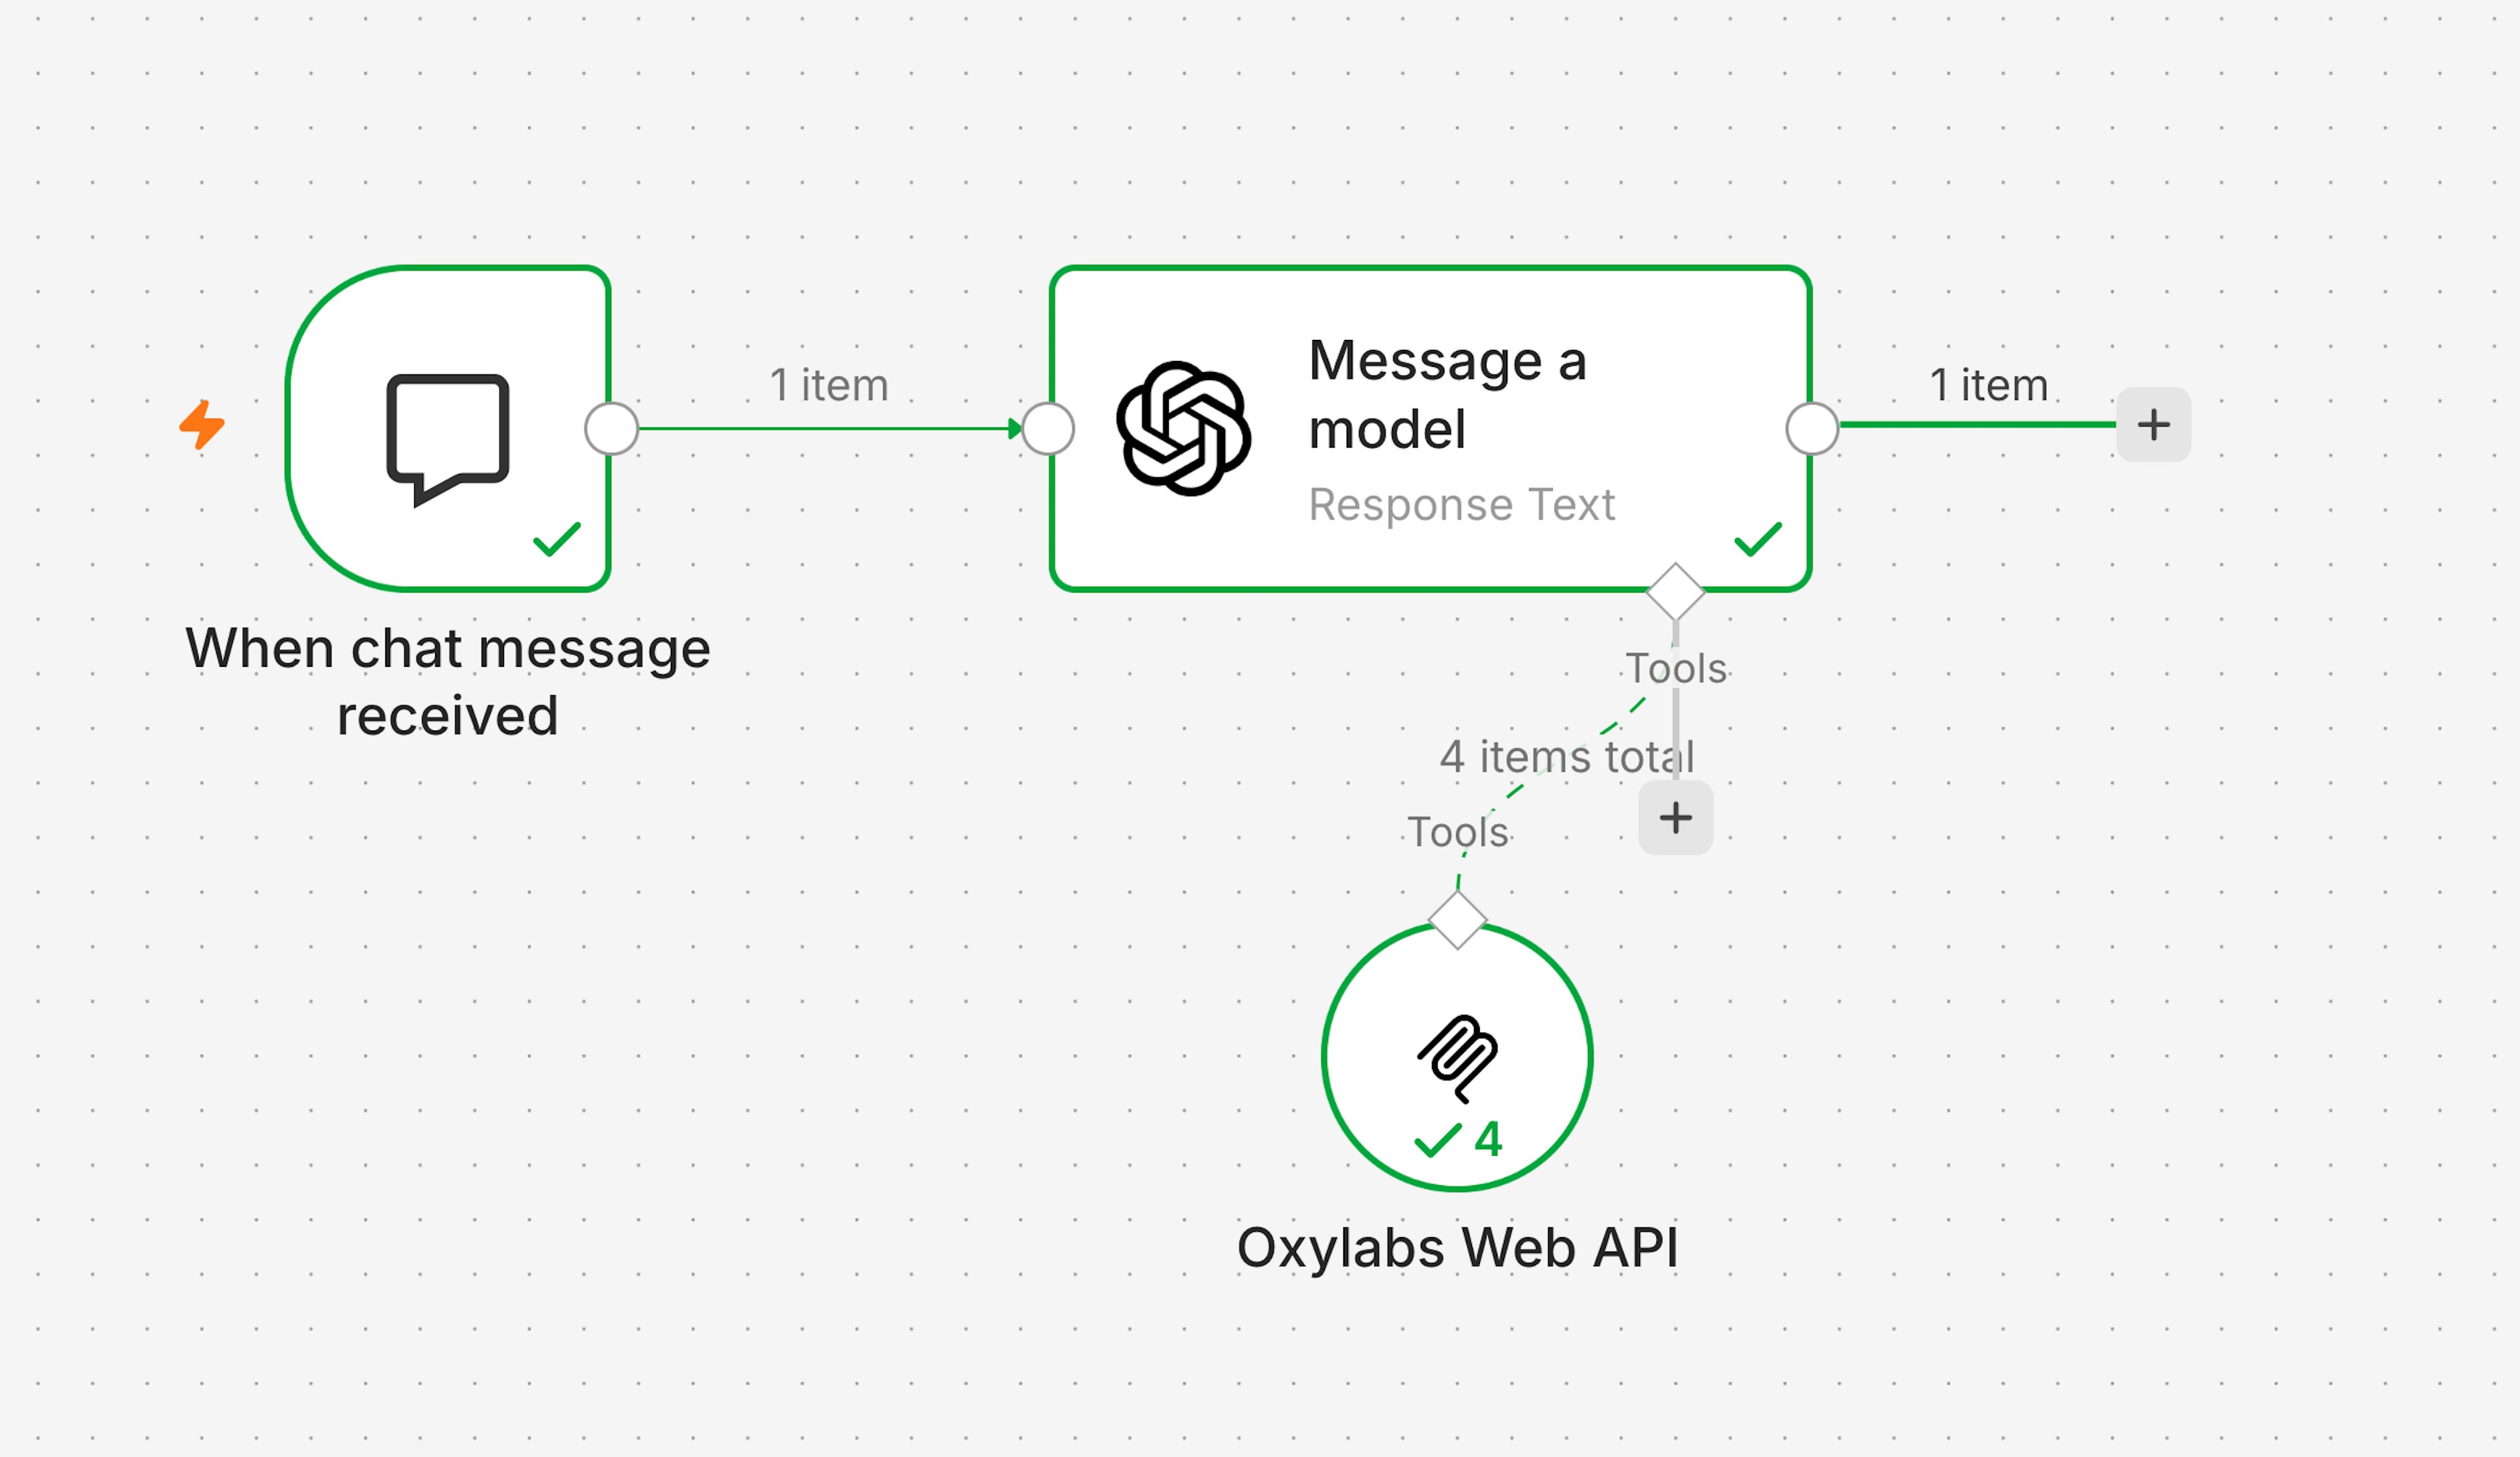
The same Web API MCP configuration works with any n8n AI node that supports MCP connections. This includes the AI Agent node and direct model nodes like OpenAI, Anthropic, and Gemini.
AI Agent node setup:
OpenAI node with MCP:
Using the n8n Assistant
Instead of building the workflow by hand, you can prompt the n8n Assistant to do it for you. Open New chat in the main menu and describe what you want.
For example, let's have it build a flow that researches recent AI model releases every three days and emails you a digest:
Build a workflow with the Oxylabs Web API (docs: https://developers.oxylabs.io/products/web-api/for-agents.md) using my "Oxylabs Web API" credential.

1. Run every 3 days at 8:00. Put the search term in its own field in the first node.

2. Search the web for "new AI models" (search location: US, 20 results).

3. Have GPT-6-Luna pick the 5 most relevant and trustworthy recent sources based on titles, snippets and dates. Skip general pages that aren't about recent releases.

4. Scrape those 5 pages as Markdown. If a page comes back nearly empty, retry it with JavaScript rendering.

5. Have GPT-6-Luna list up to 10 AI models released or updated in the past 3 days from those pages, including new versions, with each model's official page or announcement link if a scraped page includes one. Remove duplicate links, then scrape each link once as Markdown, with the same JavaScript retry.

6. Have GPT-6-Luna write a digest entry for each of those models using the full text of all pages scraped in steps 4 and 5, and nothing else. Return the entries as structured data, newest first, with these fields:
   – Model name and company
   – Type – is it text, image, video or audio
   – Open-weight – always Yes or No: Yes only if the pages say the weights are released
   – Key specs (parameters, context window, etc.)
   – What's new, or what changed from the previous version
   – What types of tasks this model suits
   – Release date
   – A link to the official page or announcement if found, otherwise the article
Fill every field the pages support and leave out the rest, except Open-weight.

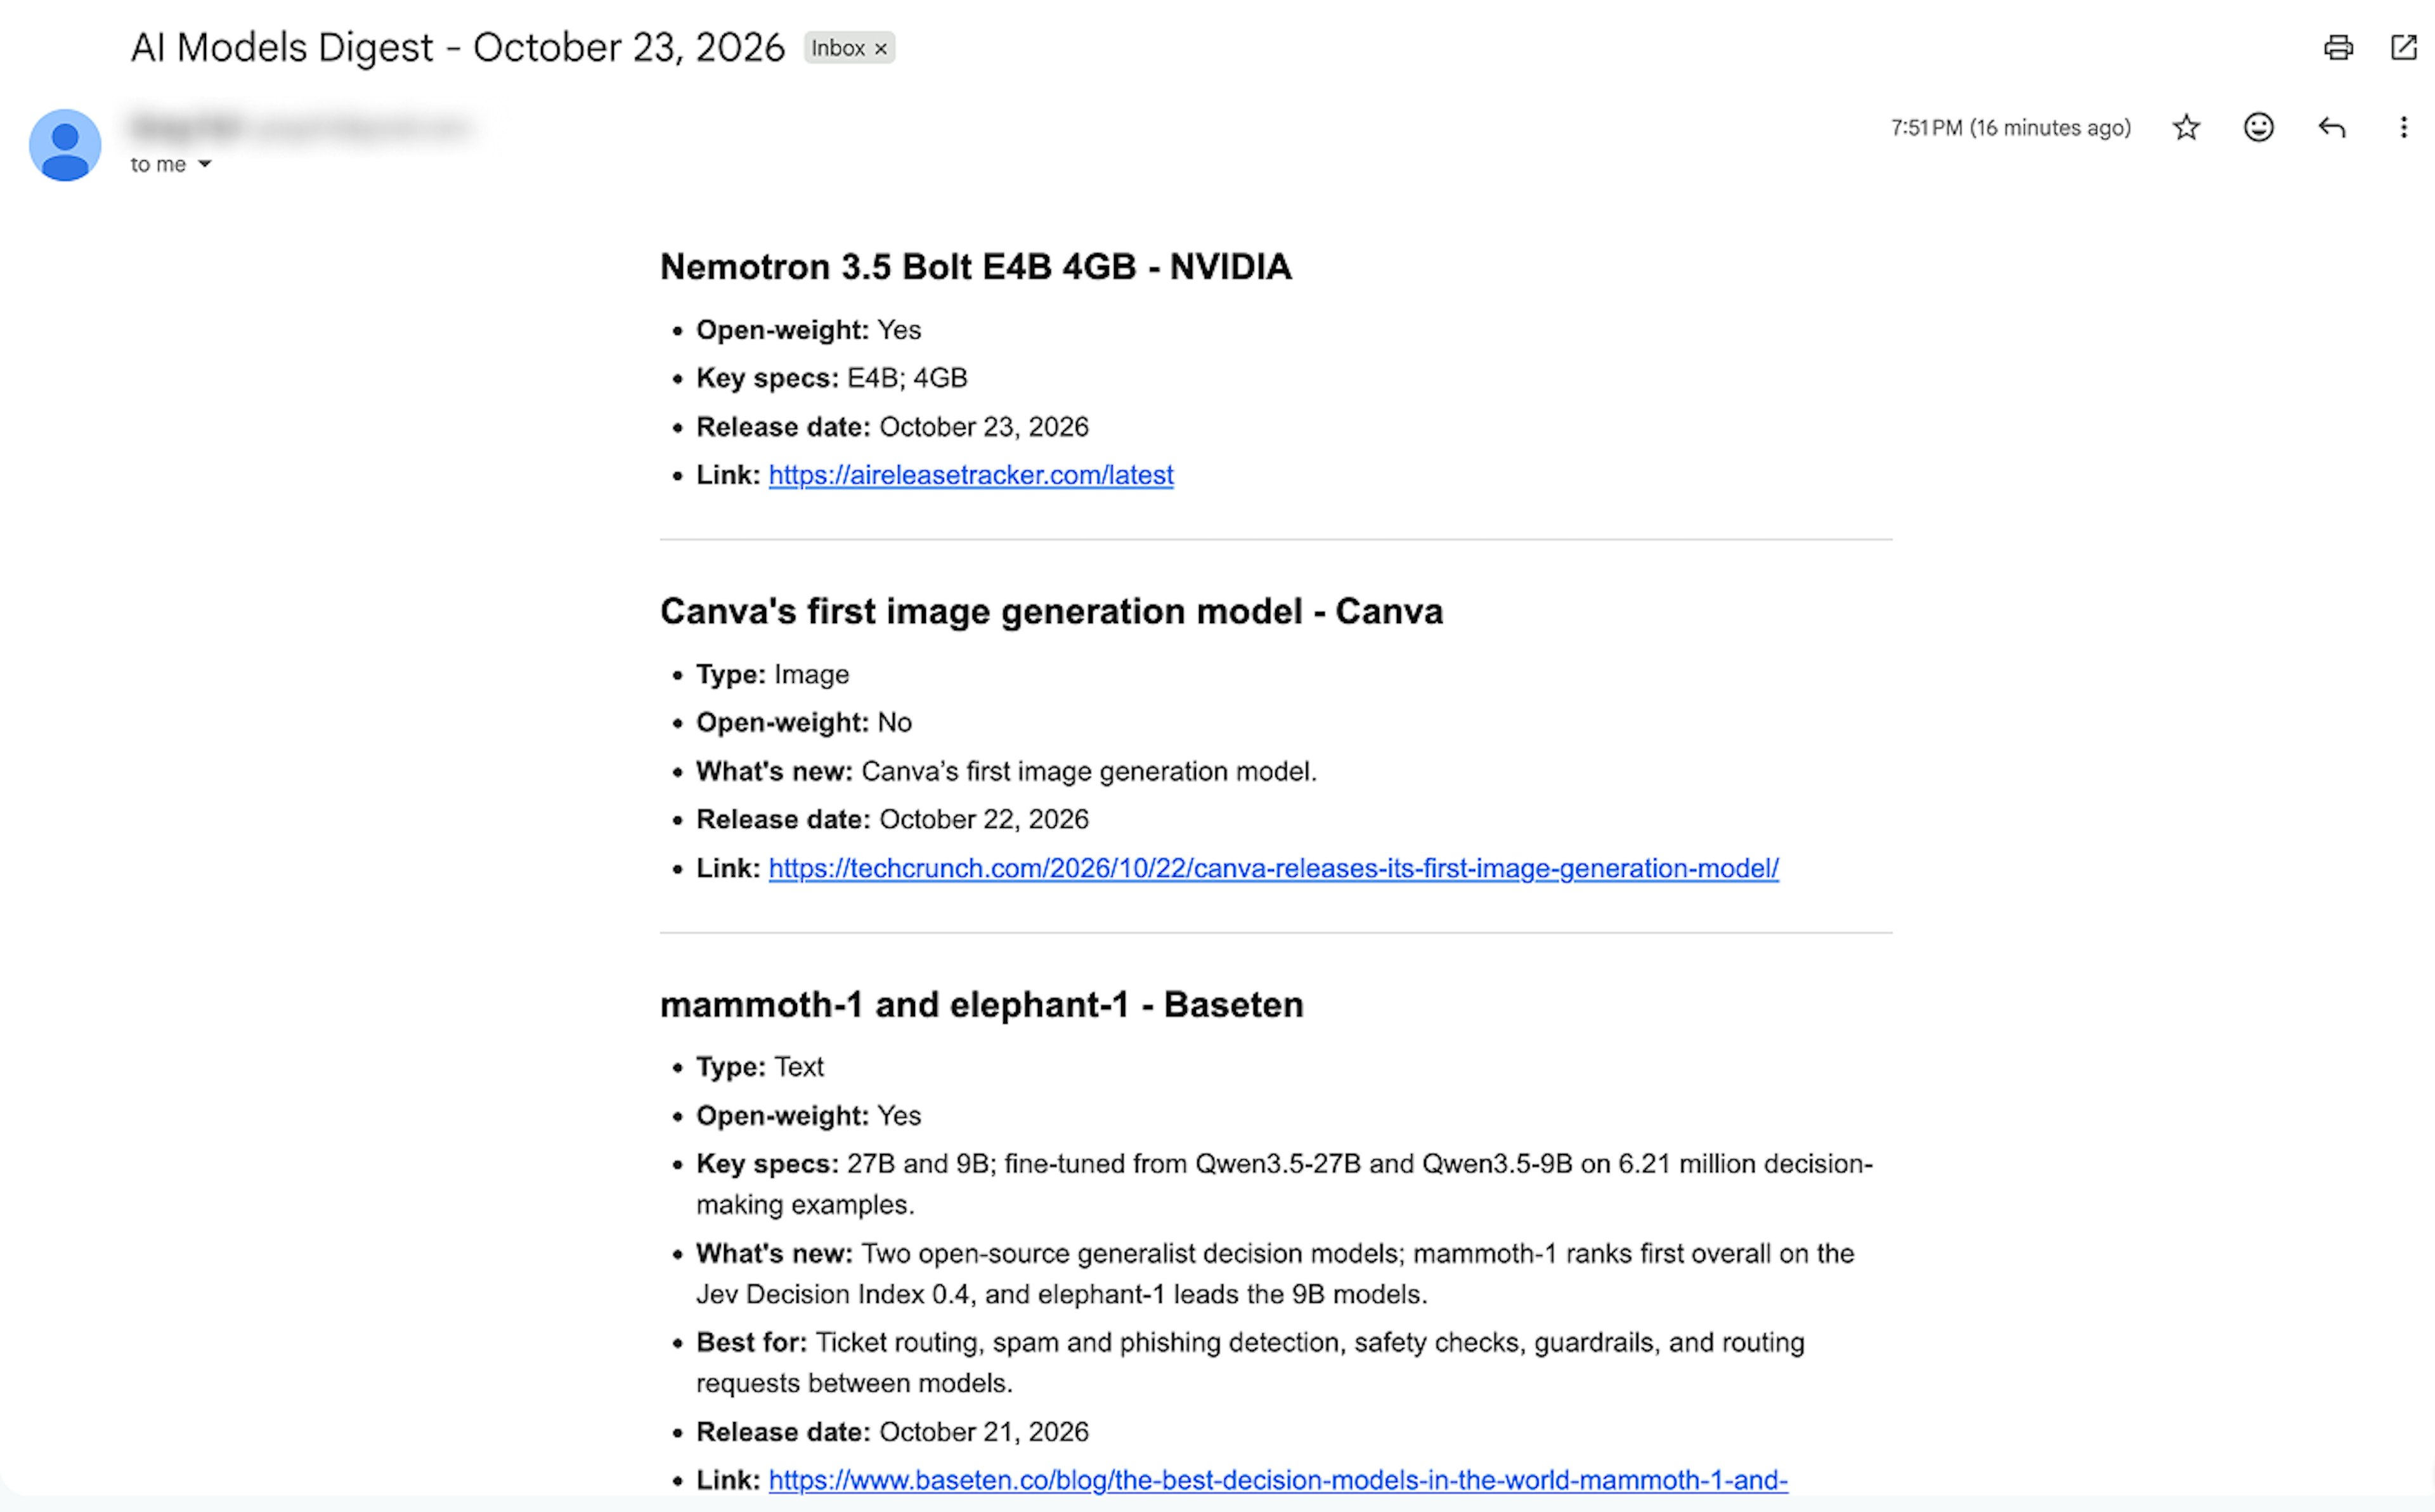
7. Build an HTML email from the entries with inline styles: each model's name and company as an H2, followed by its fields as bullets with bold labels and a divider between models. Show only fields that have a value. If there are no entries, send an email that says "No new AI models found in the last 3 days." instead. Send it to me with Gmail, with today's date in the subject.

Run it once and ask me before publishing.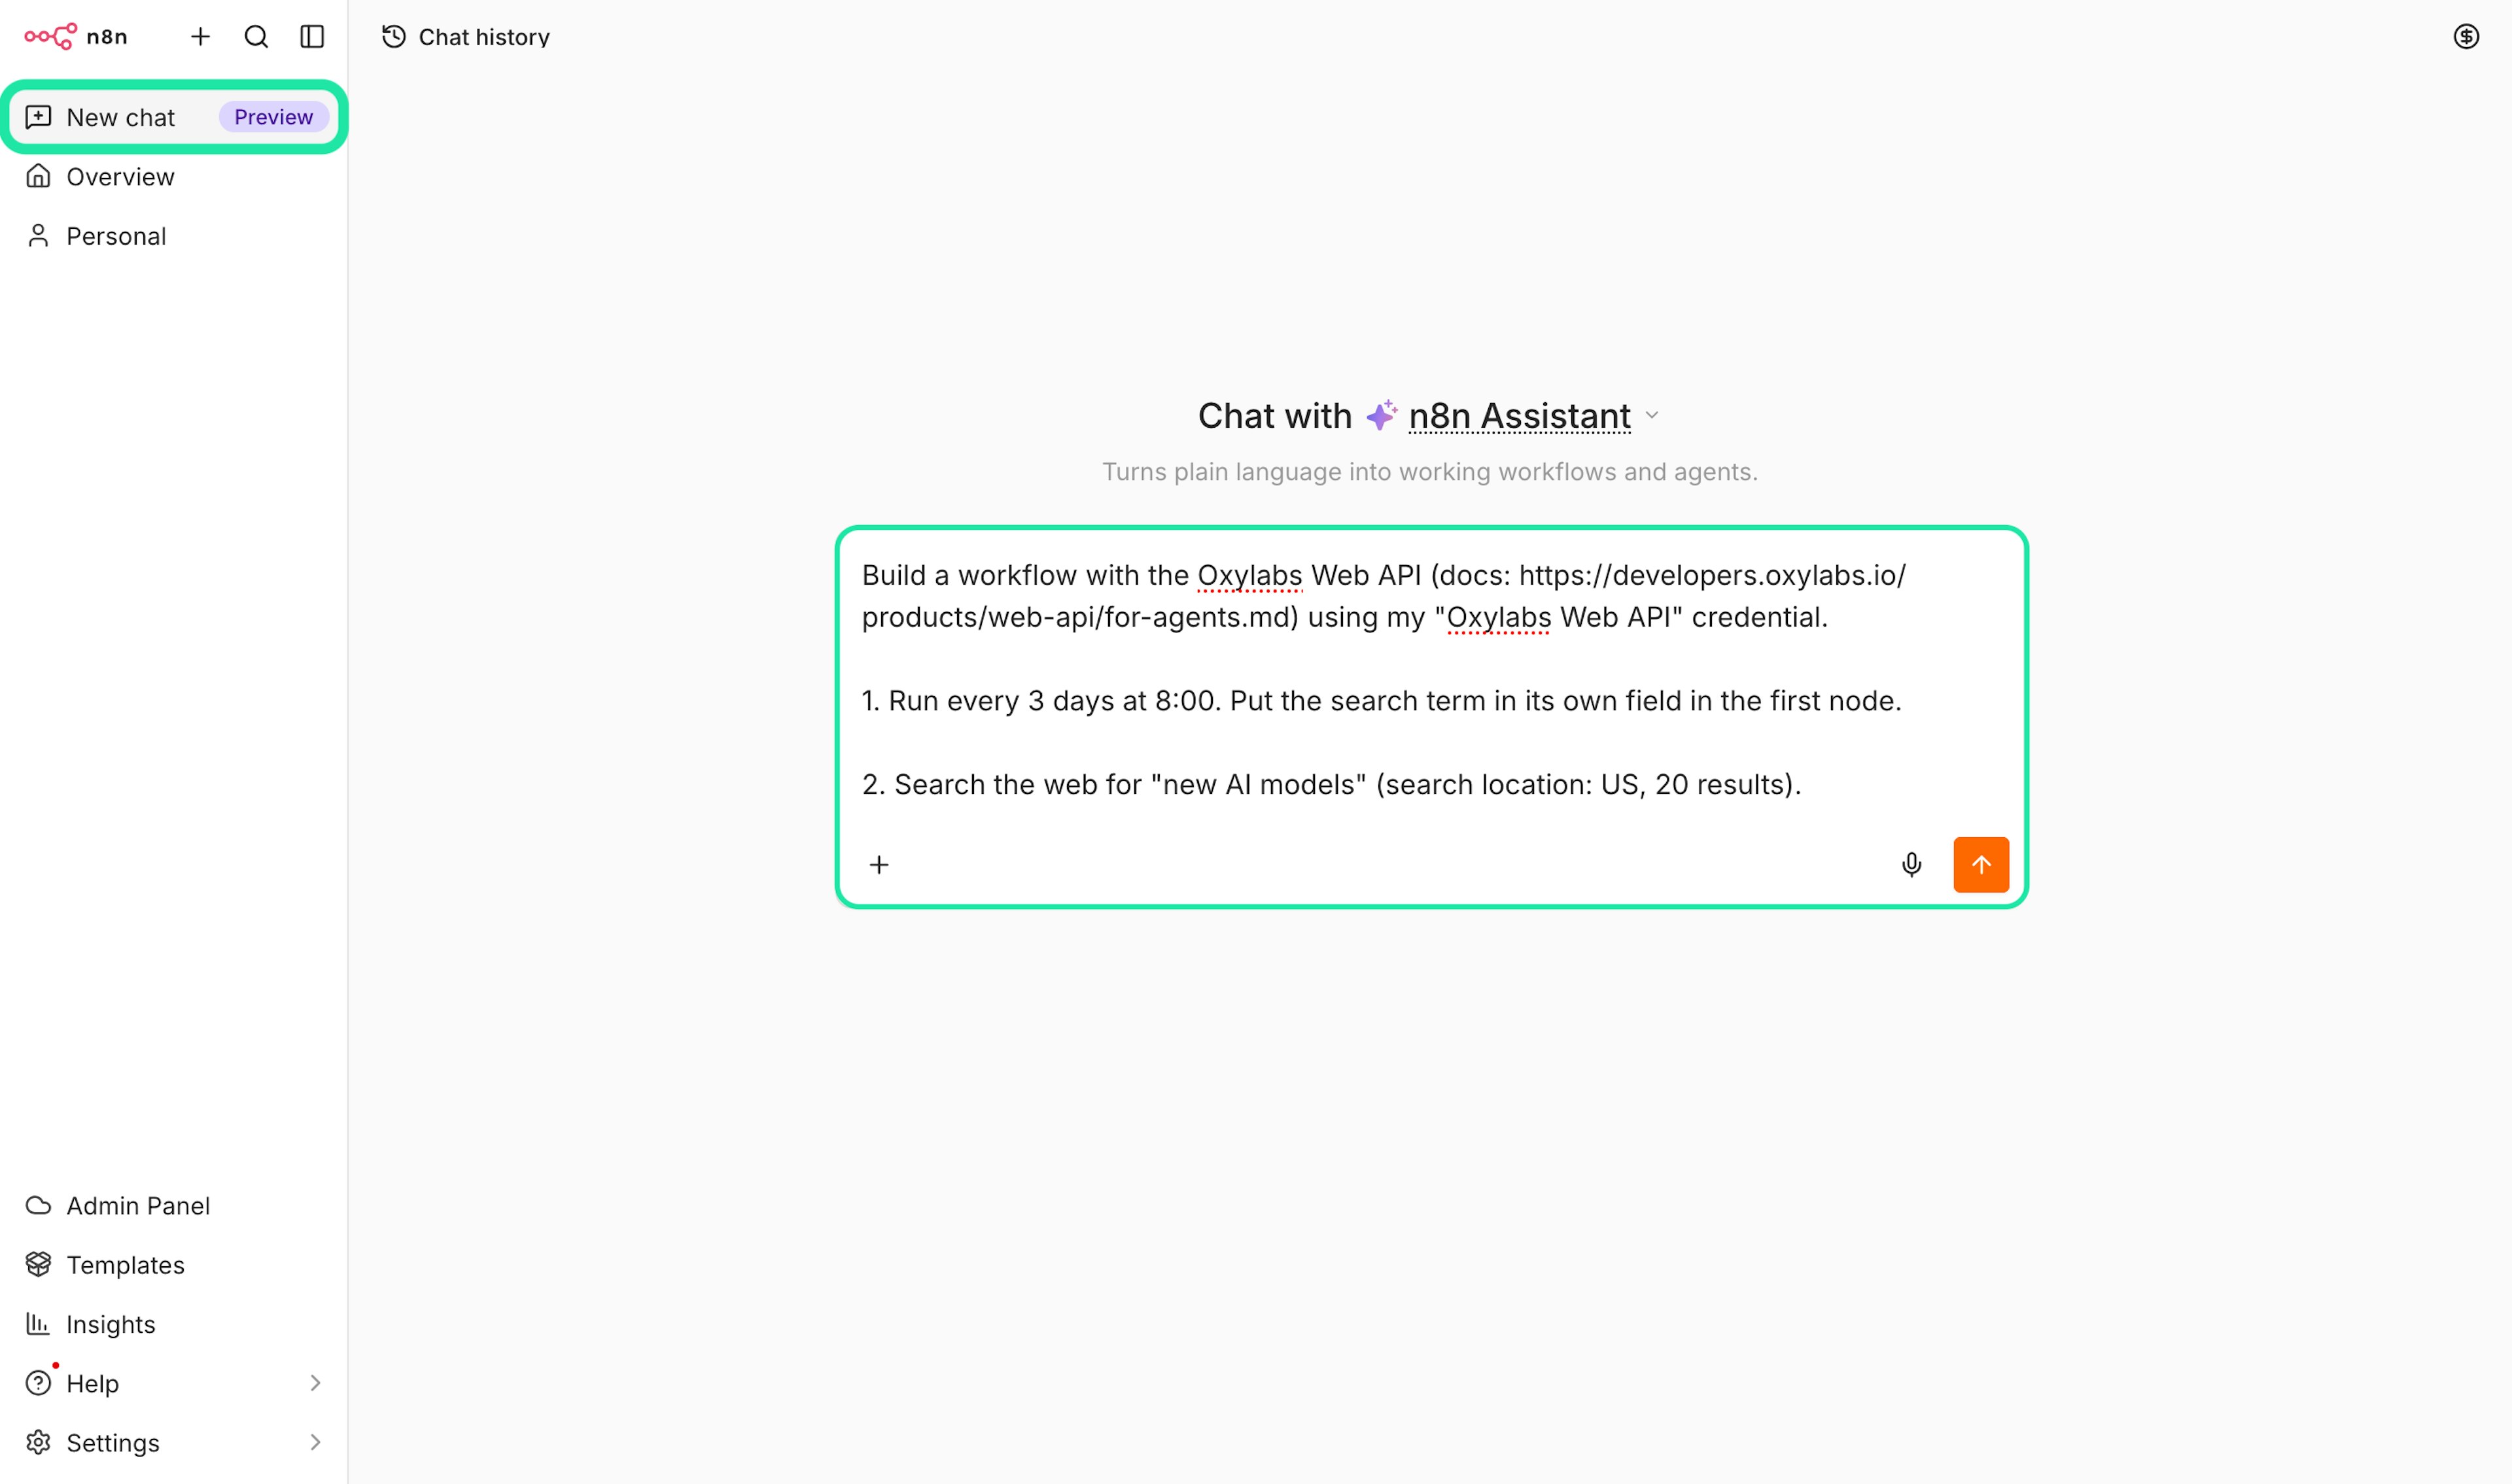
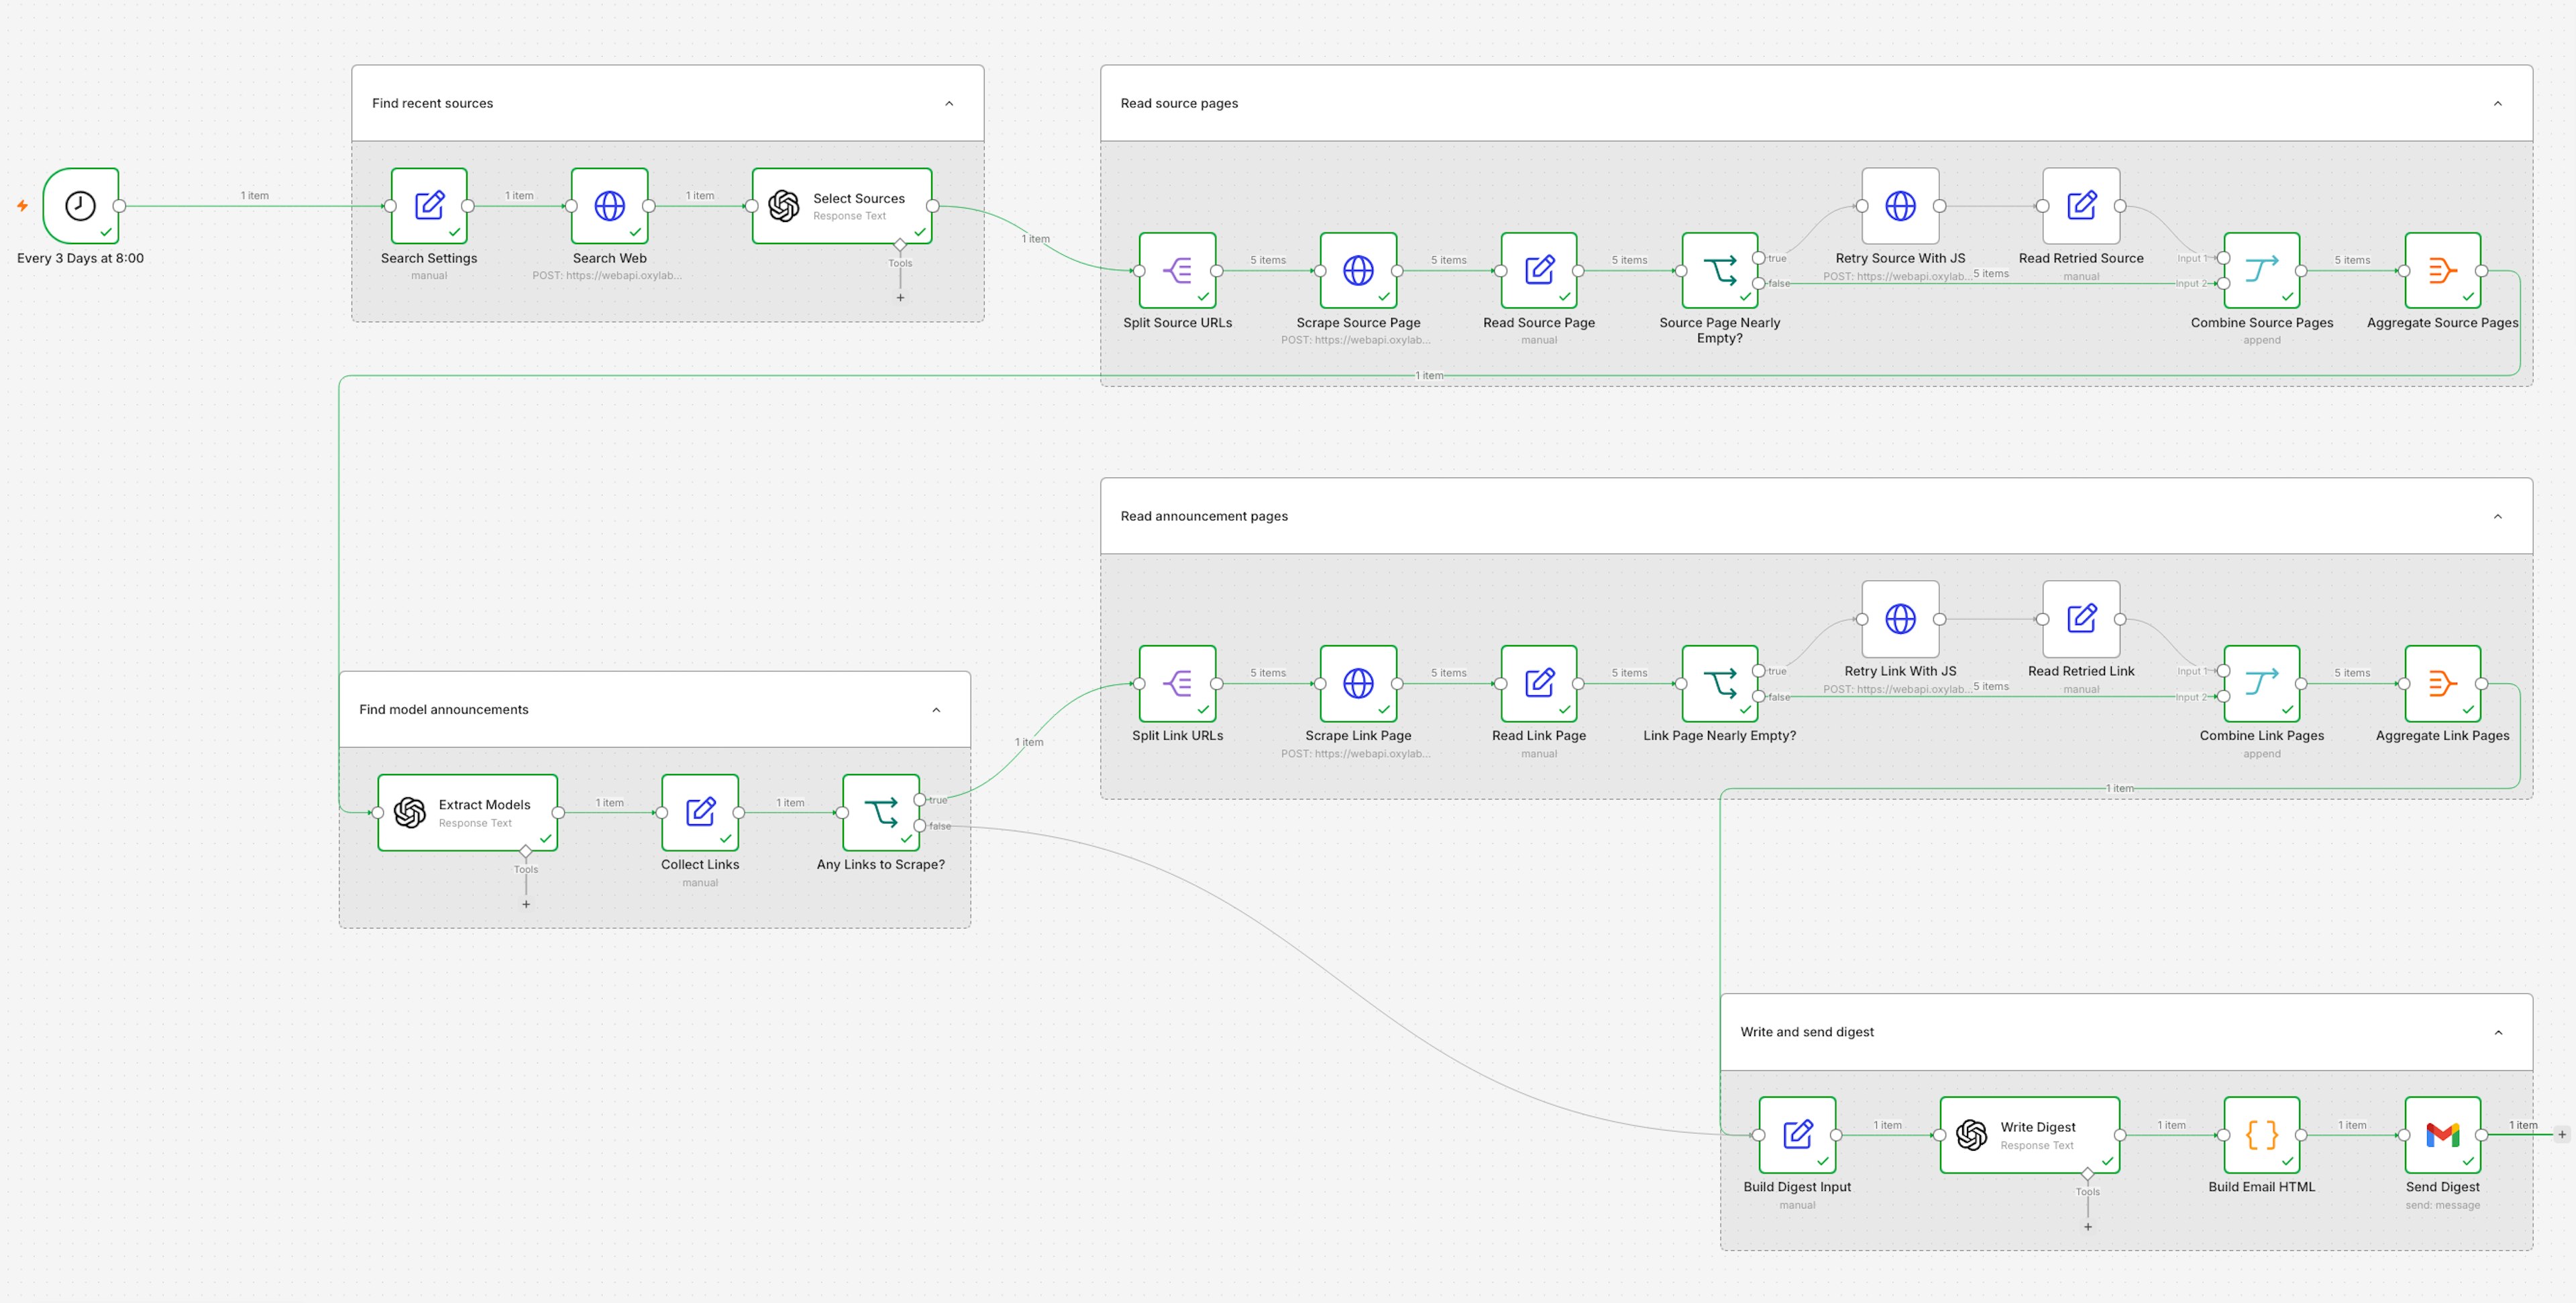
The Assistant will ask you to allow access to the Oxylabs docs and to connect the Gmail account that will send the digest. Once it finishes, you'll have a workflow like this:
And the email it sends:
Plug & play n8n workflow
The workflow we created above is also available for you to download and try out for free. Copy the workflow below into a JSON file and then go to Overview → Create workflow → click the three horizontal dots (⋯) → Import → From file.
{
  "name": "AI Models Digest (every 3 days)",
  "nodes": [
    {
      "parameters": {
        "rule": {
          "interval": [
            {
              "daysInterval": 3,
              "triggerAtHour": 8
            }
          ]
        }....
Important: Replace the <your@email.com> placeholder in the "Send Digest" node with your own email.
Troubleshooting
A few common issues and how to fix them:
| Error | Possible causes | Solution |
|---|---|---|
| 401 Unauthorized |
• Account has no Web API instance • Key is from a different Oxylabs product • Basic Auth used instead of Bearer • Stray whitespace in the pasted key |
In the HTTP Request node or MCP Client, use a Bearer Auth credential holding a key generated in the dashboard for a Web API instance. Strip any whitespace. |
| 400 Bad Request |
• Malformed JSON body • Unknown or misspelled parameter • Invalid value for a parameter |
The response’s errors[] array names the exact field via pointer. Fix that field in the request body. |
| 408 Request Timeout | • Timeout set too low for the request (common with JS-rendered pages or large-scale scrapes) | In the HTTP Request node’s Options, raise Timeout to at least 150000 ms. In the MCP Client, raise Timeout to 120000 ms. For heavy scrapes, use the /v1/async/scrape endpoint and poll for results. |
| Scraped page is empty or thin |
• Site renders content with JavaScript • Site serves different content by country |
Retry with run_js set to true in the body. If it’s still empty and the site is region-specific, also set location. |
| 429 Too Many Requests |
• API concurrency limit exceeded • API quota exhausted |
In the node settings, enable Retry On Fail with a wait between tries, and lower concurrency upstream. If retries don’t help, check your dashboard quota. |
| MCP Client can’t connect or no tools appear |
• Wrong server URL • Wrong server transport • Credential doesn’t match • When self-hosted, MCP_ALLOWED_HOSTS doesn’t include the hostname
|
Confirm the URL is https://mcp.oxylabs.io/web-api-mcp, Server Transport is HTTP Streamable, and the credential is Bearer Auth with a Web API key. For self-hosted, add your hostname to MCP_ALLOWED_HOSTS. |
Final thoughts
With Web API in n8n, you can automate reliable web data pipelines end to end. Use it to build workflows that generate business leads, enrich CRM records, monitor competitor pricing, track SERP changes, feed RAG pipelines, power AI research agents, and more.
Interested in other AI agent platforms? Check out our overview of the 6 Best AI Agent Frameworks or integration guides for Meta Muse and Instinct agent.
Please be aware that this is a third-party tool not owned or controlled by Oxylabs. Each third-party provider is responsible for its own software and services. Consequently, Oxylabs will have no liability or responsibility to you regarding those services. Please carefully review the third party's policies and practices and/or conduct due diligence before accessing or using third-party services.
Frequently Asked Questions
What is n8n?
n8n is a visual automation toolkit (under the Sustainable Use License) built around modular “nodes” you can mix, match, and extend to integrate APIs and handle logic. It includes secure credential storage and handling, offers hundreds of prebuilt integrations with popular third-party tools, and can run either self-hosted or on n8n Cloud.
How does n8n compare to Zapier?
How does n8n handle data security and privacy?
Useful resources
Web Scraping With Muse & Oxylabs Web API
Follow our quick guide on combining Meta Muse with Web API for easy agentic web scraping workflow and AI-driven analysis.
How to Integrate Oxylabs Web API With Instinct
Integrate Oxylabs Web API with Instinct agent to build automated AI workflows that collect and analyze data from any public sources.
Start using Oxylabs Web API
Learn everything you need to know to start using Oxylabs Web API for effortless public data discovery and collection at scale.

Get the latest news from data gathering world