175M+ ethically sourced IPs built for the highest reliability.
High-speed, cost-effective proxies built for any scraping workload.
Premium static residential proxies from trusted ASNs for most difficult targets.
Exclusive high-performance proxies for data-intensive tasks.
Dedicated IPs from premium ASNs for demanding scraping.

AI-powered proxy solution for optimized web scraping performance.

20M+ IP addresses from real mobile devices for precise targeting.

Free Chrome proxy manager extension that works with any proxy provider.

Free Android proxy manager app that works with any proxy provider.

Free community-driven tools to improve your web scraping projects.
Web Scraper API
All-in-one web data collection platform for every stage of web scraping.
Fast Search API
Ultra-fast organic search results scraper tailored for AI workflows.
Headless Browser
Advanced browser automation solution for AI agents and scraping.
AI Studio
A suite of AI-powered tools for various scraping projects.
Data for AI
From RAG to autonomous agents, fuel your AI applications with precise, real-time, and multimodal data pipelines at scale.
Instant search results data
Gather top 10 organic search results for AI agents in milliseconds.
Video & audio data
Collect massive volumes of multimodal video and audio data for model training.
Web data from any website
Scrape rich and structured web data for model training or RAG pipelines.
Browser automation
Let AI agents navigate, automate, and extract web data from the toughest targets.
Web index data
Retrieve up-to-date, pre-indexed web content for RAG and agentic workflows in sub-second.


Documentation
All features, parameters, and integration details, backed by code samples in every coding language.
Tutorials, samples, and guides.
Latest fixes and features.


LLM Web Scraping: Integrate Assistants API with Scraped Data


Vytenis Kaubrė
Last updated on
2024-07-24
6 min read
![]() AI Summary:
AI Summary:
This tutorial shows how to connect Oxylabs Web Scraper API with OpenAI's Assistants API to build AI assistants that use fresh web data. It walks through creating a Python Product Assistant that scrapes an e-commerce site, and covers three ways to pass scraped data to the API.
The Assistants API, created by OpenAI, allows developers to access the power of AI and connect external tools to build any assistant application. While the API has capabilities like interpreting code, using uploaded files, and calling functions, it lacks uninterrupted access to modern websites.
This guide will show you several different methods for integrating scraped public web data to the Assistants API with the help of Oxylabs Web Scraper API, which can also scrape SERP and e-commerce websites. In the end, you’ll have gained experience with both APIs by building a practical Product Assistant that performs data analysis of scraped web pages to answer questions.
How does Assistants API work?
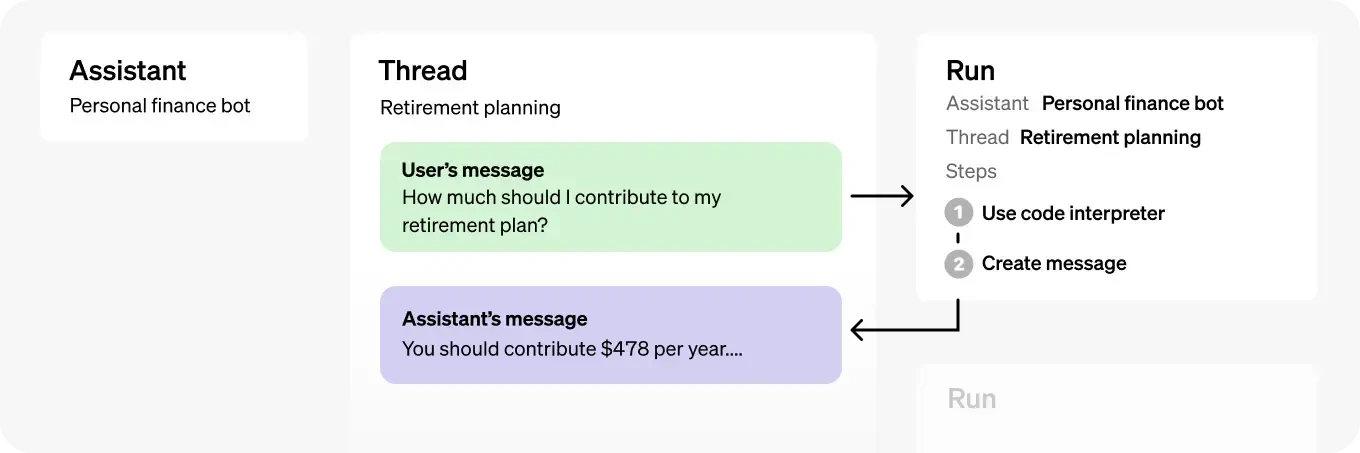
Image source OpenAI: https://platform.openai.com/docs/assistants/overview
Assistants API workflow involves the four main steps, as presented in the OpenAI’s documentation:
Assistants use instructions to determine their own purpose, capabilities, and personality as defined by users;
Assistants can access multiple built-in and user-defined tools at once;
Assistants can create new or access existing conversation threads;
Assistants can create and access files that developers or users upload and use those files to answer questions.
Limitations of Assistants API
Before starting up your assistant development, you should know some key limitations of Assistants API that may be pivotal for your project:
Code interpreter can have a maximum of 20 files attached, while the File search feature can accommodate up to 10,000 files;
Each file is limited to 512 MB and 5,000,000 tokens, with a default overall upload limit of 100 GB, which can be increased by contacting support;
You can process images as input using only two models that support the Vision feature (currently GPT-4o and GPT-4 Turbo);
Requests to the Assistants API are rate-limited based on your subscription;
The AI might answer incorrectly even if the supplied content is accurate.
How to use Assistants API with scraped data
The Assistants API integration takes three main steps for successful setup:
Extract data using Oxylabs Web Scraper API;
Pass the data to the Assistants API for processing;
Submit a message to the Assistants API to receive an answer.
For a more straightforward guide, the article will showcase how you can create a basic product assistant that uses scraped content from a demo e-commerce website to answer product-related questions. Also, check out this blog post to learn more about the main public data sources for LLMs.
Remember there are various ways you can integrate both tools. This guide will show you the main integration steps, providing you with the bread and butter for further development ventures.
1. Extract data using a scraper
Let’s keep it simple by creating a separate Python file that scrapes product data and saves everything to a JSON file. Providing raw HTML content to the Assistants API can easily exceed the token limit and increase your OpenAI's API subscription costs. Hence, the best approach is to parse data that you need and save it in a structured format like JSON or CSV.
If you’re new to Oxylabs Web Scraper API, we recommend taking advantage of Oxylabs SDK for Python and Golang languages, as it makes it easier to write the code for your specific target website. Additionally, check out our documentation, where you can find data dictionaries and code examples for a quick start.
Get a free trial
Claim your free trial to test Web Scraper API for your project needs.
Up to 2K results
No credit card is required
This guide is written using Python 3.12, so make sure to install the latest version of the software. The code should also work well with Python 3.7+ versions. Once you have Python ready, you can install the requests library to help you make calls to Web Scraper API. Open up your terminal and run the following line:
pip install requestsFor better security, you can store your Web Scraper API credentials safely using environment variables. On a Windows device, open your Command Prompt and run the following command:
setx OXYLABS_CREDENTIALS "username:password"Make sure to use your actual username and password separated by :. To ensure your credentials were saved, open a new Command Prompt window and run this line to print them to stdout:
echo %OXYLABS_CREDENTIALS%If you’re using macOS or Linux, run the following two commands in your terminal:
echo "export OXYLABS_CREDENTIALS='username:password'" >> ~/.zshrc
source ~/.zshrc
Then, you can check the environment variable by executing this line:
echo $OXYLABS_CREDENTIALSOnce that’s done, copy the below code and paste it into a new .py file:
# === product_scraper.py === #
import requests, json, os
from pprint import pprint


# Access your Oxylabs Scraper API credentials from the env variable.
USERNAME, PASSWORD = os.environ.get("OXYLABS_CREDENTIALS").split(':')

# Structure payload.
payload = {
    'source': 'universal',
    'url': 'https://sandbox.oxylabs.io/products', # Link to the target website.
    'render': 'html',
    'parse': True,
    'parsing_instructions': {
        'products': {
            '_fns': [
                {
                    '_fn': 'xpath',
                    '_args': ['//div[contains(@class, "product-card")]']
                }
            ],
            '_items': {
                'title': {
                    '_fns': [
                        {
                            '_fn': 'xpath_one',
                            '_args': ['.//h4/text()']
                        }
                    ]
                },
                'price': {
                    '_fns': [
                        {
                            '_fn': 'xpath_one',
                            '_args': ['.//div[contains(@class, "price")]/text()']
                        }
                    ]
                },
                'availability': {
                    '_fns': [
                        {
                            '_fn': 'xpath_one',
                            '_args': ['.//p[contains(@class, "stock")]/text()']
                        }
                    ]
                },
                'url': {
                    '_fns': [
                        {
                            '_fn': 'xpath_one',
                            '_args': ['.//a[contains(@class, "card-header")]/@href']
                        }
                    ]
                }
            }
        }
    }
}

# Send a POST request using the Realtime integration method.
response = requests.request(
    'POST',
    'https://realtime.oxylabs.io/v1/queries',
    auth=(USERNAME, PASSWORD),
    json=payload
)

# Print the entire JSON response, including results and job information.
pprint(response.json())

# Save product data to a JSON file.
with open('products.json', 'w', encoding='utf-8') as f:
    json.dump(response.json()['results'][0]['content']['products'], f)
The code scrapes a demo website and uses Custom Parser to select HTML elements and extract product titles, prices, availability, and URLs with XPath selectors (you may also use CSS selectors instead). If you aim to scrape SERP results from Google, Bing, or e-commerce giants like Amazon or Walmart, you can also get automatically parsed results. Visit our documentation for more details.
After running the code, you should see a products.json file in your working directory containing parsed data:
[
    {
        "url": "/products/1",
        "price": "91,99 \u20ac",
        "title": "The Legend of Zelda: Ocarina of Time",
        "availability": "In stock"
    },
    {"...": "..."},
    {
        "url": "/products/32",
        "price": "91,99 \u20ac",
        "title": "Grim Fandango",
        "availability": "Out of Stock"
    }
]
2. Install the OpenAI library and store your API key
Next, install the OpenAI SDK in your terminal using this line:
pip install openaiAs highlighted in the OpenAI documentation, you should also store your OpenAI API key safely. Follow the steps shown previously for saving Oxylabs credentials, or see these OpenAI instructions for Windows, macOS, and Linux devices. Additionally, you may want to check the quickstart guide for more details.
The OpenAI SDK automatically gets the key from the environment variable using os.environ.get("OPENAI_API_KEY") by default. Hence, you can access your API key with a simple code:
import openai

client = openai.OpenAI()
If you’ve saved the key to a custom-named environment variable, you can specify your environment variable like this:
client = openai.OpenAI(
    api_key=os.environ.get("YOUR_ENV_VARIABLE_NAME")
)
3. Define your assistant
In a new Python file, import the OpenAI SDK and define the file paths, assistant name, instructions, and OpenAI model:
from openai import OpenAI


file_paths = ["products.json"]
name = "Product assistant"
instructions = (
    "You are a product assistant that analyzes video game data (products.json file) and provides very short information to the user about specific products. "
    "You must analyze each product's information. The 'availability' key specifies whether the product is in stock or out of stock."
    "Provide answers in plain text without markdown. Use this format for listing products: Product Title - Product Price - Product Availability - Product Link. "
    "For product link, use the URL value and add it to https://sandbox.oxylabs.io. For instance, https://sandbox.oxylabs.io/products/1."
)
model = "gpt-4o"
4. Create an assistant class
Next, create a ProductAssistant class that’ll act as a blueprint for setting up the assistant, storing files, and creating messages:
class ProductAssistant:
    def __init__(self, file_paths, name, instructions, model):
        self.file_paths = file_paths
        self.name = name
        self.instructions = instructions
        self.model = model
        self.client = OpenAI()
        self.assistant = None
        self.thread = None
        self.setup_assistant()
5. Set up an assistant and upload a file
First, within the ProductAssistant class, create a function that lists all available assistants and checks if any have the same name and instructions as the current assistant. If there’s a match, the code returns the ID of the existing assistant, and if it doesn’t match anything, then the code returns None. This check is necessary so you won’t create new assistants each time you run the code.
    def retrieve_assistant(self):
        assistants_list = self.client.beta.assistants.list(order="desc")

        for existing_assistant in assistants_list.data:
            if existing_assistant.name == self.name and existing_assistant.instructions == self.instructions:
                return self.client.beta.assistants.retrieve(existing_assistant.id)
        return None
Visit the OpenAI API reference for more details about the available endpoints and response samples.
Next, define another function that creates a vector store called “Video Games”, uploads the products.json file, and returns the ID of the vector store:
    def create_vector_with_files(self):
        vector_store = self.client.beta.vector_stores.create(name="Video Games")

        file_streams = [open(path, "rb") for path in self.file_paths]
        self.client.beta.vector_stores.file_batches.upload_and_poll(
            vector_store_id=vector_store.id, files=file_streams
        )
        return vector_store.id
Note that the code uses the File Batches endpoint. You may also store single files if needed.
Once the vector store is created, you can then create a new assistant by passing the defined name, instructions, and model variables to it. Additionally, the tools parameter tells the API to enable the File Search feature, while the tool_resources parameter searches for files in the newly created vector store:
    def create_assistant(self, vector_store_id):
        return self.client.beta.assistants.create(
            name=self.name,
            instructions=self.instructions,
            model=self.model,
            tools=[{"type": "file_search"}],
            tool_resources={"file_search": {"vector_store_ids": [vector_store_id]}}
        )
After that, you can combine all the previous functions under a new one to set up the assistant. Here, you should also create a thread for adding messages:
    def setup_assistant(self):
        self.assistant = self.retrieve_assistant()

        if not self.assistant:
            vector_store_id = self.create_vector_with_files()
            self.assistant = self.create_assistant(vector_store_id)

        self.thread = self.client.beta.threads.create()
6. Add a message to the thread and create a Run
Once the assistant is ready, the next step is to add a user’s message to the thread. Here, the question variable will utilize the built-in input() function that we’ll define later:
    def add_message_to_thread(self, question):
        self.client.beta.threads.messages.create(
            thread_id=self.thread.id,
            role="user",
            content=question
        )
Next, configure another function that runs the thread to generate a response. It should also check the status to be “completed” before listing all the messages from the thread and returning the latest AI-generated message:
    def get_response(self):
        run = self.client.beta.threads.runs.create_and_poll(
            thread_id=self.thread.id,
            assistant_id=self.assistant.id
        )

        if run.status == "completed":
            messages = self.client.beta.threads.messages.list(thread_id=self.thread.id)
            return messages.data[0].content[0].text.value
        else:
            return run.status
Now you can compile both functions under a single ask_question() function:
    def ask_question(self, question):
        self.add_message_to_thread(question)
        return self.get_response()
7. Add the main function and a loop for questions
What’s left is to use the ProductAssistant class and create a while True loop that allows you to ask questions until you enter “exit”:
def main():
    assistant = ProductAssistant(file_paths, name, instructions, model)
    while True:
        question = input("\033[1;34mQuestion ->\033[0m ")
        if question.lower() in ["exit"]:
            print("\033[1;31mExiting the assistant.\033[0m")
            break
        answer = assistant.ask_question(question)
        print("\033[1;33mAnswer -> " + f"\033[1;32m{answer}\033[0m")

if __name__ == "__main__":
    main()
Once you run the code, you’ll be able to ask different questions about the products, for instance:

Complete code example
Let’s move the file_paths, name, instructions, and model variables to the main() function for modularity. Here’s what the final code should look like:
# === product_assistant_1.py === #
from openai import OpenAI


class ProductAssistant:
    def __init__(self, file_paths, name, instructions, model):
        self.file_paths = file_paths
        self.name = name
        self.instructions = instructions
        self.model = model
        self.client = OpenAI()
        self.assistant = None
        self.thread = None
        self.setup_assistant()

    def retrieve_assistant(self):
        # List existing assistants.
        assistants_list = self.client.beta.assistants.list(order="desc")

        # Retrieve existing assistant if it matches the 'name' and 'instructions'.
        for existing_assistant in assistants_list.data:
            if existing_assistant.name == self.name and existing_assistant.instructions == self.instructions:
                return self.client.beta.assistants.retrieve(existing_assistant.id)
        return None

    def create_vector_with_files(self):
        # Create a vector store.
        vector_store = self.client.beta.vector_stores.create(name="Video Games")

        # Upload files to the vector store.
        file_streams = [open(path, "rb") for path in self.file_paths]
        self.client.beta.vector_stores.file_batches.upload_and_poll(
            vector_store_id=vector_store.id, files=file_streams
        )
        return vector_store.id

    def create_assistant(self, vector_store_id):
        return self.client.beta.assistants.create(
            name=self.name,
            instructions=self.instructions,
            model=self.model,
            tools=[{"type": "file_search"}], # Enable the file search feature.
            # Instruct the assistant to use the vector store.
            tool_resources={"file_search": {"vector_store_ids": [vector_store_id]}}
        )

    def setup_assistant(self):
        self.assistant = self.retrieve_assistant()

        if not self.assistant: # If no matching assistant is found.
            # Create a new vector store, upload files, and create a new assistant.
            vector_store_id = self.create_vector_with_files()
            self.assistant = self.create_assistant(vector_store_id)

        self.thread = self.client.beta.threads.create() # Create a new thread for the conversation.

    def add_message_to_thread(self, question):
        self.client.beta.threads.messages.create(
            thread_id=self.thread.id,
            role="user",
            content=question
        ) # Add the question to the thread.

    def get_response(self):
        run = self.client.beta.threads.runs.create_and_poll(
            thread_id=self.thread.id,
            assistant_id=self.assistant.id
        ) # Run the assistant on the thread.

        if run.status == "completed":
            messages = self.client.beta.threads.messages.list(thread_id=self.thread.id)
            return messages.data[0].content[0].text.value # Return the assistant's response.
        else:
            return run.status

    def ask_question(self, question):
        self.add_message_to_thread(question)
        return self.get_response()


def main():
    file_paths = ["products.json"] # Path to the products JSON file and other files.
    name = "Product assistant"
    instructions = (
        "You are a product assistant that analyzes video game data (products.json file) and provides very short information to the user about specific products. "
        "You must analyze each product's information. The 'availability' key specifies whether the product is in stock or out of stock."
        "Provide answers in plain text without markdown. Use this format for listing products: Product Title - Product Price - Product Availability - Product Link. "
        "For product link, use the URL value and add it to https://sandbox.oxylabs.io. For instance, https://sandbox.oxylabs.io/products/1."
    )
    model = "gpt-4o" # OpenAI model to use.

    assistant = ProductAssistant(file_paths, name, instructions, model)
    while True:
        question = input("\033[1;34mQuestion ->\033[0m ")
        if question.lower() in ["exit"]:
            print("\033[1;31mExiting the assistant.\033[0m")
            break
        answer = assistant.ask_question(question)
        print("\033[1;33mAnswer -> " + f"\033[1;32m{answer}\033[0m")

if __name__ == "__main__":
    main()
Other integration methods
Attach a file to a message
Another way to pass the scraped data to the Assistants API is to attach the products.json file directly to the user’s message. This method automatically creates a vector store or attaches new files to an existing vector store. You can find more information here.
See the code example below. Here, some changes were made to the __init__(), create_assistant(), add_message_to_thread(), and setup_assistant() functions, while a new function, called upload_file(), is added to upload a file:
# === product_assistant_2.py === #
from openai import OpenAI


class ProductAssistant:
    def __init__(self, file_path, name, instructions, model):
        self.file_path = file_path
        self.name = name
        self.instructions = instructions
        self.model = model
        self.client = OpenAI()
        self.assistant = None
        self.thread = None
        self.message_file = None
        self.setup_assistant()

    def retrieve_assistant(self):
        # List existing assistants.
        assistants_list = self.client.beta.assistants.list(order="desc")

        # Retrieve existing assistant if it matches the 'name' and 'instructions'.
        for existing_assistant in assistants_list.data:
            if existing_assistant.name == self.name and existing_assistant.instructions == self.instructions:
                return self.client.beta.assistants.retrieve(existing_assistant.id)
        return None

    def upload_file(self):
        self.message_file = self.client.files.create(
            file=open(self.file_path, "rb"), purpose="assistants"
        ) # Upload the products JSON file.

    def create_assistant(self):
        return self.client.beta.assistants.create(
                name=self.name,
                instructions=self.instructions,
                model=self.model,
                # Enable the file search feature.
                tools=[{"type": "file_search"}]
            )

    def add_message_to_thread(self, question):
        self.client.beta.threads.messages.create(
            thread_id=self.thread.id,
            role="user",
            content=question,
            # Attach the file to the message.
            attachments=[{"file_id": self.message_file.id, "tools": [{"type": "file_search"}]}]
        ) # Add the question to the thread.

    def get_response(self):
        run = self.client.beta.threads.runs.create_and_poll(
            thread_id=self.thread.id,
            assistant_id=self.assistant.id
        ) # Run the assistant on the thread.

        if run.status == "completed":
            messages = self.client.beta.threads.messages.list(thread_id=self.thread.id)
            return messages.data[0].content[0].text.value # Return the assistant's response.
        else:
            return run.status

    def ask_question(self, question):
        self.add_message_to_thread(question)
        return self.get_response()

    def setup_assistant(self):
        self.assistant = self.retrieve_assistant()

        if not self.assistant: # If no matching assistant is found.
            # Upload the file and create a new assistant.
            self.upload_file()
            self.assistant = self.create_assistant()

        self.thread = self.client.beta.threads.create() # Create a new thread for the conversation.

def main():
    file_path = "products.json" # Path to the products JSON file.
    name = "Product assistant"
    instructions = (
        "You are a product assistant that analyzes video game data (products.json file) and provides very short information to the user about specific products. "
        "You must analyze each product's information. The 'availability' key specifies whether the product is in stock or out of stock."
        "Provide answers in plain text without markdown. Use this format for listing products: Product Title - Product Price - Product Availability - Product Link. "
        "For product link, use the URL value and add it to https://sandbox.oxylabs.io. For instance, https://sandbox.oxylabs.io/products/1."
    )
    model = "gpt-4o" # OpenAI model to use.

    assistant = ProductAssistant(file_path, name, instructions, model)
    while True:
        question = input("\033[1;34mQuestion ->\033[0m ")
        if question.lower() in ["exit"]:
            print("\033[1;31mExiting the assistant.\033[0m")
            break
        answer = assistant.ask_question(question)
        print("\033[1;33mAnswer -> " + f"\033[1;32m{answer}\033[0m")

if __name__ == "__main__":
    main()
Pass data directly with the user’s message
Alternatively, you can skip creating vector stores and uploading files altogether, instead adding the contents of the products.json file to the user’s message like so:
    def add_message_to_thread(self, question):
        self.client.beta.threads.messages.create(
            thread_id=self.thread.id,
            role="user",
            content=f"{question} Here are the video games in JSON format: {self.products}"
        )
This would be ideal if you want to provide brief snippets of scraped data. However, for larger datasets, you should stick with the file upload process because embedding extensive data in message content may raise your API expenses, reduce the processing speed, and complicate data management. Here’s the complete code:
# === product_assistant_3.py === #
from openai import OpenAI
import json


class ProductAssistant:
    def __init__(self, file_path, name, instructions, model):
        self.file_path = file_path
        self.name = name
        self.instructions = instructions
        self.model = model
        self.client = OpenAI()
        self.assistant = None
        self.thread = None
        self.products = self.load_products()
        self.setup_assistant()

    def retrieve_assistant(self):
        # List existing assistants.
        assistants_list = self.client.beta.assistants.list(order="desc")

        # Retrieve existing assistant if it matches the 'name' and 'instructions'.
        for existing_assistant in assistants_list.data:
            if existing_assistant.name == self.name and existing_assistant.instructions == self.instructions:
                return self.client.beta.assistants.retrieve(existing_assistant.id)
        return None

    def load_products(self):
        with open(self.file_path, "r") as file:
            return json.load(file) # Load product data from a JSON file.

    def create_assistant(self):
        return self.client.beta.assistants.create(
                name=self.name,
                instructions=self.instructions,
                model=self.model
            )

    def add_message_to_thread(self, question):
        self.client.beta.threads.messages.create(
            thread_id=self.thread.id,
            role="user",
            content=f"{question} Here are the video games in JSON format: {self.products}"
        ) # Add the question and products data to the thread.

    def get_response(self):
        run = self.client.beta.threads.runs.create_and_poll(
            thread_id=self.thread.id,
            assistant_id=self.assistant.id
        ) # Run the assistant on the thread.

        if run.status == "completed":
            messages = self.client.beta.threads.messages.list(thread_id=self.thread.id)
            return messages.data[0].content[0].text.value # Return the assistant's response.
        else:
            return run.status

    def ask_question(self, question):
        self.add_message_to_thread(question)
        return self.get_response()

    def setup_assistant(self):
        self.assistant = self.retrieve_assistant()

        if not self.assistant: # If no matching assistant is found.
            # Create a new assistant.
            self.assistant = self.create_assistant()

        self.thread = self.client.beta.threads.create() # Create a new thread for the conversation.

def main():
    file_path = "products.json" # Path to the products JSON file.
    name = "Product assistant"
    instructions = (
        "You are a product assistant that analyzes video game data and provides very short information to the user about specific products. "
        "You must analyze each product's information. The 'availability' key specifies whether the product is in stock or out of stock."
        "Provide answers in plain text without markdown. Use this format for listing products: Product Title - Product Price - Product Availability - Product Link. "
        "For product link, use the URL value and add it to https://sandbox.oxylabs.io. For instance, https://sandbox.oxylabs.io/products/1."
    )
    model = "gpt-4o" # OpenAI model to use.

    assistant = ProductAssistant(file_path, name, instructions, model)
    while True:
        question = input("\033[1;34mQuestion ->\033[0m ")
        if question.lower() in ["exit"]:
            print("\033[1;31mExiting the assistant.\033[0m")
            break
        answer = assistant.ask_question(question)
        print("\033[1;33mAnswer -> " + f"\033[1;32m{answer}\033[0m")

if __name__ == "__main__":
    main()
Wrapping up
OpenAI truly brings the future of AI-based applications to the hands of the community. By integrating Oxylabs Web Scraper API with the Assistants API, you can take a huge step forward by developing AI tools powered by real-world and real-time data. While this tutorial demonstrates how to scrape a website and transfer the parsed content to the Assistants API, another strategic option is to query Oxylabs API whenever the assistant requires more information to address a user's question.
Want to learn more about AI and web scraping? We highly recommend reading our article on What is LLM, Custom GPTs integration, an article about using ChatGPT for web scraping, and comparison pieces like LangChain vs. LangGraph. Additionally, watch this webinar about machine learning for better web scraping to delve deeper into the topic.
Have questions or need assistance with Oxylabs solutions? Don’t hesitate to contact our 24/7 support via live chat or email.
Frequently Asked Questions
What is LLM scraping?
LLM web scraping leverages large language models, such as GPT-4, to automate various web scraping tasks such as data parsing, form filling, website navigation, and others. A prominent use case is automatic data parsing, where the LLM analyzes unstructured or semi-structured data (e.g., HTML) to identify and extract critical data points into structured formats like JSON or CSV.
In contrast, traditional parsing relies on manual input from developers, who must analyze the HTML structure of target websites and determine appropriate selectors (XPath, CSS, or regex) to extract the required information. These selectors must be constantly maintained as even a slight change in the website’s structure can make these selectors defunct.
How to scrape the web for LLM?
Does LLM understand HTML?
Forget about complex web scraping processes
Choose Oxylabs' advanced web intelligence collection solutions to gather real-time public data hassle-free.
About the author
Vytenis Kaubrė
Technical Content Researcher
Vytenis Kaubrė was a Technical Content Researcher at Oxylabs. Creative writing and a growing interest in technology fueled his work, where he researched and crafted technical content while honing his skills in Python. Off duty, he could often be found working on personal projects, learning about cybersecurity, or relaxing with a book.
All information on Oxylabs Blog is provided on an "as is" basis and for informational purposes only. We make no representation and disclaim all liability with respect to your use of any information contained on Oxylabs Blog or any third-party websites that may be linked therein. Before engaging in scraping activities of any kind you should consult your legal advisors and carefully read the particular website's terms of service or receive a scraping license.
Related articles

Cheerio vs. Puppeteer: Which Should You Use for Web Scraping?

Shinthiya Nowsain Promi
2026-06-23


List Crawling in Python: Tools, Tips, and Techniques

Danielė Virinaitė
2026-06-17

Get the latest news from data gathering world
Scale up your business with Oxylabs®
Proxies
Advanced proxy solutions
Data Collection
Datasets
Resources
Innovation hub
Forget about complex web scraping processes
Choose Oxylabs' advanced web intelligence collection solutions to gather real-time public data hassle-free.