175M+ ethically sourced IPs built for the highest reliability.
High-speed, cost-effective proxies built for any scraping workload.
Premium static residential proxies from trusted ASNs for most difficult targets.
Exclusive high-performance proxies for data-intensive tasks.
Dedicated IPs from premium ASNs for demanding scraping.

AI-powered proxy solution for optimized web scraping performance.

20M+ IP addresses from real mobile devices for precise targeting.

Free Chrome proxy manager extension that works with any proxy provider.

Free Android proxy manager app that works with any proxy provider.

Free community-driven tools to improve your web scraping projects.
Web Scraper API
All-in-one web data collection platform for every stage of web scraping.
Fast Search API
Ultra-fast organic search results scraper tailored for AI workflows.
Headless Browser
Advanced browser automation solution for AI agents and scraping.
AI Studio
A suite of AI-powered tools for various scraping projects.
Data for AI
From RAG to autonomous agents, fuel your AI applications with precise, real-time, and multimodal data pipelines at scale.
Instant search results data
Gather top 10 organic search results for AI agents in milliseconds.
Video & audio data
Collect massive volumes of multimodal video and audio data for model training.
Web data from any website
Scrape rich and structured web data for model training or RAG pipelines.
Browser automation
Let AI agents navigate, automate, and extract web data from the toughest targets.
Web index data
Retrieve up-to-date, pre-indexed web content for RAG and agentic workflows in sub-second.


Documentation
All features, parameters, and integration details, backed by code samples in every coding language.
Tutorials, samples, and guides.
Latest fixes and features.


Scrapy Splash Tutorial: How to Scrape JavaScript-Rendered Websites


Agnė Matusevičiūtė
Last updated by Iveta Liupševičė
2025-10-09
6 min read
![]() AI Summary:
AI Summary:
This article demonstrates how to integrate Scrapy with Splash to scrape websites that render content using JavaScript or AJAX. It covers setting up Splash via Docker, configuring Scrapy settings, and implementing a spider that uses `SplashRequest` for dynamic content and pagination.
Scrapy Splash is a lightweight browser with an HTTP API; it’s used to scrape websites that render data with JavaScript or AJAX calls. In today’s article, we’ll demonstrate modern web scraping with Python using Scrapy and Splash.
How to configure Splash
First, let’s take a look at the steps for installing Scrapy Splash.
Scrapy Splash uses the Splash API, so you’ll also need to install it or use the Docker image (in this tutorial, we’re going to use Docker.)
If you want to configure Splash manually without Docker, you can check the detailed instructions in the official installation documentation.
1) How to set up and install Docker
Docker is an open-source containerization technology that’ll help us to run the Splash instance in a virtual container. To install Docker Splash, you can use the below command in Linux:
curl -fsSL https://get.docker.com -o get-docker.sh
sudo sh get-docker.sh
If you’re using Windows, macOS, or any other operating system, you can find the relevant installation information on the Docker website.
2) Downloading and installing Splash
Once Docker is installed, you can use the `docker` command to pull the Splash Docker image from the Docker cloud.
docker pull scrapinghub/splashThe above command will download the Splash Docker image. Now, you’ll have to run it using the below command:
docker run -it -p 8050:8050 --rm scrapinghub/splashThe Splash instance will be available and ready to use on port 8050. So, if you visit: localhost:8050 on your browser, you’ll see the default Splash page.
3) Installing Scrapy via pip
Next, you’ll have to install Scrapy and the `scrapy-splash` plugin. The latter can be done with a single command as below:
pip install scrapy scrapy-splashThe `pip`command will download all the necessary dependencies from the Python package index(PyPI) and install them.
4) Setting up a new Scrapy project using the command line
The next step is to create a Scrapy project. You’ll need to run the following command:
scrapy startproject splashscraperIt’s as simple as that! You’ve now created your first Scrapy project named splashscraper. Depending on your Scrapy version, this command will create a project structure similar to the below:
splashscraper
├── scrapy.cfg
└── splashscraper
    ├── __init__.py
    ├── items.py
    ├── middlewares.py
    ├── pipelines.py
    ├── settings.py
    └── spiders
        └── __init__.py

2 directories, 7 files
5) Configuring Scrapy to use Splash by modifying the settings file
Now, you’ll have to update the `settings.py` file to include some Splash specific settings. First, you’ll need to create a `SPLASH_URL` variable that points to the Splash instance that you booted in the second step.
SPLASH_URL = 'http://localhost:8050'Then, you’ll have to modify the `DOWNLOADER_MIDDLEWARES` to include the Splash middlewares.
DOWNLOADER_MIDDLEWARES = {
   'scrapy_splash.SplashCookiesMiddleware': 723,
   'scrapy_splash.SplashMiddleware': 725,
}
After that, you’ll have to update the `SPIDER_MIDDLEWARES` with another Splash middleware which is necessary for deduplication, and add a Splash aware duplicate filter.
SPIDER_MIDDLEWARES = {
   'scrapy_splash.SplashDeduplicateArgsMiddleware': 100,
}
DUPEFILTER_CLASS = 'scrapy_splash.SplashAwareDupeFilter'
The rest of the settings can be left with the default values for now.
Writing a Scrapy Splash spider
Scrapy has a built-in command to generate spiders. You’ll use this command to create the boilerplate of the spider. We’ll use the quotes.toscrape.com website as the target.

As you can see, this website has a lot of quotes. You can extract all the information available; also, you can use the pagination to navigate to all the other pages. First, let’s generate the spider using the below command:
scrapy genspider quotes quotes.toscrape.comOnce you execute this command, it’ll create a new file in the spiders directory. Let’s take a look at this file.
1) Understanding the basics of a Scrapy spider
In the spiders directory, you’ll find a file named quotes.py. Open it up in any text editor tool. It’ll look like below:
import scrapy

class QuotesSpider(scrapy.Spider):
   name = 'quotes'
   allowed_domains = ['quotes.toscrape.com']
   start_urls = ['http://quotes.toscrape.com/']

   def parse(self, response):
       pass
Notice all the class variables of the `QuotesSpider` class: the `allowed_domains` list restricts the spider to the listed domains. This way, it’s ensured that the spider won’t send network requests to websites or domains outside its scope.
When the spider starts, it’ll scrape all the URLs listed in the `start_urls` asynchronously. The generator also created the `parse` method, which’ll get invoked for each url by default.
2) Writing a spider to scrape data from a single page
Right now, the spider isn’t doing anything. You’ll have to update the parse method to bring it to life.
Inspect elements using a web browser
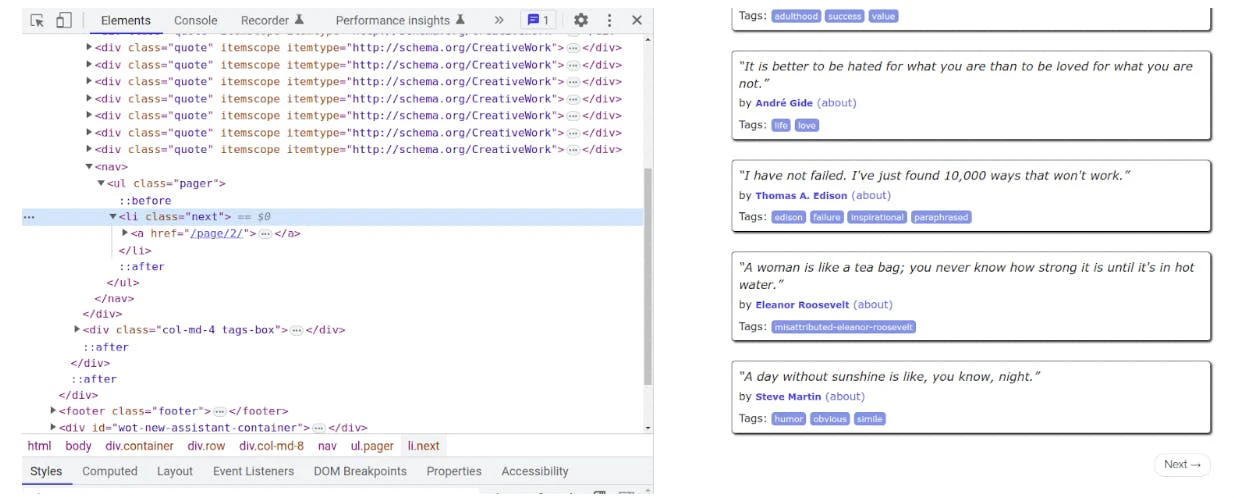
First, let’s check the HTML source of the website in a web browser using the dev tool.

As you can see, each quote is wrapped in a div tag, which has a class name quote. The quote’s text is enclosed in a span tag. The author's name has a small tag wrapped around it. And lastly, the tags are available in a meta tag.
Prepare the class SplashscraperItem
Now, you’ll have to create a class to map the data into Scrapy items. By default, Scrapy uses the items.py file to store the class definition. Fortunately, you don’t have to write it from scratch – Scrapy already generated this file for you. Navigate to the items.py file in the project root directory. Then, modify it to include three fields: author, text, and tags.
import scrapy

class SplashscraperItem(scrapy.Item):
   author = scrapy.Field()
   text = scrapy.Field()
   tags = scrapy.Field()
Implement parse() method
Next, you’ll have to implement the parse method. You’ll begin by importing the `SplashscraperItem` class that you created in the previous step:
from items import SplashscraperItemThen, you’ll have to implement the parse method as shown below:
   def parse(self, response):
       for quote in response.css("div.quote"):
           text = quote.css("span.text::text").extract_first("")
           author = quote.css("small.author::text").extract_first("")
           tags = quote.css("meta.keywords::attr(content)").extract_first("")
           item = SplashscraperItem()
           item['text'] = text
           item['author'] = author
           item['tags'] = tags
           yield item
Following this `parse()` method, you can see the code is using the response object to extract all the quote `div` elements. After that, it iterates over each item to extract the text authors and tags. Once this data is extracted, it then creates a `SplashscraperItem()` with the data and yields the `item` object.
3) Handling pagination
The code that you’ve written so far only works on a single page. So, let’s modify it further to navigate through all the pages using the pagination of the website.
Head on to the website again using a web browser and scroll to the bottom, where you’ll see the “Next” button. As soon as you click it, it loads the second page.
Now, you’ll need code so the process of getting to the next page is automated.
By taking a closer look, we can see that the website is using an anchor tag nested inside a li element. You’ll have to add the following lines after the for loop that you’ve written earlier:
next_url = response.css("li.next>a::attr(href)").extract_first("")
if next_url:
    yield scrapy.Request(next_url, self.parse)
The next_url variable will contain the url of the next page. When it reaches the last page, the next_url will be an empty string. So, the if statement checks this condition to properly handle that case.
4) Adding Splash requests to the spider to scrape dynamic content using SplashRequest
To use SplashRequest, you’ll have to make some changes to the current spider.
First, you’ll have to import the SplashRequest from the scrapy_splash library.
from scrapy_splash import ScrapyRequestIf the start_urls list is used, Scrapy uses scrapy.Request by default. So, you’ll also have to replace it with the start_requests method.
  def start_requests(self):
       url = 'https://quotes.toscrape.com/'
       yield SplashRequest(url, self.parse, args={'wait': 1})
Last but not least, you’ll need to update the parse method to use SplashRequest as well. Once you make these changes, the code will look like the below:
import scrapy
from scrapy_splash import ScrapySplash
from items import SplashscraperItem

class QuotesSpider(scrapy.Spider):
   name = 'quotes'
   allowed_domains = ['quotes.toscrape.com']


   def start_requests(self):
       url = 'https://quotes.toscrape.com/'
       yield SplashRequest(url, self.parse, args={'wait': 1})

   def parse(self, response):
       for quote in response.css("div.quote"):
           text = quote.css("span.text::text").extract_first("")
           author = quote.css("small.author::text").extract_first("")
           tags = quote.css("meta.keywords::attr(content)").extract_first("")
           item = SplashscraperItem()
           item['text'] = text
           item['author'] = author
           item['tags'] = tags
           yield item
       next_url = response.css("li.next>a::attr(href)").extract_first("")
       if next_url:
           yield scrapy.SplashRequest(next_url, self.parse, args={'wait': 1})
Handling Splash responses
Splash responses have all the properties and attributes of a standard Scrapy Request. So, you don’t have to make any changes to the parse method.
1) Understanding how Splash responds to requests and its response object
Scrapy Splash returns various Response subclasses for Splash requests depending on the request type, for example:
SplashResponse - returned for binary Splash responses that contain media files, e.g., image, video, audio, etc.;
SplashTextResponse - returned when the result is text;
SplashJsonResponse - returned when the result is a JSON object.
2) Parsing data from Splash responses
You can use Scrapy’s built-in parser and Selector classes to parse Splash Responses. In the last example, you’ve used the response.css() method to use CSS Selectors to extract the desired data.
text = quote.css("span.text::text").extract_first("")
author = quote.css("small.author::text").extract_first("")
tags = quote.css("meta.keywords::attr(content)").extract_first("")
Note the `::text` inside the CSS selectors, it tells Scrapy to extract the text property from the element. Similarly, the `::attr(content)` denotes the content attribute of the meta tag.
Join our Discord community
Exclusive events, support from experienced developers, and much more.

Conclusion
Scrapy Splash is an excellent tool for extracting content from dynamic websites in bulk. If you're wondering how to enable JavaScript in Scrapy, Splash helps scrape websites with JavaScript rendering at ease.
If you enjoyed this blog post, make sure to check out our post on dynamic web scraping with Python and Selenium. In case JavaScript is your preferred language, check out this general web scraping guide using JavaScript & Node.js. Additionally, we have updated our resources to include various tips and best practices on executing data extraction processes, such as learning how to scroll to element in JavaScript.
Frequently asked questions
What is Splash in Python?
Splash is a headless browser with an HTTP API used in Python for web scraping. It renders JavaScript-heavy web pages, returns the fully loaded HTML, captures screenshots, and interacts with dynamic content. It’s often used with Scrapy via scrapy-splash.
What is the difference between Scrapy Splash and Selenium?
What is the difference between Scrapy Splash and Beautiful Soup?
What is the difference between Scrapy Splash and Playwright?
Can Scrapy handle complex Javascript Rendering?
About the author
Agnė Matusevičiūtė
Technical Copywriter
With a background in philology and pedagogy, Agnė focuses on making complicated tech simple.
All information on Oxylabs Blog is provided on an "as is" basis and for informational purposes only. We make no representation and disclaim all liability with respect to your use of any information contained on Oxylabs Blog or any third-party websites that may be linked therein. Before engaging in scraping activities of any kind you should consult your legal advisors and carefully read the particular website's terms of service or receive a scraping license.
Related articles

Scrapy vs. Beautiful Soup: A Comparison of Web Scraping Tools

Enrika Pavlovskytė
2025-08-28

Serverless Web Scraping with Scrapy and AWS Lambda

Yelyzaveta Hayrapetyan
2024-11-28

Scrapy Cloud: How to Use, Manage & Maximize Spider Execution

Maryia Stsiopkina
2023-08-03
Effortless web scraping with Residential Proxies
Choose Oxylabs' Residential Proxies for the most effective web access and scraping without interruptions.
Premium proxy servers for efficient data gathering
Empower your web scraping with reliable proxy infrastructure.

Get the latest news from web data intelligence world
Scale up your business with Oxylabs®
Proxies
Advanced proxy solutions
Data Collection
Datasets
Resources
Innovation hub
Effortless web scraping with Residential Proxies
Choose Oxylabs' Residential Proxies for the most effective web access and scraping without interruptions.
Premium proxy servers for efficient data gathering
Empower your web scraping with reliable proxy infrastructure.