175M+ ethically sourced IPs built for the highest reliability.
High-speed, cost-effective proxies built for any scraping workload.
Premium static residential proxies from trusted ASNs for most difficult targets.
Exclusive high-performance proxies for data-intensive tasks.
Dedicated IPs from premium ASNs for demanding scraping.

AI-powered proxy solution for optimized web scraping performance.

20M+ IP addresses from real mobile devices for precise targeting.

Free Chrome proxy manager extension that works with any proxy provider.

Free Android proxy manager app that works with any proxy provider.

Free community-driven tools to improve your web scraping projects.
Web Scraper API
All-in-one web data collection platform for every stage of web scraping.
Fast Search API
Ultra-fast organic search results scraper tailored for AI workflows.
Headless Browser
Advanced browser automation solution for AI agents and scraping.
AI Studio
A suite of AI-powered tools for various scraping projects.
Data for AI
From RAG to autonomous agents, fuel your AI applications with precise, real-time, and multimodal data pipelines at scale.
Instant search results data
Gather top 10 organic search results for AI agents in milliseconds.
Video & audio data
Collect massive volumes of multimodal video and audio data for model training.
Web data from any website
Scrape rich and structured web data for model training or RAG pipelines.
Browser automation
Let AI agents navigate, automate, and extract web data from the toughest targets.
Web index data
Retrieve up-to-date, pre-indexed web content for RAG and agentic workflows in sub-second.


Documentation
All features, parameters, and integration details, backed by code samples in every coding language.
Tutorials, samples, and guides.
Latest fixes and features.


JavaScript Web Scraping using Node.js & Puppeteer


Adelina Kiskyte
Last updated by Shinthiya Nowsain Promi
2025-11-13
10 min read
![]() AI Summary:
AI Summary:
This guide explains web scraping in Node.js using Axios for HTTP requests and Cheerio for HTML parsing. It details how to extract data from web pages, manage pagination, and save the collected information to a CSV file. The tutorial provides practical steps for building a JavaScript-based web scraper.
With the arrival of Node.js, JavaScript web scraping has evolved into a very powerful language. Node.js, sometimes written as Node js or even nodejs, is the engine that runs the JavaScript code without a browser. Additionally, npm, or Node.js Package Manager has a massive collection of libraries, which make web scraping in node.js very easy. Web scraping using JavaScript and Node.js isn't only easy, it's fast, and the learning curve is very low for those who are already familiar with JavaScript.
This tutorial will explain how to do web scraping using JavaScript while using a real-life scenario. By the end of this tutorial, you will have a good understanding on how to build a web scraper in JavaScript and Node.js.

This guide assumes at least a basic understanding of JavaScript. Familiarity with web browser Developer tools would also help and some knowledge of jQuery or CSS Selectors is essential. This tutorial doesn't expect any experience with Node.js or web scraping with Node.js
Prerequisites
Required software
There are only two pieces of software that will be needed:
Node.js (which comes with npm—the package manager for Node.js)
Any code editor
The only thing that you need to know about Node.js is that it's a runtime framework. This simply means that JavaScript code, which typically runs in a browser, can run without a browser. Node.js is available for Windows, macOS, and Linux. It can be downloaded at the official download page
Many developers prefer web scraping in Node.js because it offers excellent speed and scalability. Node.js allows you to scrape with JavaScript efficiently, even on dynamic sites that rely on heavy client-side rendering. Compared to other languages, web scraping in Node.js can feel smoother thanks to async handling and the vast JavaScript web scraping library ecosystem.
Set up Node.js project using the CLI
Before writing any code to web scrape data using Node.js, create a folder where JavaScript files will be stored. These files will contain all the code required for JavaScript web scraping.
Once the folder is created, navigate to this folder and run the initialization command:
npm init -yThis will create a package.json file in the directory. This file will contain information about the packages that are installed in this folder. The next step is to install the Node.js Packages that will be discussed in the next section.
Node.js packages and libraries
For Node.js web scraping, we need to use certain packages, also known as libraries. These libraries are prepackaged code that can be reused. The packages can be downloaded and installed using the npm install command, which is the Node.js Package Manager.
To install any package, simply run npm install <package-name>. For example, to install the package axios, run this in your terminal:
npm install axiosThis also supports installing multiple packages. Run the following command to install all the packages used in this tutorial:
npm install axios cheerio json2csvThis command will download the packages in the node_modules directory and update the package.json file.
Basic JavaScript scraping with Cheerio & Axios
Almost every web scraping project using Node.js or JavaScript would involve three basics steps:
Sending the HTTP request
Parsing the HTTP response to extract data
Saving the data in some persistent storage, e.g. file, database and similar
Popular JavaScript HTTP clients include Fetch, a built-in API calls for basic requests, and SuperAgent, which offers both promises and callbacks for added flexibility. With millions of downloads every day, Axios is one of the most popular HTTP request libraries. It fully supports Promise syntax, as well as async-await syntax. Each tool has its strengths depending on the project's needs.
Cheerio is another popular and useful package because it converts the raw HTML code captured by Axios into something that can be queried using a jQuery-like syntax. JavaScript developers are usually familiar with jQuery. This makes Cheerio a preferable choice to extract data from HTML content.
The following sections will demonstrate how you can use Axios to send HTTP requests, Cheerio to parse the response and extract the specific information that's needed, and finally, save the extracted data to CSV using json2csv. Additionally, if you want to replicate a cURL command using Axios, Node.js, or JavaScript, you can quickly do so using these cURL to Node Axios, cURL to Node.js, and cURL to JavaScript converters.
Selecting a target URL
One of the most common scenarios of web scraping with JavaScript is to collect data from e-commerce stores. A good place to start is a fictional e-commerce platform https://sandbox.oxylabs.io/products. This site is very much like a real store, except that this is fictional and is made to learn about web scraping tools.
When it comes to scraping websites, a significant challenge arises—dealing with anti-scraping systems that block web access. A few common bypassing techniques include:
Creating HTTP header sets that rotate with each or a couple of requests. Sometimes, simply rotating different User-Agent strings can be enough.
Integrating proxy servers within your web scraper can help you spread requests across different IP addresses, essentially making a web scraper more stealthy.
Using a headless browser to make your JavaScript web scraper requests appear more realistic, which will also help to overcome CAPTCHAs during scraping operations.
Creating selectors from the DOM
The first step before beginning web scraping with JavaScript is creating selectors. The purpose of selectors is to select the specific data to be extracted.
Begin by opening the URL https://sandbox.oxylabs.io/products in Chrome, Firefox, or any other preferred web browser. Once the web page loads, right-click on the title of the page, ”Video Games to scrape”, and select Inspect. This should open the Developer Tools with <h1 class="css-1128ess e1kord973">Video Games to scrape</h1> selected in the Elements tab.
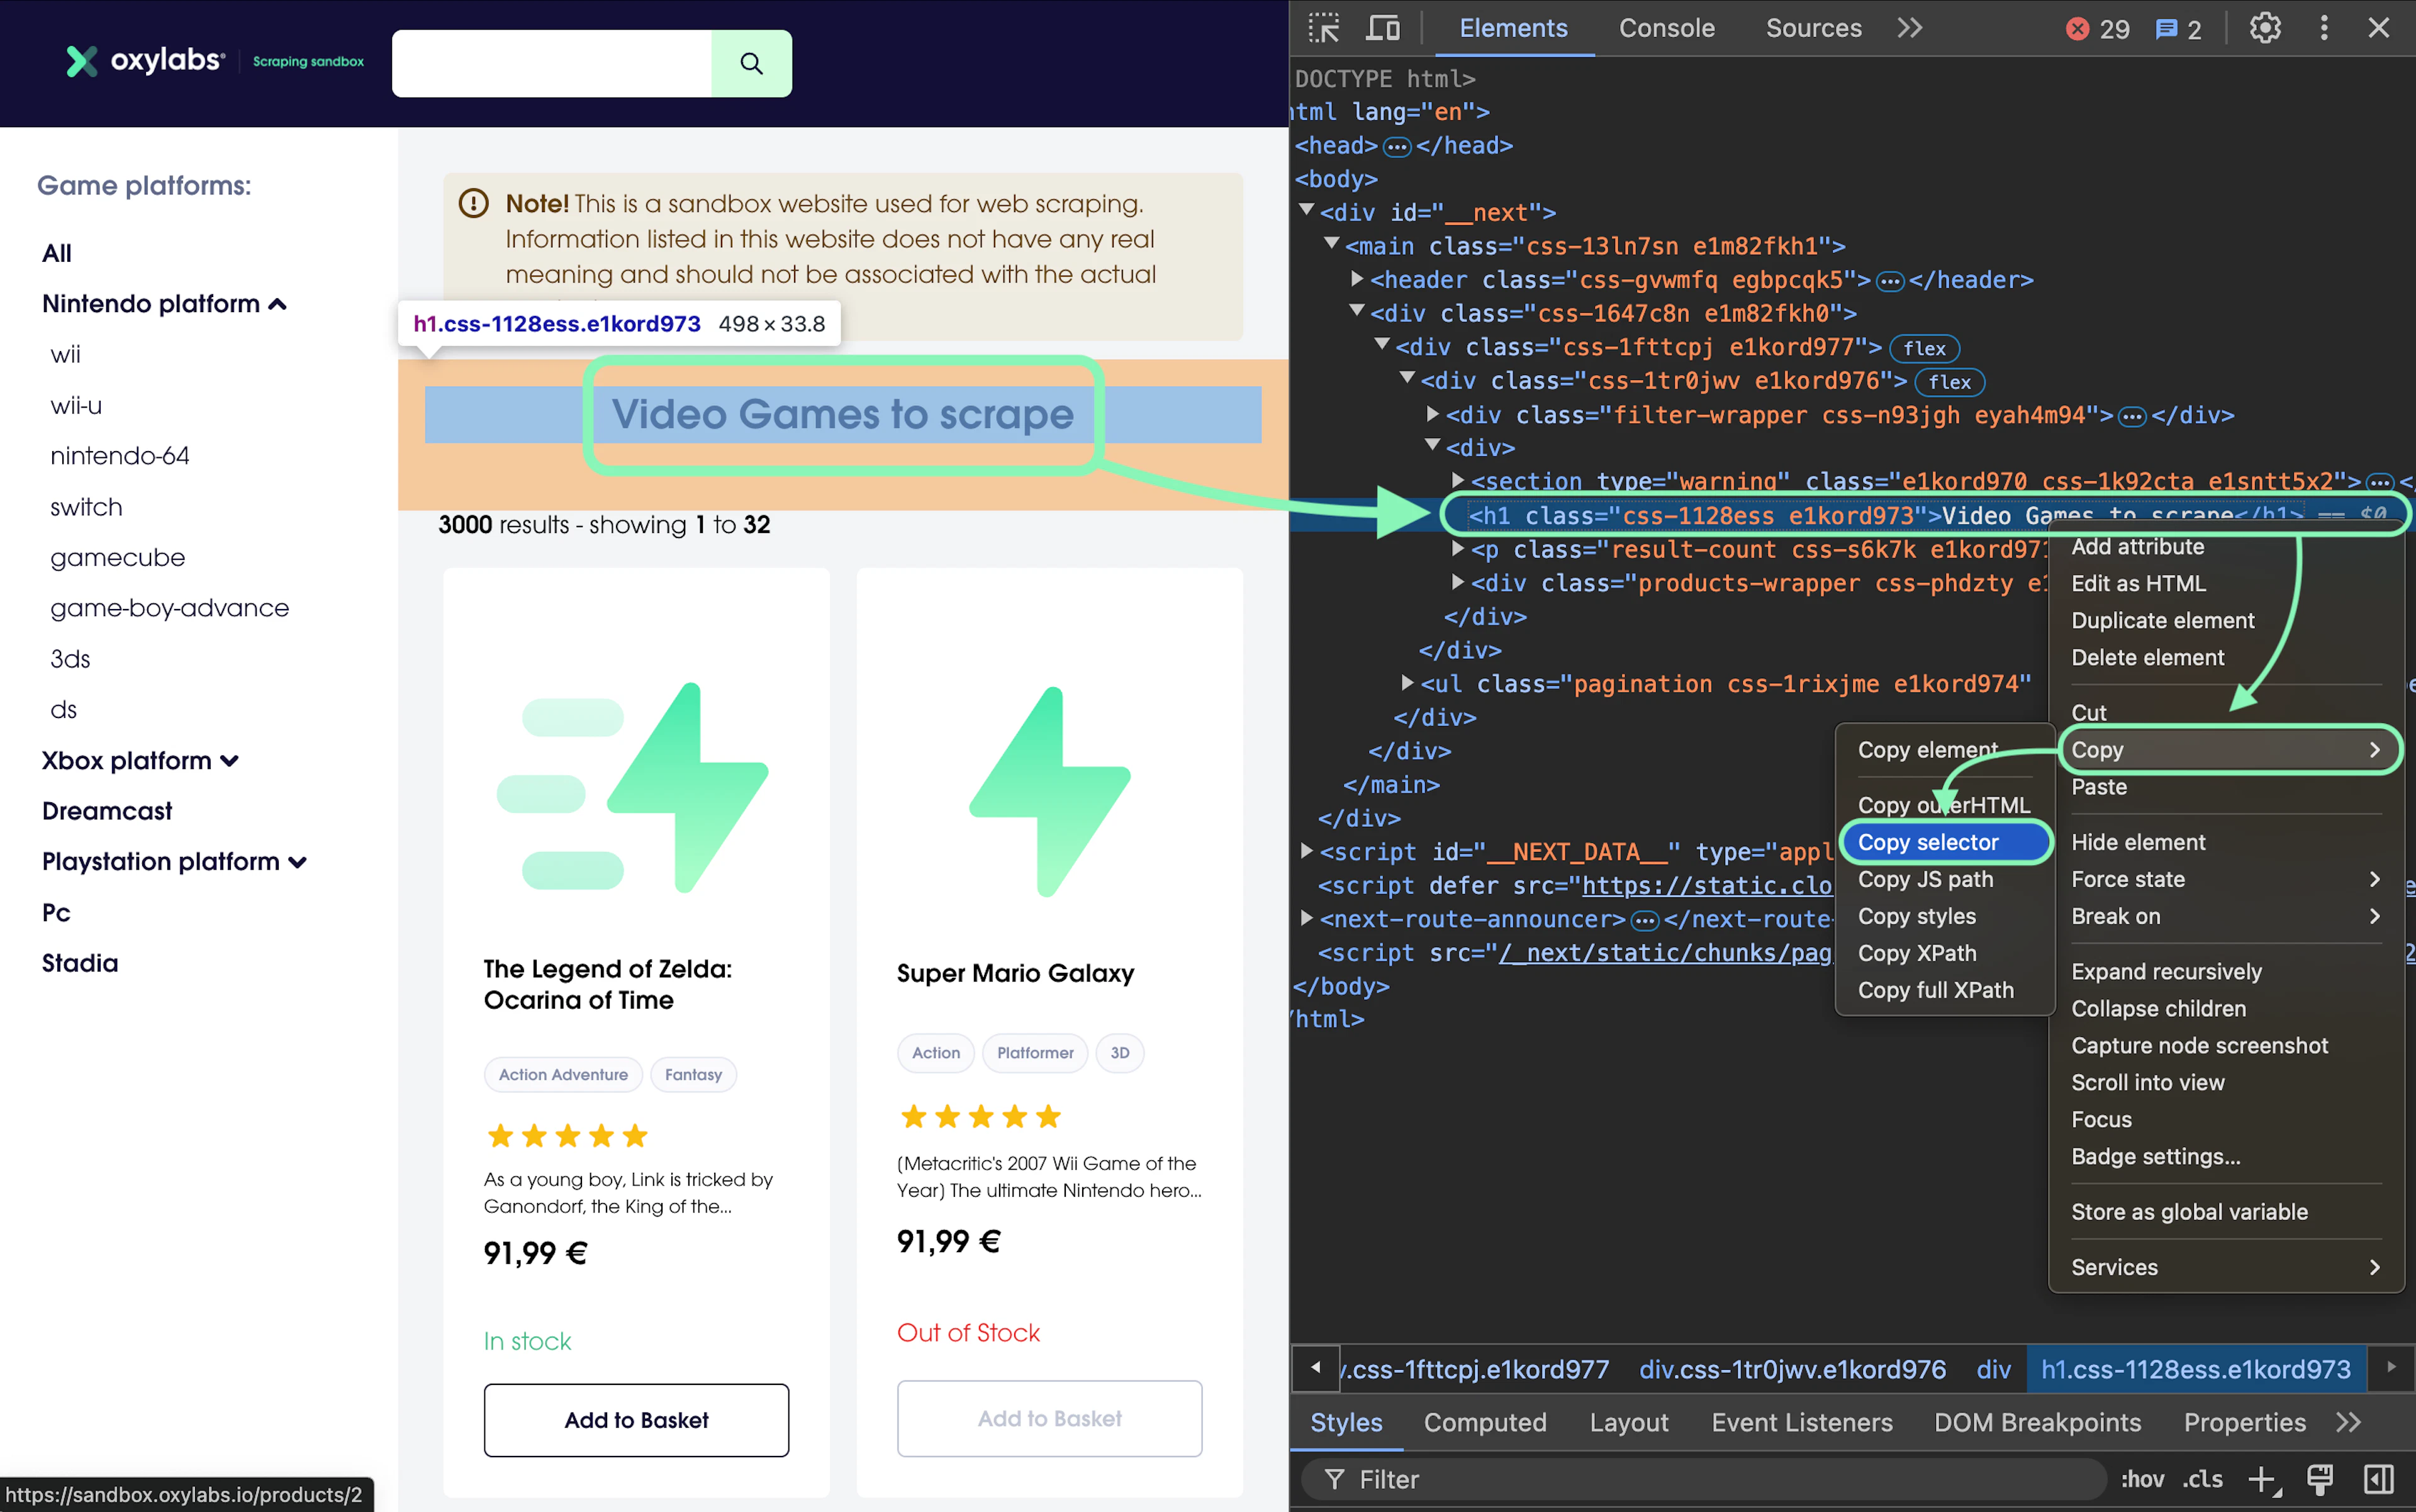
The simplest way to create a selector is to right-click this <h1> tag in the Developer Tools, point to Copy, and then click Copy selector. This will create a selector like this:
#__next > main > div > div > div > div:nth-child(2) > h1This selector is valid and works well. The only problem is that this method creates a long selector. This makes it difficult to understand and maintain the code.
After spending some time with the page, it becomes clear that there's only one h1 tag on the page. This makes it very easy to create a very short selector:
h1Alternatively, a third-party tool like Selector Gadget extension for Chrome can be used to create selectors very quickly. This is a useful tool for web scraping with JavaScript.
Note that while this works most of the time, there will be cases where it doesn't work. Understanding how CSS selectors work is always a good idea. W3Schools has a good CSS Reference page.
Scraping the title from HTML
The first step is to define the constants that will hold a reference to Axios and Cheerio.
const cheerio = require("cheerio");
const axios = require("axios");
The address of the page that’s being scraped is saved in the variable url for readability:
const url = "https://sandbox.oxylabs.io/products";Axios has a method get() that will send an HTTP GET request. Note that this is asynchronous method and thus needs await prefix:
async function getTitle() {
    const response = await axios.get(url);
};
If there's a need to pass additional headers, for example, User-Agent, this can be sent as the second parameter:
    const response = await axios.get(url, {
        headers:
        {
            "User-Agent": "custom-user-agent string",
        }
    });
This particular site doesn’t need any special header, which makes it easier to learn.
Axios supports both the Promise pattern and the async-await pattern. This tutorial focuses on the async-await pattern. The response has a few attributes like headers, data, etc. The HTML document that we want is in the data attribute. This HTML can be loaded into an object that can be queried using the cheerio.load() method.
const $ = cheerio.load(response.data);Cheerio’s load() method returns a reference to the document, which can be stored in a constant. This can have any name. To make our code look and feel more like jQuery web scraping code, a $ can be used instead of a name.
The method text() will be used everywhere when writing web scraping code with JavaScript, as it can be used to get the text inside any element. This can be extracted and saved in a local variable.
const title = $("h1").text();Finally, console.log() will simply print the variable value to the console.
console.log(title);To handle errors, the code will be surrounded by a try-catch block. Note that it's a good practice to use console.error for errors and console.log for other messages.
Here's the complete code put together. Save it as title.js in the folder created earlier, where the command npm init was run.
const cheerio = require("cheerio");
const axios = require("axios");

const url = "https://sandbox.oxylabs.io/products";

async function getTitle() {
    try {
        const response = await axios.get(url);
        const $ = cheerio.load(response.data);
        const title = $("h1").text();
        console.log(title);
    }
    catch (error) {
        console.error(error);
    }
};
getTitle();
The final step to run this web scraping in JavaScript is to run it using Node.js. Open the terminal and run this command:
node title.jsThe output of this code is going to be the page title name:
Video Games to scrapeCongratulations! This was the first program for web scraping using JavaScript and Node.js. Time to do more complex things!
Scraping product listings into JSON
Let’s try scraping listings. Here's the same page that lists e-commerce products: https://sandbox.oxylabs.io/products.
The first step is to analyze the page and understand its HTML document structure. Load this page in your web browser, open Developer Tools by pressing together Ctrl + Shift + I (on Windows) or Cmd + Option + I (on macOS), and examine the elements.
Each product is wrapped in a <div> element with a class containing product-card. It means that all these listings can be easily extracted and a loop can be run to extract individual product details. If the HTML page is parsed with Cheerio, jQuery function each() can be used to run a loop. Let’s start by extracting the titles of all the products. Here's the code:
const cheerio = require("cheerio");
const axios = require("axios");

async function getTitles() {
    const response = await axios.get("https://sandbox.oxylabs.io/products");
    const $ = cheerio.load(response.data);
    const products = $(".product-card"); // Selector to get all product listings
    products.each(function () { // Run a loop
            title = $(this).find("h4").text(); // Extract a product title
            console.log(title); // Print a product title
        });
};
getTitles();
When it comes to printing more product details, it becomes evident that the extracted data needs to be saved in a different way to make it more readable. The best idea would be to store these values in an array. In fact, other attributes of the products can be extracted and stored as JSON in an array.
Keep in mind that when scraping real websites, you should implement ethical web scraping methods such as appropriate delays between requests. Ethical scraping will ensure your operations don’t overload the website’s servers and don’t undermine its performance.
Here's the complete code. Create a new file, paste this code and save it as product_titles.js in the same folder where npm init was run:
const cheerio = require("cheerio");
const axios = require("axios");

const page = "https://sandbox.oxylabs.io/products";
const products_data = [];

async function getTitles(url) {
    try {
        const response = await axios.get(url);
        const $ = cheerio.load(response.data);

        const products = $(".product-card");

        products.each(function () {
            title = $(this).find("h4").text();
            price = $(this).find(".price-wrapper").text();
            description = $(this).find(".description").text().trim();
            products_data.push({ title, price, description }); // Store in an array
        });
        console.log(products_data); // Print the array
    }
    catch (err) {
        console.error(err);
    }
};
getTitles(page);
Run this file using Node.js from the terminal:
node product_titles.jsThis will print the array of product information to the console. The only limitation of this JavaScript code is that it's scraping only one page. The next section will cover how you can handle pagination.
Handling pagination and navigation
The listings like this are usually spread over multiple web pages. While every site may have its own way of paginating, the most common one is having a next button on every page.
The pagination logic for these situations is rather simple. Create a selector for the next page link. Looking at our demo site, you can see that the “Forward” button on the 93rd page has an href value equal to “/products?page=94”, while the 94th page has an href set to just “#”. We can use this to our advantage by reading the length of the href value each time we access a new page. If the href value is longer than 1 character, the code should get the href attribute value and call the getTitles function with this new URL recursively.
Immediately after the products.each() loop and console.log(), add these lines:
        const baseUrl = "https://sandbox.oxylabs.io"
        if ($(".next a").attr("href").length > 1) {
            // Convert to absolute URL
            next_page = baseUrl + $(".next a").attr("href");
            getTitles(next_page); // Recursive call to the same function with new URL
        }
Note that the href returned above is a relative URL. To convert it into an absolute URL, the simplest way is to concatenate a fixed part to it. This fixed part of the URL can be stored in the baseUrl variable:
const baseUrl = "https://sandbox.oxylabs.io"Once the web scraper reaches the last page, the href value will be equal to 1 and the recursive call will stop. At this point, the array will have product information from all the web pages. The final step of web scraping with Node.js is to save the data.
Saving scraped data to CSV file
If web scraping with JavaScript is easy, saving data into a CSV file is even easier. It can be done using these two packages—fs and json2csv. The file system is represented by the package fs, which is built-in. json2csv would need to be installed using the following command:
npm install json2csvAfter the installation, in your .js file, create a constant that will store this package’s Parser.
const j2cp = require("json2csv").Parser;Access to the file system is needed to write the file on disk. For this, initialize the fs package.
const fs = require("fs");Find the line in the code where an array with all the scraped data is available, and then insert the following lines of code to create the CSV file.
        else {
            const parser = new j2cp();
            const csv = parser.parse(products_data); // json to CSV in memory
            fs.writeFileSync("./products.csv", csv); // Write CSV to disk
        }
Here's the complete script put together. This can be saved as a save_data.js file in the Node.js project folder. Once it's run using a node command in the terminal, data from all the pages will be available in the products.csv file.
const cheerio = require("cheerio");
const axios = require("axios");
const j2cp = require("json2csv").Parser;
const fs = require("fs");

const page = "https://sandbox.oxylabs.io/products";
const products_data = [];

async function getTitles(url) {
    try {
        const response = await axios.get(url);
        const $ = cheerio.load(response.data);

        const products = $(".product-card");

        products.each(function () {
            title = $(this).find("h4").text();
            price = $(this).find(".price-wrapper").text();
            description = $(this).find(".description").text().trim();
            products_data.push({ title, price, description });
        });
        console.log(products_data);

        const baseUrl = "https://sandbox.oxylabs.io"
        if ($(".next a").attr("href").length > 1) {
            next_page = baseUrl + $(".next a").attr("href");
            getTitles(next_page);
        }
        else {
            const parser = new j2cp();
            const csv = parser.parse(products_data);
            fs.writeFileSync("./products.csv", csv);
        }
    }
    catch (err) {
        console.error(err);
    }
};
getTitles(page);
Run this save_data.js file using Node.js from the terminal:
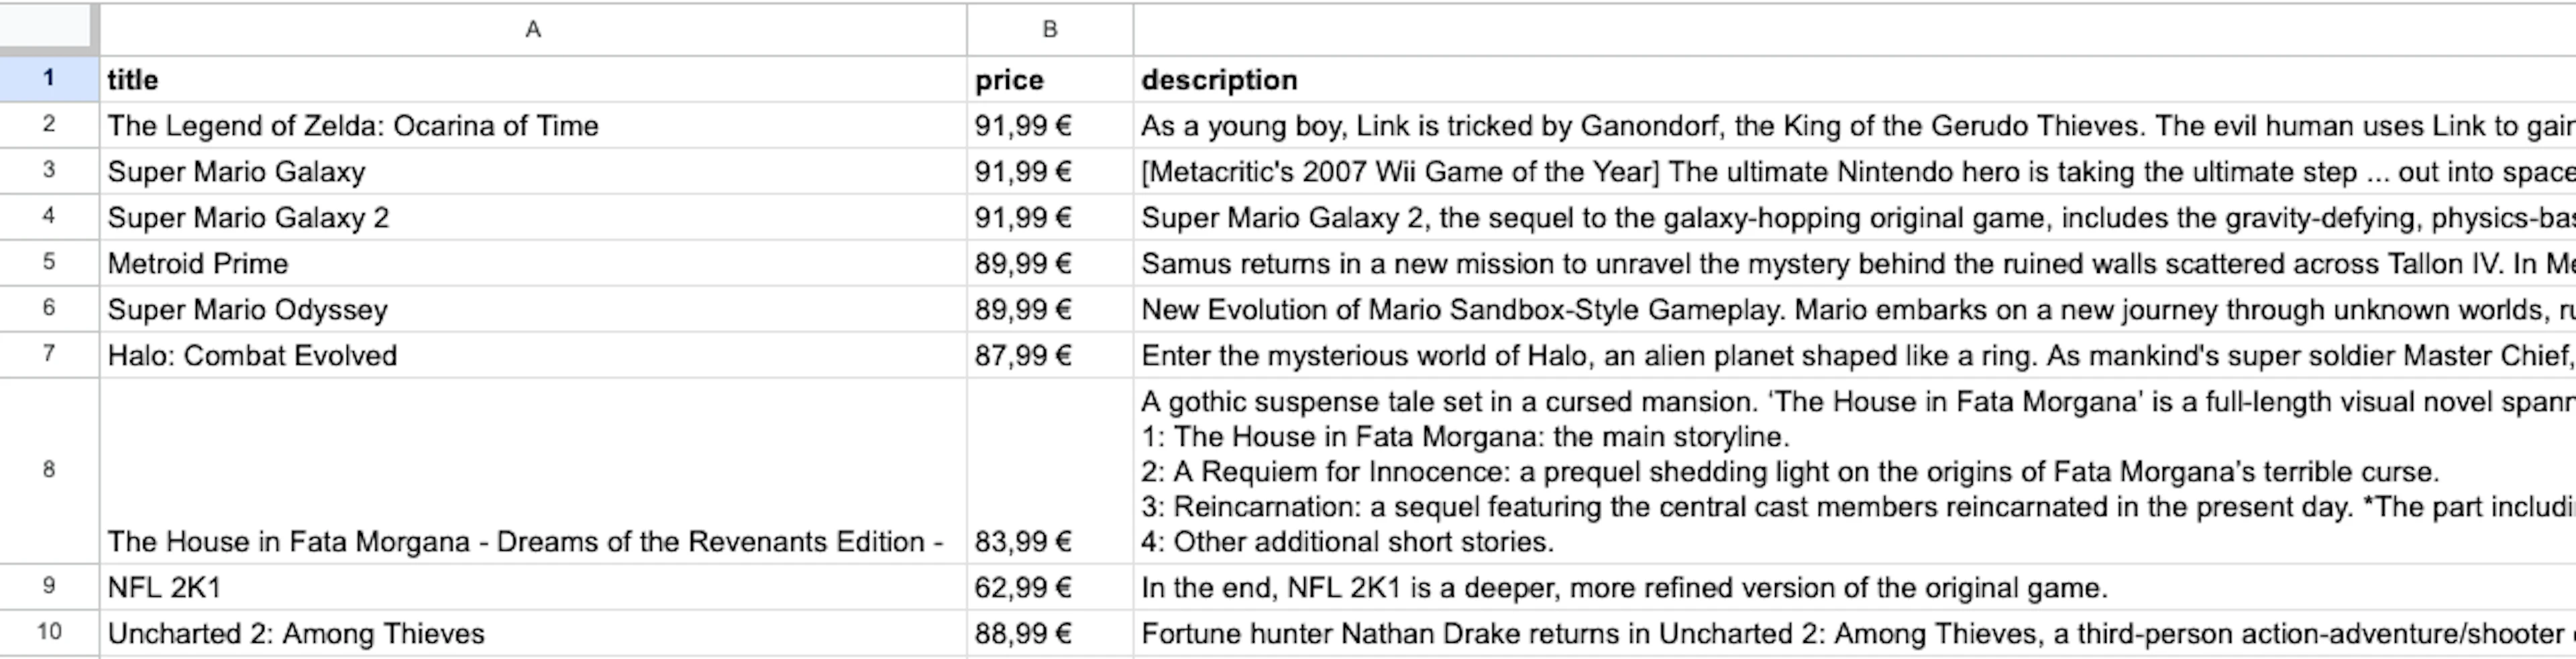
node save_data.jsWe now have a new file products.csv, which will contain all the desired data from JavaScript web scraping. This can be viewed using any spreadsheet program such as Microsoft Excel or Google Sheets:
You may also find it useful to learn how to read JSON files in JavaScript, especially when JSON data is used heavily by websites, making it considerably easier to gather already structured public web data.
Advanced JavaScript web scraping with Puppeteer and Headless Browser
Puppeteer is a popular open-source JavaScript web scraping library that can run in headless browser mode (a GUI-less browser controlled programmatically) and is designed for automated testing. It allows developers to simulate user interactions with a website and perform tasks such as filling out forms, clicking links, and extracting data from the page.
As Puppeteer supports headless browser, it remains one of the best web scraping Node.js libraries for handling dynamic content and executing JavaScript on web pages. This is particularly useful for scraping modern web applications that rely on JavaScript to load their content.
For example, let's say you want to scrape all the product availability information on a dynamic web page https://sandbox.oxylabs.io/products. Open this URL in your browser, disable JavaScript via Developer Tools, and refresh the page:

You’ll notice that the product rating (stars) and availability will be gone after disabling JavaScript:

Let's see how you can handle web scraping JavaScript content with Puppeteer in this situation. To create a dynamic web page scraper, start by installing Puppeteer using the command below:
npm install puppeteerNext, define constants holding references to Puppeteer, a new headless browser window, and a new tab or page.
const puppeteer = require("puppeteer");

async function DynamicScraping() {
    const headlessBrowser = await puppeteer.launch({ headless: true });
    const newTab = await headlessBrowser.newPage();
};
Now, set the target URL and navigate your tab to the target web page using the following code:
    const url = "https://sandbox.oxylabs.io/products";
    await newTab.goto(url);
As the product availability loads dynamically via JavaScript, you must first wait for the dynamic elements to load. You can use waitForSelector() as demonstrated by the following code line:
await newTab.waitForSelector(".in-stock, .out-of-stock");There's also a possibility to wait for a page to load in Javascript, instead of specific dynamic elements.
From this point, you can proceed further to scrape all product details from the current page. Use the following code to do that:
    let ScrapedProducts = await newTab.evaluate(() => {
        let product_cards = document.querySelectorAll(".product-card");
        let products = "";
        product_cards.forEach((product) => {
            let title = product.querySelector("h4").innerHTML;
            let availability = product.querySelector(
                ".in-stock, .out-of-stock"
            ).innerHTML;
            products += `${title} \n ${availability} \n\n`;
        });
        return products;
    });
    console.log(ScrapedProducts);
    headlessBrowser.close(); // Close the browser.
In Puppeteer, the evaluate() method allows you to execute a function in the Document Object Model (DOM) context of the current tab or page. The above code snippet evaluates an anonymous function to scrape data and return all the products from the current DOM context in the form of a string.
Let's put everything together with a bit of exception handling:
const puppeteer = require("puppeteer");

async function DynamicScraping() {
    try {
        const headlessBrowser = await puppeteer.launch({ headless: true });
        const newTab = await headlessBrowser.newPage();

        const url = "https://sandbox.oxylabs.io/products";
        await newTab.goto(url);
        await newTab.waitForSelector(".in-stock, .out-of-stock");

        let ScrapedProducts = await newTab.evaluate(() => {
            let product_cards = document.querySelectorAll(".product-card");
            let products = "";
            product_cards.forEach((product) => {
                let title = product.querySelector("h4").innerHTML;
                let availability = product.querySelector(
                    ".in-stock, .out-of-stock"
                ).innerHTML;
                products += `${title} \n ${availability} \n\n`;
            });
            return products;
        });
        console.log(ScrapedProducts);
        headlessBrowser.close();

    } catch (error) {
        console.error(error);
    }
};
DynamicScraping();
You should get an output like the one below:

Comparison of JavaScript tools for scraping
| Tool | Type | Use Case | Async Support | Browser Automation | Pros | Cons |
|---|---|---|---|---|---|---|
| Axios | HTTP Client Library | Making requests | Yes | No | Fast and efficient, simple error handling | Cannot handle JavaScript-rendered pages |
| Fetch API | Built-in Web API | Making requests | Yes | No | Native in modern browsers, no extra dependencies | Cannot scrape dynamic pages, limited for large-scale scraping |
| Cheerio | DOM Parsing Library | Parsing static HTML | No | No | Great for scraping static content, lightweight, fast | Cannot scrape JavaScript-rendered pages |
| Puppeteer | Headless Browser Automation | Scraping dynamic websites | Yes | Yes | Handles JavaScript-heavy sites, interacts with pages like a real user | Needs careful resource management for concurrent scrapers |
| Playwright | Headless Browser Automation | Scraping dynamic websites | Yes | Yes | Supports multiple browsers, handles complex JavaScript and interactions | Resource-heavy, requires more setup for large-scale concurrent scraping |
| Selenium | Headless Browser Automation | Scraping dynamic websites | Yes | Yes | Compatible with many browsers, good for complex scenarios | Slower than others, higher resource usage for parallel scrapers |
Summary
This whole exercise of web scraping using JavaScript and Node.js can be broken down into three steps — send the request, parse and query the response, and save the data. For all three steps, there are many packages available. In this tutorial, we discussed how to use Axios, Cheerio, and Json2csv packages for these tasks.
If you would like to learn more about web scraping or how JavaScript compares to other languages, read about Python Web Scraping, Web Scraping with Selenium, Web Scraping with C++ and JavaScript vs Python for web scraping. Or if you want to learn a different method of scraping via a browser, check out our tutorials on how to scrape with Puppeteer, use Scrapy Playwright combination, extract data using Scrapy Splash, and a beginner-friendly Crawlee web scraping tutorial. To integrate proxies with Puppeteer, we also have an integration guide available. Also, don't hesitate to try our own general-purpose web scraper for free.
People also ask
What is Node.js?
Node.js is a JavaScript runtime environment built for JavaScript execution outside a web browser. It’s an open-source tool commonly used for building server-side applications, command-line tools, and desktop applications.
What is web scraping in JavaScript?
How do I build a web scraper in JavaScript?
Is Node.js good for web scraping?
What are alternatives to Puppeteer?
What are alternatives to Axios?
Which is better for web scraping: Python or Node.js?
Is bypassing CAPTCHA illegal?
About the author
Adelina Kiskyte
Former Senior Content Manager
Adelina Kiskyte is a former Senior Content Manager at Oxylabs. She constantly follows tech news and loves trying out new apps, even the most useless. When Adelina is not glued to her phone, she also enjoys reading self-motivation books and biographies of tech-inspired innovators. Who knows, maybe one day she will create a life-changing app of her own!
All information on Oxylabs Blog is provided on an "as is" basis and for informational purposes only. We make no representation and disclaim all liability with respect to your use of any information contained on Oxylabs Blog or any third-party websites that may be linked therein. Before engaging in scraping activities of any kind you should consult your legal advisors and carefully read the particular website's terms of service or receive a scraping license.
Related articles

Cheerio vs. Puppeteer: Which Should You Use for Web Scraping?
Shinthiya Nowsain Promi
2026-06-23


List Crawling in Python: Tools, Tips, and Techniques

Danielė Virinaitė
2026-06-17
Web Scraper API for block-free data scraping
Extract quality data from any website hassle-free while avoiding CAPTCHA and IP blocks.

Get the latest news from data gathering world
Scale up your business with Oxylabs®
Proxies
Advanced proxy solutions
Data Collection
Datasets
Resources
Innovation hub
Web Scraper API for block-free data scraping
Extract quality data from any website hassle-free while avoiding CAPTCHA and IP blocks.