175M+ ethically sourced IPs built for the highest reliability.
High-speed, cost-effective proxies built for any scraping workload.
Premium static residential proxies from trusted ASNs for most difficult targets.
Dedicated IPs from premium ASNs for demanding scraping.

AI-powered proxy solution for optimized web scraping performance.

20M+ IP addresses from real mobile devices for precise targeting.

Free Chrome proxy manager extension that works with any proxy provider.

Free Android proxy manager app that works with any proxy provider.

Free community-driven tools to improve your web scraping projects.
Web Scraper API
All-in-one web data collection platform for every stage of web scraping.
Fast Search API
Ultra-fast organic search results scraper tailored for AI workflows.
Headless Browser
Advanced browser automation solution for AI agents and scraping.
AI Studio
A suite of AI-powered tools for various scraping projects.

Documentation
All features, parameters, and integration details, backed by code samples in every coding language.
Tutorials, samples, and guides.
Latest fixes and features.


![]() AI Summary:
AI Summary:
This article details how to build a Python script to track Walmart product prices. It leverages Oxylabs' Walmart Scraper API to extract product data, compares it with historical records stored in a JSON file, and sends email alerts for price changes or new products.
In this article, you’ll learn how to track the prices of Walmart products using Python. By tracking the Walmart price of your desired products, you’ll be able to analyze the market trends and use the data to predict what’s ahead. You’ll also be able to purchase items at the best prices as soon as they’re available. You’ll be using Oxylabs’ Walmart Scraper API to handle bot management protection and CAPTCHA. You’ll also learn to set up an email alert with the latest product and price change data. Let’s get started.
1. Install libraries
Before you begin, make sure you already have Python installed. Run the below command to install the necessary libraries:
pip install requestsNext, you’ll have to create an Oxylabs account to get the necessary credentials for the Walmart Scraper API. Go ahead and sign in to the Oxylabs dashboard.
2. Import libraries
Now, let’s import the libraries.
import json
import smtplib
from email.message import EmailMessage
from pprint import pprint
import requests
Notice, apart from requests, there are some standard libraries imported as well. You’ll use these libraries to send the email alert in the later sections.
3. Inspect elements to prepare XPaths
Use Google Chrome or similar browsers’ developer tools to inspect the website content. After visiting the Walmart category page on the browser, you can press `CTRL + SHIFT+ I` or simply right-click and select `inspect` to open the developer tools. First, you should notice that each product is wrapped in a div with a custom attribute `role=’group’`.

You can take advantage of this while preparing the XPaths.
Title
Now, let’s inspect the title of a product.

In the above screenshot, the product title is wrapped in a `<span>` tag with a unique attribute `data-automation-id=’product-title’`. Using this information, you can now select this element with the following XPath.
//div[@role='group']//span[@data-automation-id='product-title']Price
Similarly, you can also inspect Walmart's price element.
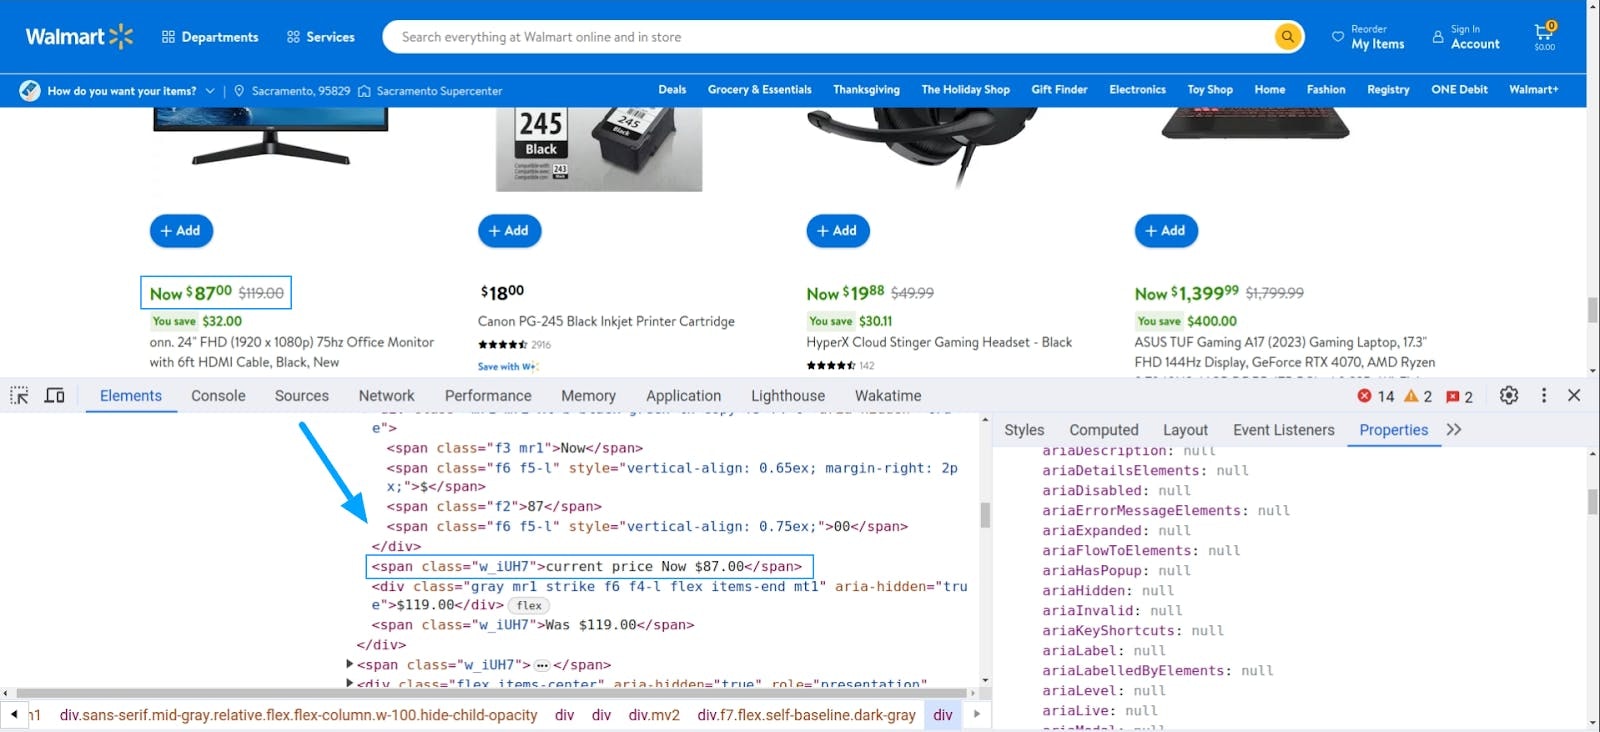
The price is available in the first `<span>` tag with a class `w_iUH7`. So the XPath will be:
//div[@role='group']//div[@data-automation-id='product-price']//span[@class='w_iUH7'][1]Product link
The product link is available in the `<a>` tag, so simply extract it using the tag.
//div[@role='group']//a/@href4. Fetch Walmart category data
In this section, you’ll learn how to use the Walmart Scraper API to fetch the content from Walmart URLs. Using the `requests` library that you installed in the previous step, you’ll send a POST request to the Walmart Scraper API and store the content for further processing.
Set API credentials
First, let’s store the Walmart Scraper API credentials.
username, password = "USERNAME", "PASSWORD"Replace `PASSWORD` and `USERNAME` with your credentials.
Prepare parsing instructions
Walmart Scraper API can automatically parse the product and search page. However, to parse category pages, you’ll have to provide additional parsing instructions. You can use both CSS selectors & XPaths to grab desired elements using the available parsing functions of the Walmart Scraper API. Let’s create a `dict` and populate it with the necessary instructions for grabbing the titles, prices, and links of the available products.
parsing_instructions = {
   "titles": {
       "_fns": [
           {
               "_fn": "xpath",
               "_args": [
                   "//div[@role='group']//span[@data-automation-id='product-title']/text()"
               ],
           }
       ]
   },
   "links": {
       "_fns": [
           {
               "_fn": "xpath",
               "_args": ["//div[@role='group']//a/@href"],
           }
       ]
   },
   "prices": {
       "_fns": [
           {
               "_fn": "xpath",
               "_args": [
                   "//div[@role='group']//div[@data-automation-id='product-price']//span[@class='w_iUH7'][1]/text()"
               ],
           },
           {"_fn": "amount_from_string"},
       ]
   },
}
As you can see, for each of these three elements, there are three function call instructions `_fns`. The XPaths prepared in the previous steps are given as arguments to the `xpath` functions. Notice, for the `prices`, you are also calling an additional function `amount_from_string`. This function conveniently extracts the price from the text, i.e., `current price Now $89.99` becomes `89.99`. If you want to learn more about these functions, check out the documentation.
Prepare payload
You’ll be scraping Walmart's electronics category. To send this URL to Oxylabs Walmart Scraper API, you’ll have to create a `dict` of payload as below.
url = "https://www.walmart.com/cp/electronics/3944"


payload = {
   "source": "universal",
   "url": url,
   "parse": True,
   "parsing_instructions": parsing_instructions,
}
The `source` must be set to `universal`, and `parse` should be set to `True`. This will make sure the API parses the HTML content of the given Walmart category pages and returns a structured JSON object with the results. You’ll also have to pass the `parsing_instructions` that you’ve created in the previous step.
Send a POST request
Next, you’ll send the payload to the API using the following.
response = requests.post(
   "https://realtime.oxylabs.io/v1/queries", auth=(username, password), json=payload
)
print(response.status_code)
pprint(response.json())
Notice, using the `auth` and `json` parameters of the `post()` method of the `requests` module, you’re passing the credentials and payload, respectively. If everything works, you should see a status `200` when you execute this code. And the output of the response in JSON format.
5. Track Walmart’s price history
Tracking Walmart price history is a little bit trickier than crawling data in real time. You’ll need the result from the previous run to track what has changed since the last execution of the script. To achieve this, you’ll use a `JSON` file.
Load history data
You can use the below code to create an empty history `dict`. It’ll also load a JSON file named `walmart_data.json` from the script’s folder (if it exists) with the previous history.
history = {}


try:
   with open("walmart_data.json", "r") as f:
       history = json.load(f)
except Exception as _:
   pass
Thanks to the `try` section, the script will work even if there is no previous history.
Track Walmart price changes and new products
Now, let’s populate the history `dict` you’ve created with data. To do this, you’ll update the code to iterate over all the products.
content = response.json()["results"][0]["content"]
price_changed = []
new_products = []
for title, price, link in zip(content["titles"], content["prices"], content["links"]):
   product = {"title": title, "price": price, "link": link}
   if link not in history:
       new_products.append(product)
   elif history[link]["price"] != price:
       product["old_price"] = history[link]["price"]
       price_changed.append(product)
   history[link] = product
The `content` object contains all the titles, prices, and links of the products as lists. So, using the `zip` method, you can get the title, price, and link of each product. As the name suggests, the `price_changed` list will contain the items that have a change in price. And the `new_products` list keeps track of products that weren’t available in history. Lastly, history `dict` is updated with the latest data.
Save history data
Now that you’ve got the history `dict` populated with data let’s save it for future use.
with open("walmart_data.json", "w") as f:
   f.write(json.dumps(history))
Once you execute this, it will either create a new `walmart_data.json` file in the current script’s folder or overwrite the existing one.
6. Create a price alert
Using the history data, you can set up an email alert for Walmart price tracking and new products. To do this, you’ll use the `smtplib` to send emails.
Configuration
Use the below code to configure the SMTP server and provide email credentials.
# config
SMTP_SERVER, SMTP_PORT = "SERVER_ADDRESS", "SERVER_PORT"
email, email_password, destination_email = "from@email", "from_email_pass", "to@email"
As you can guess, you’ll have to replace these configs with appropriate data. For example, if you are using a Gmail account for sending email, you’ll have to set the `SERVER_ADDRESS` as `smtp.gmail.com` and `SERVER_PORT` must be set to `587`. `from@email` and `from_email_pass` should be set as per your sender email. Last but not least, `to@email` will be replaced with the receiver of the email notification.
To generate an app password for Gmail, you can do the following:
Go to your Google account
Select Security
Select 2-Step Verification under "Signing in to Google"
Select App passwords at the bottom of the page
Enter a name to help you remember where you'll use the app password
Select Generate
Copy and save the generated password
For more details, check out Google's support documentation.
Compose email
Now, you can start composing the email. For simplicity, in this tutorial, you’ll send the data in `JSON` format; however, if you want, you can change it to your preference.
body = f"""Price Changed:
{json.dumps(price_changed, indent=2)}
New products:
{json.dumps(new_products, indent=2)}
"""
msg = EmailMessage()
msg.set_content(body)
msg["subject"] = "Walmart Price Tracking alert"
msg["to"] = destination_email
msg["from"] = email
The `msg` object contains the email data. Use the `set_content` method to set the `body` of the email.
Send email
To send the email, you’ll have to spin up the SMTP server using the `SMTP()` method of `smtplib`. The rest of the steps are pretty straightforward.
server = smtplib.SMTP(SMTP_SERVER, SMTP_PORT)
server.starttls()
server.login(email, email_password)
server.send_message(msg)
server.quit()
Once you run this code, the email will be sent using the sender email address defined in the variable `email`.
7. Full source code
For your convenience, the full source code is given below.
import json
import smtplib
from email.message import EmailMessage
from pprint import pprint
import requests


username, password = "USERNAME", "PASSWORD"

history = {}

try:
   with open("walmart_data.json", "r") as f:
       history = json.load(f)
except Exception as _:
   pass


url = "https://www.walmart.com/cp/electronics/3944"
parsing_instructions = {
   "titles": {
       "_fns": [
           {
               "_fn": "xpath",
               "_args": [
                   "//div[@role='group']//span[@data-automation-id='product-title']/text()"
               ],
           }
       ]
   },
   "links": {
       "_fns": [
           {
               "_fn": "xpath",
               "_args": ["//div[@role='group']//a/@href"],
           }
       ]
   },
   "prices": {
       "_fns": [
           {
               "_fn": "xpath",
               "_args": [
                   "//div[@role='group']//div[@data-automation-id='product-price']//span[@class='w_iUH7'][1]/text()"
               ],
           },
           {"_fn": "amount_from_string"},
       ]
   },
}
payload = {
   "source": "universal",
   "url": url,
   "parse": True,
   "parsing_instructions": parsing_instructions,
}
response = requests.post(
   "https://realtime.oxylabs.io/v1/queries", auth=(username, password), json=payload
)


print(response.status_code)
pprint(response.json())
content = response.json()["results"][0]["content"]
price_changed = []
new_products = []
for title, price, link in zip(content["titles"], content["prices"], content["links"]):
   product = {"title": title, "price": price, "link": link}
   if link not in history:
       new_products.append(product)
   elif history[link]["price"] != price:
       product["old_price"] = history[link]["price"]
       price_changed.append(product)
   history[link] = product
   print(product)


with open("walmart_data.json", "w") as f:
   f.write(json.dumps(history))


# Send email alert
SMTP_SERVER, SMTP_PORT = "SERVER_ADDRESS", "SERVER_PORT"
email, email_password, destination_email = "from@email", "from_email_pass", "to@email"


body = f"""Price Changed:
{json.dumps(price_changed, indent=2)}
New products:
{json.dumps(new_products, indent=2)}
"""


msg = EmailMessage()
msg.set_content(body)
msg["subject"] = "Walmart Price Tracking alert"
msg["to"] = destination_email
msg["from"] = email
server = smtplib.SMTP(SMTP_SERVER, SMTP_PORT)
server.starttls()
server.login(email, email_password)
server.send_message(msg)
server.quit()
Conclusion
You now have all the necessary equipment to monitor product prices and Walmart deals. By seamlessly integrating web scraping techniques and data parsing, you've gained the ability to stay on top of product prices, track their history, and receive timely alerts. This personalized tool not only enhances your shopping efficiency but also exemplifies the practical applications of Python in the realm of e-commerce. You can use this experience to build similar price trackers for other websites. Also, if you are interested in similar tutorials, check the "How to Scrape Walmart" tutorial on our blog.
Apart from E-commerce Scraper API (part of Web Scraper API), Oxylabs also has a variety of other products that can help you overcome complex scraping challenges and extend the project with various other features such as price history charts, price trends, price drop notifications via other platforms or services, etc. If you'd like to avoid scraping altogether, e-commerce datasets are another option for getting valuable data.
About the author

Maryia Stsiopkina
Former Senior Content Manager
Maryia Stsiopkina was a Senior Content Manager at Oxylabs. As her passion for writing was developing, she was writing either creepy detective stories or fairy tales at different points in time. Eventually, she found herself in the tech wonderland with numerous hidden corners to explore. At leisure, she does birdwatching with binoculars (some people mistake it for stalking), makes flower jewelry, and eats pickles.
All information on Oxylabs Blog is provided on an "as is" basis and for informational purposes only. We make no representation and disclaim all liability with respect to your use of any information contained on Oxylabs Blog or any third-party websites that may be linked therein. Before engaging in scraping activities of any kind you should consult your legal advisors and carefully read the particular website's terms of service or receive a scraping license.
Related articles

Cheerio vs. Puppeteer: Which Should You Use for Web Scraping?

Shinthiya Nowsain Promi
2026-06-23


Build Python Headless Browser Automation from Scratch
Shinthiya Nowsain Promi
2026-06-11
Try Walmart Scraper API
Choose Oxylabs' Walmart Scraper API to gather real-time public data hassle-free.

Get the latest news from data gathering world
Scale up your business with Oxylabs®
Proxies
Advanced proxy solutions
Data Collection
Datasets
Resources
Innovation hub
Try Walmart Scraper API
Choose Oxylabs' Walmart Scraper API to gather real-time public data hassle-free.