

 AI Summary:
A step-by-step guide to setting up Oxylabs Datacenter Proxies, from account registration to running your first request. It also covers session control, geo-targeting, supported protocols, response codes, and usage monitoring to help users manage their proxy setup effectively.
In this Quick Start Guide, we'll show you all you need to know for a smooth start with Oxylabs Datacenter Proxies – a high-speed proxy solution for high-volume tasks. In addition, you can connect your AI agent to Datacenter Proxies in just a few steps with Agent Skills. Learn how.
There are two subscription options, each having their advantages for different use cases, allowing you to choose the best for cost efficiency and your project requirements.
Setting up Datacenter Proxies
1. Register and create a product instance
Go to the Oxylabs Dashboard and create an account. Then, click + Add product instance, select Datacenter proxies, set an instance name, and choose the proxy type:
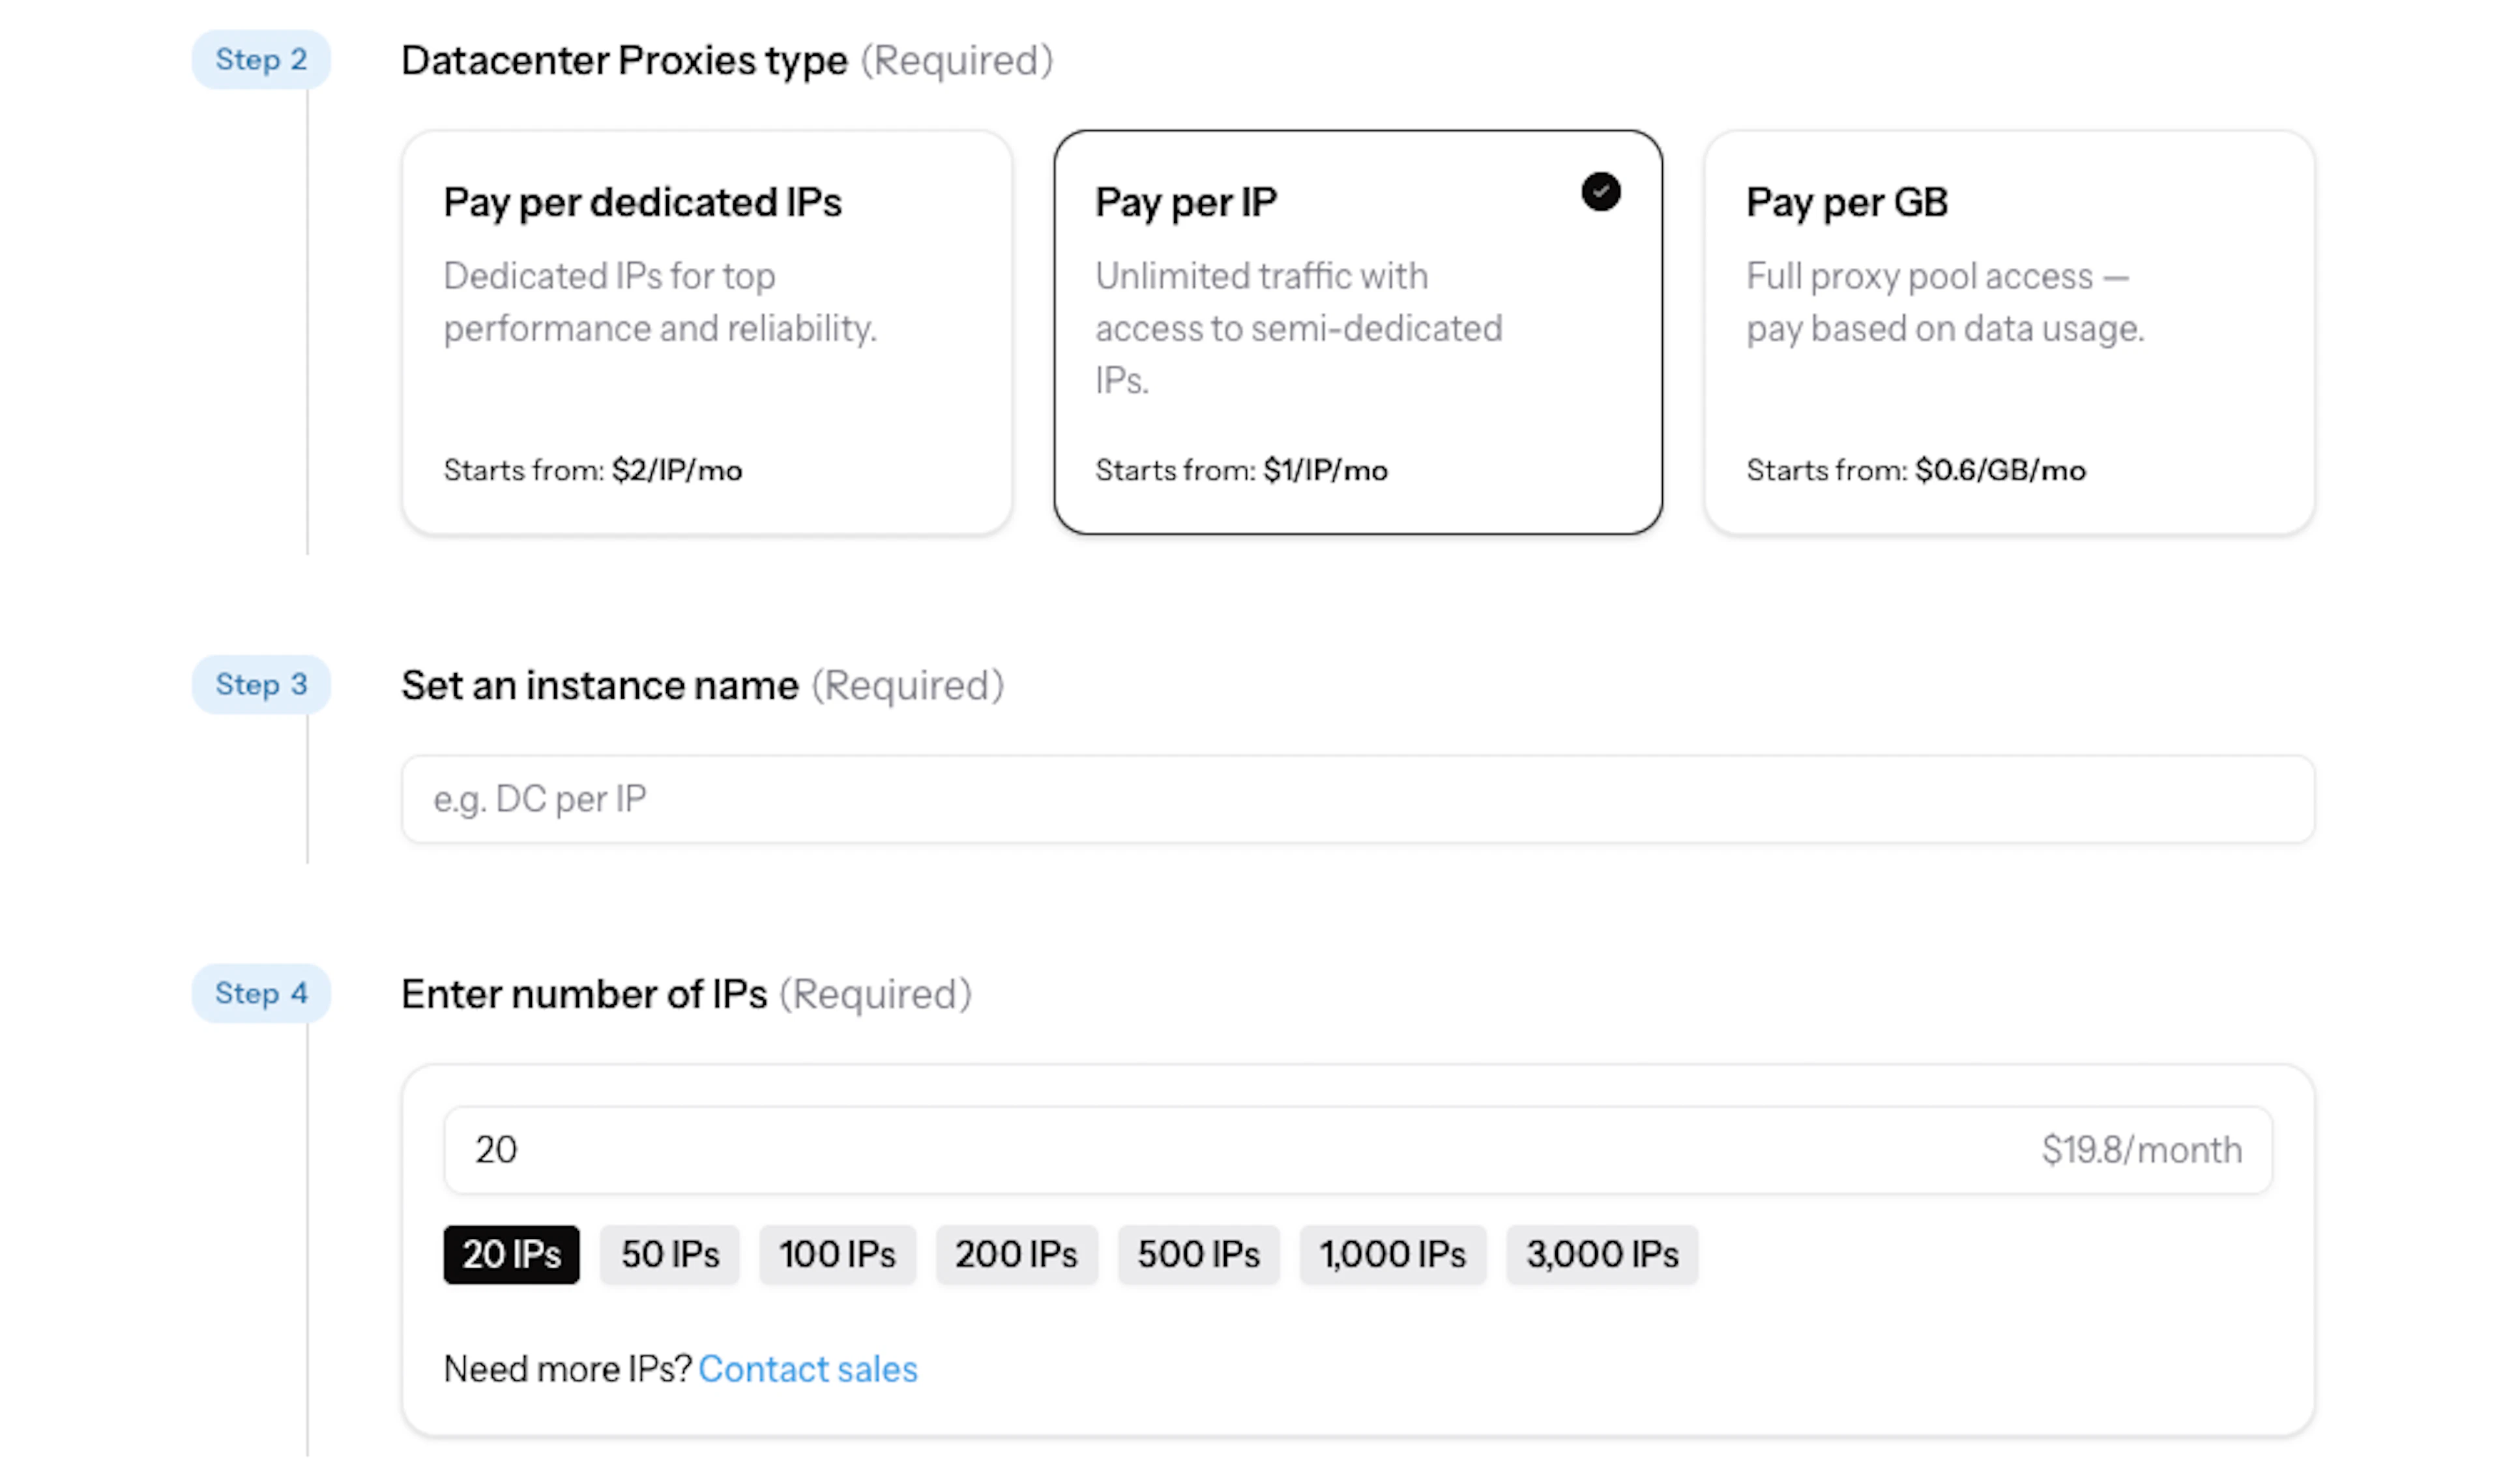
Pay per IP: Best for large-volume and cost-effective data collection.
Pay per GB: Best for low-traffic scraping tasks that require a large and diverse pool of IP addresses.
If you choose Pay per IP: Set up the IP locations and choose the number of IPs for each location.
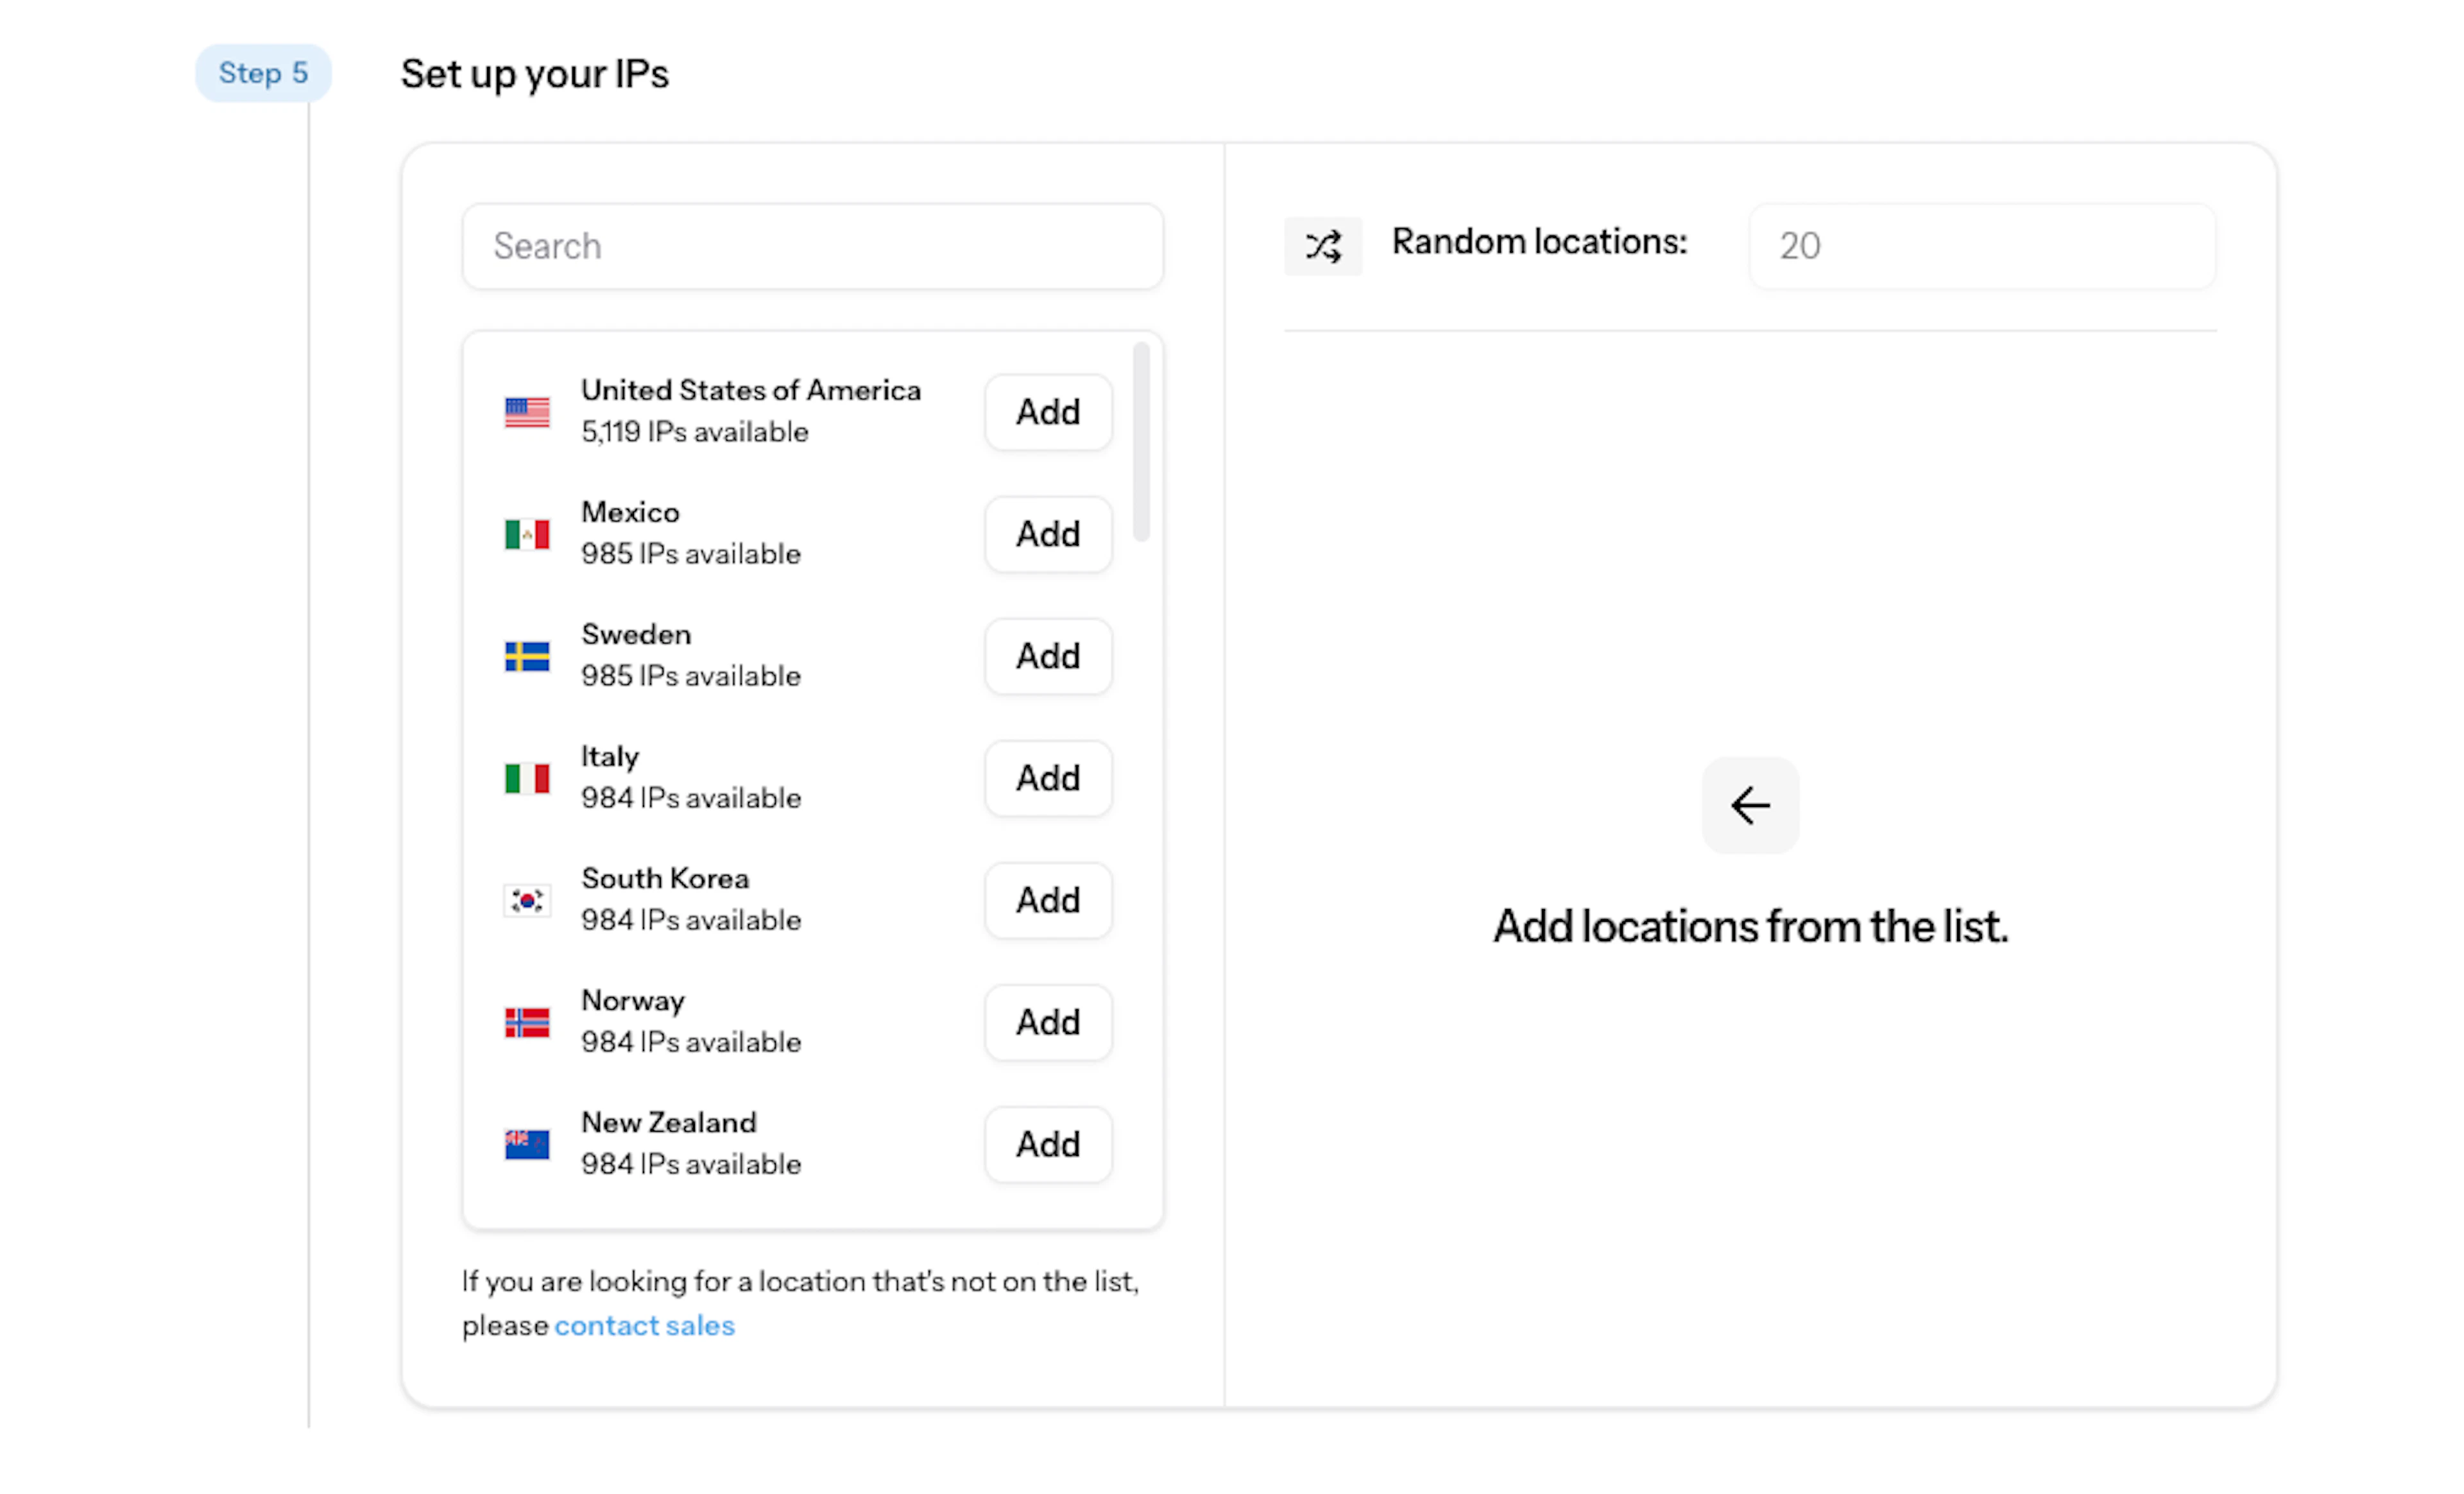
Continuing with no chosen locations will assign IPs randomly. Finish by configuring your authentication settings, and click Create instance.
2. Get instance credentials
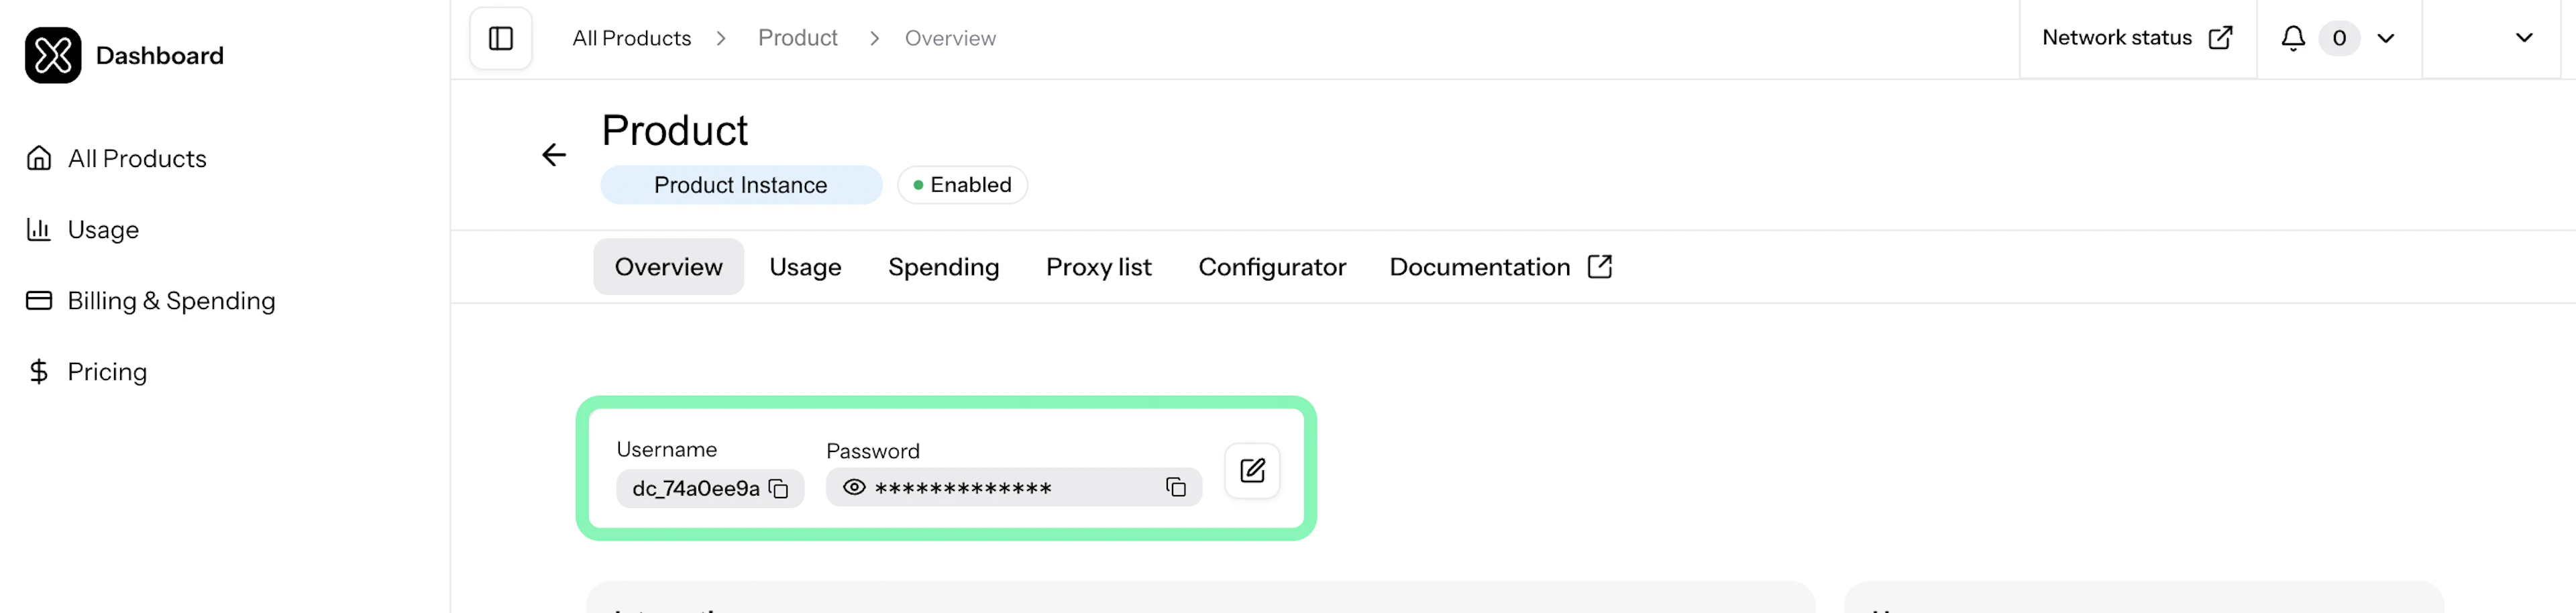
First, open your Datacenter Proxies instance in the dashboard home section. Then, look for your new proxy instance credentials at the top of the overview: username and password. These credentials are your access to the IPs.
3. Run a request
After completion, you can now form and run your first cURL request in a terminal or any other setup to test Datacenter Proxies and see the results instantly.
Let’s send a query to https://ip.oxylabs.io/location using port 8000:
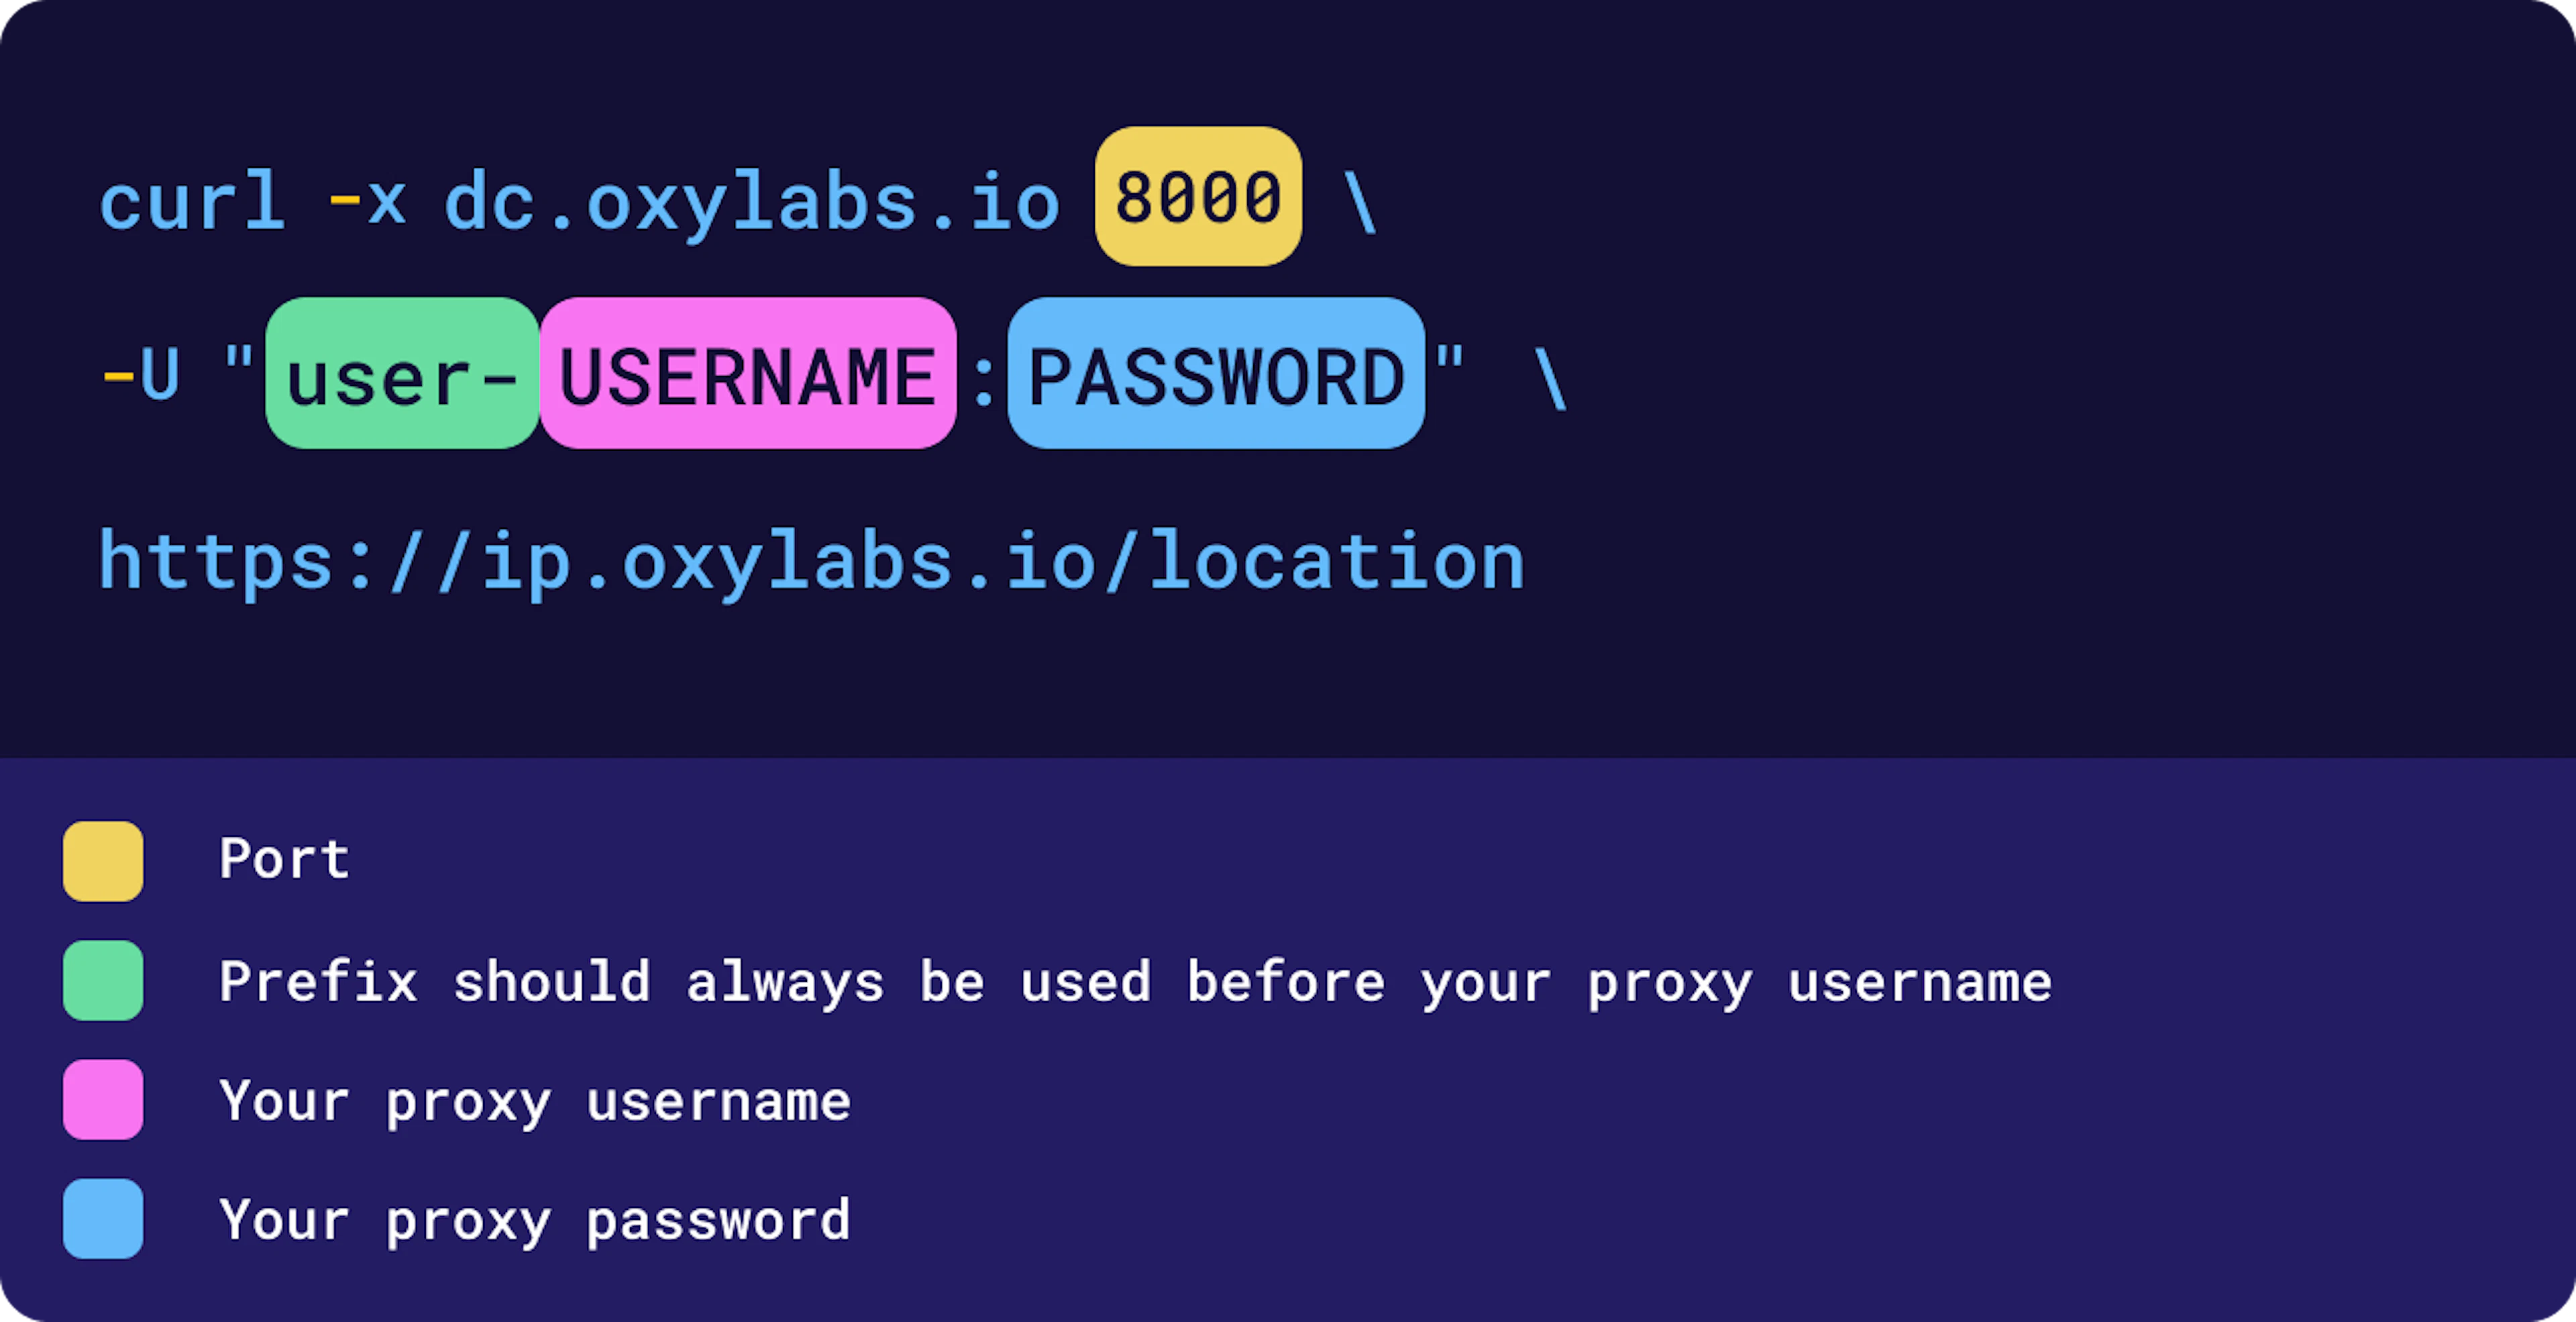
Here’s the same code for you to copy:
curl -x dc.oxylabs.io:8000 -U "user-USERNAME:PASSWORD" https://ip.oxylabs.io/locationGet your proxy list
⚠️ Note: This section is relevant only for the pay-per-IP proxy users. If you’ve purchased Datacenter Proxies per traffic, skip to the next section.
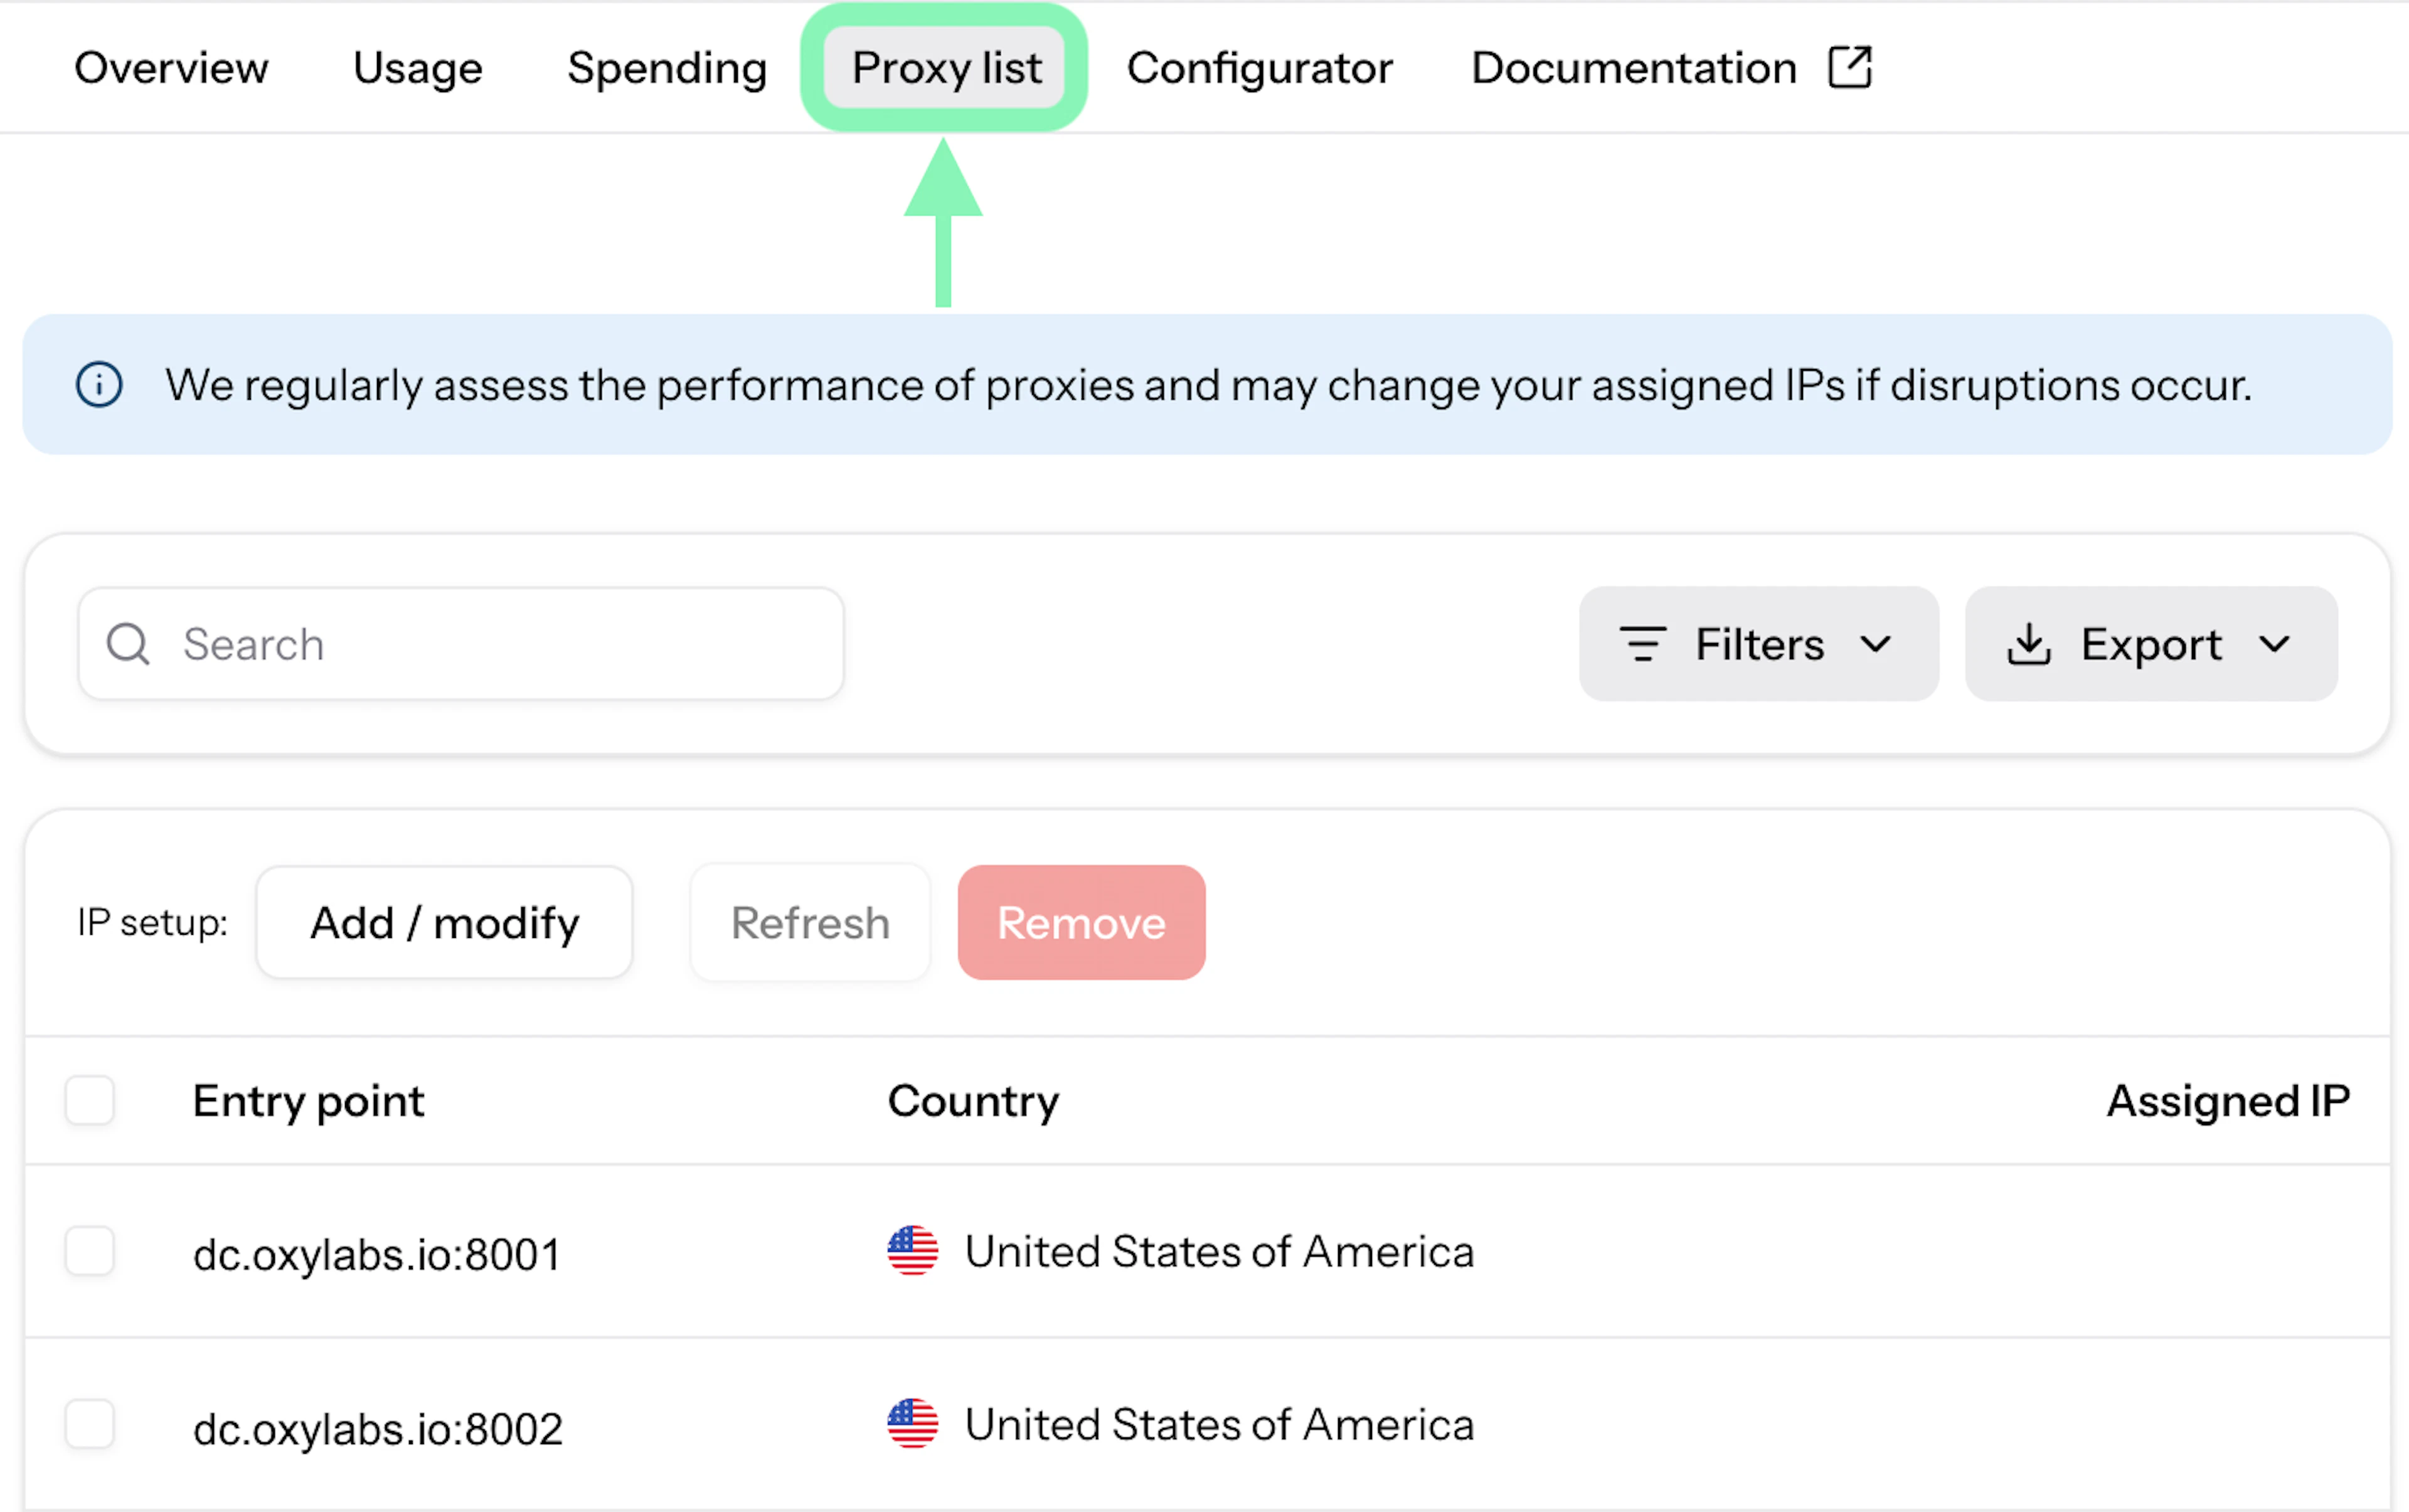
You can access your proxy list by opening your Datacenter Proxies product instance and selecting Proxy List tab.
Static Sessions
Another important aspect of our Datacenter Proxies is session control, allowing you to keep the same proxy IP address for multiple requests.
With a pay-per-IP subscription, when connecting through the 8001 port, you’ll always use the same IP address that’s assigned to this port. If you want to use another IP, you must change the port to 8002, 8003, and so on. You can find assigned port numbers in your proxy list.
In the case of pay-per-traffic subscription, use a port within the range of 8001 to 63000. For example, if you use port 8001, you’ll connect to a random IP address that’ll remain the same with the following requests, and the session won’t expire.
You can find a code example below showing how the process should look like. A German IP is chosen for the first request, and then the same IP is kept with new queries:
curl -x dc.oxylabs.io:8001 -U "user-USERNAME-country-DE:PASSWORD" https://ip.oxylabs.io/locationFor more code examples, visit our documentation.
Location settings
Oxylabs Datacenter Proxies currently offers eight different countries from which to choose. To get an IP with a dedicated geo-location, include a country- parameter followed by a two-letter country code within the user authentication string. Below is an example of a query to ip.oxylabs.io/location that’s performed from a random IP address in Germany. You can find more code examples in our documentation.

Here’s the same cURL command you can copy:
curl -x dc.oxylabs.io:8000 -U "user-USERNAME-country-DE:PASSWORD" https://ip.oxylabs.io/locationDifferences in subscription methods
Datacenter proxies-per-IP users who provide a rotating port and a country parameter will receive a random IP from the selected country from their Proxy list with each new request.
Datacenter proxies-per-traffic users who provide a rotating port and a country parameter will receive random IP from the selected country from the entire proxy pool.
Protocols
Datacenter Proxies support HTTP, HTTPS, and SOCKS5 protocols. For example, to connect through an HTTPS protocol, you must specify this in your request by adding https:// to your entry point, like so: https://dc.oxylabs.io:8000.
Please ensure that the libraries or third-party tools you want to use support HTTPS and SOCKS5 protocols. Check out this complete code sample that uses HTTPS:
curl -x https://dc.oxylabs.io:8000 -U "user-USERNAME:PASSWORD" https://ip.oxylabs.io/locationResponse codes
These are the most common response codes you can get while using our Datacenter Proxies. If you received an error while making a request and it's not on the list, contact our 24/7 available support team or your dedicated account manager.
| Response code | Error Message | Description |
|---|---|---|
407 |
Proxy Authentication Required | User credentials are not provided / are incorrect / the user is connecting from an IP that is not whitelisted. |
429 |
Too Many Requests | User has reached the thread/concurrent session limit. |
500 |
Internal Server Error | We had a problem with our server. Try again later. |
503 |
Service Unavailable | Failed to connect to the target server. DNS failure to resolve the target server address. |
504 |
Gateway Timeout | A proxy server timed out, waiting for a response from the target server. It usually takes about 60 seconds. |
Usage statistics
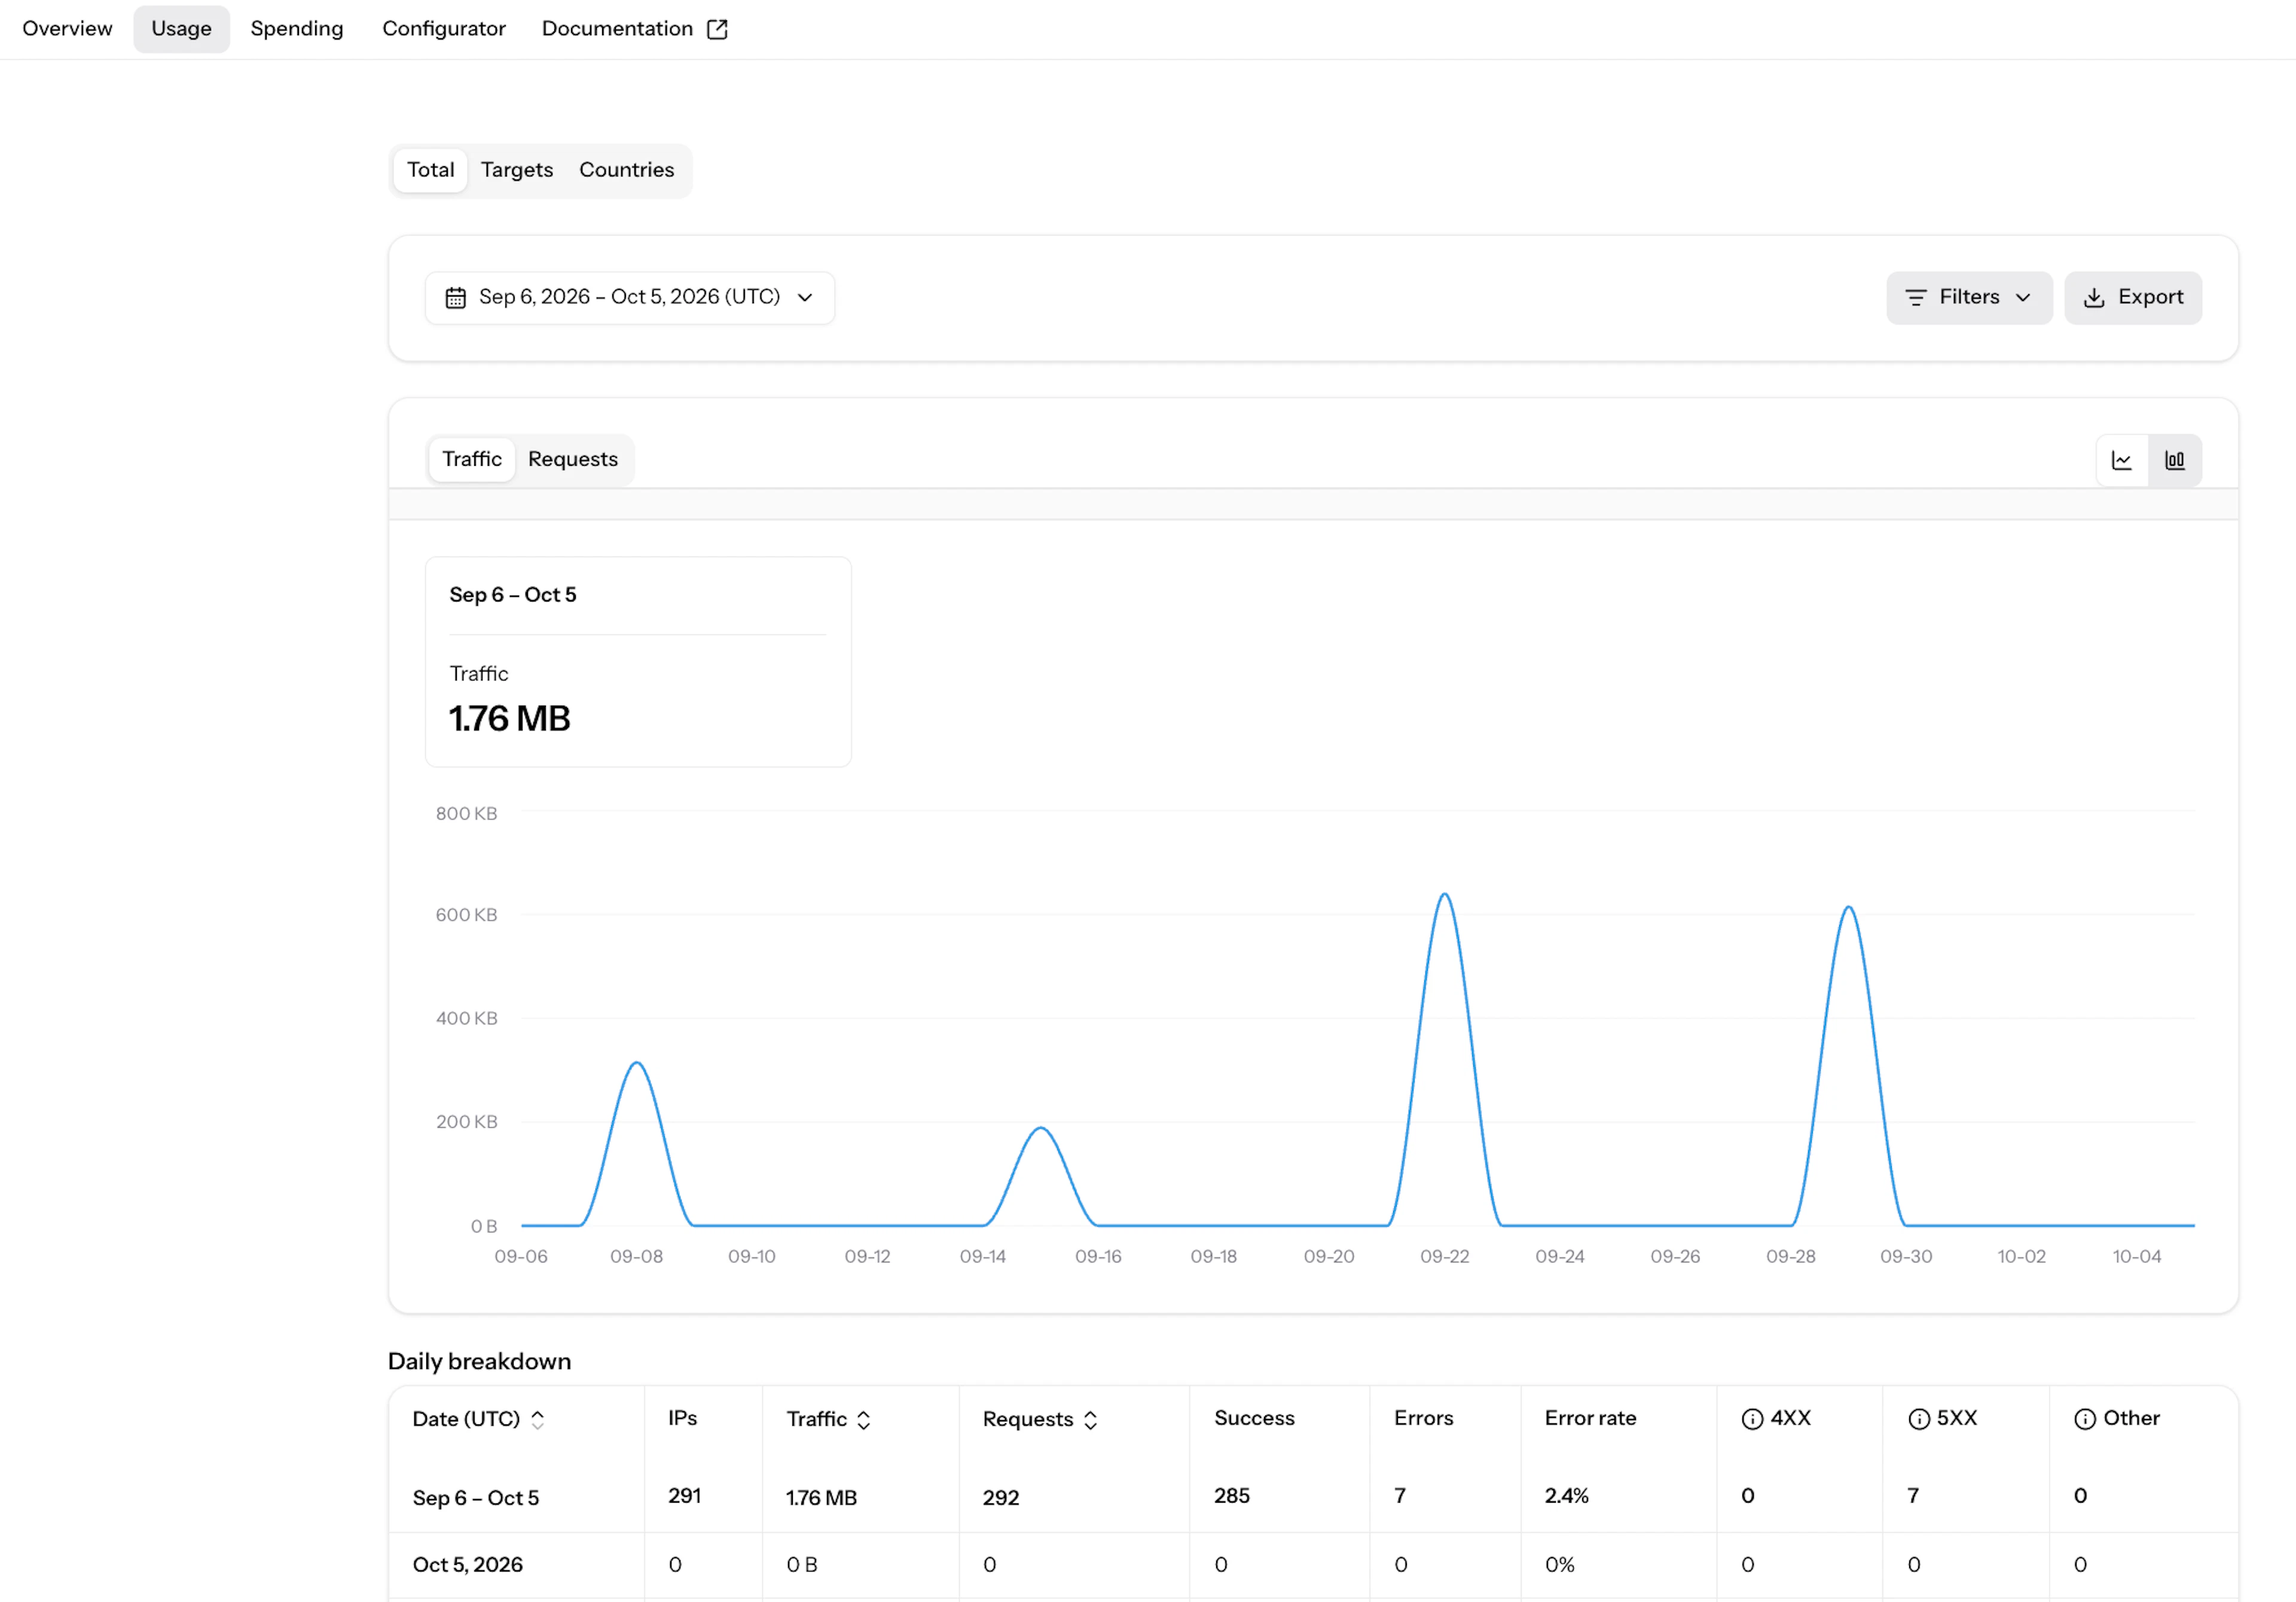
You can view your usage statistics by visiting the Oxylabs Dashboard. In the Usage section of the product instance, you will find detailed information about your traffic usage, the number of requests, and the number of errors received each day. There’s also an option to filter the statistics and view the metrics for a specific time period.
Usage limits
⚠️ Note: This section is relevant only for the pay per GB subscribers.
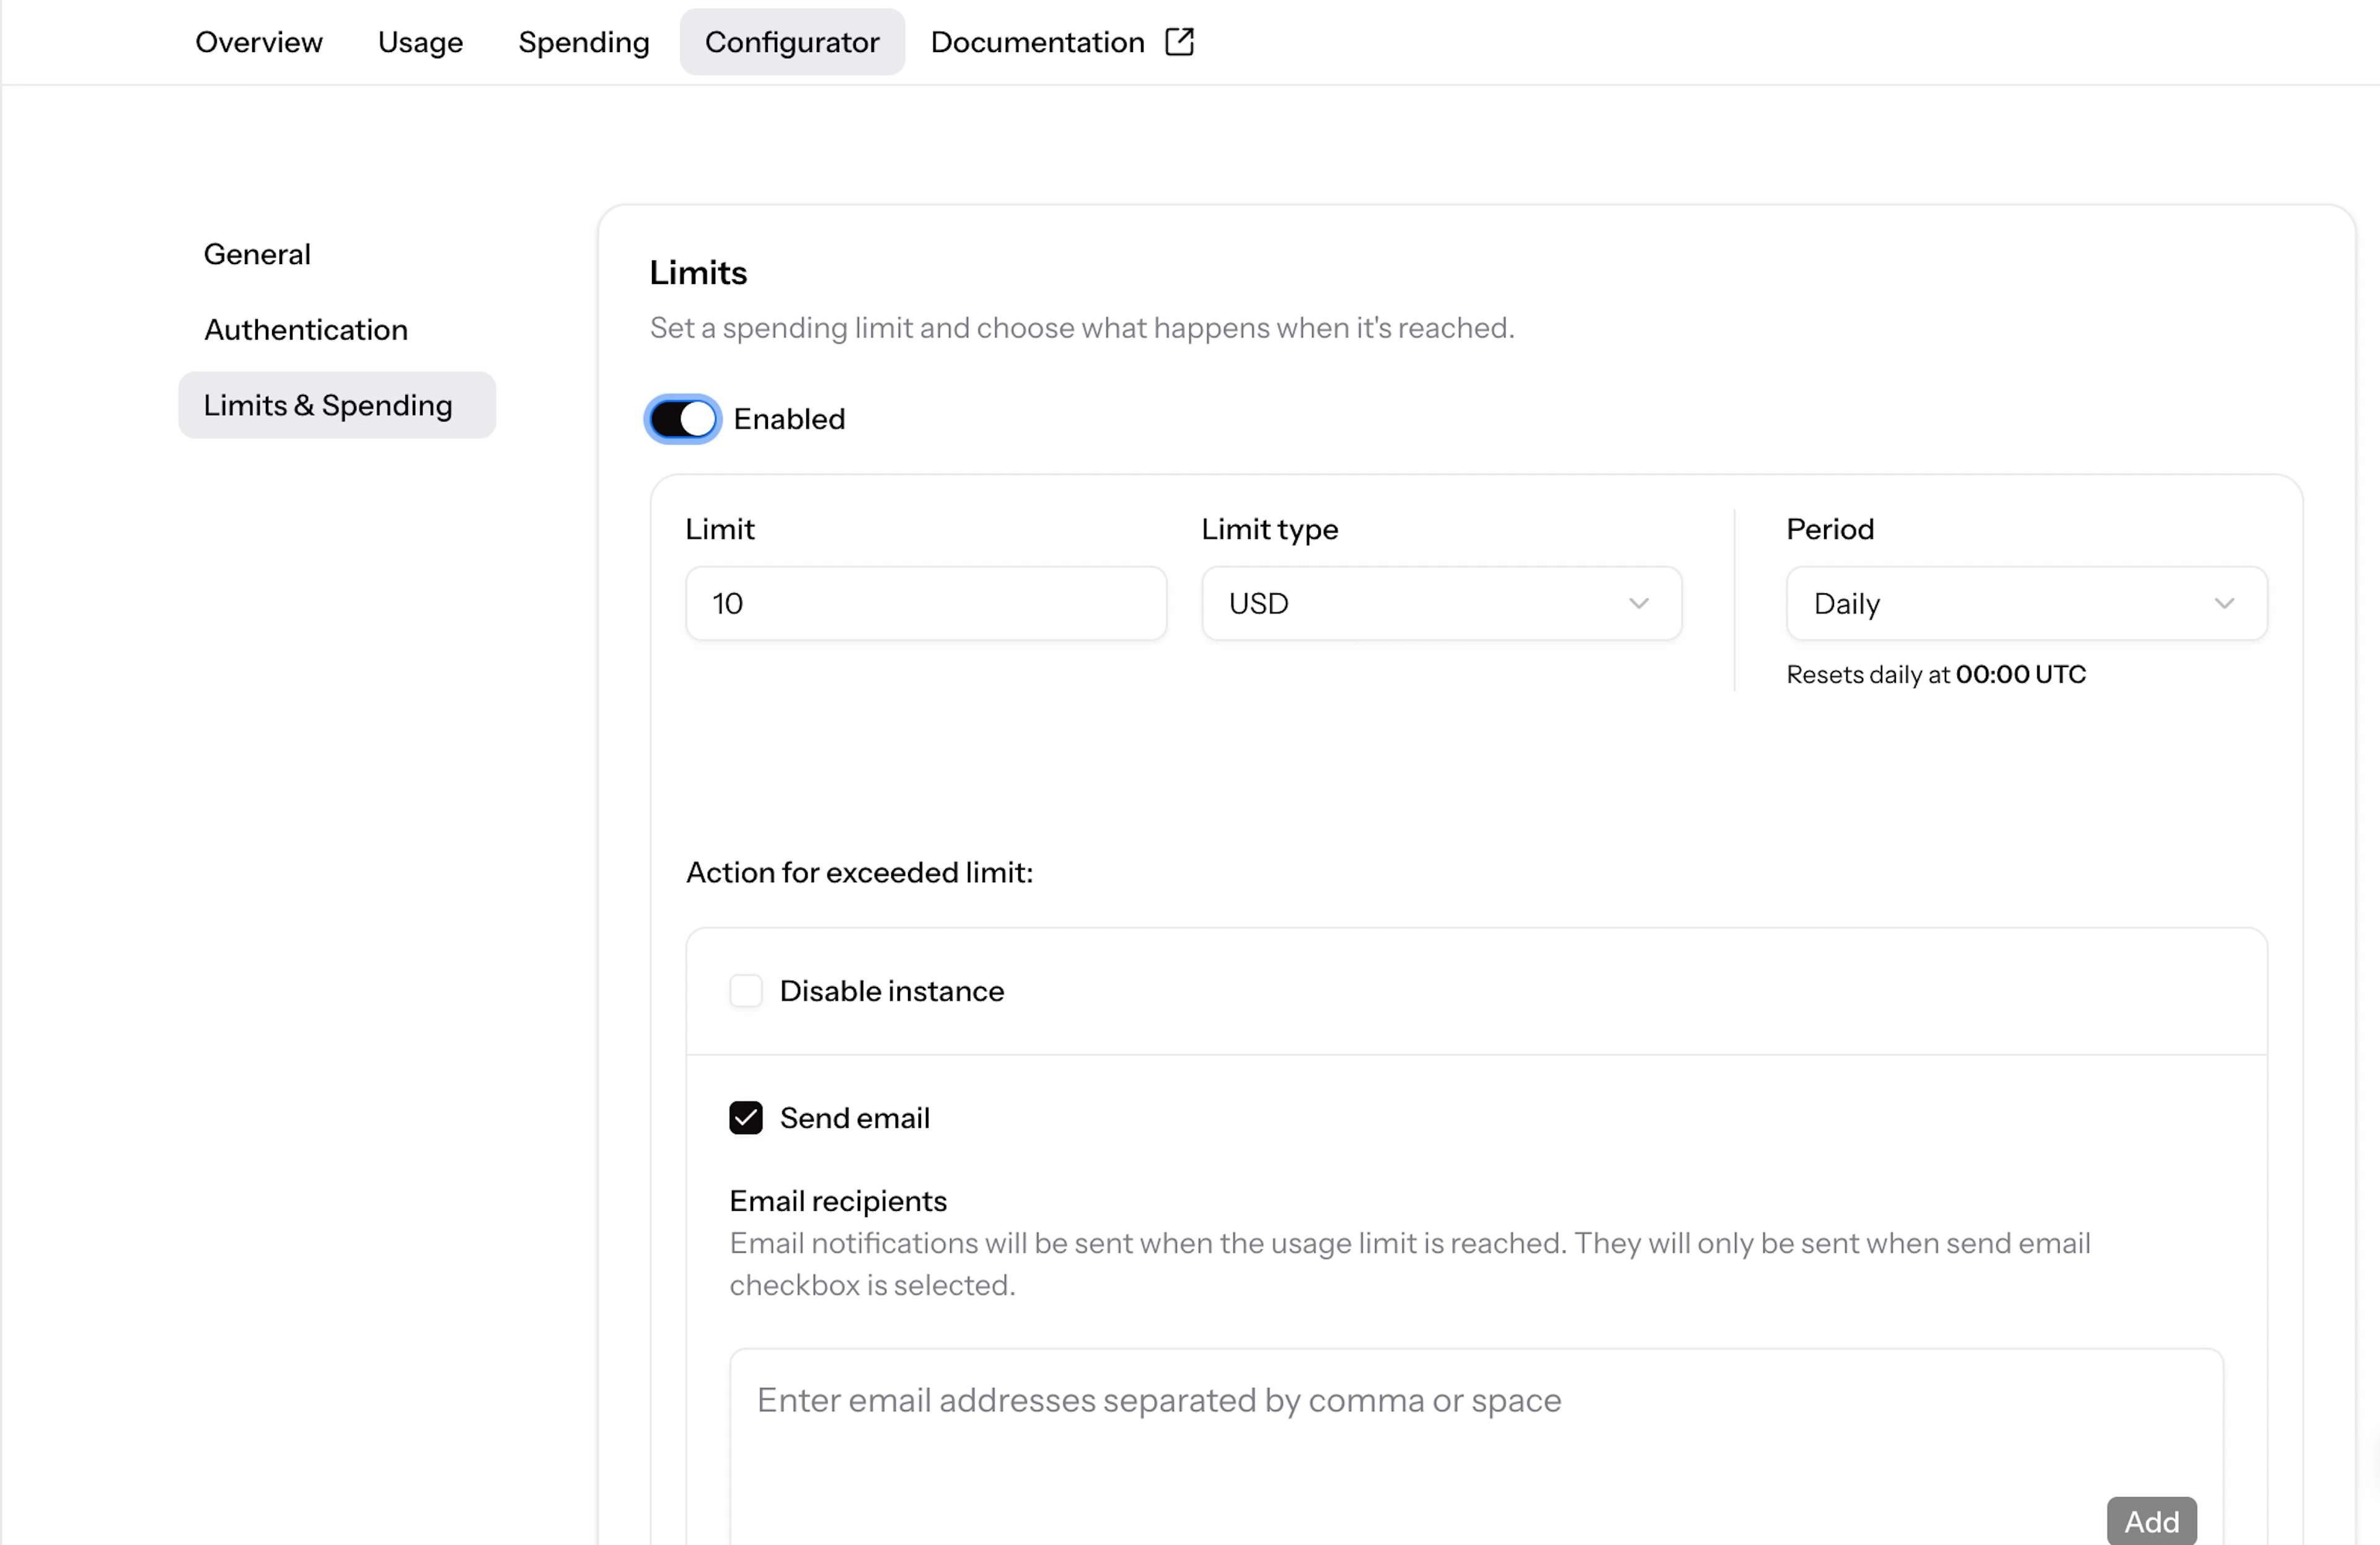
To add traffic limits, either set them up during the new Datacenter Proxy instance creation or add them later. While creating a product instance, configure Limits & Spending:
Limit type: USD/EUR (Monetary) or GB (Traffic).
Period: Daily, Weekly, Monthly, or Lifetime.
Then choose an Action for exceeded limit – Disable instance when the limit is reached or Send email alerts without disabling the instance.
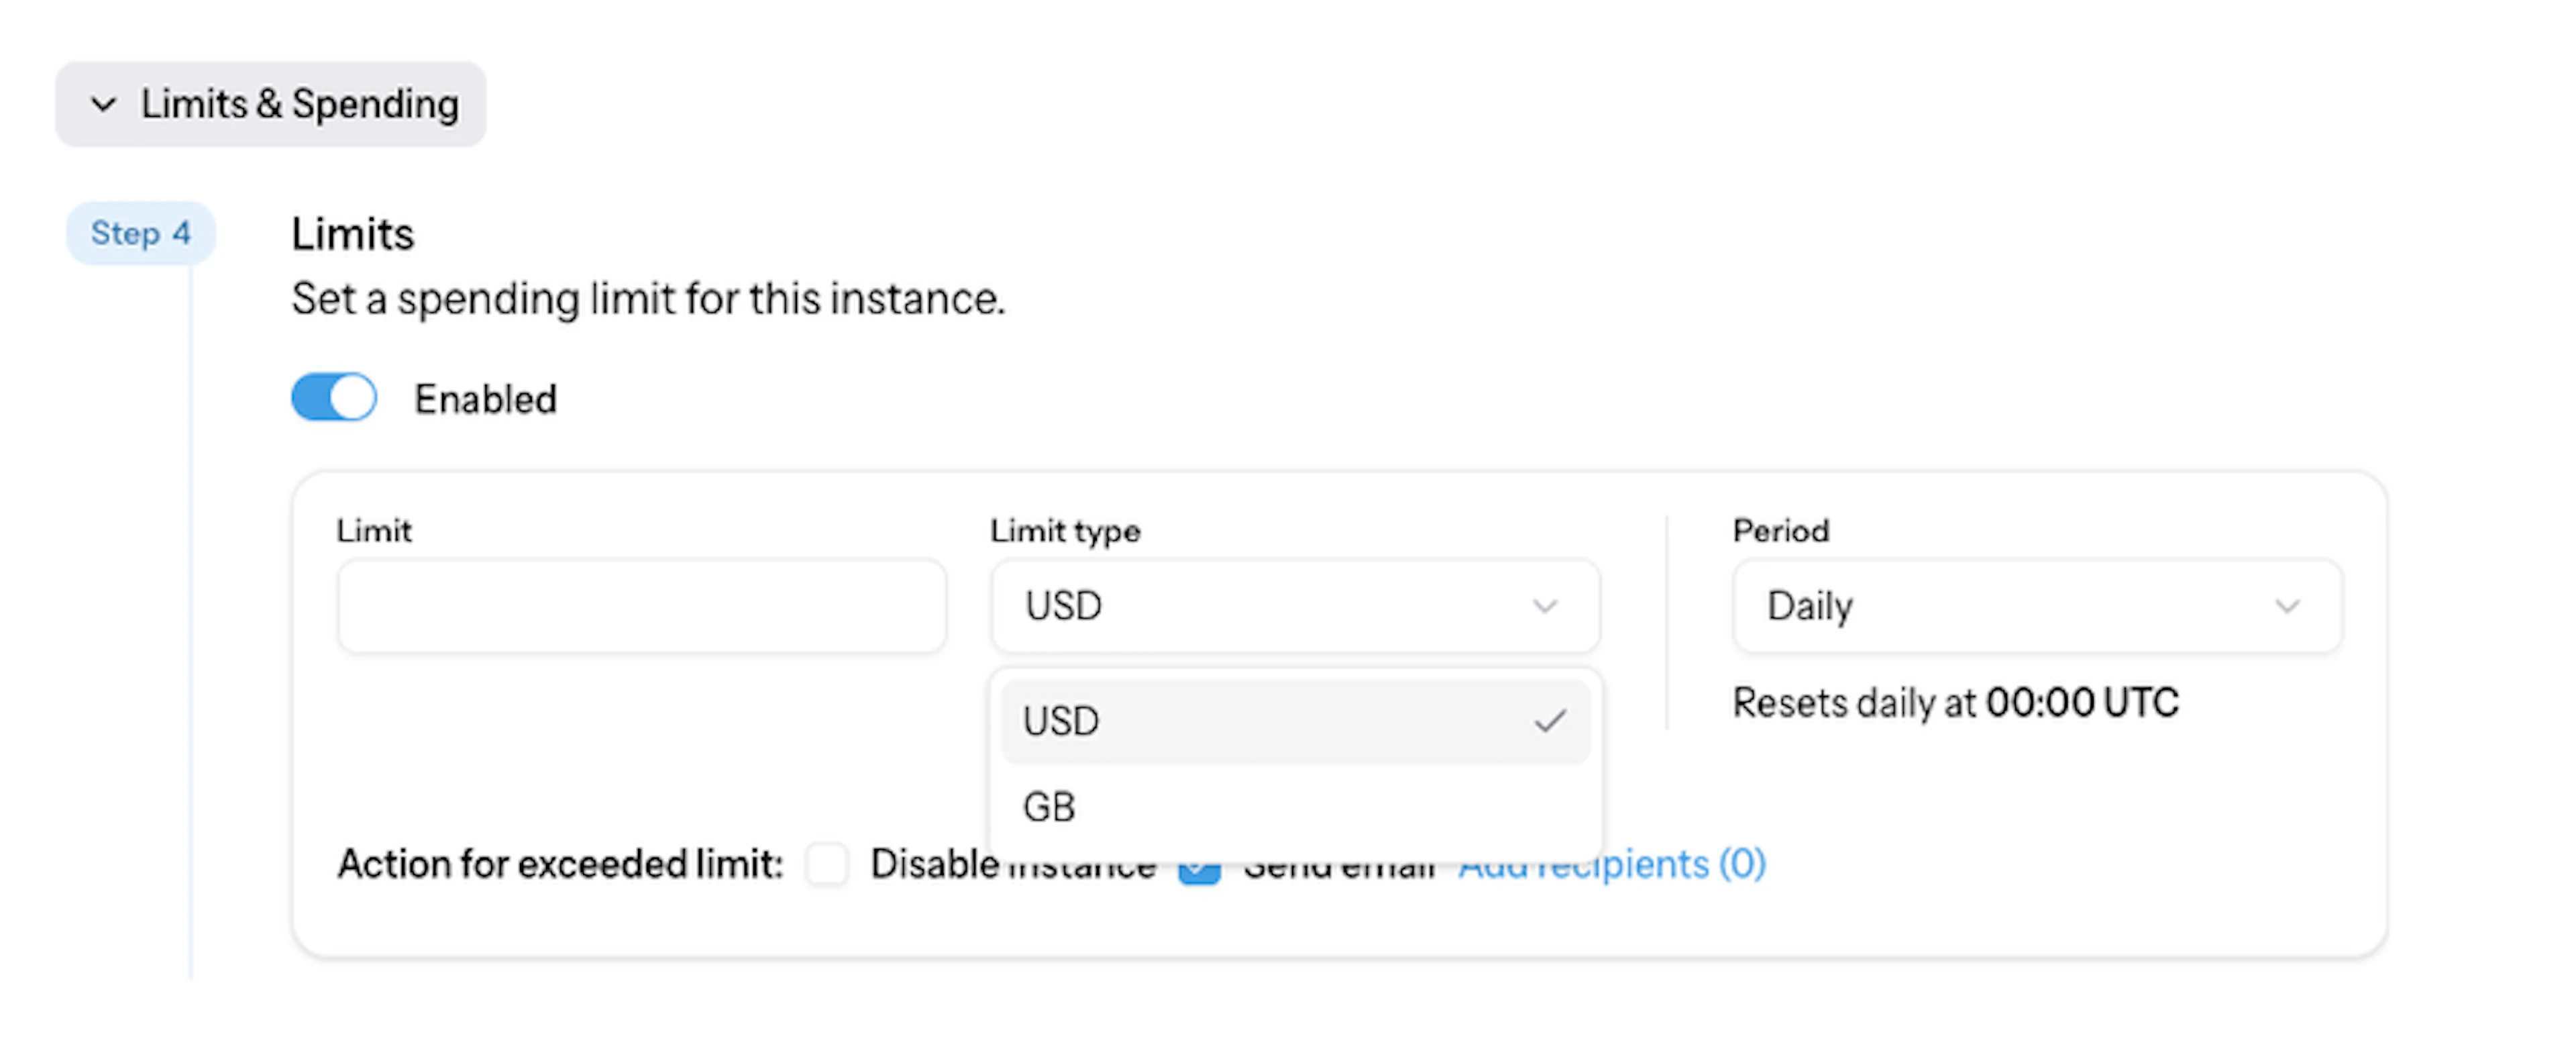
If you wish to add usage limits later, open your Datacenter Proxy instance, select the Configurator tab, click the Limits & Spending section, and configure your usage limits with the same available settings.
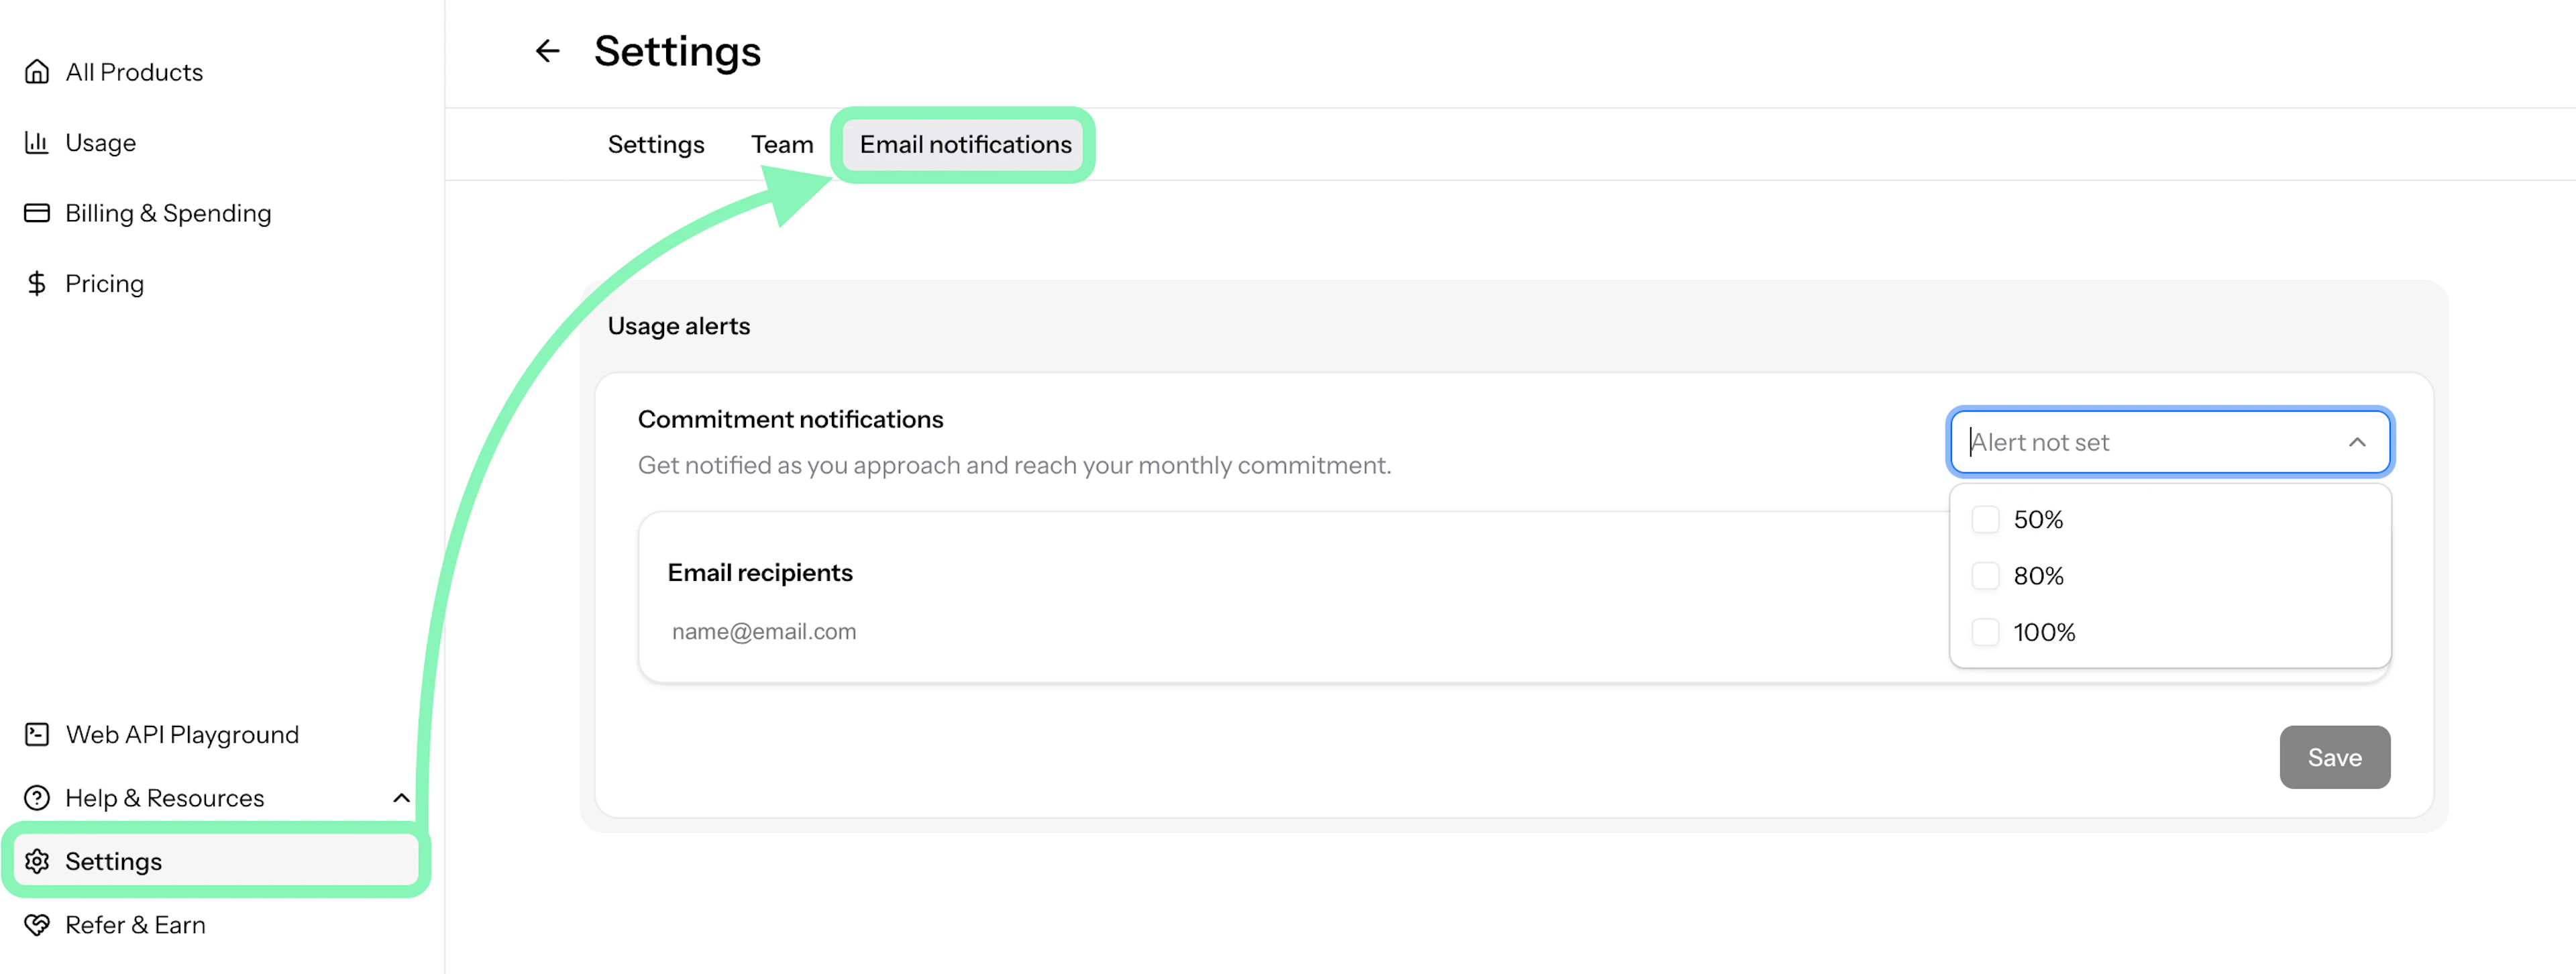
Usage alerts
⚠️ Note: This section is relevant only for the pay per GB subscribers.
You can set spending alerts at the 50%, 80%, or 100% of usage so you're notified before a product instance or your overall account hits its limit.
Additional resources
If there’s anything else you’d like to ask, don’t hesitate to contact our Support Team via live chat or email. They will help you ease your worries before you check out our free proxy list or buy a proxy server.
We’ve got plenty of content to answer most questions and teach you something new, so feel free to explore:
People also ask
Do you have any restricted targets?
We do. Some websites are restricted on our Datacenter Proxy network to avoid abuse and unclear activities.
The list includes but is not limited to targets such as:
All Apple domains, including iTunes and App store
Entertainment (e.g., Playstation)
Banking and other financial institutions
Government websites
Streaming
Ticketing
Mailing
For broader target coverage, you may also explore our residential proxies. Don’t hesitate to contact our customer support in case you have questions about a specific target and which option would suit you best.
Do you have specific integration guides?
What are the technical requirements to start using Datacenter Proxies?
Can I get a free trial for Datacenter Proxies?
What is your Datacenter refund policy?
About the author

Augustas Pelakauskas
Former Senior Technical Copywriter
Augustas Pelakauskas was a Senior Technical Copywriter at Oxylabs. Coming from an artistic background, he is deeply invested in various creative ventures - the most recent being writing. After testing his abilities in freelance journalism, he transitioned to tech content creation. When at ease, he enjoys the sunny outdoors and active recreation. As it turns out, his bicycle is his fourth-best friend.
All information on Oxylabs Blog is provided on an "as is" basis and for informational purposes only. We make no representation and disclaim all liability with respect to your use of any information contained on Oxylabs Blog or any third-party websites that may be linked therein. Before engaging in scraping activities of any kind you should consult your legal advisors and carefully read the particular website's terms of service or receive a scraping license.
Related articles




Proxies for budget-friendly scraping
Access an extensive proxy pool with over 175M Residential Proxies for your projects.

Get the latest news from data gathering world
Scale up your business with Oxylabs®
Proxies for budget-friendly scraping
Access an extensive proxy pool with over 175M Residential Proxies for your projects.