175M+ ethically sourced IPs built for the highest reliability.
High-speed, cost-effective proxies built for any scraping workload.
Premium static residential proxies from trusted ASNs for most difficult targets.
Dedicated IPs from premium ASNs for demanding scraping.

AI-powered proxy solution for optimized web scraping performance.

20M+ IP addresses from real mobile devices for precise targeting.

Free Chrome proxy manager extension that works with any proxy provider.

Free Android proxy manager app that works with any proxy provider.

Free community-driven tools to improve your web scraping projects.
Web Scraper API
All-in-one web data collection platform for every stage of web scraping.
Fast Search API
Ultra-fast organic search results scraper tailored for AI workflows.
Headless Browser
Advanced browser automation solution for AI agents and scraping.
AI Studio
A suite of AI-powered tools for various scraping projects.

Documentation
All features, parameters, and integration details, backed by code samples in every coding language.
Tutorials, samples, and guides.
Latest fixes and features.


![]() AI Summary:
AI Summary:
This tutorial outlines how to construct a web scraper using Golang and the Colly library. It details the process of installing necessary tools, extracting structured data from web pages using CSS selectors, managing pagination, and exporting the collected information to a CSV file. The post also briefly covers scheduling the scraper with GoCron.
Web scraping is an automated process of data extraction from a website. As a tool, a web scraper collects and exports data to a more usable format (JSON, CSV) for further analysis. Building a scraper could be complicated, requiring guidance and practical examples. A vast majority of web scraping tutorials concentrate on the most popular web scraping languages, such as JavaScript, PHP, and, more often than not – Python. This time let’s take a look at Golang.
Golang, or Go, is designed to leverage the static typing and run-time efficiency of C and usability of Python and JavaScript, with added features of high-performance networking and multiprocessing. It’s also compiled and excels in concurrency, making it quick.
This article will guide you through the step-by-step process of writing a fast and efficient Golang web scraper. By the end, you will be able to extract public data from any target website with ease.
If you’d prefer a visual walkthrough, we also cover this topic in a dedicated video:

1. Installing Go
To start, head over to the Go downloads page. Here you can download all of the common installers, such as Windows MSI installer, macOS Package, and Linux tarball. Go is open-source, meaning that if you wish to compile Go on your own, you can download the source code as well.
A package manager facilitates working with first-party and third-party libraries by helping you to define and download project dependencies. The manager pins down version changes, allowing you to upgrade your dependencies without fear of breaking the established infrastructure.
Installing Go on macOS
If you prefer package managers, you can use Homebrew on macOS. Open the terminal and enter the following:
brew install goInstalling Go on Windows
On Windows, you can use the Chocolatey package manager. Open the command prompt and enter the following:
choco install golangInstalling Go on Linux
Installing Go on Linux requires five simple steps:
Remove previous Go installations (if any) using the following command:
rm -rf /usr/local/go Download the GO for Linux package; head over to the Go downloads page, or use:
wget https://go.dev/dl/go1.19.2.linux-amd64.tar.gzOnce the .tar.gz file is downloaded, extract the archive in the /usr/local directory through:
tar -C /usr/local -xzf go1.19.2.linux-amd64.tar.gzAdd the Go path to the PATH environment variable by adding the following line into $HOME/.profile file, or for a system-wide installation, add it in /etc/profile file:
export PATH=$PATH:/usr/local/go/binUse the source $HOME/.profile command to apply changes in the environment variable of the .profile file.
Now, you can use the go version command to verify that the Go version is installed.
Once Go is installed, you can use any code editor or an integrated development environment (IDE) that supports Go.
How to install Golang in Visual Studio Code?
While you can use virtually any code editor to write a Go program, one of the most commonly used ones is Visual Studio Code (VS Code).
For Golang to be supported, you’ll need to install the Go extension. To do that, select the Extensions icon on the left side, type in Go in the search bar, and simply click Install:
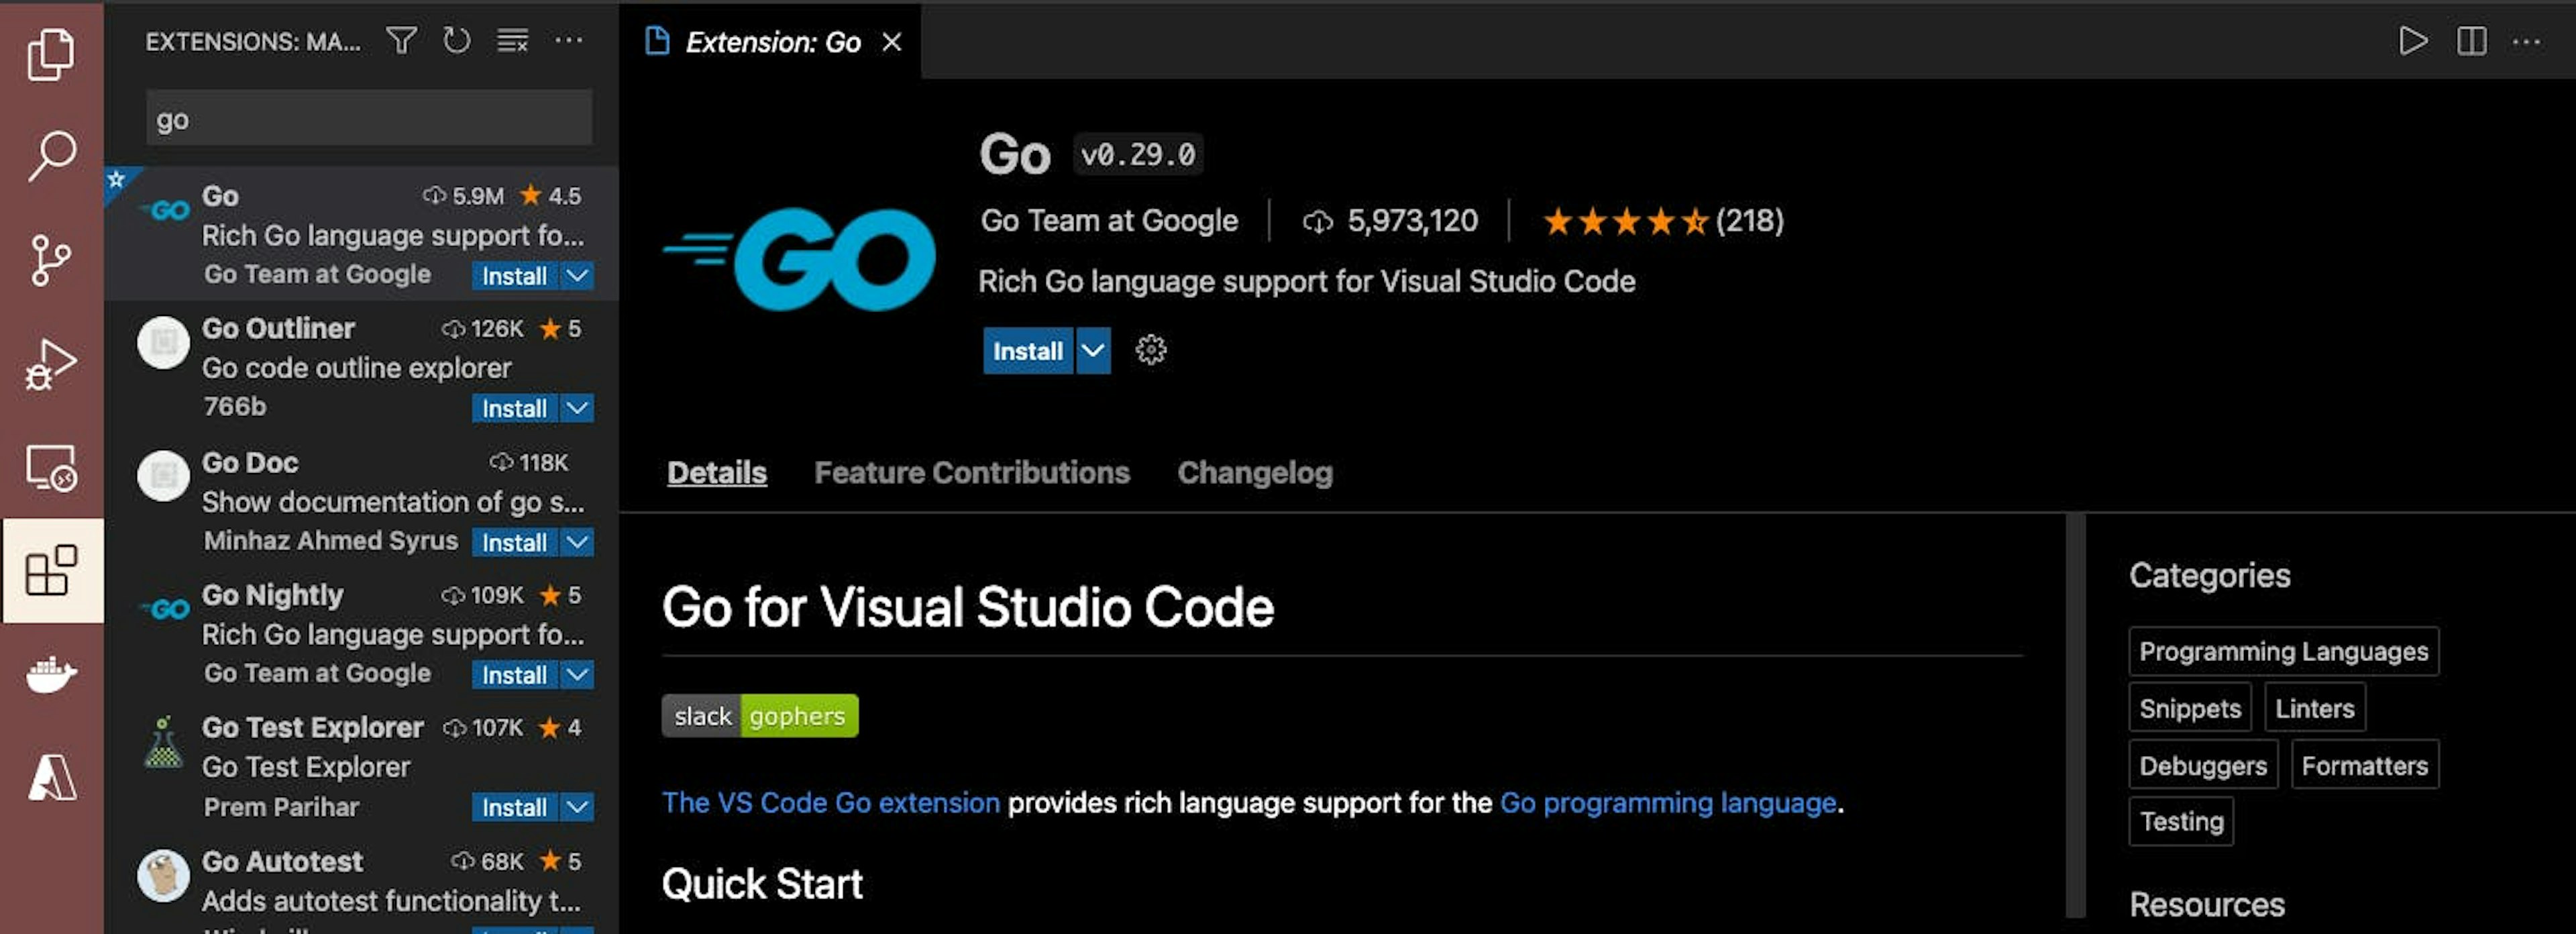
Go extension for Visual Studio Code
Once you’ve finished installing the Go extension, you’ll need to update Go tools.
Press Ctrl+Shift+P to open the Show All Commands window and search for Go: Install/Update tools.
Take a look at the image below to see how it looks:
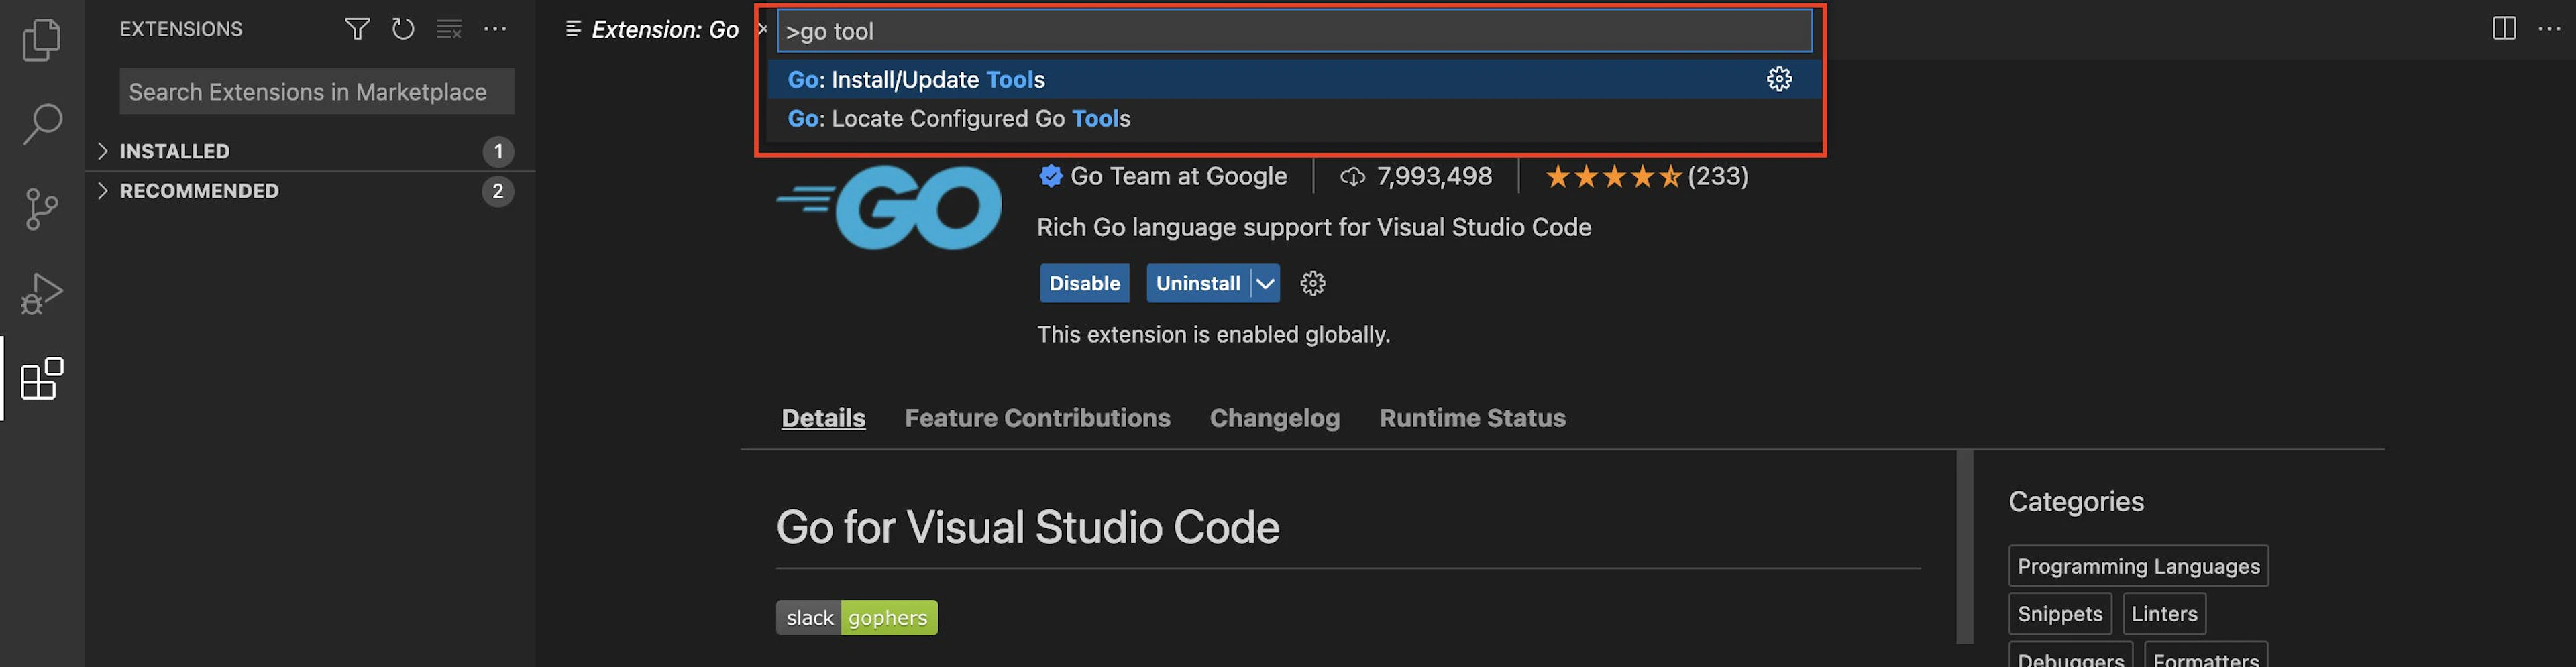
Go tools for Visual Studio Code
After selecting all the available Go tools, click on the OK button to install.
We can also use a separate IDE (e.g., GoLand) to write, debug, compile, and run the Go projects. Both VS Code and GoLand are available for Windows, macOS, and Linux.
2. Installing Colly
One of the most popular frameworks for writing web scrapers in Go is Colly. It’s a fast web scraping framework that can be used to write any kind of crawler, scraper, or spider. If you want to know more about differentiating a scraper from a crawler, check this article.
Colly has a clean API, handles cookies and sessions automatically, supports caching and robots.txt, and, most importantly, it’s fast. Colly offers distributed web scraping process, HTTP request delays, and concurrency per domain.
In this Golang Colly tutorial, we’ll be using Colly to scrape books.toscrape.com. The website is a dummy book store for practicing web scraping.
How to import a package in Golang?
As the name suggests, the import directive imports different packages into a Golang program. For example, the fmt package has definitions of formatted I/O library functions and can be imported using the import preprocessor directive, as shown in the following snippet:
package main
import "fmt"
func main() {
    fmt.Println("Hello World")
}
The code above first imports the fmt package and then uses its Println function to display the Hello World text in the console.
We can also import multiple packages using a single import directive, as you can see from the example below:
package main
import (
    "fmt"
    "math/rand"
)
func main() {
    fmt.Println("Hello World")
    fmt.Println(rand.Intn(25))
}
3. Parsing HTML with Colly
To easily extract structured data from the URLs and HTML, the first step is to create a project and install Colly.
Create a new directory and navigate there using the terminal. From this directory, run the following command:
go mod init oxylabs.io/web-scraping-with-goThis will create a go.mod file that contains the following lines with the name of the module and the version of Go. In this case, the version of Go is 1.17:
module oxylabs.io/web-scraping-with-go
go 1.17
Next, run the following command to install Colly and its dependencies:
go get github.com/gocolly/collyThis command will also update the go.mod file with all the required dependencies as well as create a go.sum file.
We are now ready to write the web scraper code file. Create a new file, save it as books.go and enter the following code:
package main

import (
   "encoding/csv"
   "fmt"
   "log"
   "os"

   "github.com/gocolly/colly"
)
func main() {
   // Scraping code here
   fmt.Println("Done")
}
The first line is the name of the package. Next, there are some built-in packages being imported as well as Colly itself.
The main() function is going to be the entry point of the program. This is where we’ll write the code for the web scraper.
4. Sending HTTP requests with Colly
The fundamental component of a Colly web scraper is the Collector. The Collector makes HTTP requests and traverses HTML pages.
The Collector exposes multiple events. We can hook custom functions that execute when these events are raised. These functions are anonymous and pass as a parameter.
First, to create a new Collector using default settings, enter this line in your code:
c := colly.NewCollector()There are many other parameters that can be used to control the behavior of the Collector. In this example, we are going to limit the allowed domains. Change the line as follows:
c := colly.NewCollector(
   colly.AllowedDomains("books.toscrape.com"),
)
Sending HTTP requests with a proxy
Another parameter you could configure is integrating a free proxy list or any other proxy solution to make requests. For example, setting it up with our residential proxies would look like this:
c := colly.NewCollector(
   colly.AllowedDomains("books.toscrape.com"),
)

proxyUsername := "Username"
proxyPassword := "Password"
proxyUrl := fmt.Sprintf("http://customer-%s:%s@pr.oxylabs.io:7777", proxyUsername, proxyPassword)

c.SetProxy(proxyUrl)
Once the instance is available, the Visit() function can be called to start the scraper. However, before doing so, it’s important to hook up to a few events.
The OnRequest event is raised when an HTTP request is sent to a URL. This event is used to track which URL is being visited. Simple use of an anonymous function that prints the URL being requested is as follows:
c.OnRequest(func(r *colly.Request) {
   fmt.Println("Visiting", r.URL)
})
Note that the anonymous function being sent as a parameter here is a callback function. It means that this function will be called when the event is raised.
Similarly, OnResponse can be used to examine the response. The following is one such example:
c.OnResponse(func(r *colly.Response) {
   fmt.Println(r.StatusCode)
})
The OnHTML event can be used to take action when a specific HTML element is found.
5. Locating HTML elements via CSS selector
The OnHTML event can be hooked using the CSS selector and a function that executes when the HTML elements matching the selector are found.
For example, the following function executes when a title tag is encountered:
c.OnHTML("title", func(e *colly.HTMLElement) {
   fmt.Println(e.Text)
})
This function extracts the text inside the title tag and prints it. Putting together all we have gone through so far, the main() function is as follows:
func main() {
   c := colly.NewCollector(
colly.AllowedDomains("books.toscrape.com"),
   )

   proxyUsername := "Username"
   proxyPassword := "Password"
   proxyUrl := fmt.Sprintf("http://customer-%s:%s@pr.oxylabs.io:7777", proxyUsername, proxyPassword)

   c.SetProxy(proxyUrl)

   c.OnHTML("title", func(e *colly.HTMLElement) {
      fmt.Println(e.Text)
   })

   c.OnResponse(func(r *colly.Response) {
      fmt.Println(r.StatusCode)
   })

   c.OnRequest(func(r *colly.Request) {
      fmt.Println("Visiting", r.URL)
   })

   c.Visit("https://books.toscrape.com/")
}
This file can be run from the terminal as follows:
go run books.goThe output will be as follows:
Visiting https://books.toscrape.com/
200
All products | Books to Scrape - Sandbox
6. Extracting the HTML elements
Now that we know how Colly works let’s modify OnHTML to extract the book titles and prices.
The first step is to understand the HTML structure of the page.
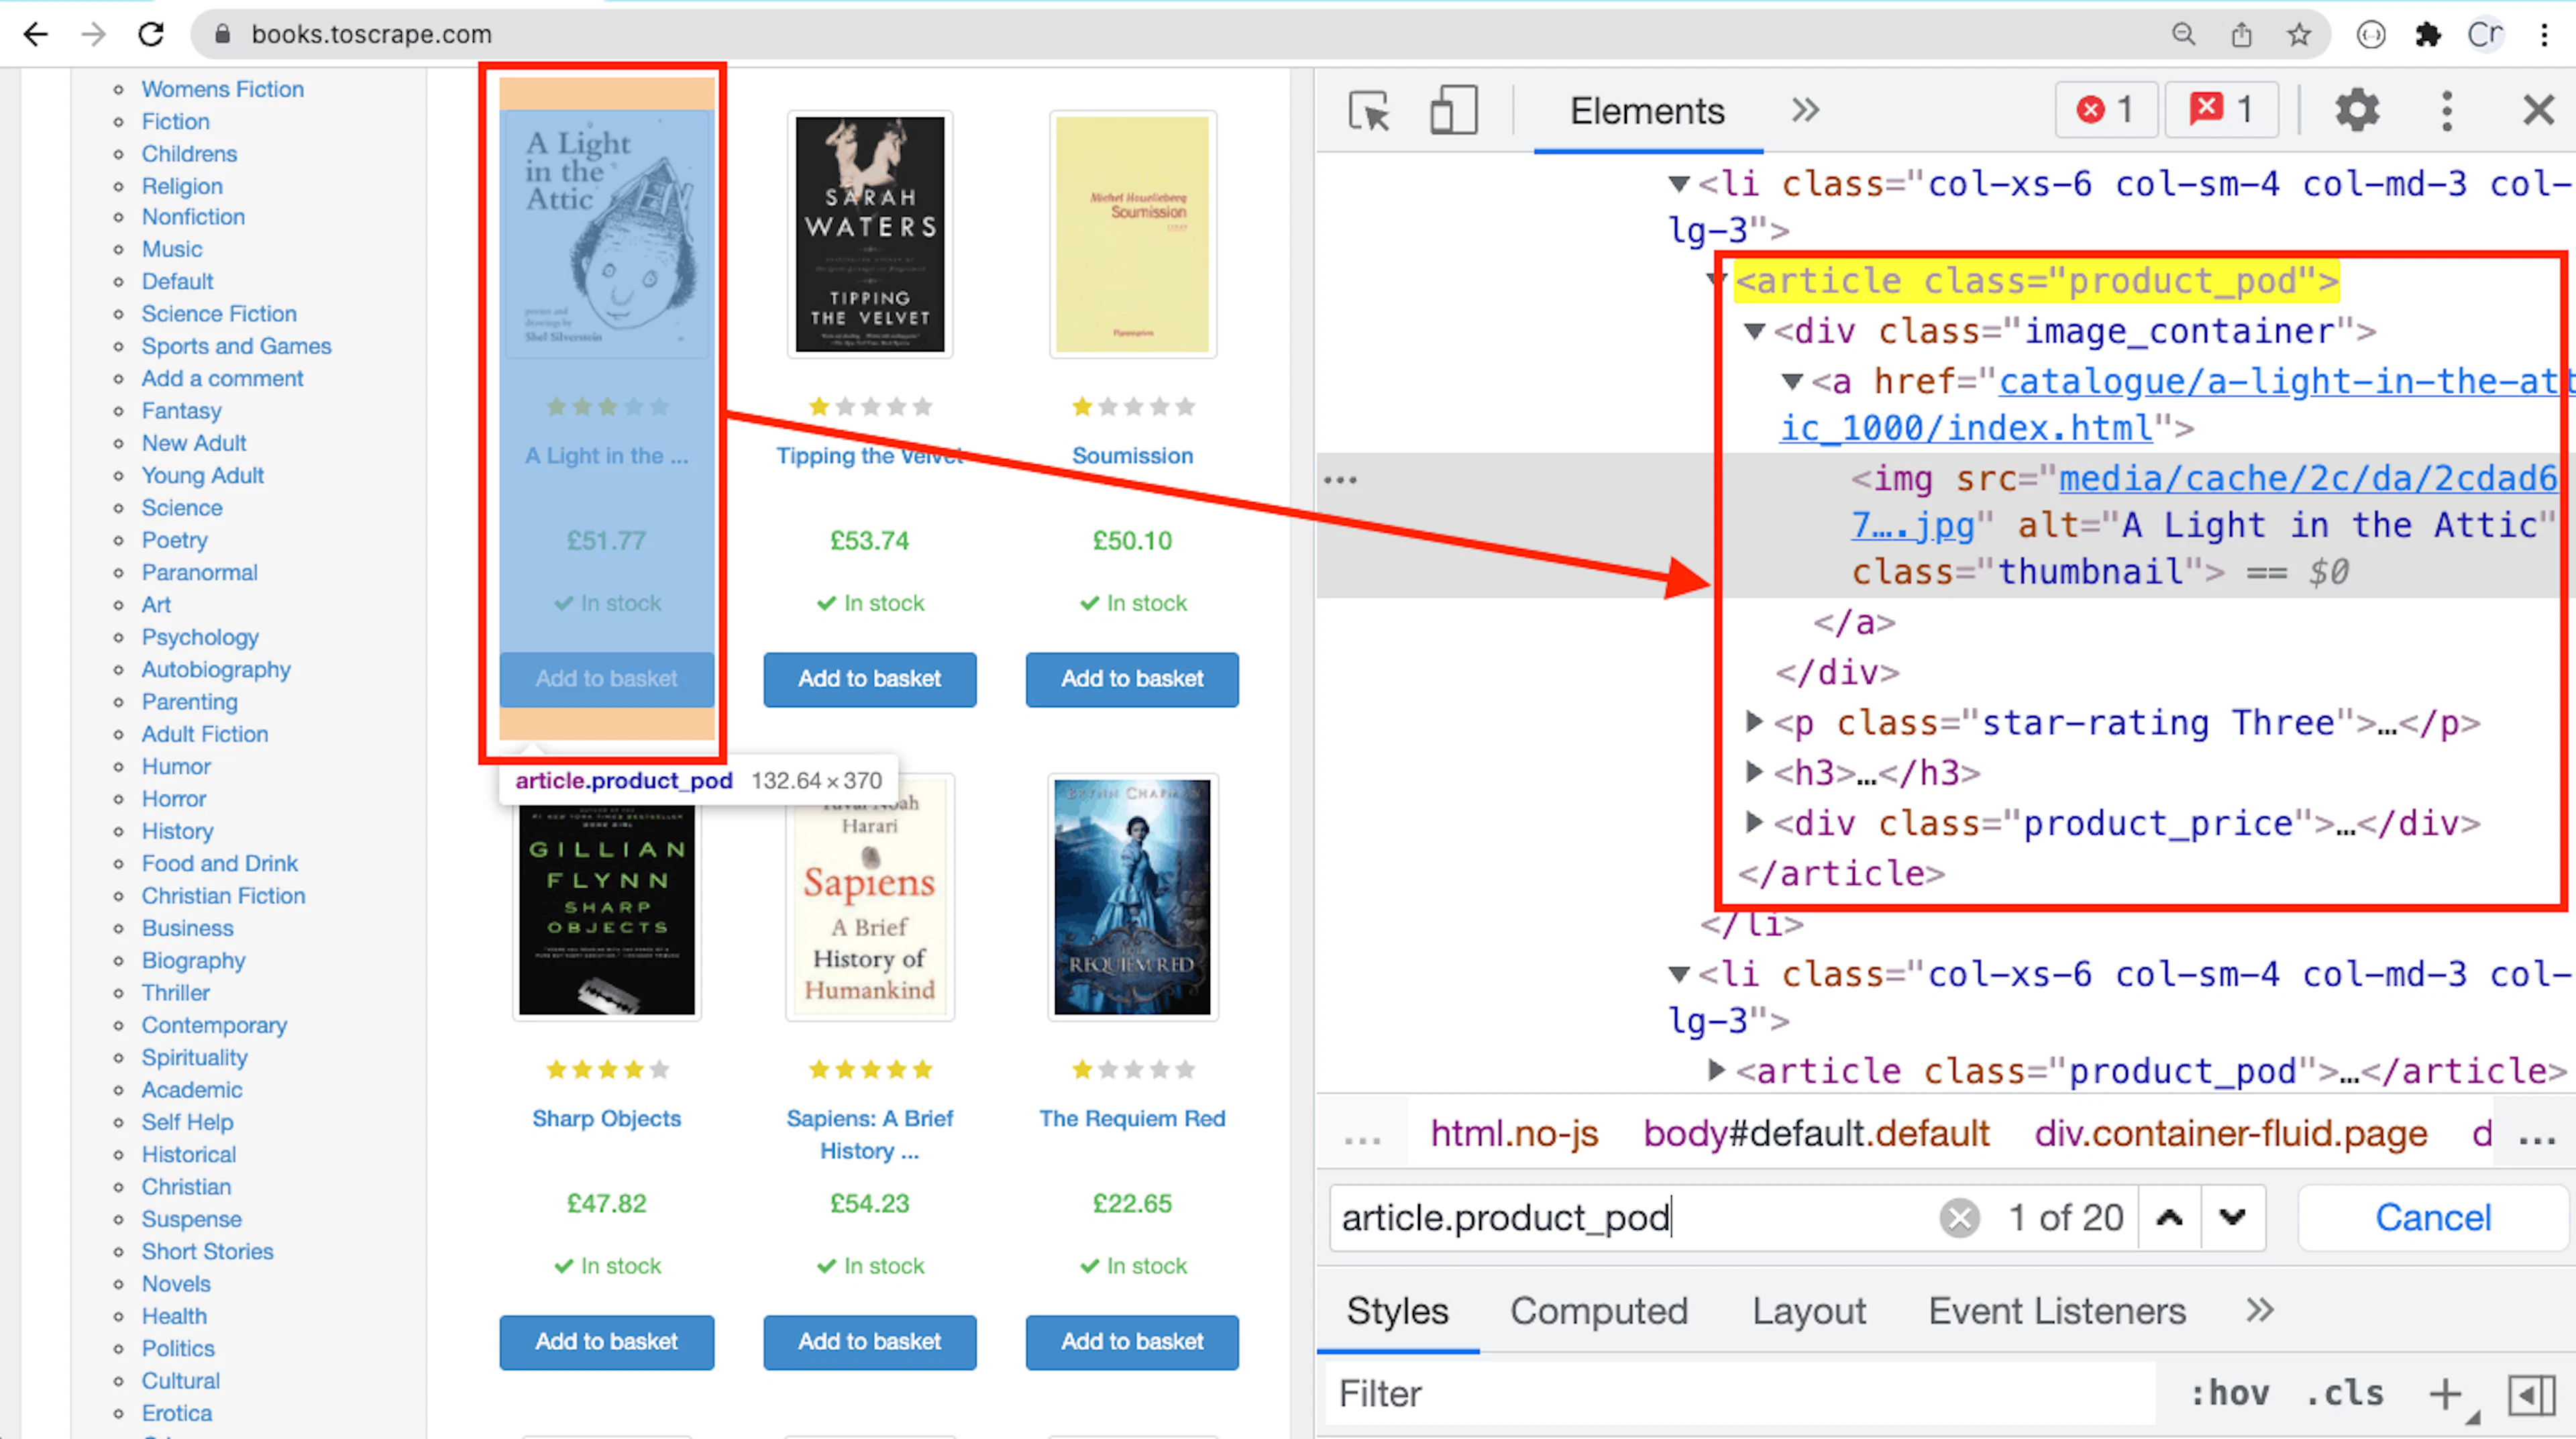
The books are in the <article> tags
Each book is contained in an article tag that has a product_pod class. The CSS selector would be .product_pod.
Next, the complete book title is found in the thumbnail image as an alt attribute value. The selector for the book title would be .image_container img.
Finally, the CSS selector for the book price would be .price_color.
The OnHTML can be modified as follows:
c.OnHTML(".product_pod", func(e *colly.HTMLElement) {
   title := e.ChildAttr(".image_container img", "alt")
   price := e.ChildText(".price_color")
})
This function will execute every time a book is found on the page.
Note the use of the ChildAttr function that takes two parameters: the CSS selector and the name of the attribute – it isn’t subtle. A better idea would be to create a data structure to hold this information. In this case, we can use struct as follows:
type Book struct {
	Title string
	Price string
}
The OnHTML will be modified as follows:
c.OnHTML(".product_pod", func(e *colly.HTMLElement) {
	book := Book{}
	book.Title = e.ChildAttr(".image_container img", "alt")
	book.Price = e.ChildText(".price_color")
	fmt.Println(book.Title, book.Price)
})
For now, this web scraper is simply printing the information to the console, which isn’t particularly useful. We’ll revisit this function when it’s time to save the data to a CSV file.
7. Handling pagination
To scrape multiple pages, we first need to locate the “next” button and create a CSS selector. For this particular site, the CSS selector is .next > a. Using the selector, a new function can be added to the OnHTML event. In this function, we’ll convert a relative URL to an absolute URL. Then, we’ll call the Visit() function to crawl the converted URL:
c.OnHTML(".next > a", func(e *colly.HTMLElement) {
	nextPage := e.Request.AbsoluteURL(e.Attr("href"))
	c.Visit(nextPage)
})
The existing function that scrapes the book information will be called on all of the resulting pages as well. No additional code is needed.
Now that we managed to extract data from all of the pages, it’s time to save it to a CSV file.
8. Writing data to a CSV file
The built-in CSV library can be used to save the structure to CSV files. If you want to save the data in JSON format, you can use the JSON library as well.
To create a new CSV file, enter the following code before creating the Colly collector:
file, err := os.Create("export.csv")
if err != nil {
   log.Fatal(err)
}
defer file.Close()
This will create export.csv and delay closing the file until the program completes its cycle.
Next, add these two lines to create a CSV writer:
writer := csv.NewWriter(file)
defer writer.Flush()
Now, it’s time to write the headers:
headers := []string{"Title", "Price"}
writer.Write(headers)
Finally, modify the OnHTML function to write each book as a single row:
c.OnHTML(".product_pod", func(e *colly.HTMLElement) {
	book := Book{}
	book.Title = e.ChildAttr(".image_container img", "alt")
	book.Price = e.ChildText(".price_color")
	row := []string{book.Title, book.Price}
	writer.Write(row)
})
That’s all! The code for the Golang web scraper is now complete. Let’s have a look at the complete code:
package main


import (
   "encoding/csv"
   "fmt"
   "log"
   "os"

   "github.com/gocolly/colly"
)


type Book struct {
    Title string
    Price string
}


func BooksScraper() {


    fmt.Println("Start scraping")
    file, err := os.Create("export.csv")
    if err != nil {
        log.Fatal(err)
    }
    defer file.Close()
    writer := csv.NewWriter(file)
    defer writer.Flush()
    headers := []string{"Title", "Price"}
    writer.Write(headers)
    c := colly.NewCollector(
        colly.AllowedDomains("books.toscrape.com"),
    )
    proxyUsername := "<Username>"
    proxyPassword := "<Password>"
    proxyUrl := fmt.Sprintf("http://customer-%s:%s@pr.oxylabs.io:7777", proxyUsername, proxyPassword)


    c.SetProxy(proxyUrl)


    c.OnHTML(".product_pod", func(e *colly.HTMLElement) {
        book := Book{}
        book.Title = e.ChildAttr(".image_container img", "alt")
        book.Price = e.ChildText(".price_color")
        row := []string{book.Title, book.Price}
        writer.Write(row)
    })


    c.OnHTML(".next a", func(e *colly.HTMLElement) {
        nextPage := e.Attr("href")
        c.Visit(e.Request.AbsoluteURL(nextPage))
    })


    c.OnResponse(func(r *colly.Response) {
        fmt.Println(r.StatusCode)
    })
    c.OnRequest(func(r *colly.Request) {
        fmt.Println("Visiting", r.URL)
    })
    c.Visit("https://books.toscrape.com/")
}
func main() {
    BooksScraper()
}
Run the file by entering the following in the terminal:
go run books.goThis will create an export.csv file with 1,000 rows of data.
9. Scheduling tasks with GoCron
For some tasks, you might want to schedule a web scraper to extract data periodically or at a specific time. You can do that by using your OS's schedulers or a high-level scheduling package usually available with the language you're using.
To schedule a Go scraper, you can use OS tools like Cron or Windows Task Scheduler. Alternatively, you can equip a high-level GoCron task scheduling package available with Golang. It's essential to keep in mind that scheduling a scraper through OS-provided schedulers limits the portability of the code. However, the GoCron task scheduler package solves this problem and works well with almost all operating systems.
GoCron is a task scheduling package available in Golang for running specific codes at a particular time. It offers similar functionalities as Python's job scheduling module named schedule.
Scheduling a task with GoCron requires a package to be installed with Golang, which you can do by using the following command:
go get github.com/go-co-op/gocronThe next step is to write a GoCron script to schedule our code. Let's look at the following code example to understand how GoCron scheduler works:
package main

import (
    "fmt"
    "time"
    "github.com/go-co-op/gocron"
)

func My_Task_1() {
    fmt.Println("Hello Task 1")
}

func main() {

    my_scheduler := gocron.NewScheduler(time.UTC)

    my_scheduler.Every(5).Seconds().Do(My_Task_1)
    my_scheduler.StartAsync()
    my_scheduler.StartBlocking()
}
The code above schedules the My_task_1 function to run every 5 seconds. Moreover, we can start the GoCron scheduler in two modes: asynchronous mode and blocking mode.
StartAsync() will start the scheduler asynchronously, while the StartBlocking() method will start the scheduler in blocking mode by blocking the current execution path.
Side note: The above code example starts the GoCron scheduler in both the asynchronous and the blocking modes. However, we can choose either of these as per our requirements.
Let’s schedule our Golang web scraper code example using the GoCron scheduling module.
package main


import (
    "encoding/csv"
    "fmt"
    "log"
    "os"
    "time"


    "github.com/go-co-op/gocron"
    "github.com/gocolly/colly"
)


type Book struct {
    Title string
    Price string
}


func BooksScraper() {


    fmt.Println("Start scraping")
    file, err := os.Create("export.csv")
    if err != nil {
        log.Fatal(err)
    }
    defer file.Close()
    writer := csv.NewWriter(file)
    defer writer.Flush()
    headers := []string{"Title", "Price"}
    writer.Write(headers)
    c := colly.NewCollector(
        colly.AllowedDomains("books.toscrape.com"),
    )
    proxyUsername := "<Username>"
    proxyPassword := "<Password>"
    proxyUrl := fmt.Sprintf("http://customer-%s:%s@pr.oxylabs.io:7777", proxyUsername, proxyPassword)


    c.SetProxy(proxyUrl)


    c.OnHTML(".product_pod", func(e *colly.HTMLElement) {
        book := Book{}
        book.Title = e.ChildAttr(".image_container img", "alt")
        book.Price = e.ChildText(".price_color")
        row := []string{book.Title, book.Price}
        writer.Write(row)
    })


    c.OnHTML(".next a", func(e *colly.HTMLElement) {
        nextPage := e.Attr("href")
        c.Visit(e.Request.AbsoluteURL(nextPage))
    })


    c.OnResponse(func(r *colly.Response) {
        fmt.Println(r.StatusCode)
    })
    c.OnRequest(func(r *colly.Request) {
        fmt.Println("Visiting", r.URL)
    })
    c.Visit("https://books.toscrape.com/")
}
func main() {


    my_scheduler := gocron.NewScheduler(time.UTC)
    my_scheduler.Every(2).Minute().Do(BooksScraper)
    my_scheduler.StartBlocking()
 }
Alternative Golang libraries for web scraping
Go offers a wide selection of other frameworks that can support web scraping activities. Some are simple packages with core functionality, while others, such as Ferret, Gocrawl, Soup, and Hakrawler, provide a complete web scraping infrastructure to simplify data extraction. Let’s have a brief overview of these frameworks.
Ferret
Ferret is a fast, portable, and extensible framework for designing Go web scrapers. It’s pretty easy to use as the user simply needs to write a declarative query expressing which data to extract. Ferret handles the HTML retrieving and parsing part by itself.
Gocrawl
Gocrawl is a web scraping framework written in Go language. It gives complete control to visit, inspect, and query different URLs using goquery. This framework allows concurrent execution as it applies goroutines.
Soup
Soup is a small web scraping framework that can be used to implement a Go web scraper. It provides an API for retrieving and parsing the content.
Hakrawler
Hakrawler is a simple and fast web crawler available with Go language. It’s a simplified version of the most popular Golang web scraping framework – GoColly. It’s mainly used for web scraping URLs and JavaScript file locations.
GoQuery
GoQuery is a framework that provides functionalities similar to jQuery in Golang. It uses two basic Go packages – net/html (a Golang HTML parser) and cascadia (a CSS Selector).
Conclusion
A code written in Go is cross-platform and runs remarkably fast. The code used in this article ran in less than 12 seconds. Executing the same task in Scrapy, which is one of the most optimized modern frameworks for Python, took 22 seconds. If speed is what you prioritize for your web scraping tasks, it’s a good idea to consider Golang in tandem with a modern framework such as Colly.
You can click here to find the complete code used in this article for your convenience. And if you want to know more on how to scrape the web using other programming languages, we have published multiple articles, such as web scraping with JavaScript, Java, R, Ruby, and many more. Alternatively, you can test the functionality of our own general-purpose web scraper for free.
People also ask
Is Golang good for web scraping?
Certainly! Golang has a powerful framework that makes it a good choice for web scraping. With excellent library support, simplicity, and built-in support for concurrency, it will be able to deliver some good results.
How to scrape a website using Golang?
Is Golang better than Python for web scraping?
Forget about complex web scraping processes
Choose Oxylabs' advanced web intelligence collection solutions to gather real-time public data hassle-free.
About the author

Augustas Pelakauskas
Former Senior Technical Copywriter
Augustas Pelakauskas was a Senior Technical Copywriter at Oxylabs. Coming from an artistic background, he is deeply invested in various creative ventures - the most recent being writing. After testing his abilities in freelance journalism, he transitioned to tech content creation. When at ease, he enjoys the sunny outdoors and active recreation. As it turns out, his bicycle is his fourth-best friend.
All information on Oxylabs Blog is provided on an "as is" basis and for informational purposes only. We make no representation and disclaim all liability with respect to your use of any information contained on Oxylabs Blog or any third-party websites that may be linked therein. Before engaging in scraping activities of any kind you should consult your legal advisors and carefully read the particular website's terms of service or receive a scraping license.
Related articles


Get the latest news from data gathering world
Scale up your business with Oxylabs®
Proxies
Advanced proxy solutions
Data Collection
Datasets
Resources
Innovation hub
Forget about complex web scraping processes
Choose Oxylabs' advanced web intelligence collection solutions to gather real-time public data hassle-free.