175M+ ethically sourced IPs built for the highest reliability.
High-speed, cost-effective proxies built for any scraping workload.
Premium static residential proxies from trusted ASNs for most difficult targets.
Dedicated IPs from premium ASNs for demanding scraping.

AI-powered proxy solution for optimized web scraping performance.

20M+ IP addresses from real mobile devices for precise targeting.

Free Chrome proxy manager extension that works with any proxy provider.

Free Android proxy manager app that works with any proxy provider.

Free community-driven tools to improve your web scraping projects.
Web Scraper API
All-in-one web data collection platform for every stage of web scraping.
Fast Search API
Ultra-fast organic search results scraper tailored for AI workflows.
Headless Browser
Advanced browser automation solution for AI agents and scraping.
AI Studio
A suite of AI-powered tools for various scraping projects.

Documentation
All features, parameters, and integration details, backed by code samples in every coding language.
Tutorials, samples, and guides.
Latest fixes and features.


![]() AI Summary:
AI Summary:
A hands-on guide to Python headless browser automation, explaining how a real browser engine renders JavaScript and handles sessions that plain HTTP clients can't. It recommends Playwright as the default, then covers setup, dynamic content, asyncio concurrency, and server-side defense systems – framing DIY as a maturity curve that graduates to a managed API once scale demands it.
Modern websites rarely serve their content in a single static response – and that's a problem for any script that relies on plain HTTP requests. Python headless browser automation solves this by running a real browser engine behind the scenes, executing JavaScript and rendering the full page before your code ever touches the DOM.
JavaScript-rendered listings, infinite scroll, lazy-loaded images, and AJAX-driven content all render correctly in a headless browser. Sessions, cookies, and local storage work natively – which also makes it the right tool for authenticated scraping and end-to-end testing.
In this guide, we'll cover how headless browser automation works, compare the main Python libraries, and write a working Python script from scratch. We'll then move into dynamic content handling, parallel web scraping with asyncio, and getting everything running in Docker and CI/CD.
How headless browser automation works
A headless browser is a real browser engine – Chromium, Firefox, or WebKit – running without a graphical user interface. It loads web pages, parses HTML, executes JavaScript, applies CSS, and manages cookies and sessions exactly as a normal browser would. The only difference is that nothing appears on screen, because there's no graphical user interface to draw to.
This distinction matters because of how the modern web works. A standard HTTP client like requests or httpx fetches the raw HTML response from a server – fast and lightweight, but blind to anything that happens after that response lands. It has no JavaScript support at all. JavaScript rendered content, lazy-loaded elements, and data that only appears after user interaction are all invisible to it. A headless browser fully renders the page before your script ever reads it, which is what makes JavaScript rendering possible in the first place.
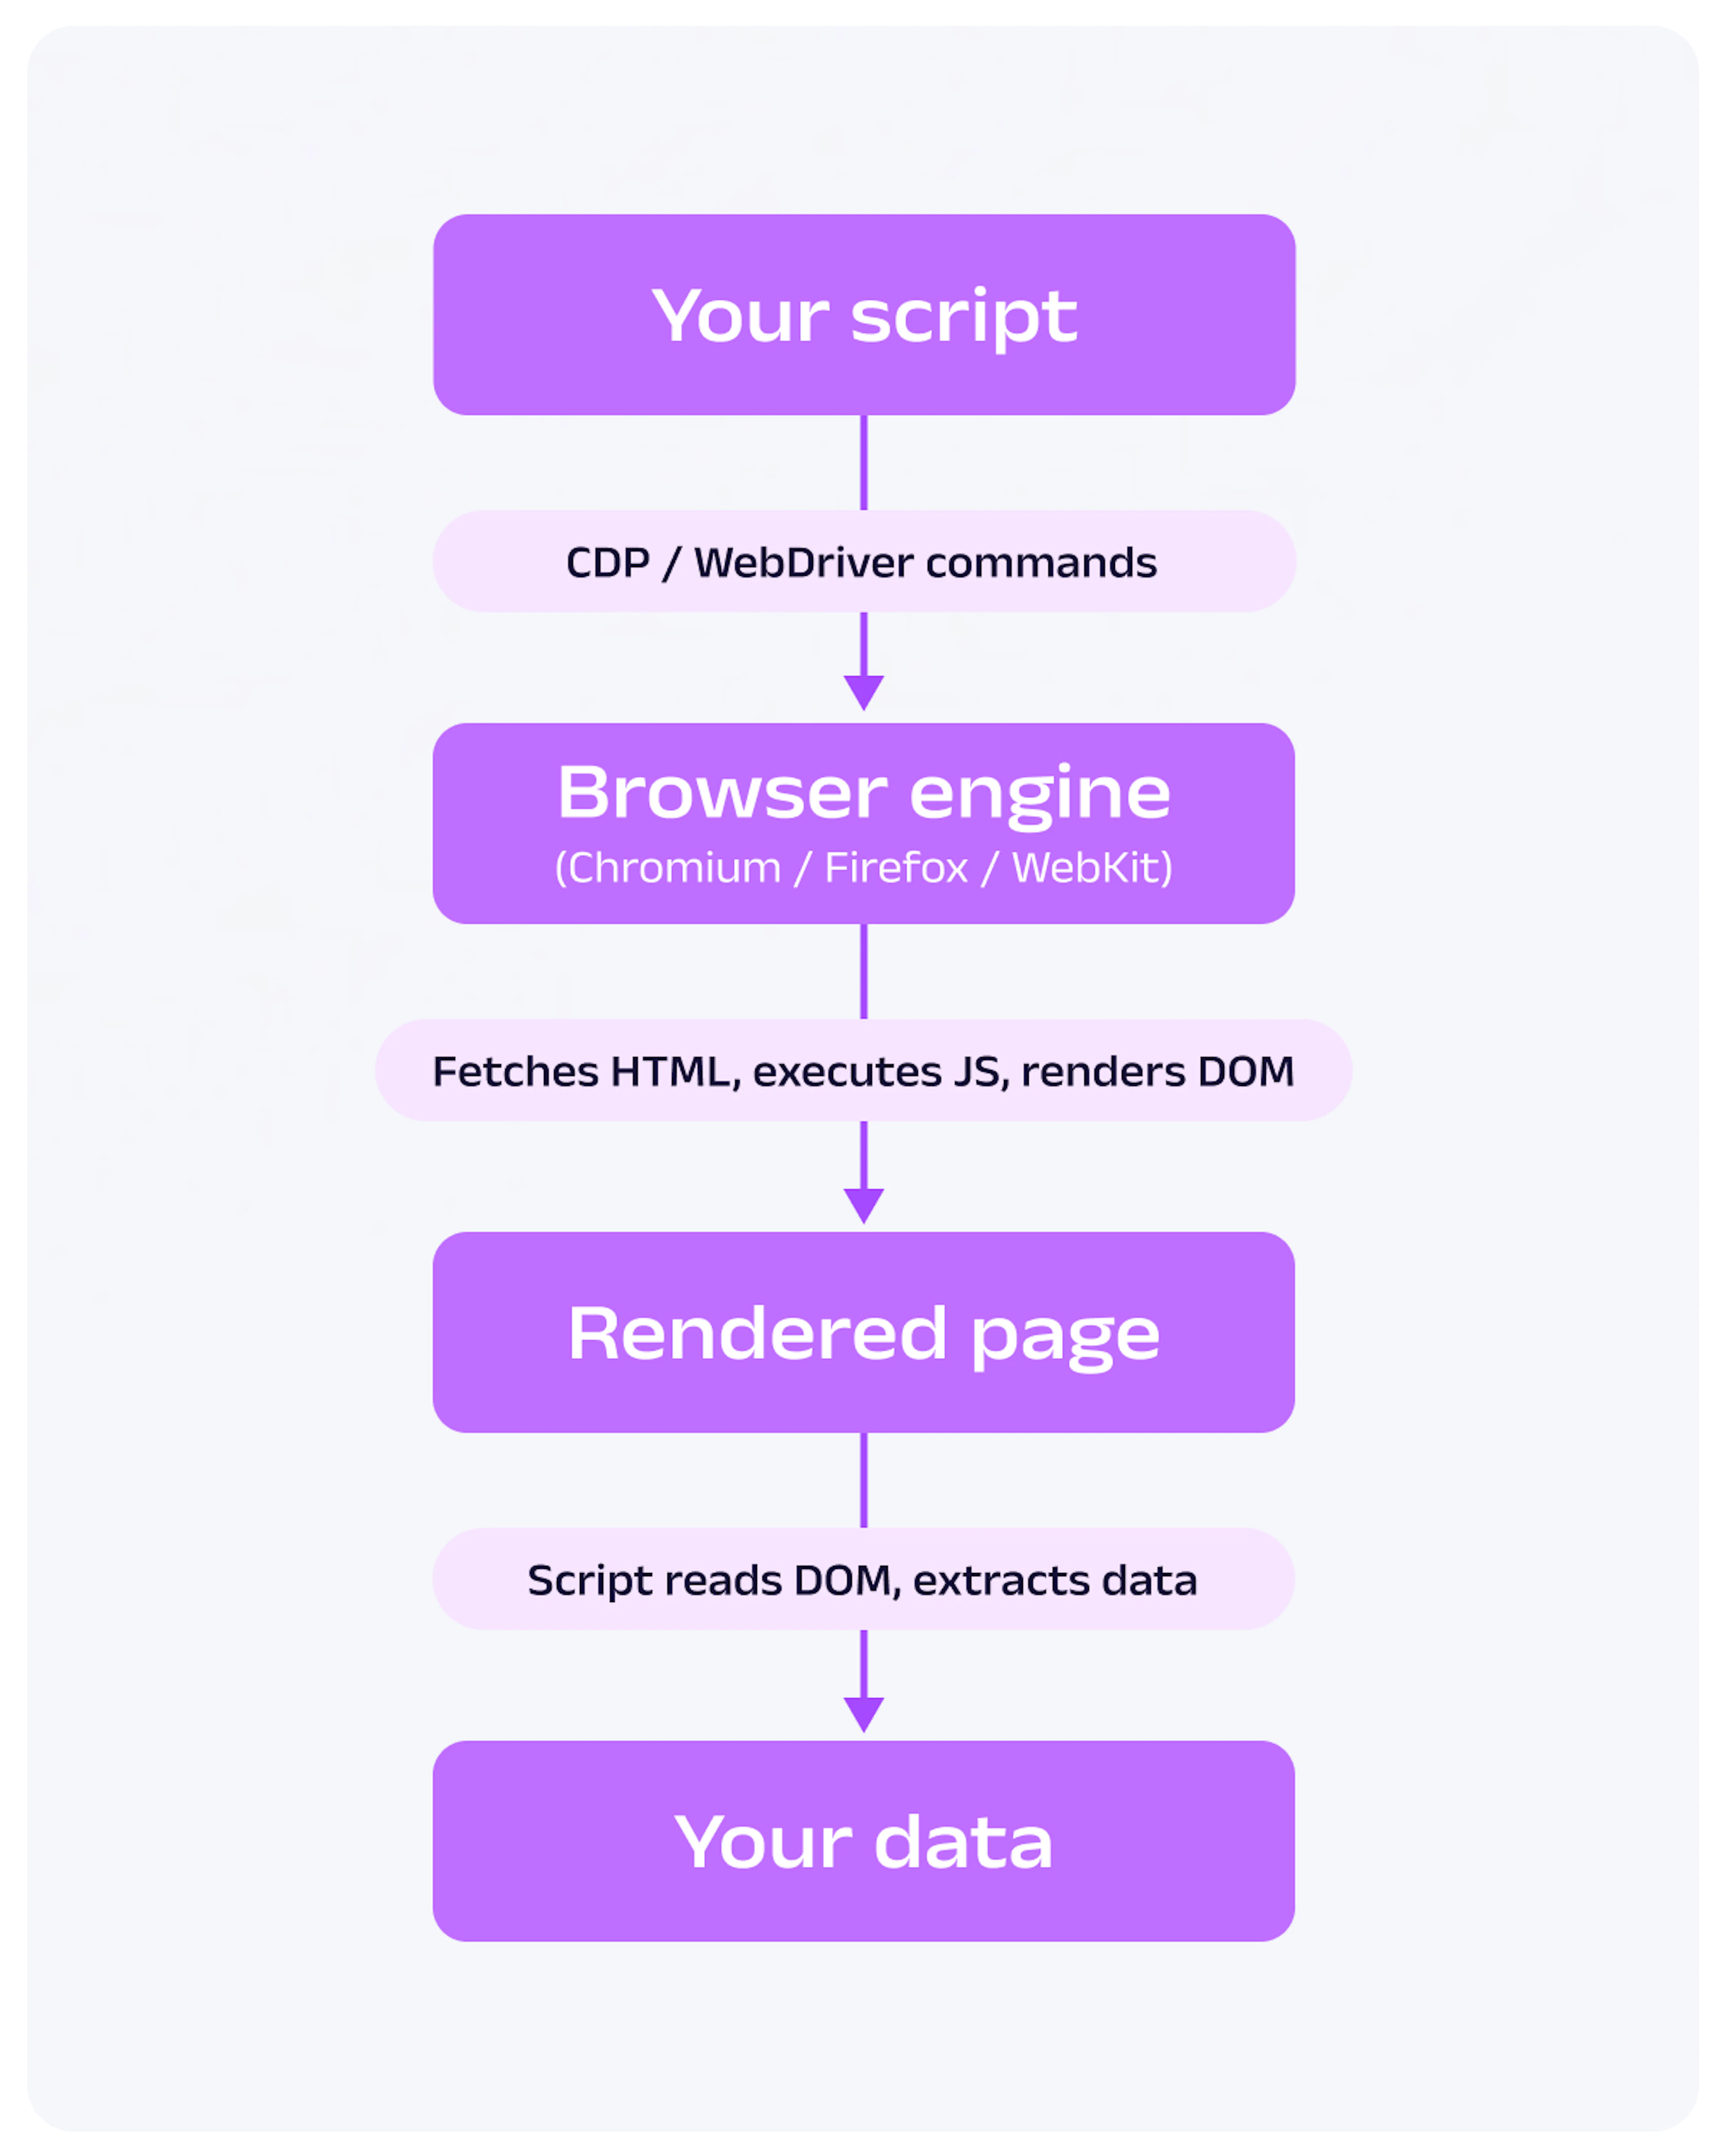
The control loop is straightforward: your Python script sends commands via the Chrome DevTools Protocol (CDP) or WebDriver to the browser process. The browser executes those commands – navigate to a URL, wait for a selector, click a button – then returns the result. Your script reads the rendered DOM and handles HTML parsing to extract what it needs.
How headless browser automation works
Why build headless browser automation with Python
Python has a mature ecosystem for browser automation, first-class support for concurrent automation tasks via asyncio, and two well-maintained libraries – Playwright and Selenium – that cover the vast majority of use cases. As a programming language for web automation, Python keeps the gap between a quick prototype and a production scraper small. But before committing to headless automation, it's worth understanding the trade-off: extra capability for extra overhead. Here's where it earns its keep, and where it doesn't.
Faster runs and lower resource usage
Running a browser without a GUI removes the cost of rendering pixels. The browser still parses HTML, executes JavaScript, and builds the DOM – but it skips compositing frames and pushing them to a display. In practice, headless mode uses roughly 20–40% less memory than headed mode and starts up faster, which compounds across large web scraping tasks or test suites with hundreds of runs.
This also makes headless browsing practical in environments where no display is available: CI servers, Docker containers, and cloud functions. You don't need a virtual framebuffer to run web browsers in a GitHub Actions workflow.
Real browser behavior for dynamic sites
A headless browser doesn't simulate a browser – it is one. Single-page applications (SPAs), infinite scroll, lazy-loaded images, and AJAX-driven content all render correctly. JavaScript executes, DOMContentLoaded fires, fetch() calls complete, and the DOM reaches its final state before your script reads it. That faithful browser behavior is exactly why headless tools beat raw HTTP clients on dynamic web content.
It also means cookies, local storage, and session data are handled natively. For workflows that require authentication – logging in, maintaining a session across multiple pages, or accessing content behind a login wall – a headless browser handles all of that without manual cookie management.
Where headless automation falls short
Headless automation isn't the right tool for every job, and there's no single perfect headless browser that wins every benchmark. If requests can retrieve the data you need, use it – a raw HTTP client is orders of magnitude faster and cheaper to run at scale.
Resource overhead is real: each instance of an automated browser consumes hundreds of megabytes of RAM. Running multiple browsers concurrently without careful resource management will exhaust a server quickly.
Getting uninterrupted access is also a genuine challenge. Server-side defense systems like Cloudflare, Akamai, and DataDome actively analyze browser fingerprints – WebGL parameters, navigator properties, TLS signatures, and behavioral signals – to identify automated traffic. A default Playwright instance is often flagged without additional browser parameter configuration. We'll cover the practical steps for maintaining reliable access later in this guide, along with when a managed browser solution makes more sense than building your own.
Most common use cases for headless browser automation
Headless browser automation covers a wide range of problems – from scraping JavaScript-heavy pages to powering AI agents that browse the web autonomously. The sections below introduce the most common use cases. Each one is a deep topic in its own right; we'll link to dedicated guides where relevant.
Web scraping dynamic websites
When a target site renders its content client-side – product listings built by JavaScript, search results loaded via AJAX, or paginated data triggered by scroll events – requests and BeautifulSoup won't get you far. A headless browser waits for selectors to appear, scrolls to trigger lazy loading, and hands you the fully rendered HTML to parse. This is what lets you scrape JavaScript heavy websites that traditional HTTP clients simply can't see.
This is the most common reason developers reach for headless automation. If you need to learn more about what a headless browser is before diving into web scraping, that's a good starting point.
Automated testing in CI/CD
Playwright and Selenium are the standard choices for end-to-end automated testing and cross browser testing. Headless mode makes them practical in CI environments – no display server needed, faster execution, and easy integration with GitHub Actions, GitLab CI, and CircleCI. Running the same suite against multiple browsers (Chromium, Firefox, WebKit) is how teams catch rendering bugs that only surface in one engine.
End-to-end tests that run as headless testing can catch regressions that unit and integration tests miss: broken navigation flows, JavaScript errors on page load, or UI elements that fail to render under certain conditions.
Automating repetitive web tasks
Not every use case involves scraping data. Headless browsers are equally useful for web automation and automating complex workflows: filling out forms, completing login flows, triggering file downloads, or clicking through a web portal that has no API. These automation tasks mirror real user interactions – every click, type, and submit is a genuine browser action. Common real-world examples include generating reports from web dashboards, submitting bulk requests through web interfaces, and automating confirmation workflows.
Website monitoring and interaction bots
Headless browsers can take screenshots of web pages on a schedule and diff them to identify visual changes – useful for price monitoring, inventory alerts, or tracking competitor pages. Unlike a simple HTTP ping, a screenshot-based monitor sees what a real user would see, including content loaded after page render.
Powering AI agents and autonomous browsing
Modern LLM-based agents need a real browser to act in the world – searching, clicking, filling forms, and navigating multi-step flows on behalf of a user. Browser automation libraries – including Playwright and CDP-based tools i.e. browser-use – are the foundation for Python AI browser agents built on models from OpenAI, Anthropic, and others.
This is one of the fastest-growing use cases for headless automation in 2026.
Choosing your Python headless browser library
The Python headless browser ecosystem has consolidated around a few clear options. Choosing the wrong one early means rewriting your automation scripts later, so it's worth spending a few minutes on the decision. Here's what's actively maintained among the best headless browsers, what's worth knowing about, and what to avoid for new projects.
Playwright as the modern default
Playwright is maintained by Microsoft and supports Chromium, Firefox, and WebKit from a single API. It was built with automation in mind from the ground up – unlike Selenium, which was designed for testing and later adapted for scraping.
The key advantages are practical: auto-waiting means you rarely need to write manual wait logic, network interception lets you emulate or mock requests at the browser level, and the Trace Viewer gives you a full timeline of what happened during a run – invaluable for debugging. The async API (async_playwright) integrates naturally with asyncio for concurrent automation.
For any new project, Playwright is the right starting point and the library we'll use throughout this guide.
Selenium when you need legacy or niche browser support
Selenium has been around since 2004 and has the broadest ecosystem of any browser automation tool. It supports legacy browsers including Internet Explorer and older Edge versions via WebDriver, and it has deep integration with enterprise testing frameworks.
The trade-offs are real: Selenium is more verbose, slower to set up, and requires more manual wait management than Playwright. That said, if you’re working with an existing Selenium test suite, inheriting enterprise tooling, or need a browser that Playwright doesn’t support, it’s a solid and battle-tested choice.
Pyppeteer, Splash, and MechanicalSoup at a glance
Pyppeteer is a Python port of Puppeteer, Google's Node.js browser automation library. It's largely unmaintained at this point and lags behind both Chromium releases and modern Python async patterns. Avoid it for new projects.
Splash takes a different approach – it's a lightweight HTTP API for JavaScript rendering, designed to integrate with Scrapy pipelines. Rather than driving a browser directly from Python, you send requests to a Splash instance and get back rendered HTML. It's a reasonable choice if you're already deep in the Scrapy ecosystem.
MechanicalSoup is worth mentioning for completeness, but it isn't a headless browser. It simulates browser-like behavior using requests and BeautifulSoup – no JavaScript execution, no DOM rendering. It's useful for simple form submission and navigation on static sites, but it won't help with any of the dynamic content challenges this guide addresses.
Library comparison
| Library | Actively maintained | Async support | JS rendering | Best for |
|---|---|---|---|---|
| Playwright | Yes | Native | Yes | New projects, web scraping, AI agents |
| Selenium | Yes | Via wrappers | Yes | Legacy test suites, enterprise tooling |
| Pyppeteer | No | Yes | Yes | – (avoid for new projects) |
| Splash | No | No | Yes | Existing Scrapy pipelines |
| MechanicalSoup | Yes | No | No | Static sites, simple form flows |
Setting up Playwright for headless browsing in Python
Before writing any automation code, we need a clean environment with Playwright and its browser binaries installed. This section walks through the setup so you have a consistent, reproducible foundation for the rest of the guide – without the setup complexity that trips up first-time Python developers.
Installing Playwright and the browser binaries
Playwright is split into two parts: the Python package and the browser binaries. Installing the package alone isn't enough – you also need to download the actual browser executables separately.
Start by creating and activating a virtual environment, then install the package:
python -m venv venv
source venv/bin/activate  # Windows: venv\Scripts\activate
pip install playwright
Then download the browser binaries:
playwright installBy default this downloads Chromium, Firefox, and WebKit. If you only need the Chromium browser, you can save disk space with:
playwright install chromiumSince Playwright 1.49, this pulls both the full (headed) Chromium and a separate headless-shell build. If you're only running a headless Chromium browser – typical on CI – you can skip the headed build entirely:
playwright install --only-shell chromiumOn Linux CI environments (GitHub Actions, Docker), you'll also need the system dependencies that the browsers rely on. The --with-deps flag handles that in one step:
playwright install --with-deps chromiumNote: --with-deps requires sudo on some Linux systems. In Docker, run it as root during image build.
Project structure and virtual environment
A minimal Playwright project doesn't need much. Here's a clean structure to start from:
my-scraper/
├── venv/
├── .env
├── requirements.txt
└── scraper.py
Pin your dependencies in requirements.txt so the environment is reproducible:
playwright==1.58.0
python-dotenv==1.0.1
If your script needs to authenticate – logging into a site, using an API key, or storing session credentials – use python-dotenv to keep those values out of your source code. Load your API key at the top of your script:
from dotenv import load_dotenv
import os

load_dotenv()
API_KEY = os.getenv("API_KEY")
Writing your first headless script
With Playwright installed, let's write a working automation script step by step. We'll build from launching a browser instance all the way to extracting structured data from a rendered page.
Launching a headless Chrome instance
The entry point for any Playwright script is sync_playwright(). The code below launches a headless Chrome browser instance, opens a new page, and closes everything cleanly – the same Chrome browser you'd run interactively, just without a window:
from playwright.sync_api import sync_playwright

with sync_playwright() as p:
    browser = p.chromium.launch(headless=True)
    page = browser.new_page()
    print(browser.version)
    browser.close()
When debugging, switch to headless=False and Playwright will open a visible Google Chrome window so you can watch your script execute in real time. Switch it back before deploying.
Navigating to a page and waiting for content
The most common mistake in headless scraping is reading the page before JavaScript has finished rendering it. Playwright's auto-waiting helps, but knowing which wait strategy to use matters.
from playwright.sync_api import sync_playwright

with sync_playwright() as p:
    browser = p.chromium.launch(headless=True)
    page = browser.new_page()
    page.goto("https://books.toscrape.com")

    # Wait until a specific element is present in the DOM
    page.wait_for_selector("article.product_pod")
    print(page.title())
    browser.close()
wait_for_selector() pauses execution until the matched element appears in the DOM – the right choice when you know exactly what element signals that the content you need has loaded. The alternative, wait_for_load_state("networkidle"), waits until there are no network connections for at least 500ms. It's useful for pages with complex loading sequences, but slower and less predictable than waiting for a specific selector – Playwright's own docs now discourage it for this reason, since pages with background polling or analytics may never go fully idle.
Extracting data from the rendered DOM
Once the page is ready, there are three core patterns for HTML parsing against it. The example below demonstrates all three using books.toscrape.com – a site built specifically for web scraping practice:
from playwright.sync_api import sync_playwright
import json

with sync_playwright() as p:
    browser = p.chromium.launch(headless=True)
    page = browser.new_page()
    page.goto("https://books.toscrape.com")
    page.wait_for_selector("article.product_pod")

    # inner_text: get the visible text of an element
    first_title = page.locator("article.product_pod h3 a").first.inner_text()

    # get_attribute: read an element's attribute value
    first_link = page.locator("article.product_pod h3 a").first.get_attribute("href")

    # eval_on_selector_all: run a JS expression across all matching elements
    all_titles = page.eval_on_selector_all(
        "article.product_pod h3 a",
        "els => els.map(el => el.getAttribute('title'))"
    )

    print(f"First book: {first_title}")
    print(f"First link: {first_link}")
    print(json.dumps(all_titles[:5], indent=2))
    browser.close()
inner_text() returns visible text – what a user would see, with whitespace normalized. get_attribute() reads any HTML attribute directly. eval_on_selector_all() runs a JavaScript expression against every matched element and returns the result to Python – useful when you need to extract the same field from a list of elements in one call. The ability to execute JavaScript inside the rendered page is what separates a headless browser from a plain HTTP request. From here, all_titles is a plain Python list you can write to JSON or CSV with the standard library.
Handling dynamic content, iframes, and shadow DOM
The basics get you far, but real-world pages come with complications. Handling JavaScript heavy sites in practice means dealing with four scenarios that trip up most intermediate users when they interact with web pages: content inside iframes (inline frames), elements buried in Shadow DOM, lazy-loaded content that only appears after scrolling, and API calls you want to intercept or maintain access to.
iframes
An iframe is a separate browsing context embedded in the page. Playwright's default page.locator() won't reach inside one – you need to switch context first using frame_locator():
from playwright.sync_api import sync_playwright

with sync_playwright() as p:
    browser = p.chromium.launch(headless=True)
    page = browser.new_page()
    page.goto("https://example.com/page-with-iframe")

    # Switch into the iframe's context
    frame = page.frame_locator("iframe#content-frame")
    text = frame.locator("h1").inner_text()
    print(text)
    browser.close()
frame_locator() accepts any CSS selector that targets the <iframe> element. Once you have the frame handle, you use it exactly like page – locator(), wait_for_selector(), inner_text(), and so on all work the same way.
Shadow DOM
Shadow DOM encapsulates component internals, but Playwright's CSS engine pierces open shadow roots by default – a regular CSS selector will reach inside them without any special syntax:
# Playwright's CSS engine pierces open shadow DOM automatically
shadow_text = page.locator(".product-title").inner_text()

# To scope to a specific host element, chain locators
shadow_text = page.locator("custom-card").locator(".product-title").inner_text()
This works for open shadow roots (the common case). Closed shadow roots explicitly interrupt external access and can't be queried from outside – element.shadowRoot returns null, so neither Playwright's selectors nor page.evaluate() can reach inside. They generally can't be queried at all unless the page exposes a reference to the root itself. In practice this is rare, and most component libraries use open roots.
Lazy-loaded content
Content that loads on scroll won't appear in the DOM until the browser viewport reaches it. Trigger it by scrolling to the bottom of the page with page.evaluate():
from playwright.sync_api import sync_playwright

with sync_playwright() as p:
    browser = p.chromium.launch(headless=True)
    page = browser.new_page()
    page.goto("https://example.com/infinite-scroll")

    for _ in range(3):
        page.evaluate("window.scrollTo(0, document.body.scrollHeight)")
        page.wait_for_timeout(1000)  # give JS time to fetch and render new items

    items = page.locator(".item").all_inner_texts()
    print(f"Loaded {len(items)} items")
    browser.close()
wait_for_timeout() is intentionally simple here – in production, replace it with wait_for_selector() targeting a new element that appears after each load, which is faster and more reliable.
XHR and fetch interception
page.route() lets you intercept any network request the browser makes. The most practical use in scraping is managing unnecessary resources to speed things up:
# Manage images, fonts, and stylesheets — cuts load time significantly
page.route("**/*.{png,jpg,jpeg,gif,svg,woff2,css}", lambda route: route.abort())
page.goto("https://books.toscrape.com")
You can also intercept API calls and read or mock their responses:
import json

def handle_api(route, request):
    if "/api/products" in request.url:
        # Return mocked data instead of hitting the real endpoint
        route.fulfill(
            status=200,
            content_type="application/json",
            body=json.dumps([{"name": "mocked product", "price": 9.99}])
        )
    else:
        route.continue_()

page.route("**/*", handle_api)
This pattern is particularly useful in testing – you can isolate your UI tests from a flaky backend by mocking the API layer entirely.
Running headless browsers in parallel with asyncio
The sync Playwright API is fine for a single page, but if you need to scrape dozens of URLs, running them one at a time is slow. Playwright's async API lets you open multiple pages concurrently under a single browser instance – the right way to scale Python web scraping and other headless automation in Python.
The key shift is from sync_playwright to async_playwright, and from regular functions to async def coroutines. The browser itself is shared; only the pages run concurrently. Here's a complete example scraping five category pages in parallel, with a semaphore to cap how many pages are open at once:
import asyncio
from playwright.async_api import async_playwright

URLS = [
    "https://books.toscrape.com/catalogue/category/books/mystery_3/index.html",
    "https://books.toscrape.com/catalogue/category/books/science-fiction_16/index.html",
    "https://books.toscrape.com/catalogue/category/books/romance_8/index.html",
    "https://books.toscrape.com/catalogue/category/books/travel_2/index.html",
    "https://books.toscrape.com/catalogue/category/books/thriller_37/index.html",
]

async def scrape_url(browser, url, semaphore):
    async with semaphore:
        page = await browser.new_page()
        try:
            await page.goto(url)
            await page.wait_for_selector("article.product_pod")
            titles = await page.eval_on_selector_all(
                "article.product_pod h3 a",
                "els => els.map(el => el.getAttribute('title'))"
            )
            print(f"{url.split('/')[-2]}: {len(titles)} books found")
            return titles
        finally:
            await page.close()

async def main():
    semaphore = asyncio.Semaphore(3)  # at most 3 pages open at once
    async with async_playwright() as p:
        browser = await p.chromium.launch(headless=True)
        tasks = [scrape_url(browser, url, semaphore) for url in URLS]
        results = await asyncio.gather(*tasks)
        await browser.close()
        return results

asyncio.run(main())
A few things worth noting here. The browser is created once and shared across all tasks – spawning a separate browser per URL would be wasteful and slow. The asyncio.Semaphore(3) ensures no more than three pages are open simultaneously, regardless of how many URLs are in the list. Without it, feeding 100 URLs into asyncio.gather() would attempt to open 100 pages at once and likely exhaust available RAM. The finally restriction ensures each page is closed even if an exception occurs mid-scrape.
asyncio.gather() runs all tasks concurrently and collects their return values in order, matching the original URLS list.
Jupyter notebook gotcha: Jupyter runs its own event loop, so calling asyncio.run() from a notebook cell will throw a RuntimeError. Use await main() directly in the cell instead, or install nest_asyncio and call nest_asyncio.apply() at the top of your notebook.
Avoiding restrictions without reinventing the wheel
A default Playwright instance is recognizable as automated traffic, and modern defense systems are good at spotting it. The defense systems fingerprint browsers across dozens of signals – and a headless browser out of the box fails several of them. This section covers what gives it away, the quick configuration wins, and when it's more practical to use infrastructure that handles this at scale.
Why headless browsers get flagged
The server-side defense systems like Cloudflare, Akamai, and DataDome don't just look at IP addresses. They analyze the full browser environment: navigator properties that are absent or inconsistent in headless mode, WebGL rendering signatures, TLS handshake fingerprints, and the absence of natural timing patterns between interactions. A browser that navigates instantly from load to click, with no mouse movement and missing plugins in the navigator.plugins list, stands out as an automated browser.
Browser parameter configuration: the quick wins
Setting a realistic user agent, viewport, and locale via Playwright's browser context is the minimum baseline for standard browser environment configuration:
from playwright.sync_api import sync_playwright

with sync_playwright() as p:
    browser = p.chromium.launch(headless=True)
    context = browser.new_context(
        user_agent=(
            "Mozilla/5.0 (Windows NT 10.0; Win64; x64) "
            "AppleWebKit/537.36 (KHTML, like Gecko) "
            "Chrome/124.0.0.0 Safari/537.36"
        ),
        viewport={"width": 1920, "height": 1080},
        locale="en-US",
    )
    page = context.new_page()
    page.goto("https://example.com")
    browser.close()
A realistic user agent string is one of the cheapest wins here – a mismatched or default one is an obvious tell. For more thorough browser parameter configuration, the playwright-stealth library patches several additional navigator properties that a default Playwright context leaves in an interruptible state. It's not a complete solution, but it meaningfully reduces the fingerprint surface.
Be honest about the limits here: no single configuration change maintains reliable access against every server-side defense system. The more sophisticated platforms combine dozens of signals, and the rules change frequently.
Proxies for IP-level access reliability
Browser parameter configuration addresses fingerprinting, but IP reputation is a separate problem. A residential proxy pool rotates requests across real ISP-assigned addresses, which is the most reliable approach for maintaining uninterrupted access to data at scale. Playwright supports proxies at the context level:
context = browser.new_context(
    proxy={
        "server": "http://your-proxy-server:8080",
        "username": "user",
        "password": "pass",
    }
)
Datacenter proxies are faster and cheaper, but more likely to be flagged by IP reputation checks. Residential proxies cost more but produce significantly more reliable access for targets with active IP-based filtering.
When to use a managed solution
DIY browser parameter configuration and proxy rotation cover most cases – but they require ongoing maintenance. Server-side defense systems update their interruption logic regularly, and keeping up with those changes is engineering work that compounds over time.
When your access reliability requirements outgrow what a self-managed setup can deliver, managed scraping APIs and browser APIs handle the full stack: browser environment configuration, proxy rotation, CAPTCHA management, and infrastructure scaling. Oxylabs offers both a Web Scraper API and Residential Proxies for teams that reach this point. The right time to make that switch is when the maintenance cost of rolling your own exceeds the cost of the managed alternative – not before.
Taking your Python headless browser to production
Getting a Python browser script working locally is one thing. Running it reliably on a server, in a container, or inside a CI pipeline is another. This section covers the practical steps: debugging without a screen, packaging for Docker, and wiring up GitHub Actions.
Debugging without a visible window
The fastest debugging loop is switching to headless=False locally – Playwright opens a real browser window and you can watch exactly what your script does. For stepping through user interactions one at a time, set the PWDEBUG=1 environment variable before running your script to launch the Playwright Inspector.
For diagnosing failures that only happen in headless mode or on CI, Playwright's Trace Viewer is the right tool. Enable tracing on a browser context and it records a full timeline of network requests, DOM snapshots, and screenshots:
context = browser.new_context()
context.tracing.start(screenshots=True, snapshots=True)
page = context.new_page()
page.goto("https://books.toscrape.com")
page.wait_for_selector("article.product_pod")
context.tracing.stop(path="trace.zip")
browser.close()
Open the trace locally with:
playwright show-trace trace.zipFor lighter-weight CI debugging, a screenshot on failure is often enough:
try:
    page.wait_for_selector(".expected-element", timeout=5000)
except Exception:
    page.screenshot(path="failure.png")
    raise
To capture video of a full run, pass record_video_dir to new_context() – the video file is written when the context closes.
Containerizing with Docker
Running Playwright inside Docker requires installing the browser binaries and their system dependencies as part of the image build. The playwright install --with-deps command handles both in one step:
FROM python:3.12-slim
WORKDIR /app
COPY requirements.txt .
RUN pip install --no-cache-dir -r requirements.txt
RUN playwright install --with-deps chromium
COPY . .
CMD ["python", "scraper.py"]
Keep the COPY . . step after the dependency installation so Docker can cache the install layers. Rebuilding the image after a code change won't re-download the browser binaries unless requirements.txt changes.
Running in CI/CD pipelines
Here's a GitHub Actions workflow that installs Playwright, caches the browser binaries between runs, and executes your automation script on every push and on a daily schedule:
name: Headless Scraper
on:
  push:
    branches: [main]
  schedule:
    - cron: "0 6 * * *"

jobs:
  scrape:
    runs-on: ubuntu-latest
    steps:
      - uses: actions/checkout@v4
      - name: Set up Python
        uses: actions/setup-python@v5
        with:
          python-version: "3.12"
      - name: Install dependencies
        run: pip install -r requirements.txt
      - name: Cache Playwright browsers
        uses: actions/cache@v4
        with:
          path: ~/.cache/ms-playwright
          key: playwright-${{ runner.os }}-${{ hashFiles('requirements.txt') }}
      - name: Install Playwright browsers
        run: playwright install --with-deps chromium
      - name: Run scraper
        run: python scraper.py
The cache step is worth keeping – Playwright browser binaries are large (150MB+ for Chromium), and downloading them on every run adds 30–60 seconds to your pipeline. The cache key is tied to requirements.txt, so it invalidates automatically when you upgrade Playwright.
Note: If you're running Playwright inside a Docker container on CI, add --ipc=host to your Docker run command. Chromium uses shared memory for rendering and will crash without it on some Linux environments.
When rolling your own headless setup stops being worth it
Building your own headless automation stack is the right place to start. The setup is straightforward, the tools are excellent, and for most use cases – scraping a handful of sites, running end-to-end tests, automating internal workflows – it's all you'll ever need.
The maintenance curve kicks in when scale or reliability demands grow. Server-side defense systems update their interruption logic continuously. Proxy pools need monitoring and rotation logic. CAPTCHA handling requires integrations with third-party solvers. Infrastructure needs to scale with job volume without blowing the memory budget. Each of these is a solvable problem, but together – especially across complex scraping tasks at volume – they become a meaningful engineering burden that compounds over time.
The honest framing is a maturity curve: start with DIY, and graduate when complexity demands it. The signal that it's time to move is usually one of three things – your team is spending more time maintaining the automation infrastructure than using the data it produces, access reliability has become a recurring problem, or the volume you need to process outpaces what a self-managed setup can handle cost-effectively.
At that point, managed solutions – scraping APIs and browser APIs that handle browser environment configuration, proxy rotation, CAPTCHA management, and scaling – become the more practical option. Oxylabs offers a Web Scraper API and Residential Proxies designed for exactly this transition: teams that have outgrown DIY infrastructure and need reliable, maintained access to web data without building and operating the stack themselves. The tools in this guide get you a long way. Know where the ceiling is.
Frequently asked questions
Is a headless browser the same as a regular browser?
Yes – a headless browser uses the exact same browser engine (Chromium, Firefox, or WebKit) as a regular browser. The only difference is that it runs without a graphical user interface. It executes JavaScript, handles cookies and sessions, and renders the DOM identically to what a real user would see.
Should I use Playwright or Selenium for a new Python project?
Why is my headless script getting flagged as automated traffic?
How do I scrape a site that requires login?
What's the difference between Playwright and Scrapy for scraping?
Can I run Playwright on a low-memory server or Raspberry Pi?
Forget about complex web scraping processes
Choose Oxylabs' advanced web intelligence collection solutions to gather real-time public data hassle-free.
About the author

Shinthiya Nowsain Promi
Technical Content Researcher
With a background in Computer Science, Shinthiya likes to turn technical jargons into clear, perspective-driven writing that rewards a reader's time rather than wasting it.
All information on Oxylabs Blog is provided on an "as is" basis and for informational purposes only. We make no representation and disclaim all liability with respect to your use of any information contained on Oxylabs Blog or any third-party websites that may be linked therein. Before engaging in scraping activities of any kind you should consult your legal advisors and carefully read the particular website's terms of service or receive a scraping license.

Cheerio vs. Puppeteer: Which Should You Use for Web Scraping?
Shinthiya Nowsain Promi
2026-06-23


List Crawling in Python: Tools, Tips, and Techniques

Danielė Virinaitė
2026-06-17

Get the latest news from data gathering world
Proxies
Advanced proxy solutions
Data Collection
Datasets
Resources
Innovation hub
Forget about complex web scraping processes
Choose Oxylabs' advanced web intelligence collection solutions to gather real-time public data hassle-free.