175M+ ethically sourced IPs built for the highest reliability.
High-speed, cost-effective proxies built for any scraping workload.
Premium static residential proxies from trusted ASNs for most difficult targets.
Dedicated IPs from premium ASNs for demanding scraping.

AI-powered proxy solution for optimized web scraping performance.

20M+ IP addresses from real mobile devices for precise targeting.

Free Chrome proxy manager extension that works with any proxy provider.

Free Android proxy manager app that works with any proxy provider.

Free community-driven tools to improve your web scraping projects.
Web Scraper API
All-in-one web data collection platform for every stage of web scraping.
Fast Search API
Ultra-fast organic search results scraper tailored for AI workflows.
Headless Browser
Advanced browser automation solution for AI agents and scraping.
AI Studio
A suite of AI-powered tools for various scraping projects.

Documentation
All features, parameters, and integration details, backed by code samples in every coding language.
Tutorials, samples, and guides.
Latest fixes and features.


How to Set Up Proxies With DICloak
Pairing DICloak with reliable proxies helps maintain stable sessions, avoid unwanted blocks, and manage multiple identities more efficiently. When combined with Oxylabs Residential or Datacenter Proxies, DICloak users can operate with top-level anonymity and reliability across all platforms that limit or block repeat requests.


What is DICloak?
DICloak is an antidetect browser designed to mask digital fingerprints and simulate authentic browsing environments. It allows users to create isolated profiles, adjust device-specific parameters, and route traffic through proxies for maximum anonymity. DICloak is best used for multi-accounting, automation, and data gathering without revealing the user's true IP address or browser fingerprint.
How to use a proxy in DICloak?
DICloak supports third-party proxies, including HTTP, HTTPS, and SOCKS5 protocols. To get the best performance and avoid IP blocking, you should integrate Oxylabs proxies into your DICloak profiles. Below, you will find the full guide on how to do just that.
Step 1: Set up DICloak
Download DICloak from the official website, launch the app, and log in.
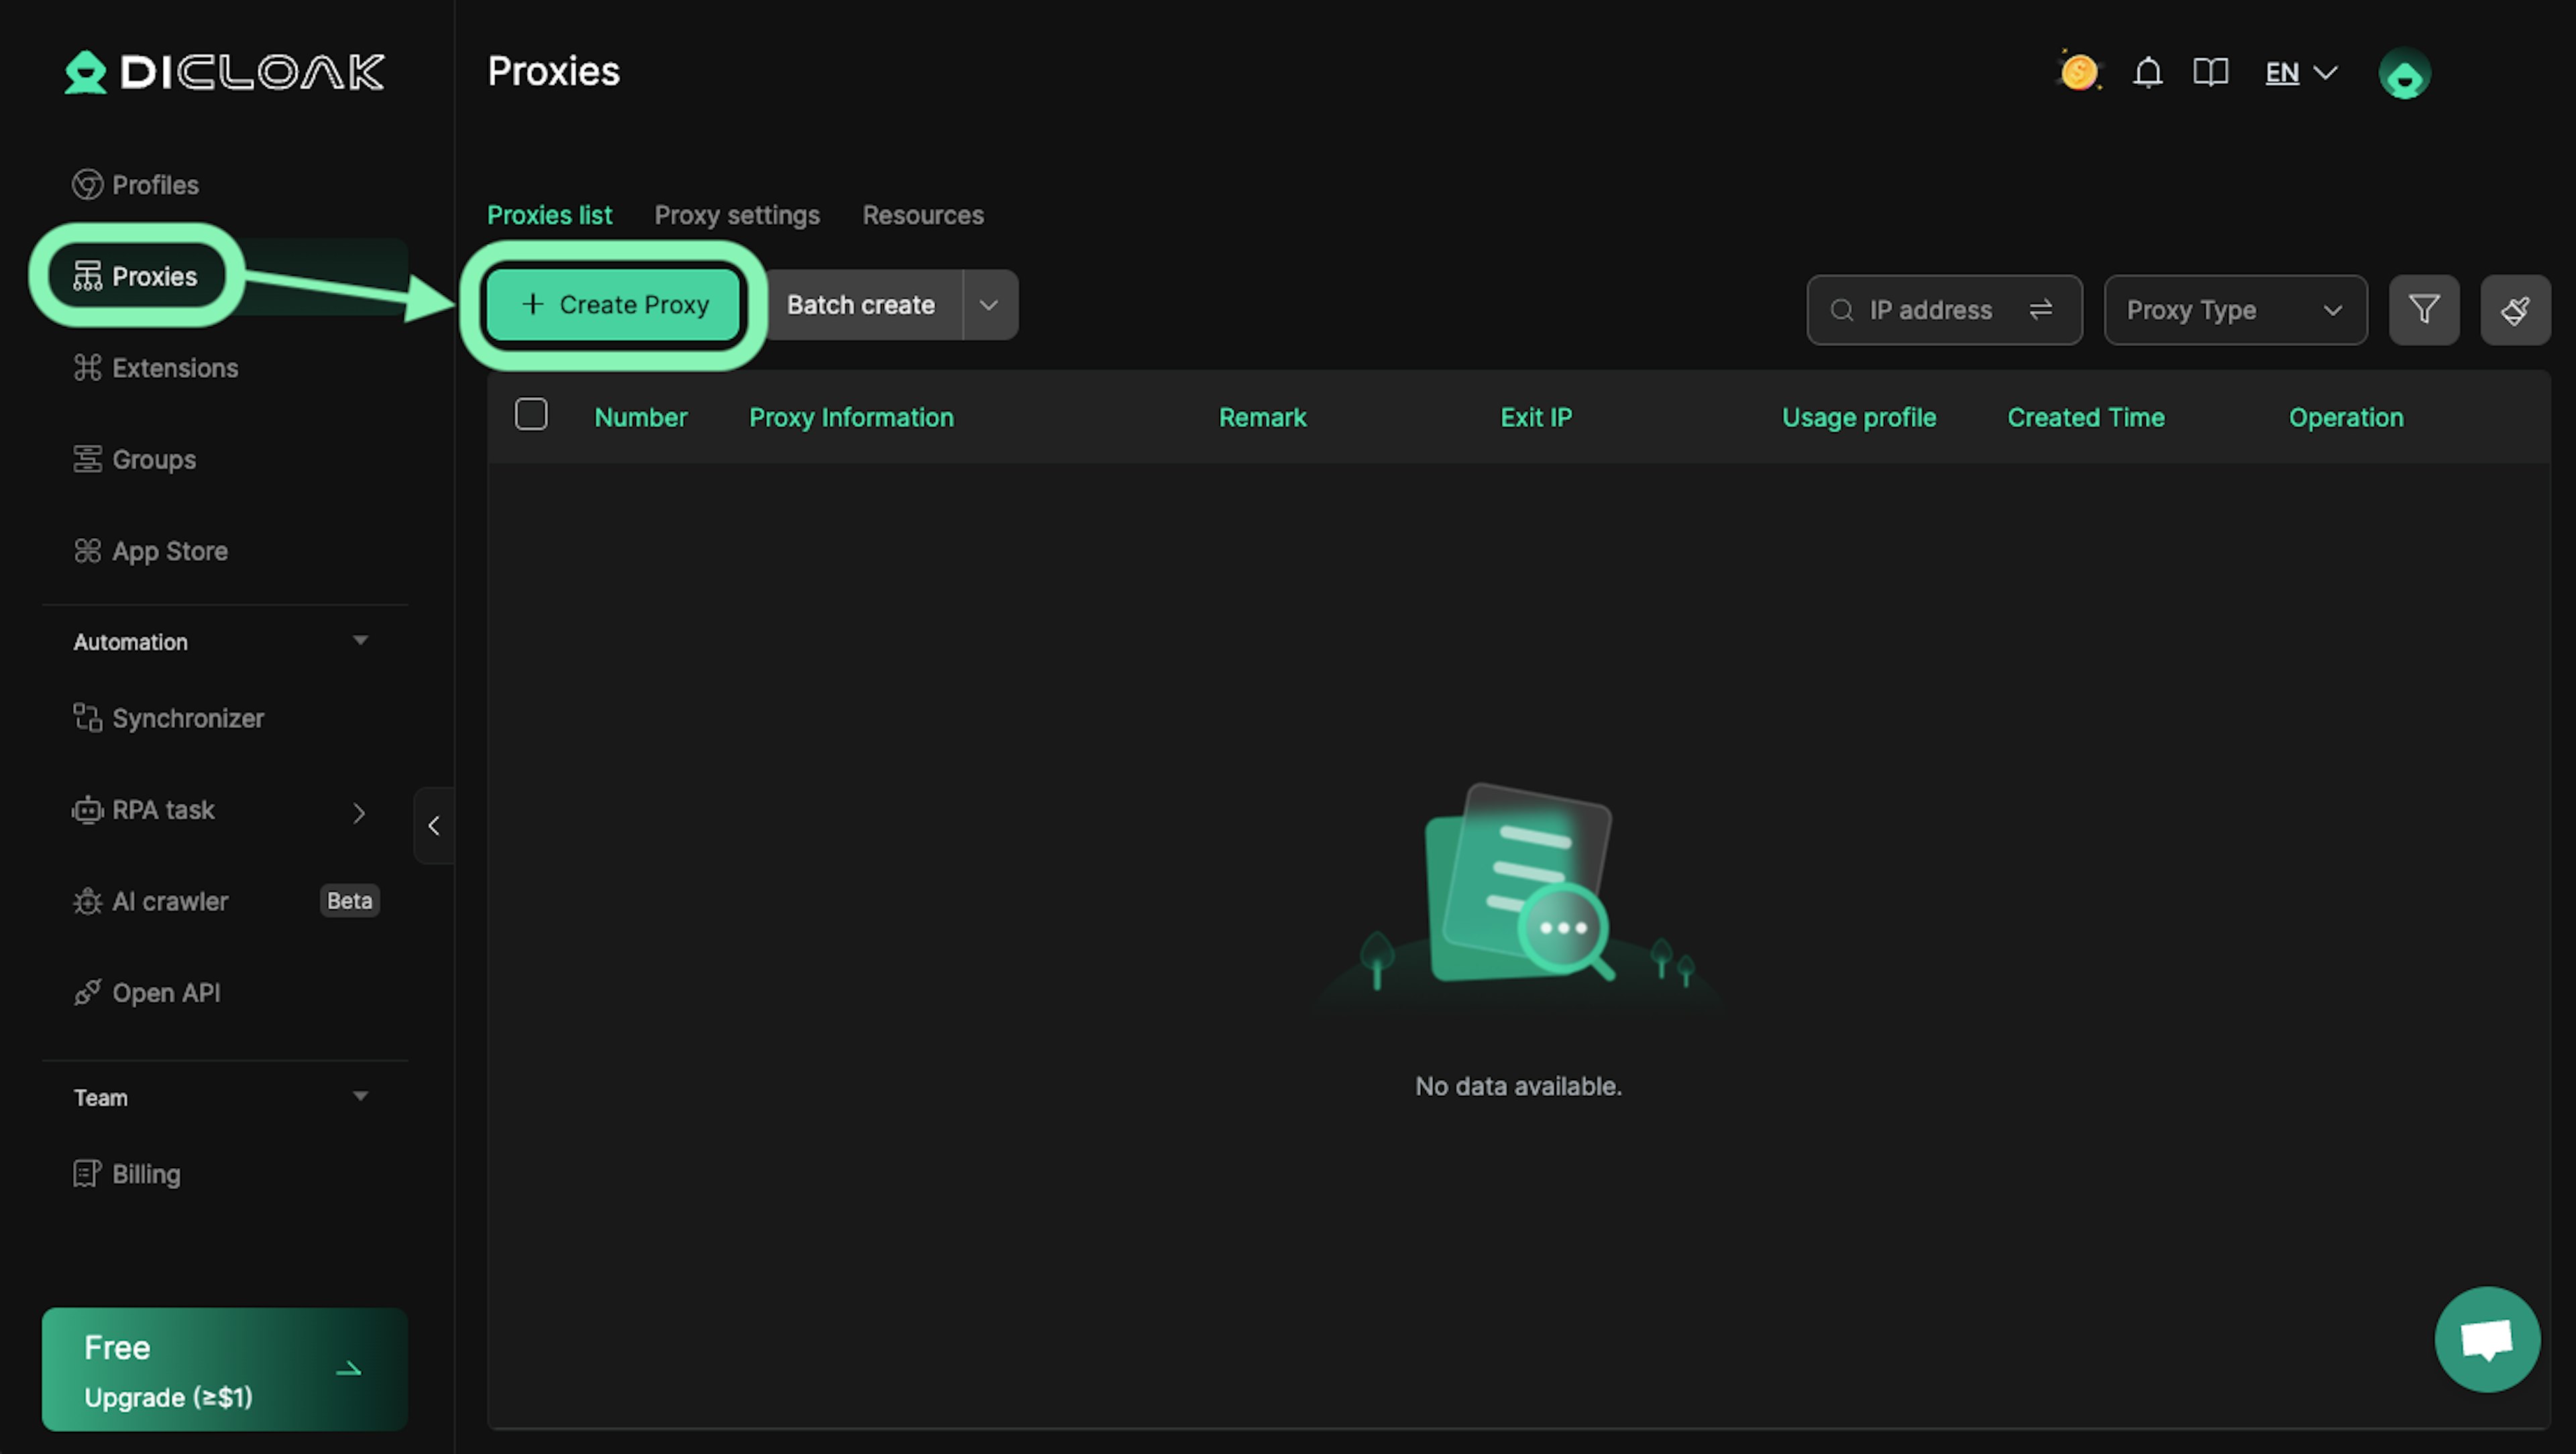
Step 2: Add a new proxy
Select the Proxies tab and click Create Proxy.
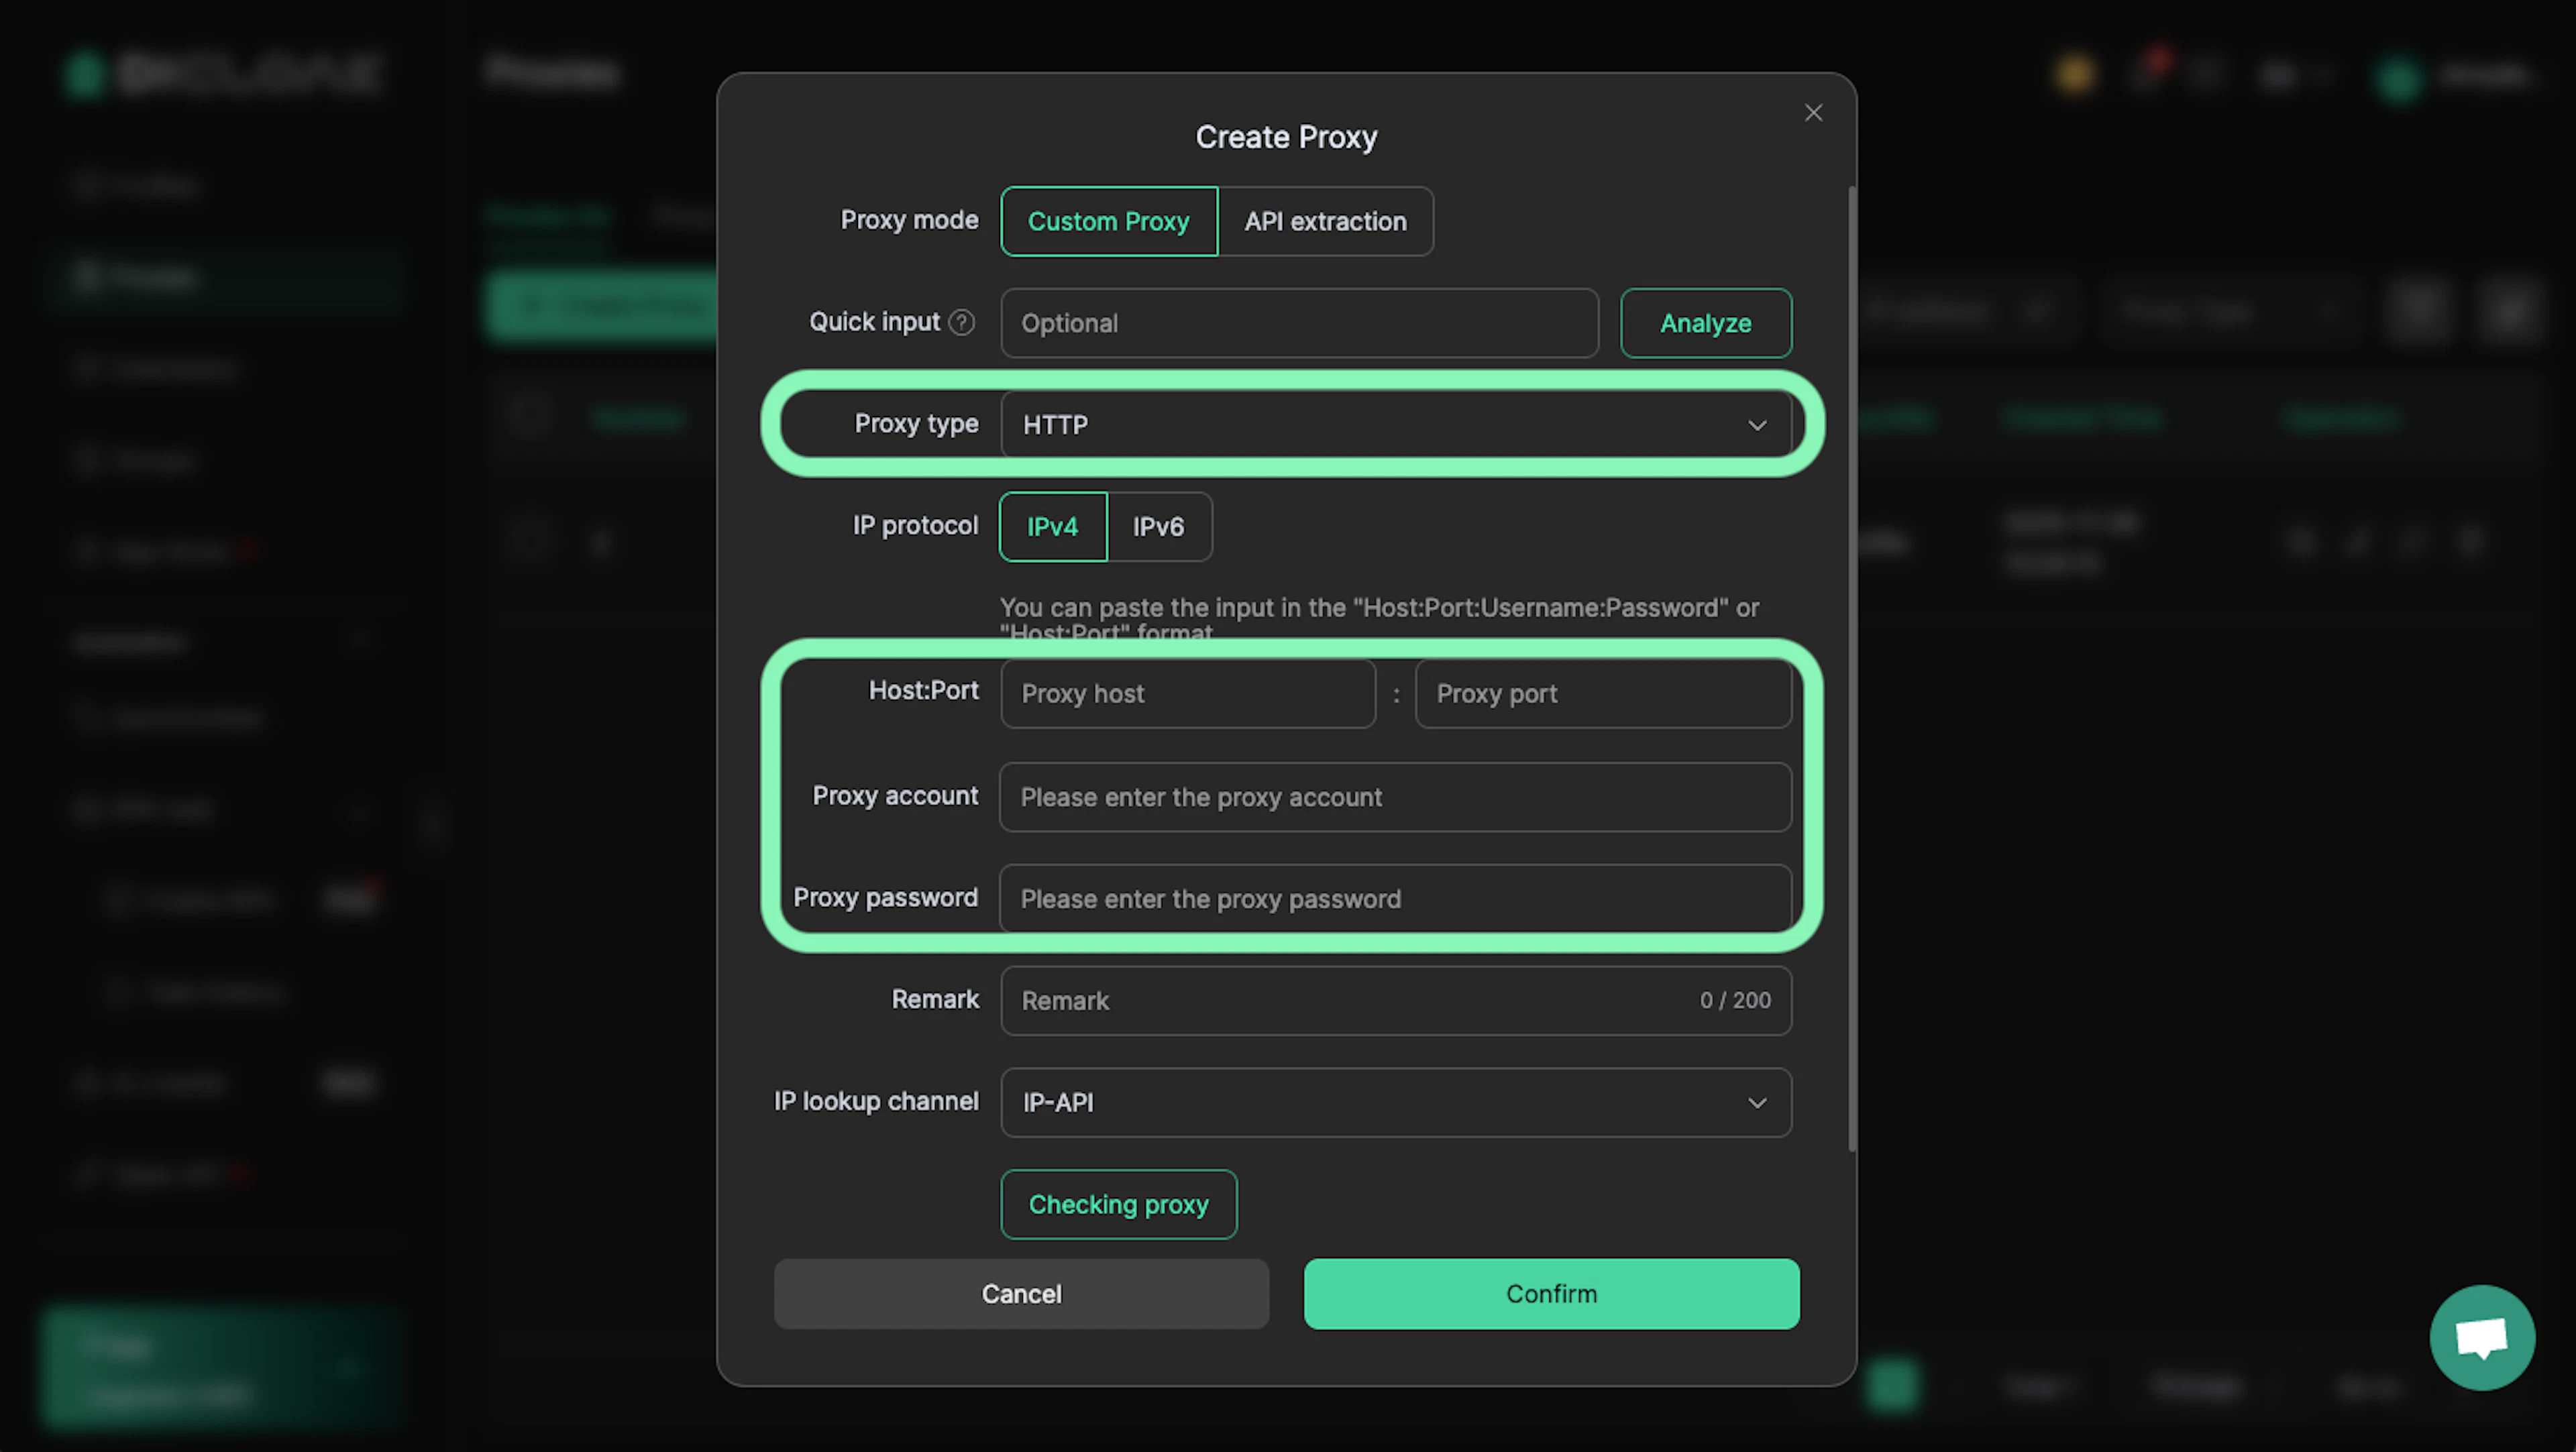
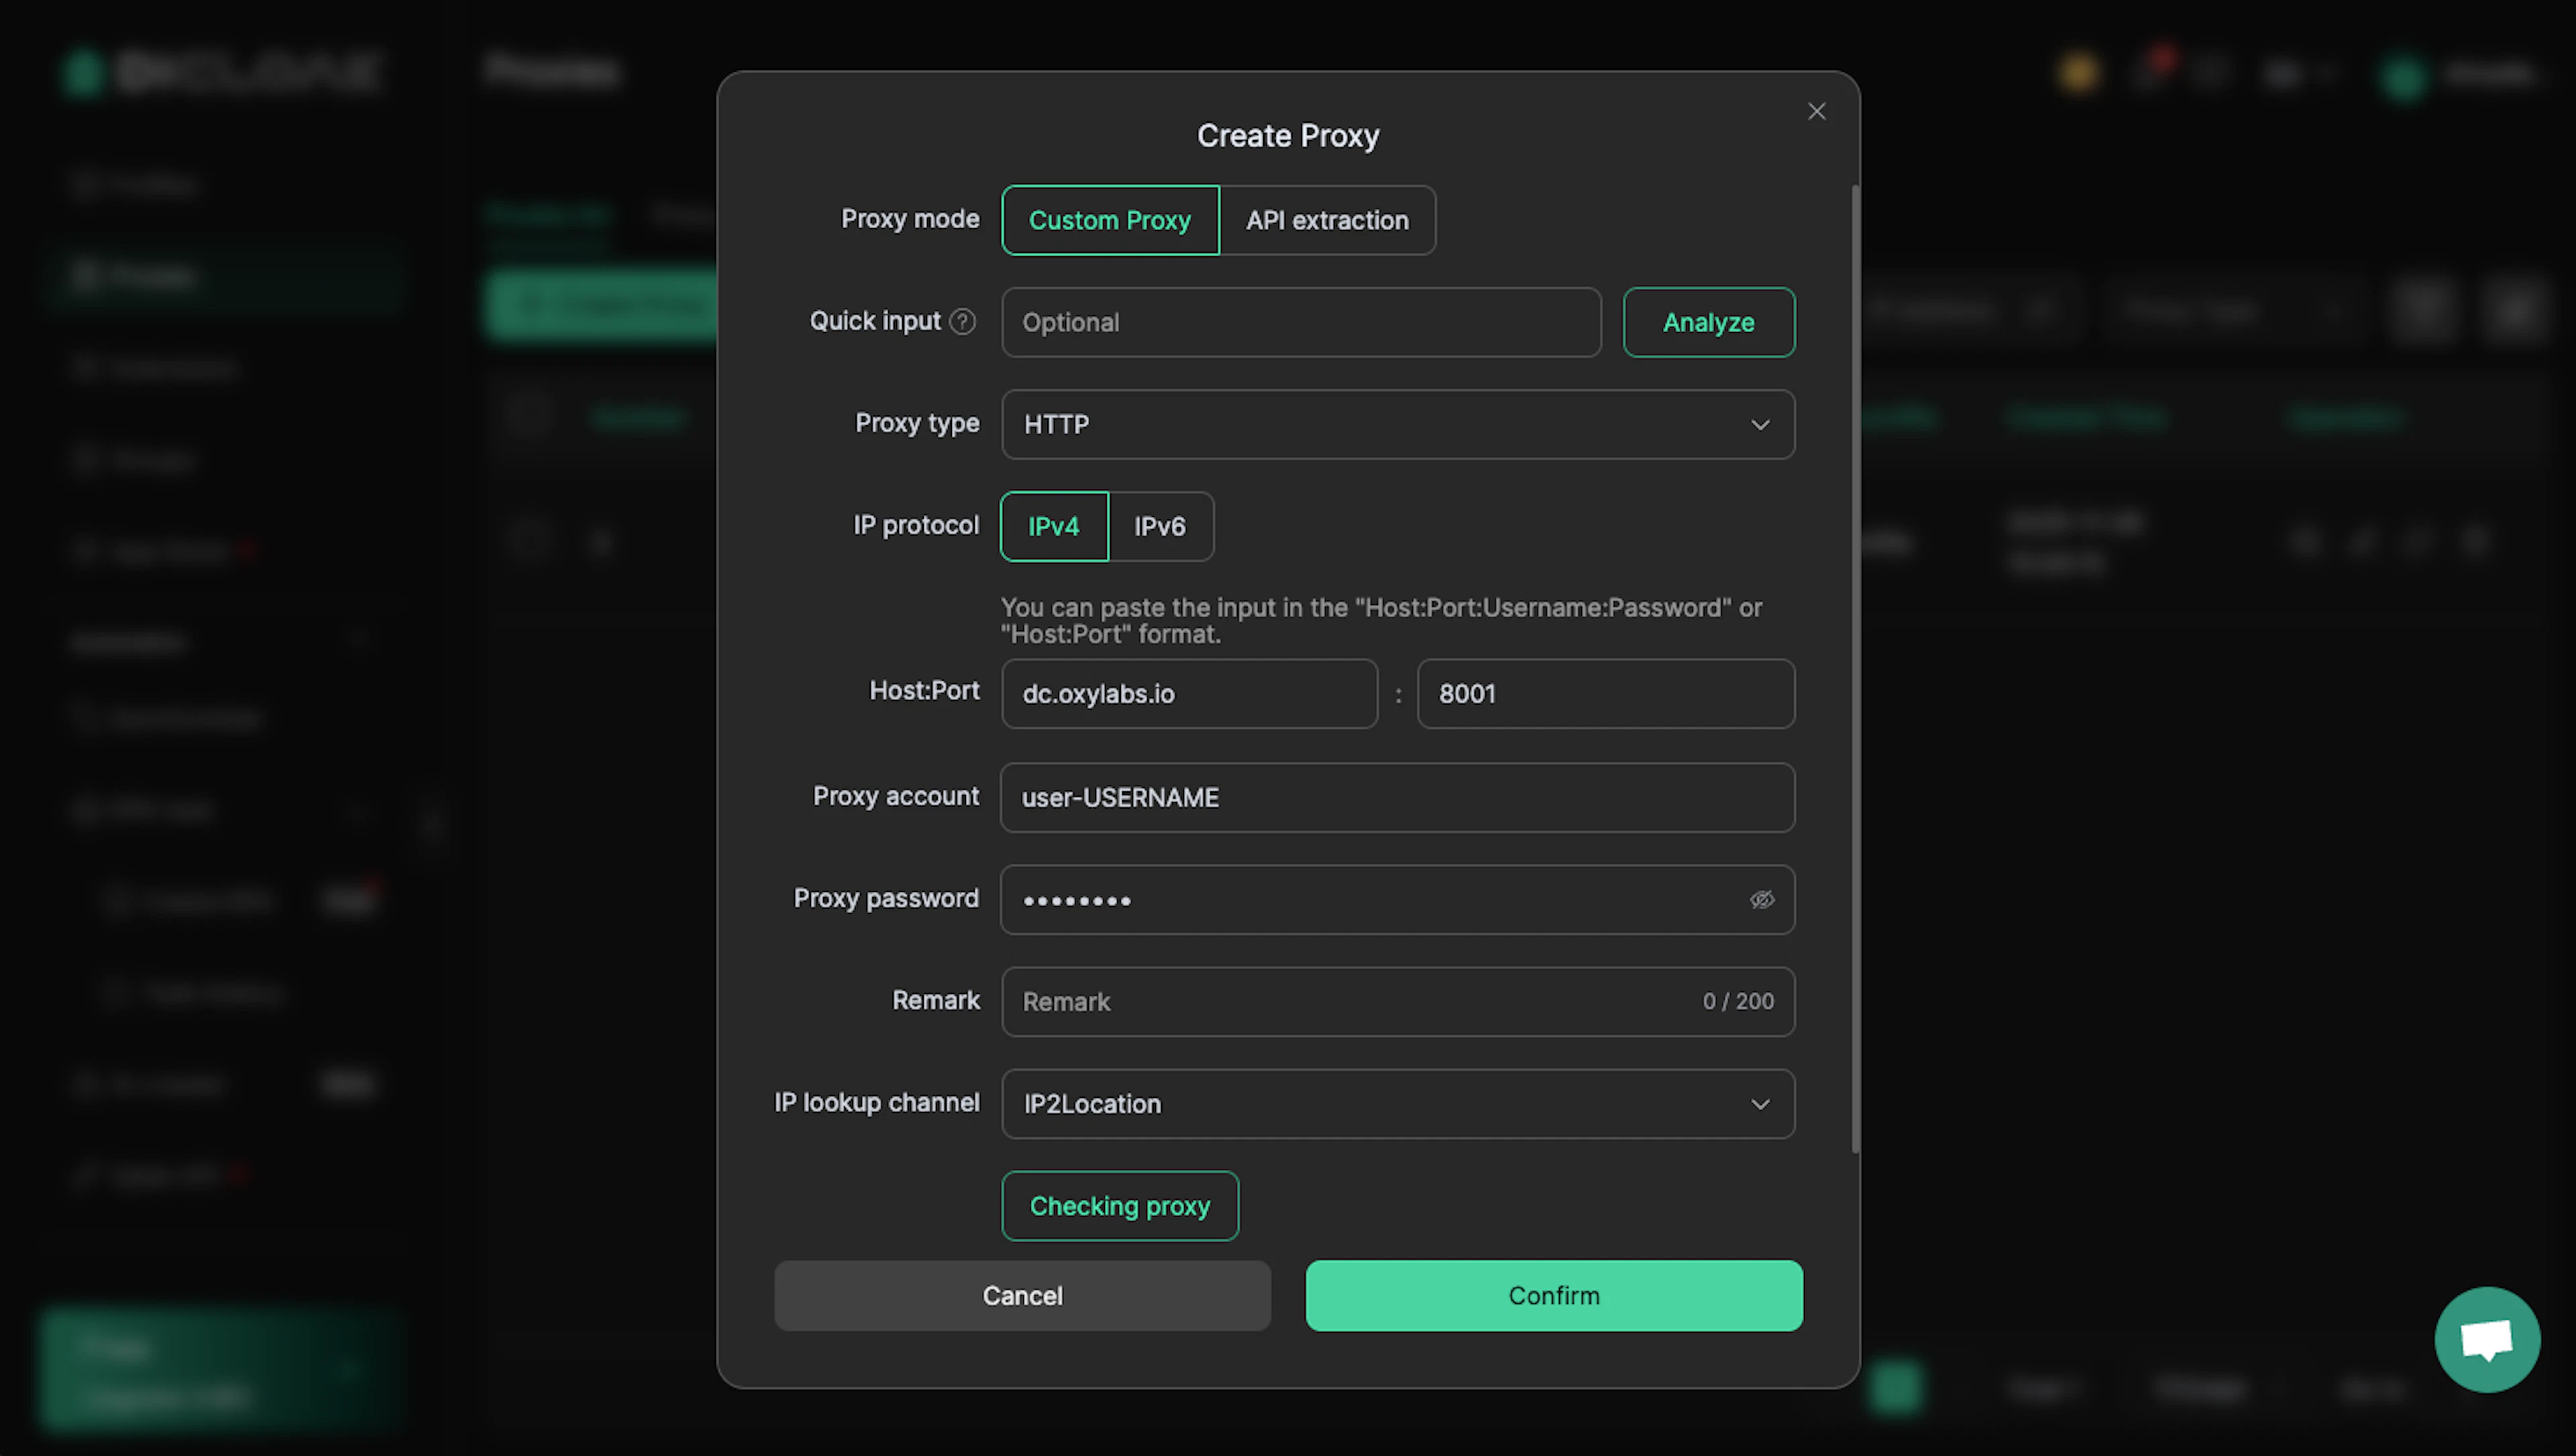
Step 3: Enter proxy details
Choose a proxy type (HTTP, HTTPS, or SOCKS5 protocols) and enter your proxy details according to the proxy types listed below.
Then, enter your Oxylabs proxy user’s credentials. Use the same username and password you entered to create a new proxy user in the Oxylabs dashboard.
Note: Include the user- or customer- prefix to your username if your proxy requires it.
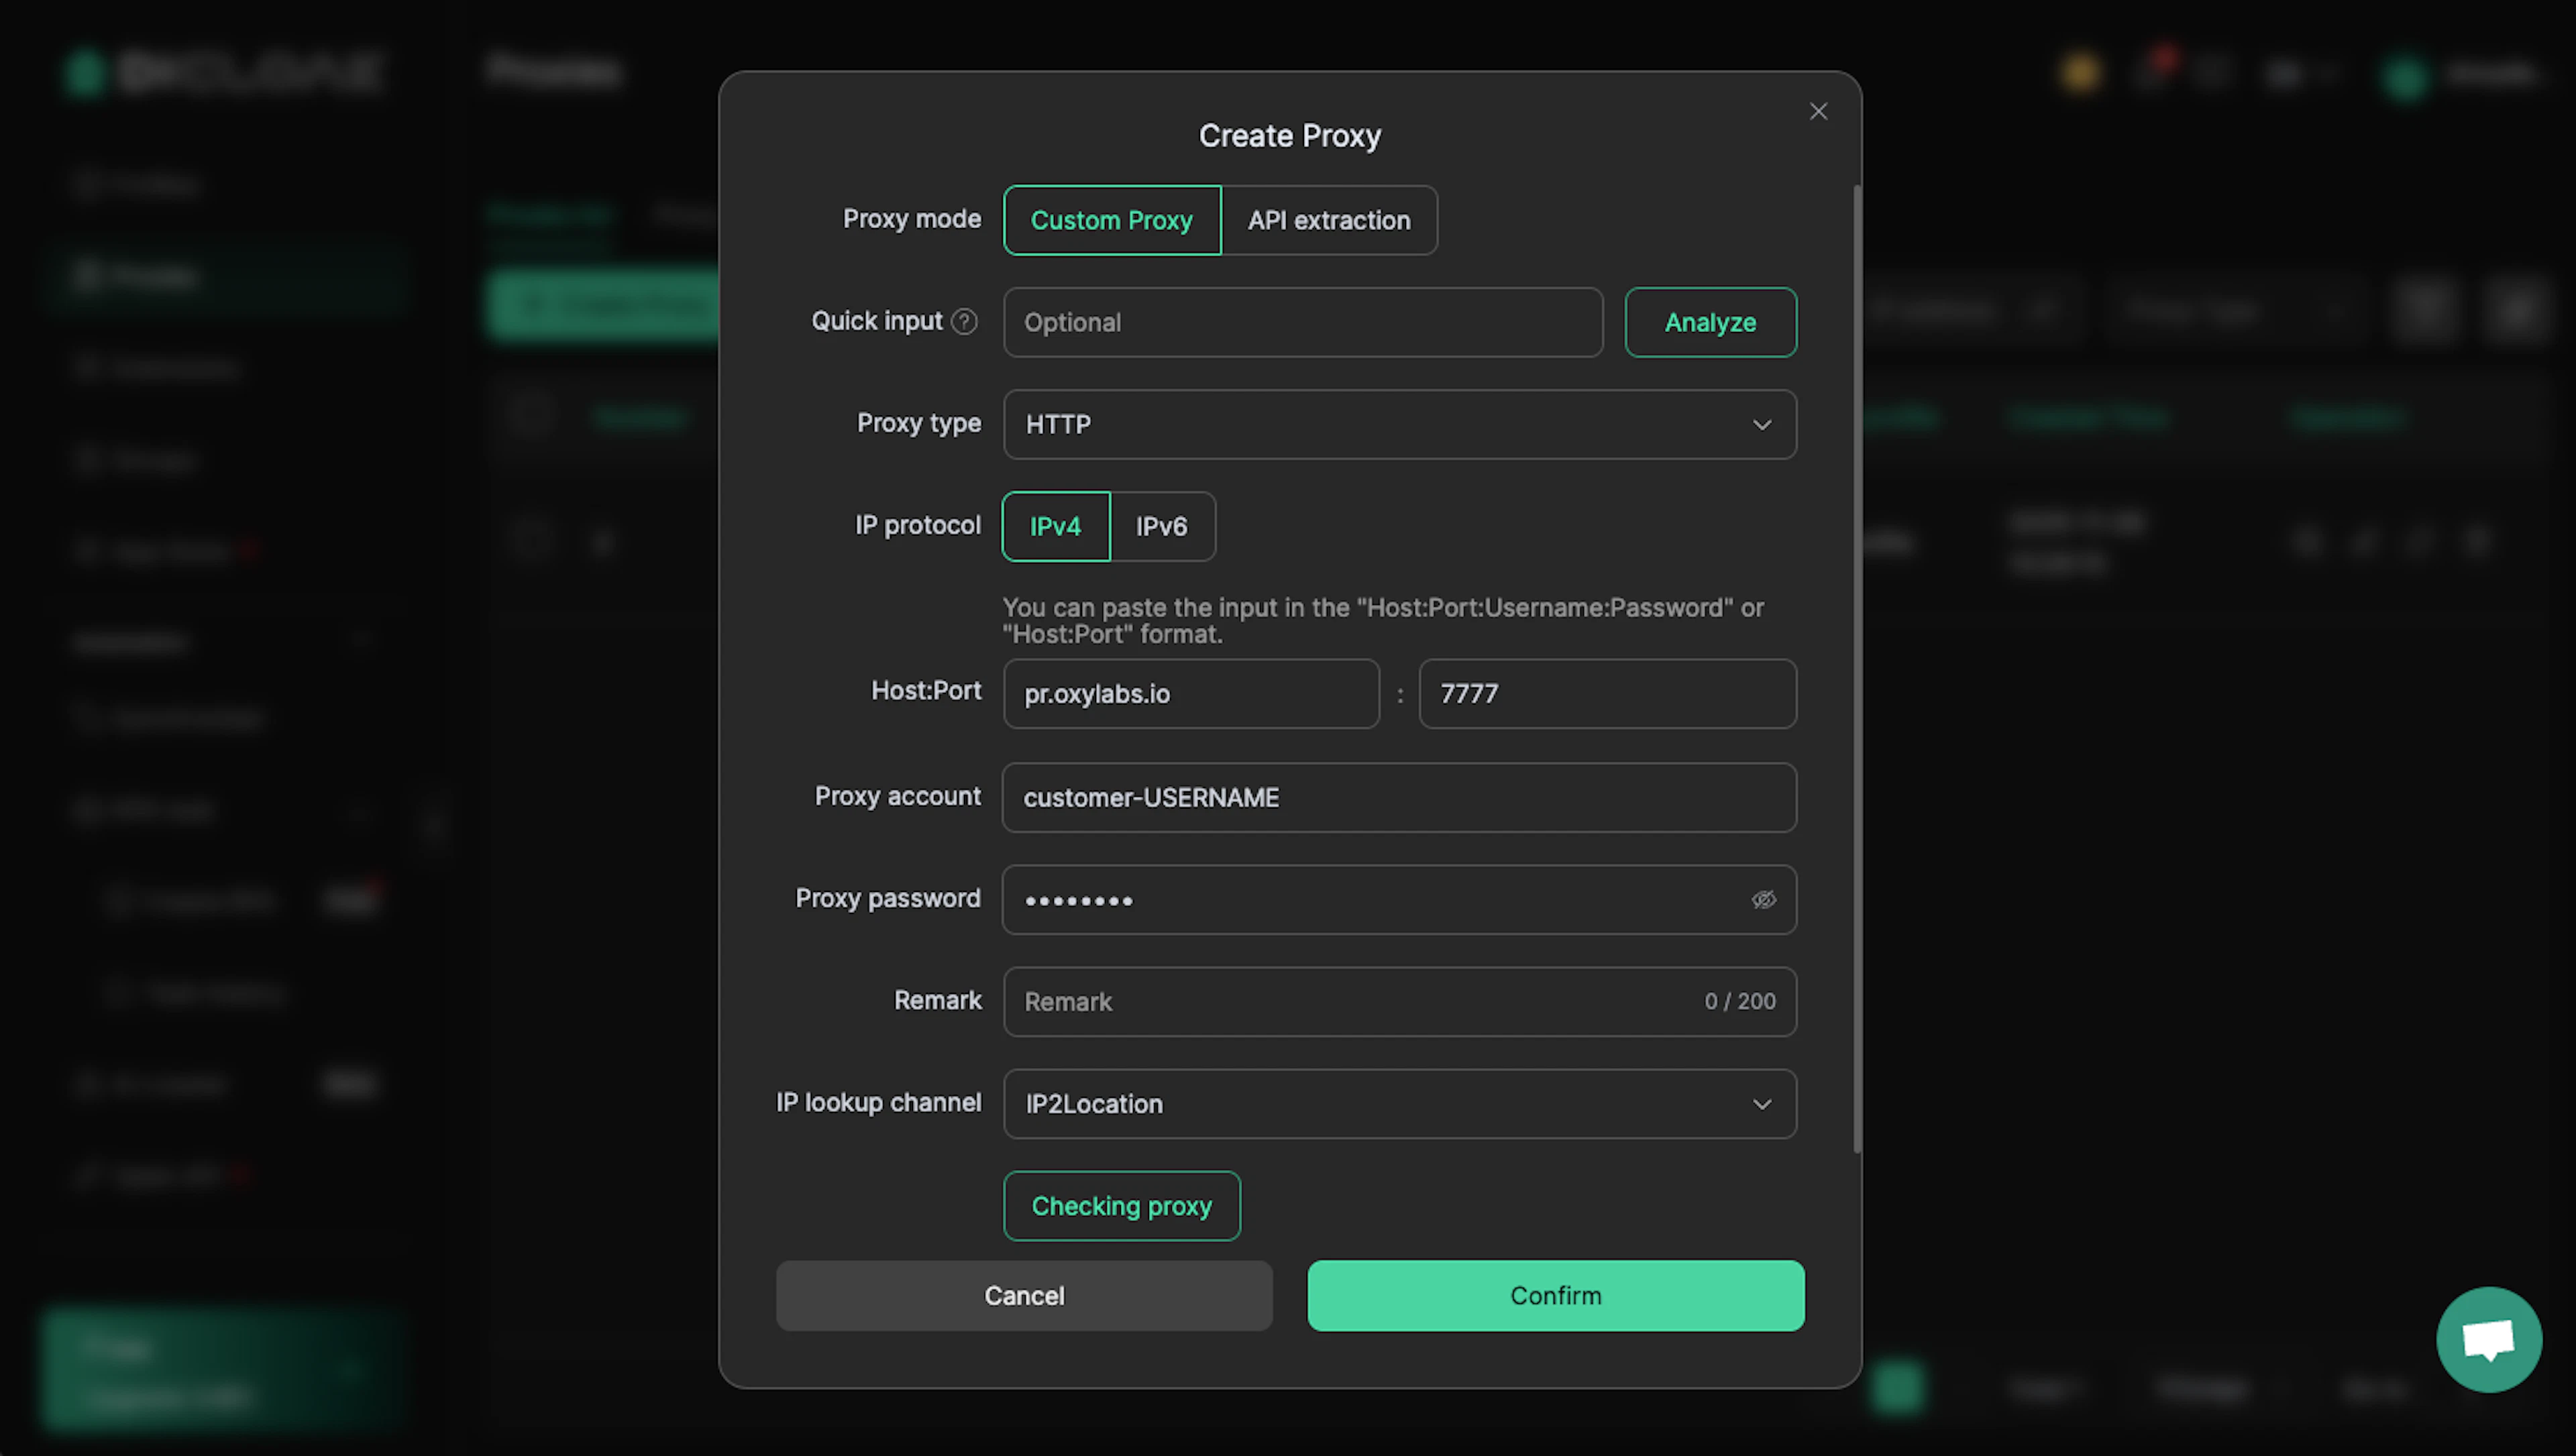
Residential and Mobile Proxies
Proxy type: HTTP, HTTPS, or SOCKS5
Host: pr.oxylabs.io
Port: 7777
Proxy account: customer-USERNAME
Proxy password: PASSWORD
Note: Don’t forget to add customer- prefix to your username.
You can also use additional parameters to set the geo-location (country, city, state, etc.) and session control of your residential proxies.
| Proxy parameter | example | Protocols |
|---|---|---|
| Country entry node |
Host: //us-pr.oxylabs.ioPort: 10000 |
HTTP, HTTPS |
| Country |
User: customer-username-cc-US |
HTTP, HTTPS, SOCKS5 |
| State |
User: customer-username-st-US_texas |
HTTP, HTTPS, SOCKS5 |
| City |
User: customer-username-city-paris |
HTTP, HTTPS, SOCKS5 |
| Continent |
User: customer-username-cn-NA |
HTTP, HTTPS, SOCKS5 |
| Postal code |
User: customer-username-cc-US-postalcode-90210 |
HTTP, HTTPS, SOCKS5 |
| ASN targeting |
User: customer-username-ASN-21928 |
HTTP, HTTPS, SOCKS5 |
| Session |
User: customer-username-sessid-qwerty123-sesstime-30 |
HTTP, HTTPS, SOCKS5 |
| Sticky session |
Host: //us-pr.oxylabs.ioPort: 10001 |
HTTP, HTTPS |
Enterprise Dedicated Datacenter Proxies
Proxy type: HTTP, HTTPS, or SOCKS5
Host: 1.2.3.4 (IP address from your proxy list)
Port: 60000 (HTTP/HTTPS) or 1180 (SOCKS5)
Proxy account: USERNAME
Proxy password: PASSWORD
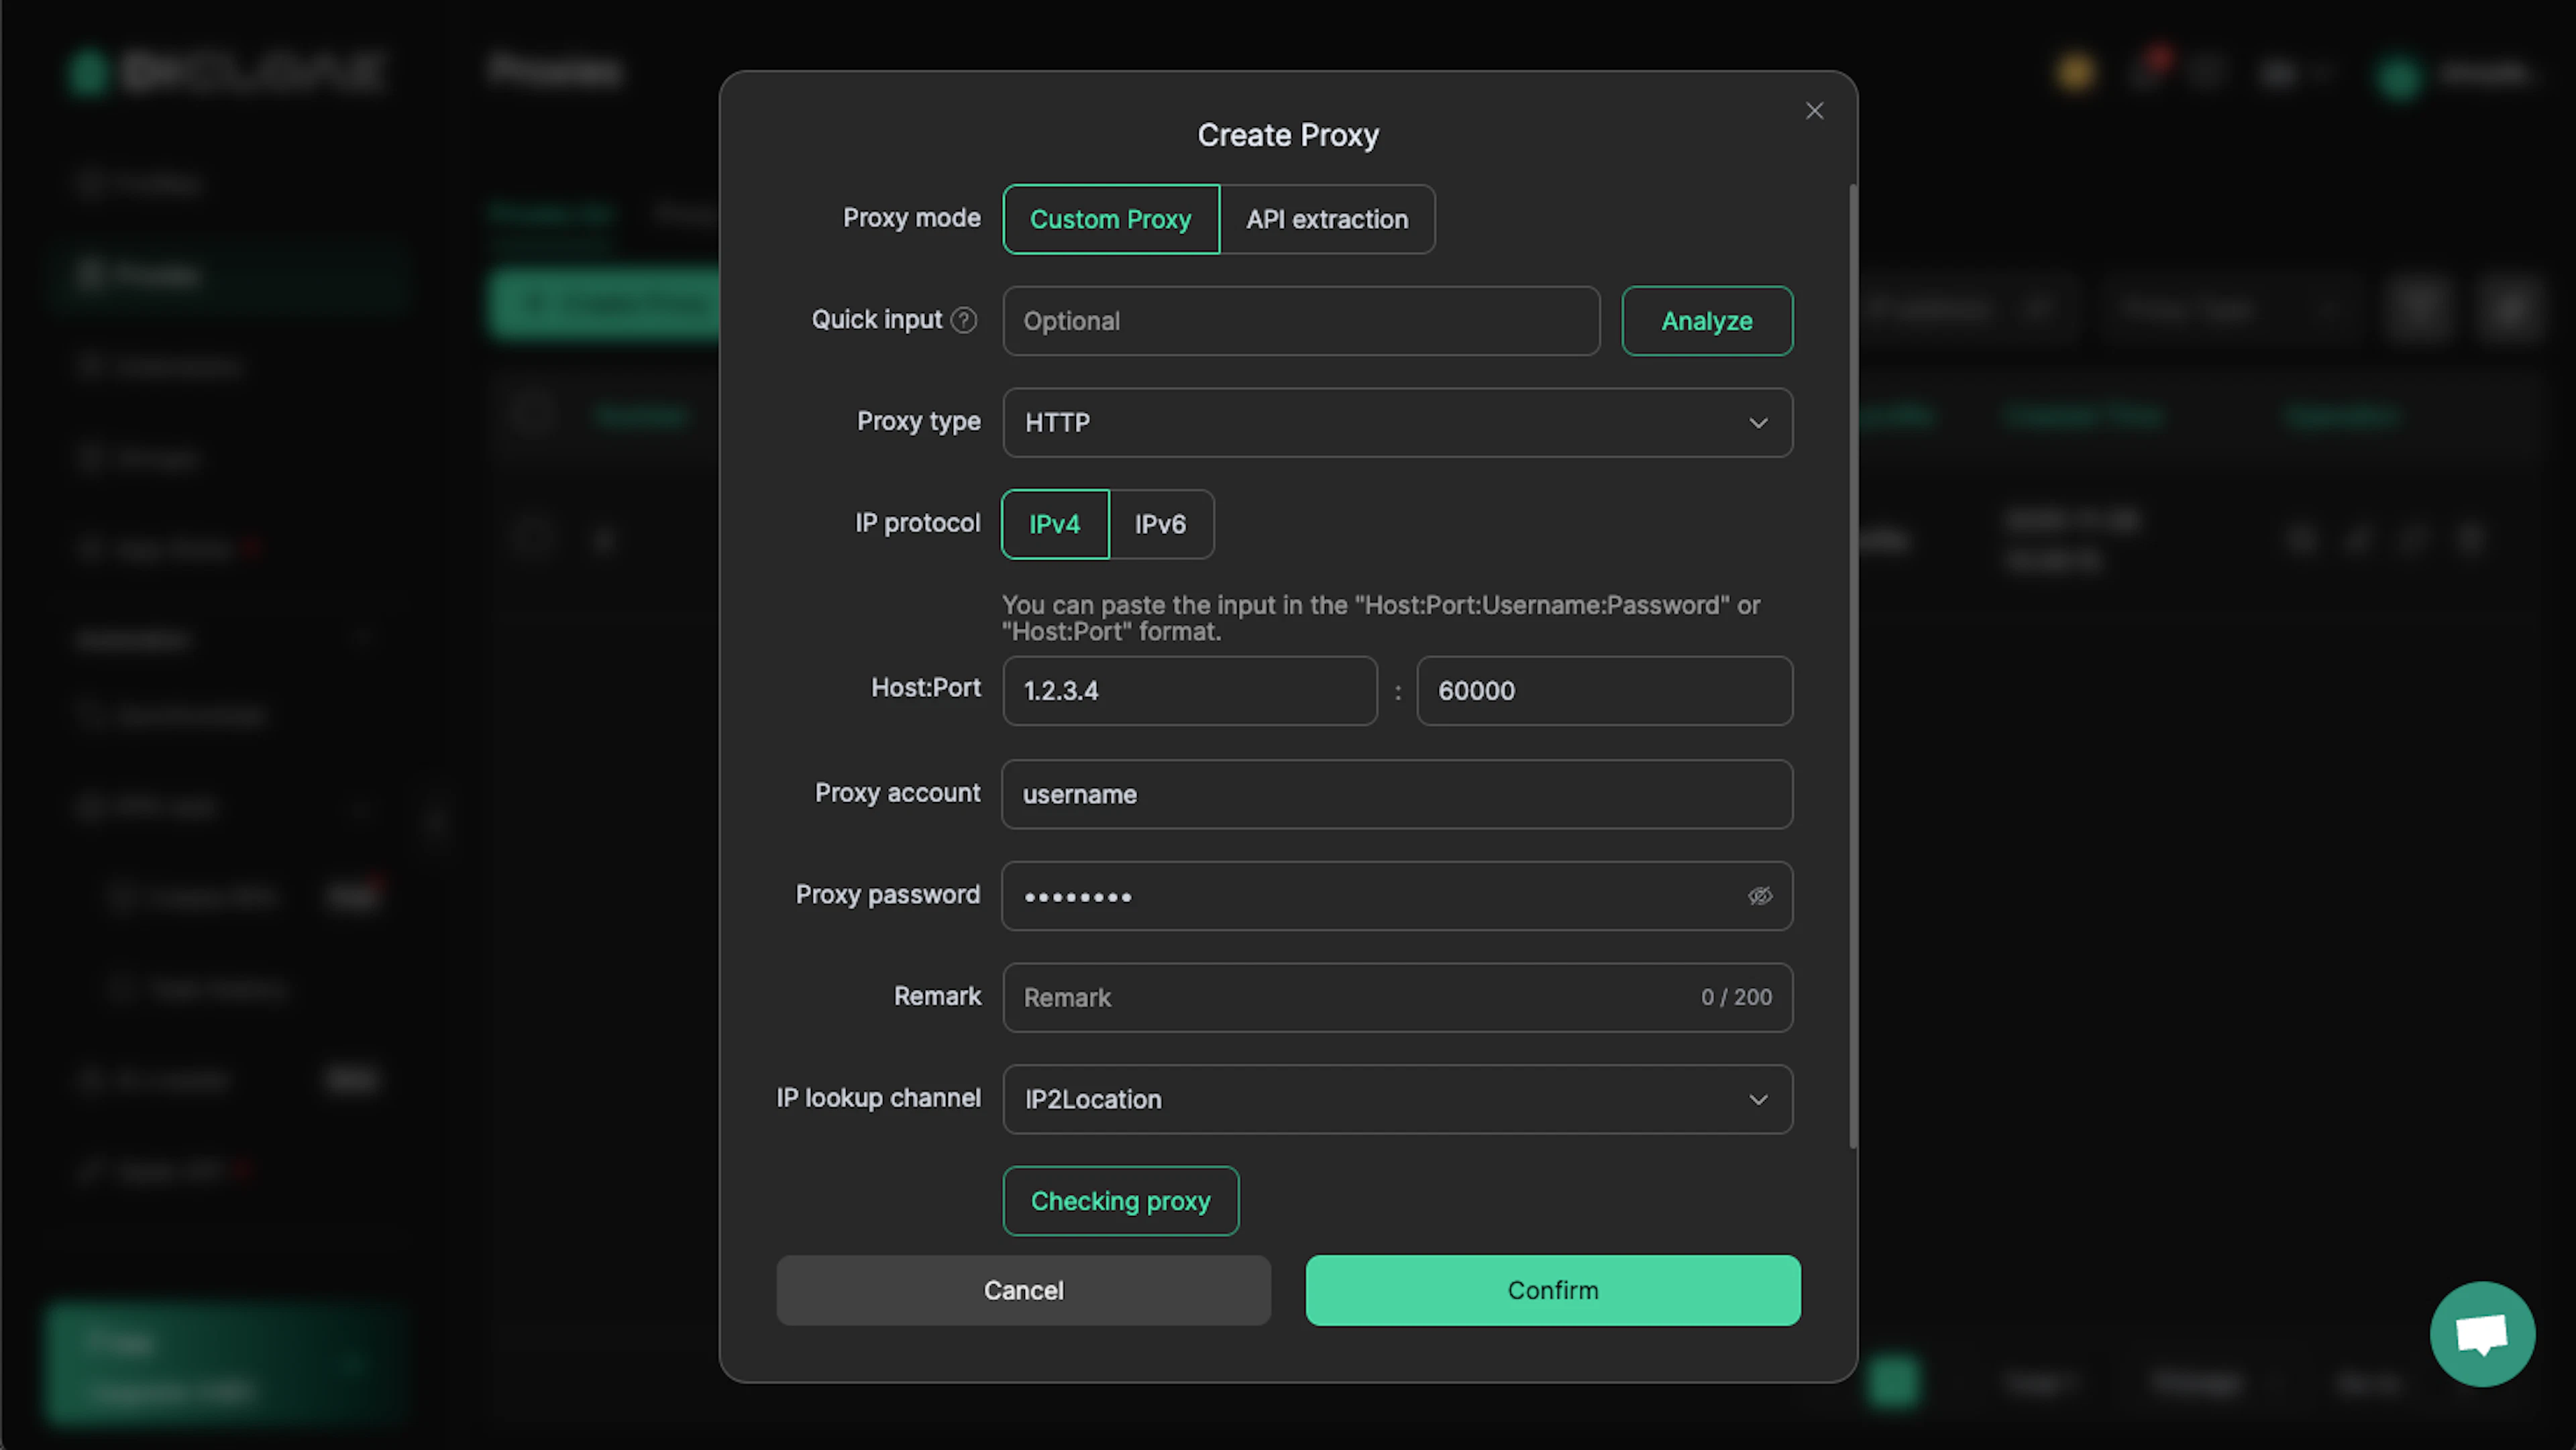
For Enterprise Dedicated Datacenter Proxies, you’ll have to choose an IP address from the acquired list. Visit our documentation for more details.
Self-Service Dedicated Datacenter Proxies
Proxy type: HTTP, HTTPS, or SOCKS5
Host: ddc.oxylabs.io
Port: 8001
Proxy account: user-USERNAME
Proxy password: PASSWORD
Note: Don’t forget to add user- prefix to your username.

For Self-Service Dedicated Datacenter Proxies, the port indicates the sequential number of an IP address from the acquired proxy list.
If you want to get a different IP with each request, change the Port to 8000 to enable proxy rotation. Check our documentation for more details.
Datacenter Proxies
Proxy type: HTTP, HTTPS, or SOCKS5
Host: dc.oxylabs.io
Port: 8001
Proxy account: user-USERNAME
Proxy password: PASSWORD
Note: Don’t forget to add user- prefix to your username.
Pay-per-IP subscription
The port is the sequential number assigned to an IP address from the proxy list. Thus, port 8001 uses the first IP address from your list. You may also enable proxy IP rotation by setting the port to 8000.
Additionally, you can choose geo-location, such as the US, by setting the Proxy username to user-USERNAME-country-US.
Pay-per-traffic subscription
Port 8001 picks a random IP address but stays consistent during a session. Alternatively, you can rotate proxy IPs with each request by using port 8000.
You can also specify geo-location, for example, the US, by setting the Proxy username to user-USERNAME-country-US.
ISP Proxies
Proxy type: HTTP, HTTPS, or SOCKS5
Host: isp.oxylabs.io
Port: 8001
Proxy account: user-USERNAME
Proxy password: PASSWORD
Note: Don’t forget to add user- prefix to your username.

With ISP Proxies, the port is assigned to a specific IP address and its location. Hence, port 8001 will always pick the first IP from your proxy list.
If you want to get a different IP with each request, change the Port to 8000 to enable proxy rotation.
Step 4: Testing
To check proxy functionality, select your IP lookup channel (IP-API or IP2Location), then click Checking proxy.
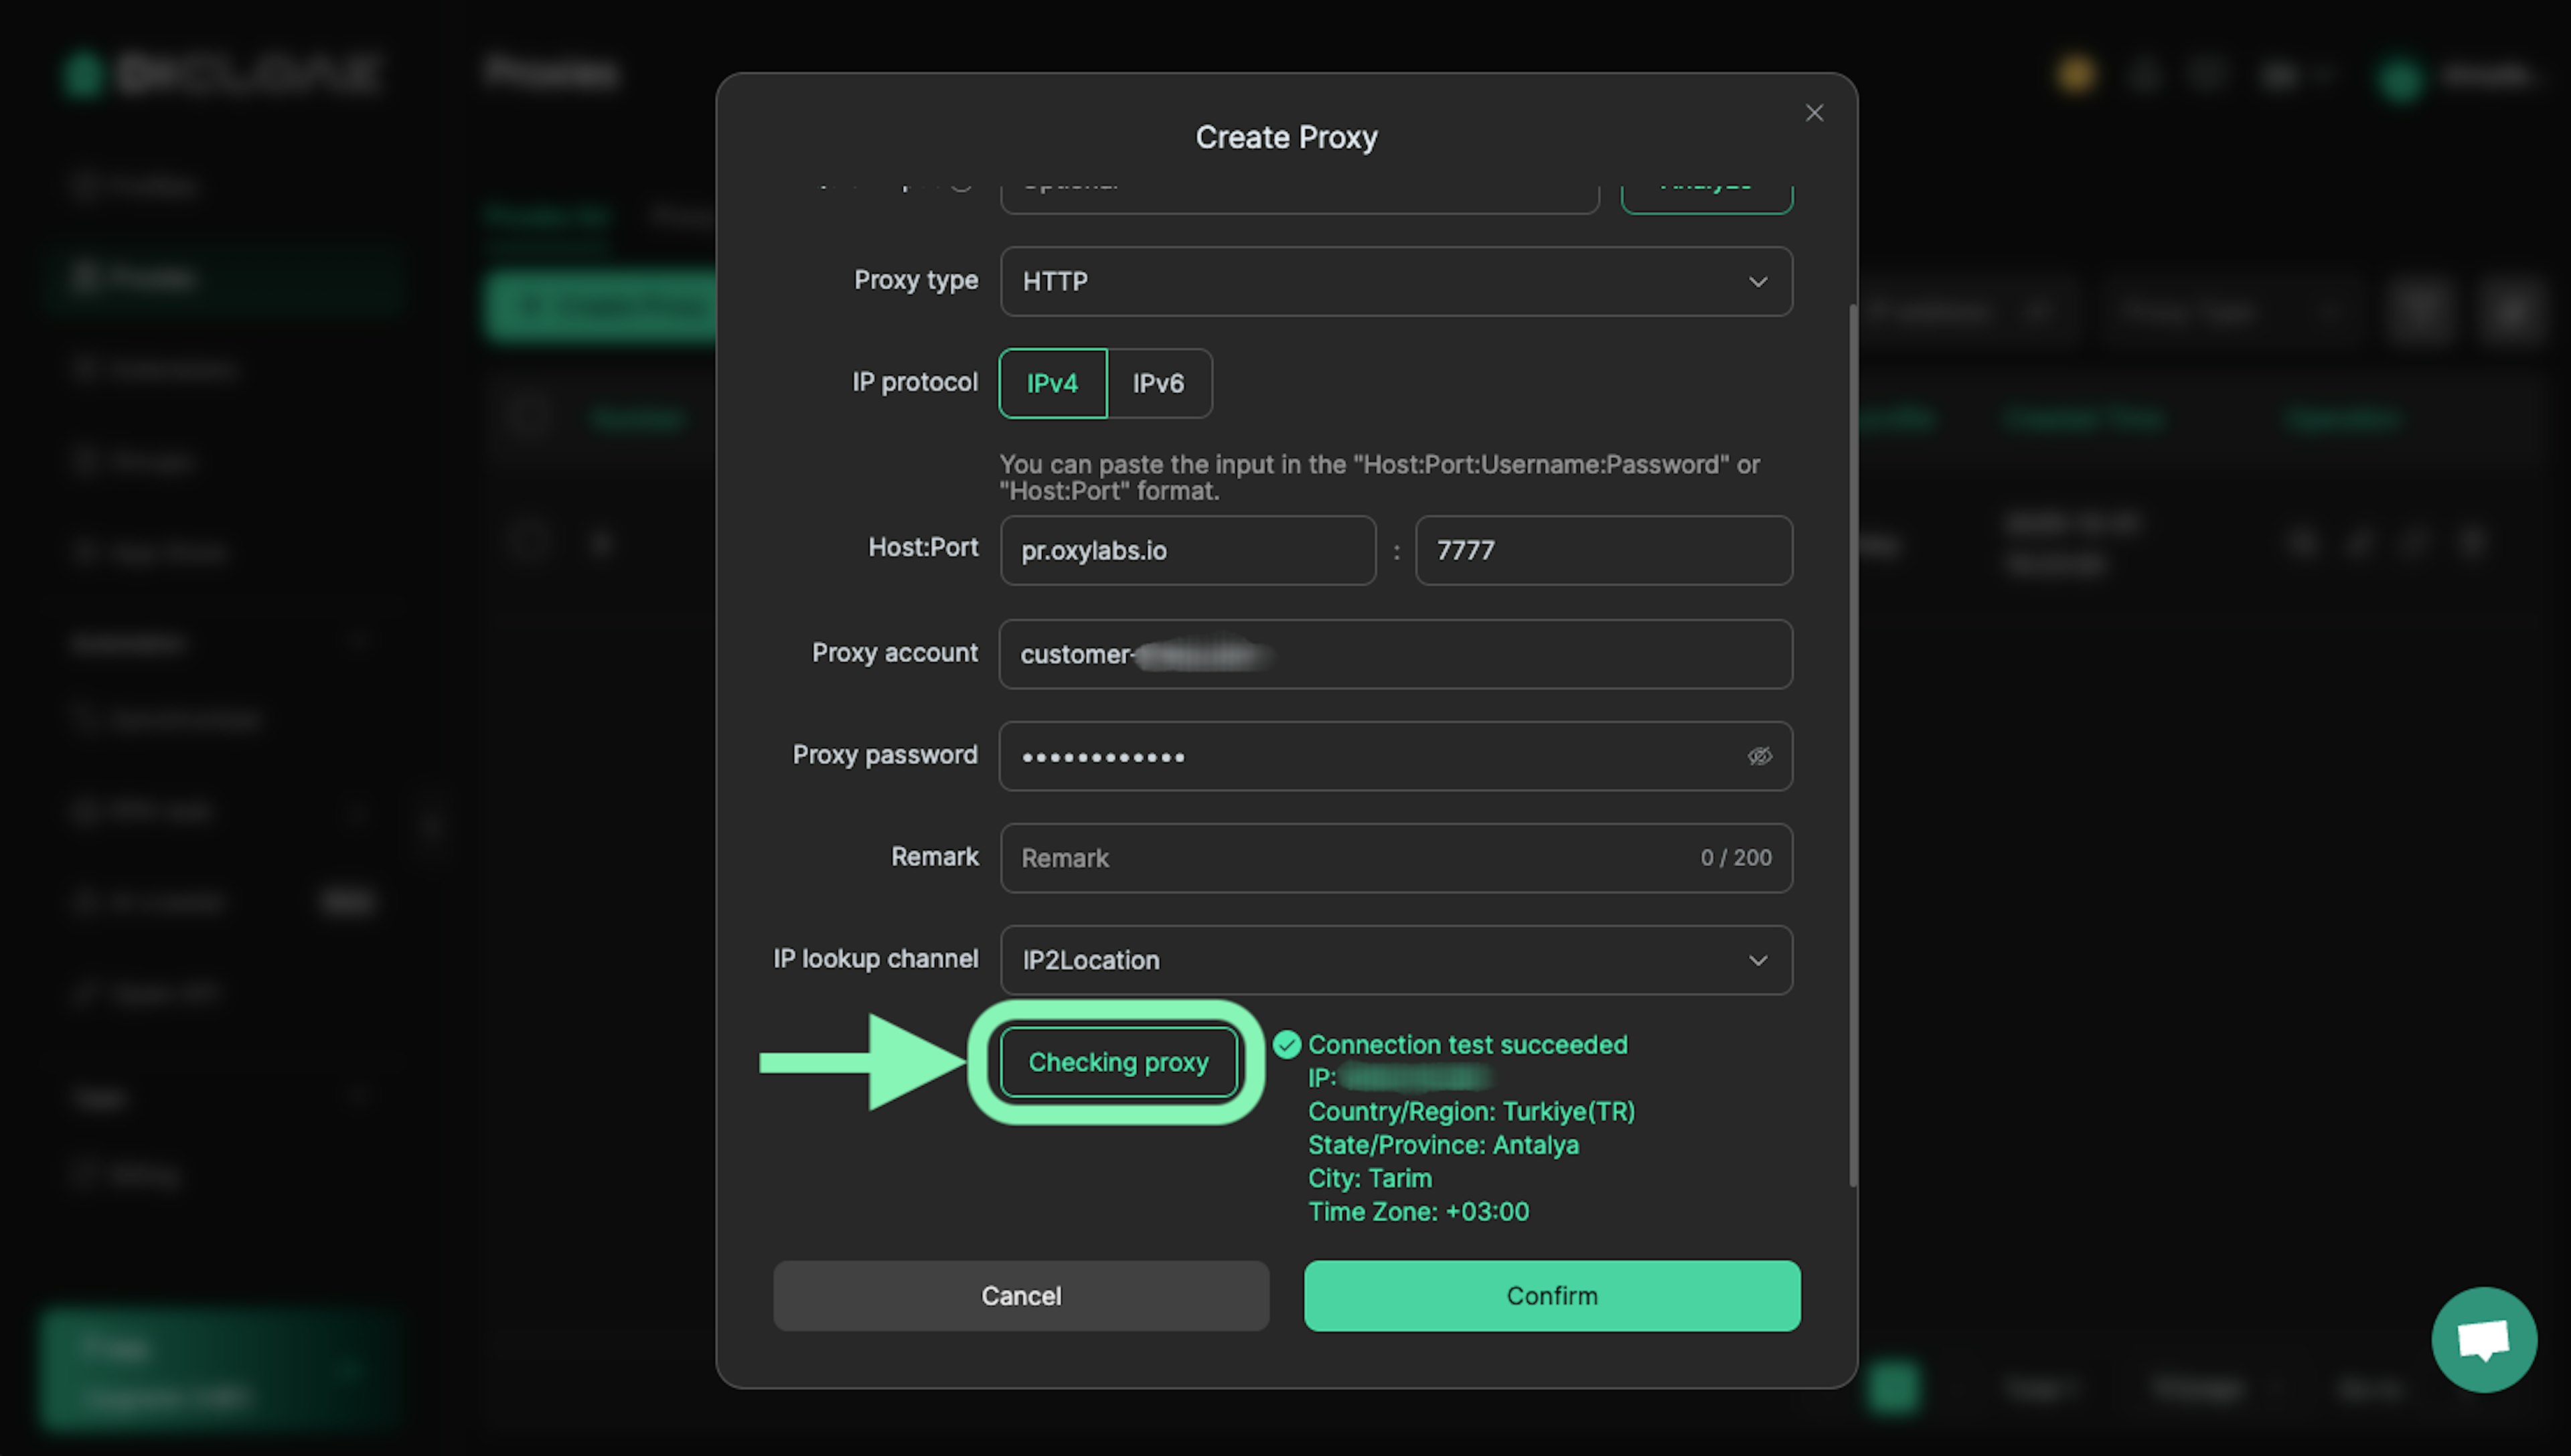
If the test is successful, you’ll see an active proxy IP address.
Finally, Confirm your new proxy. You can add as many proxies as you like and pair or unpair them with different profiles.
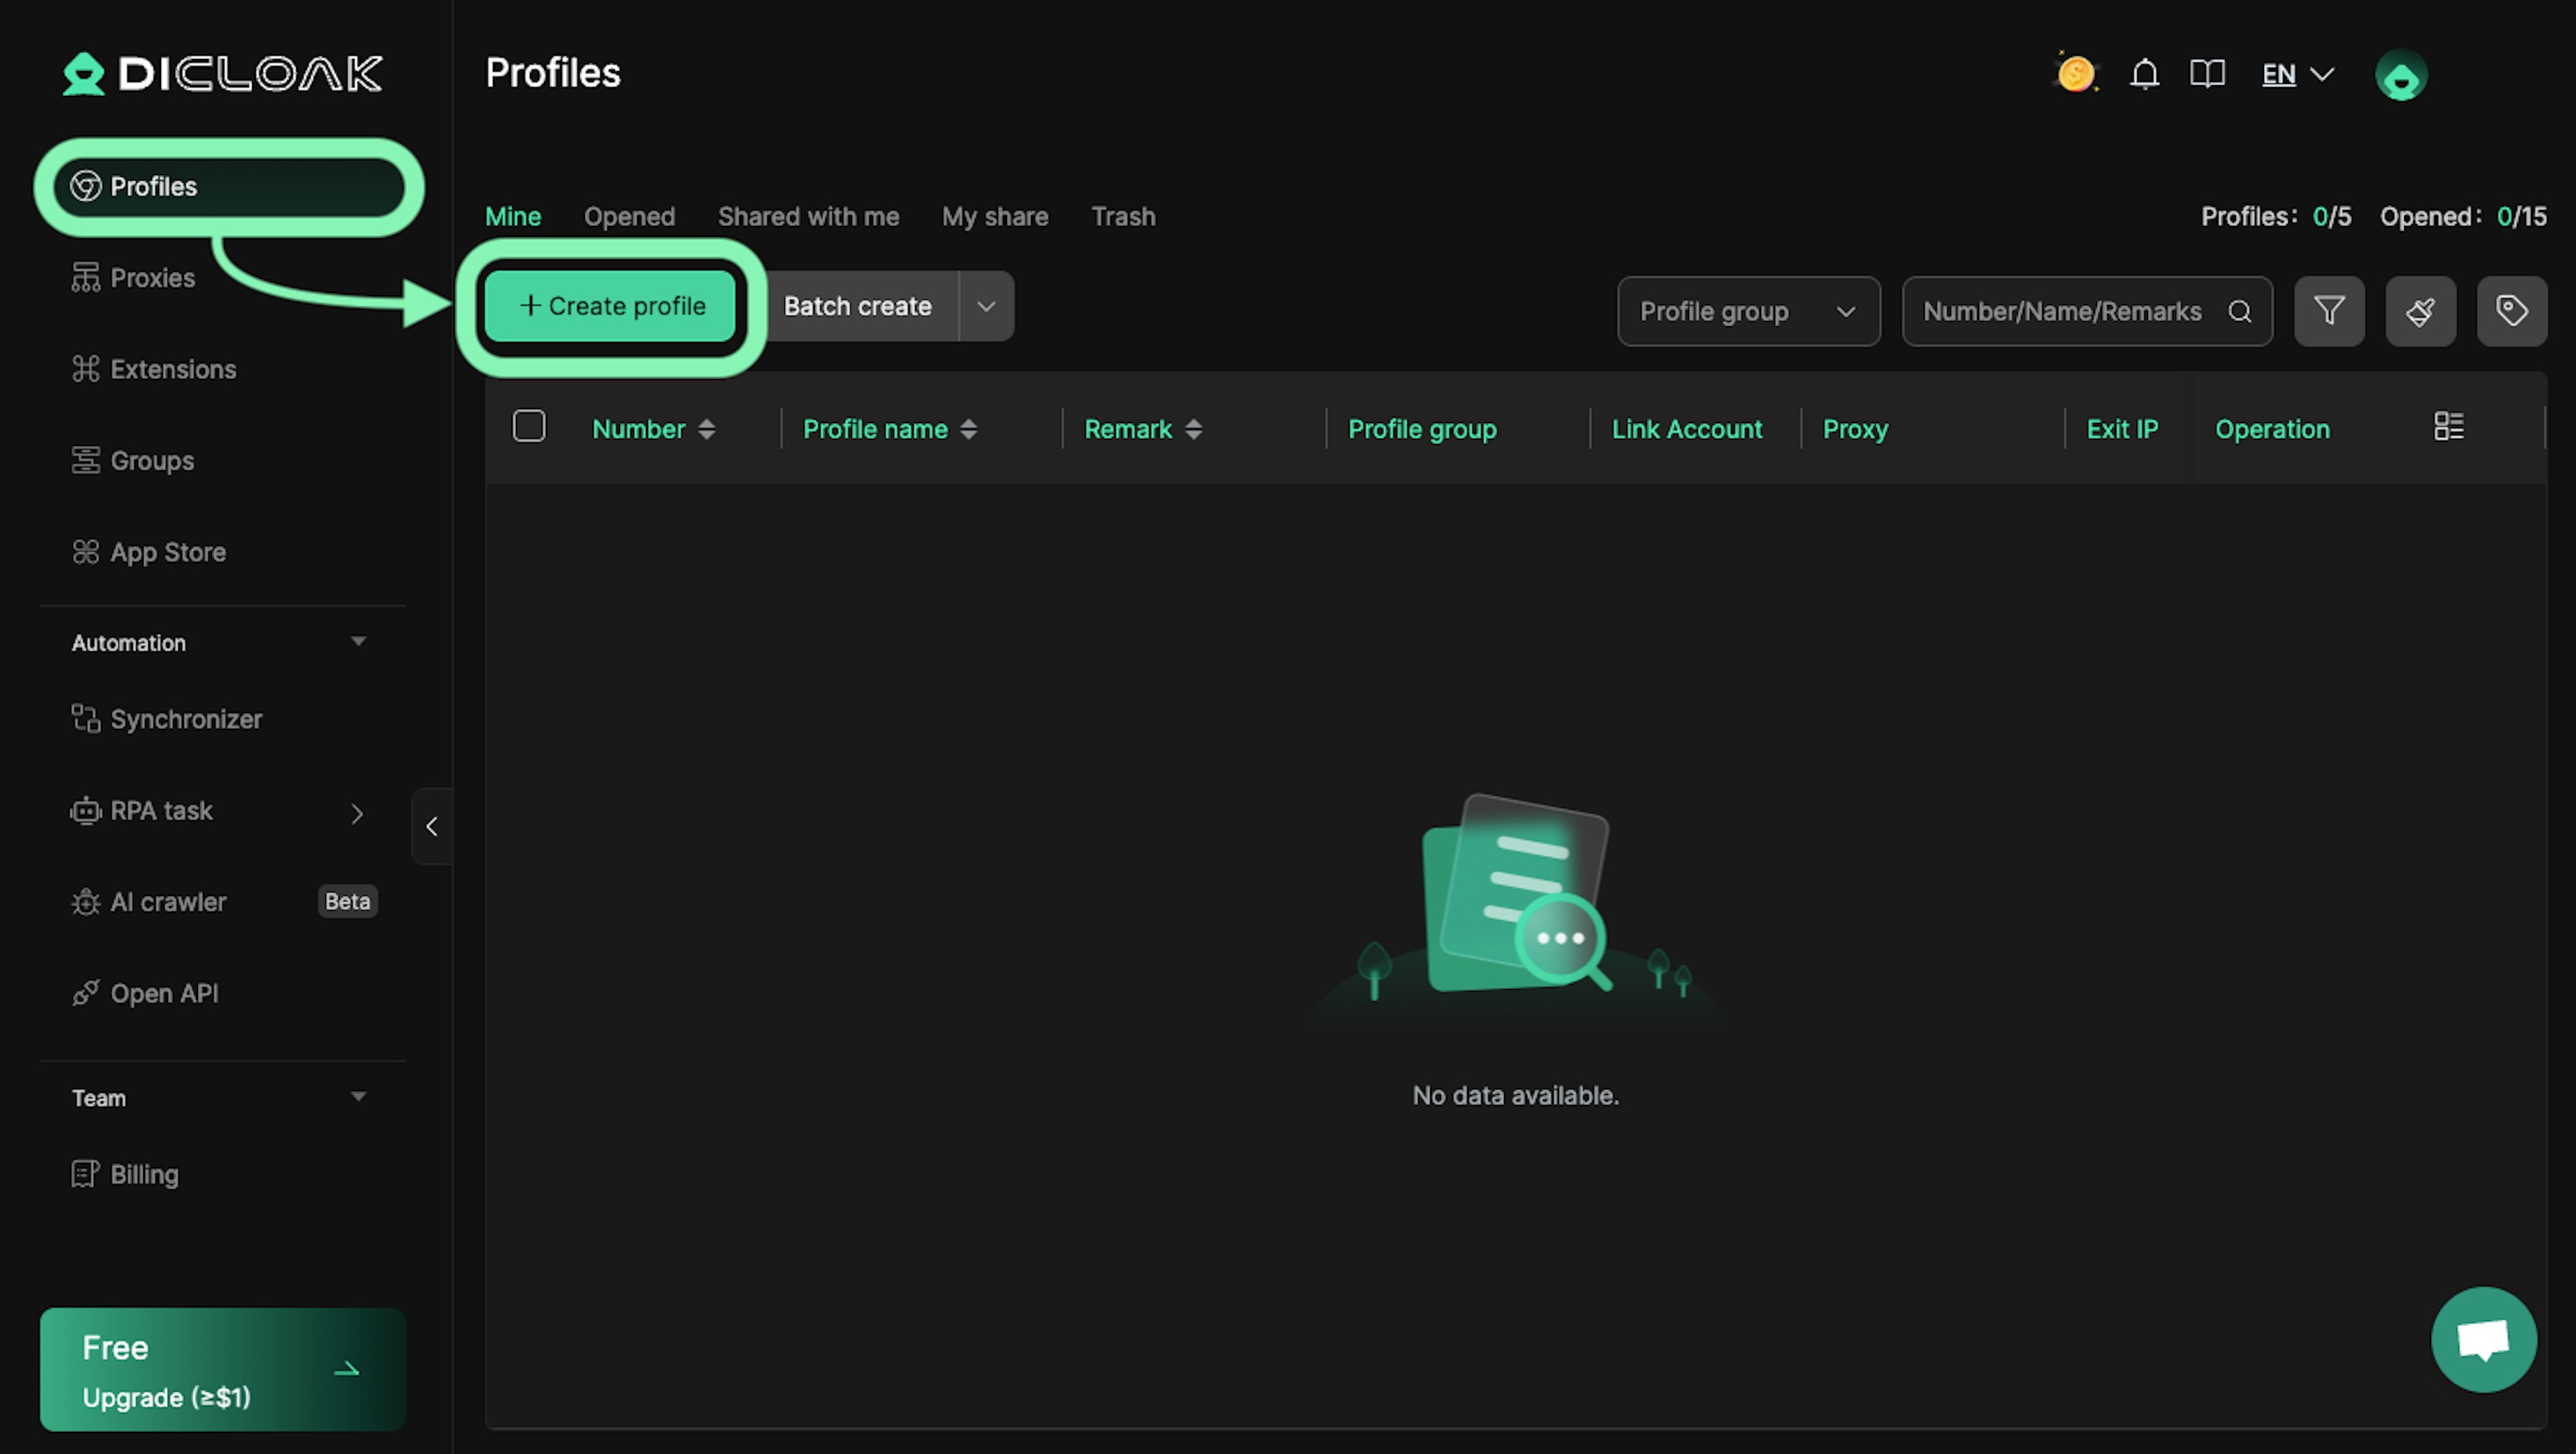
Step 5: Create a browser profile
Go to the Profiles tab and select Create profile.
There, enter your Profile name, and select the proxy you just added from Saved Proxies.
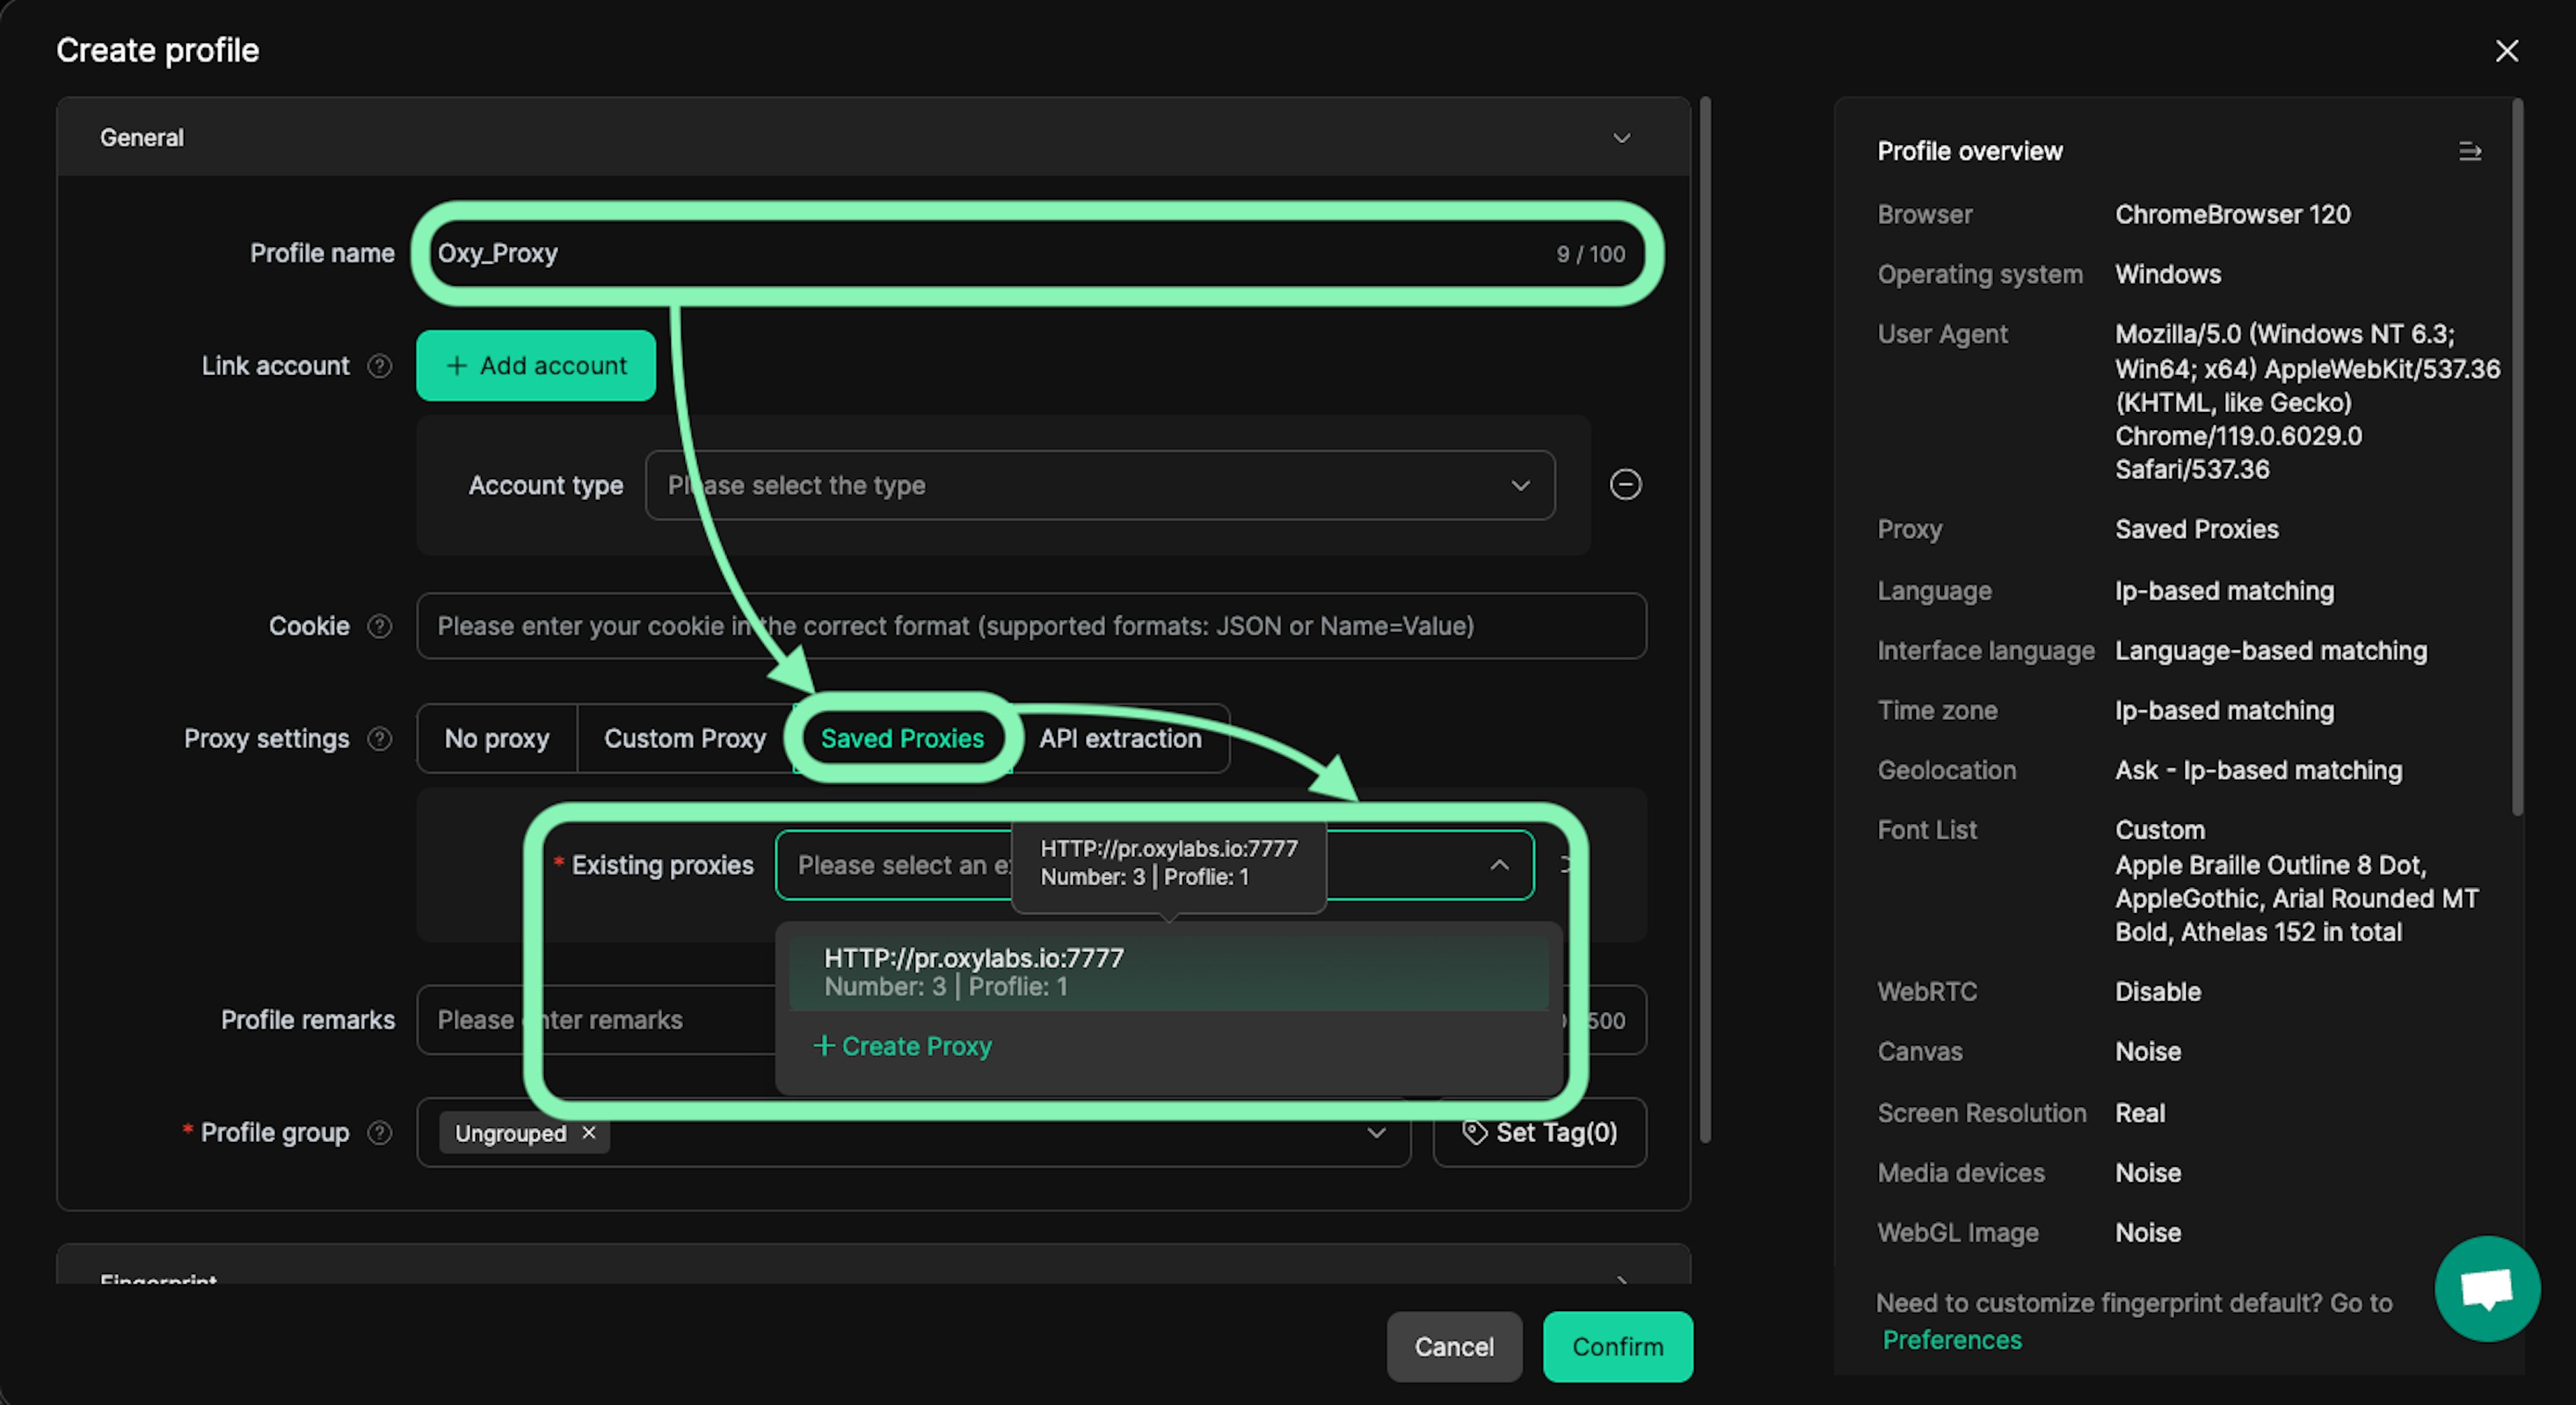
If required, adjust your profile with a custom browser fingerprint, including user agents, cookies, and hardware or software parameters.
To finish the profile, click Confirm at the bottom of the screen.
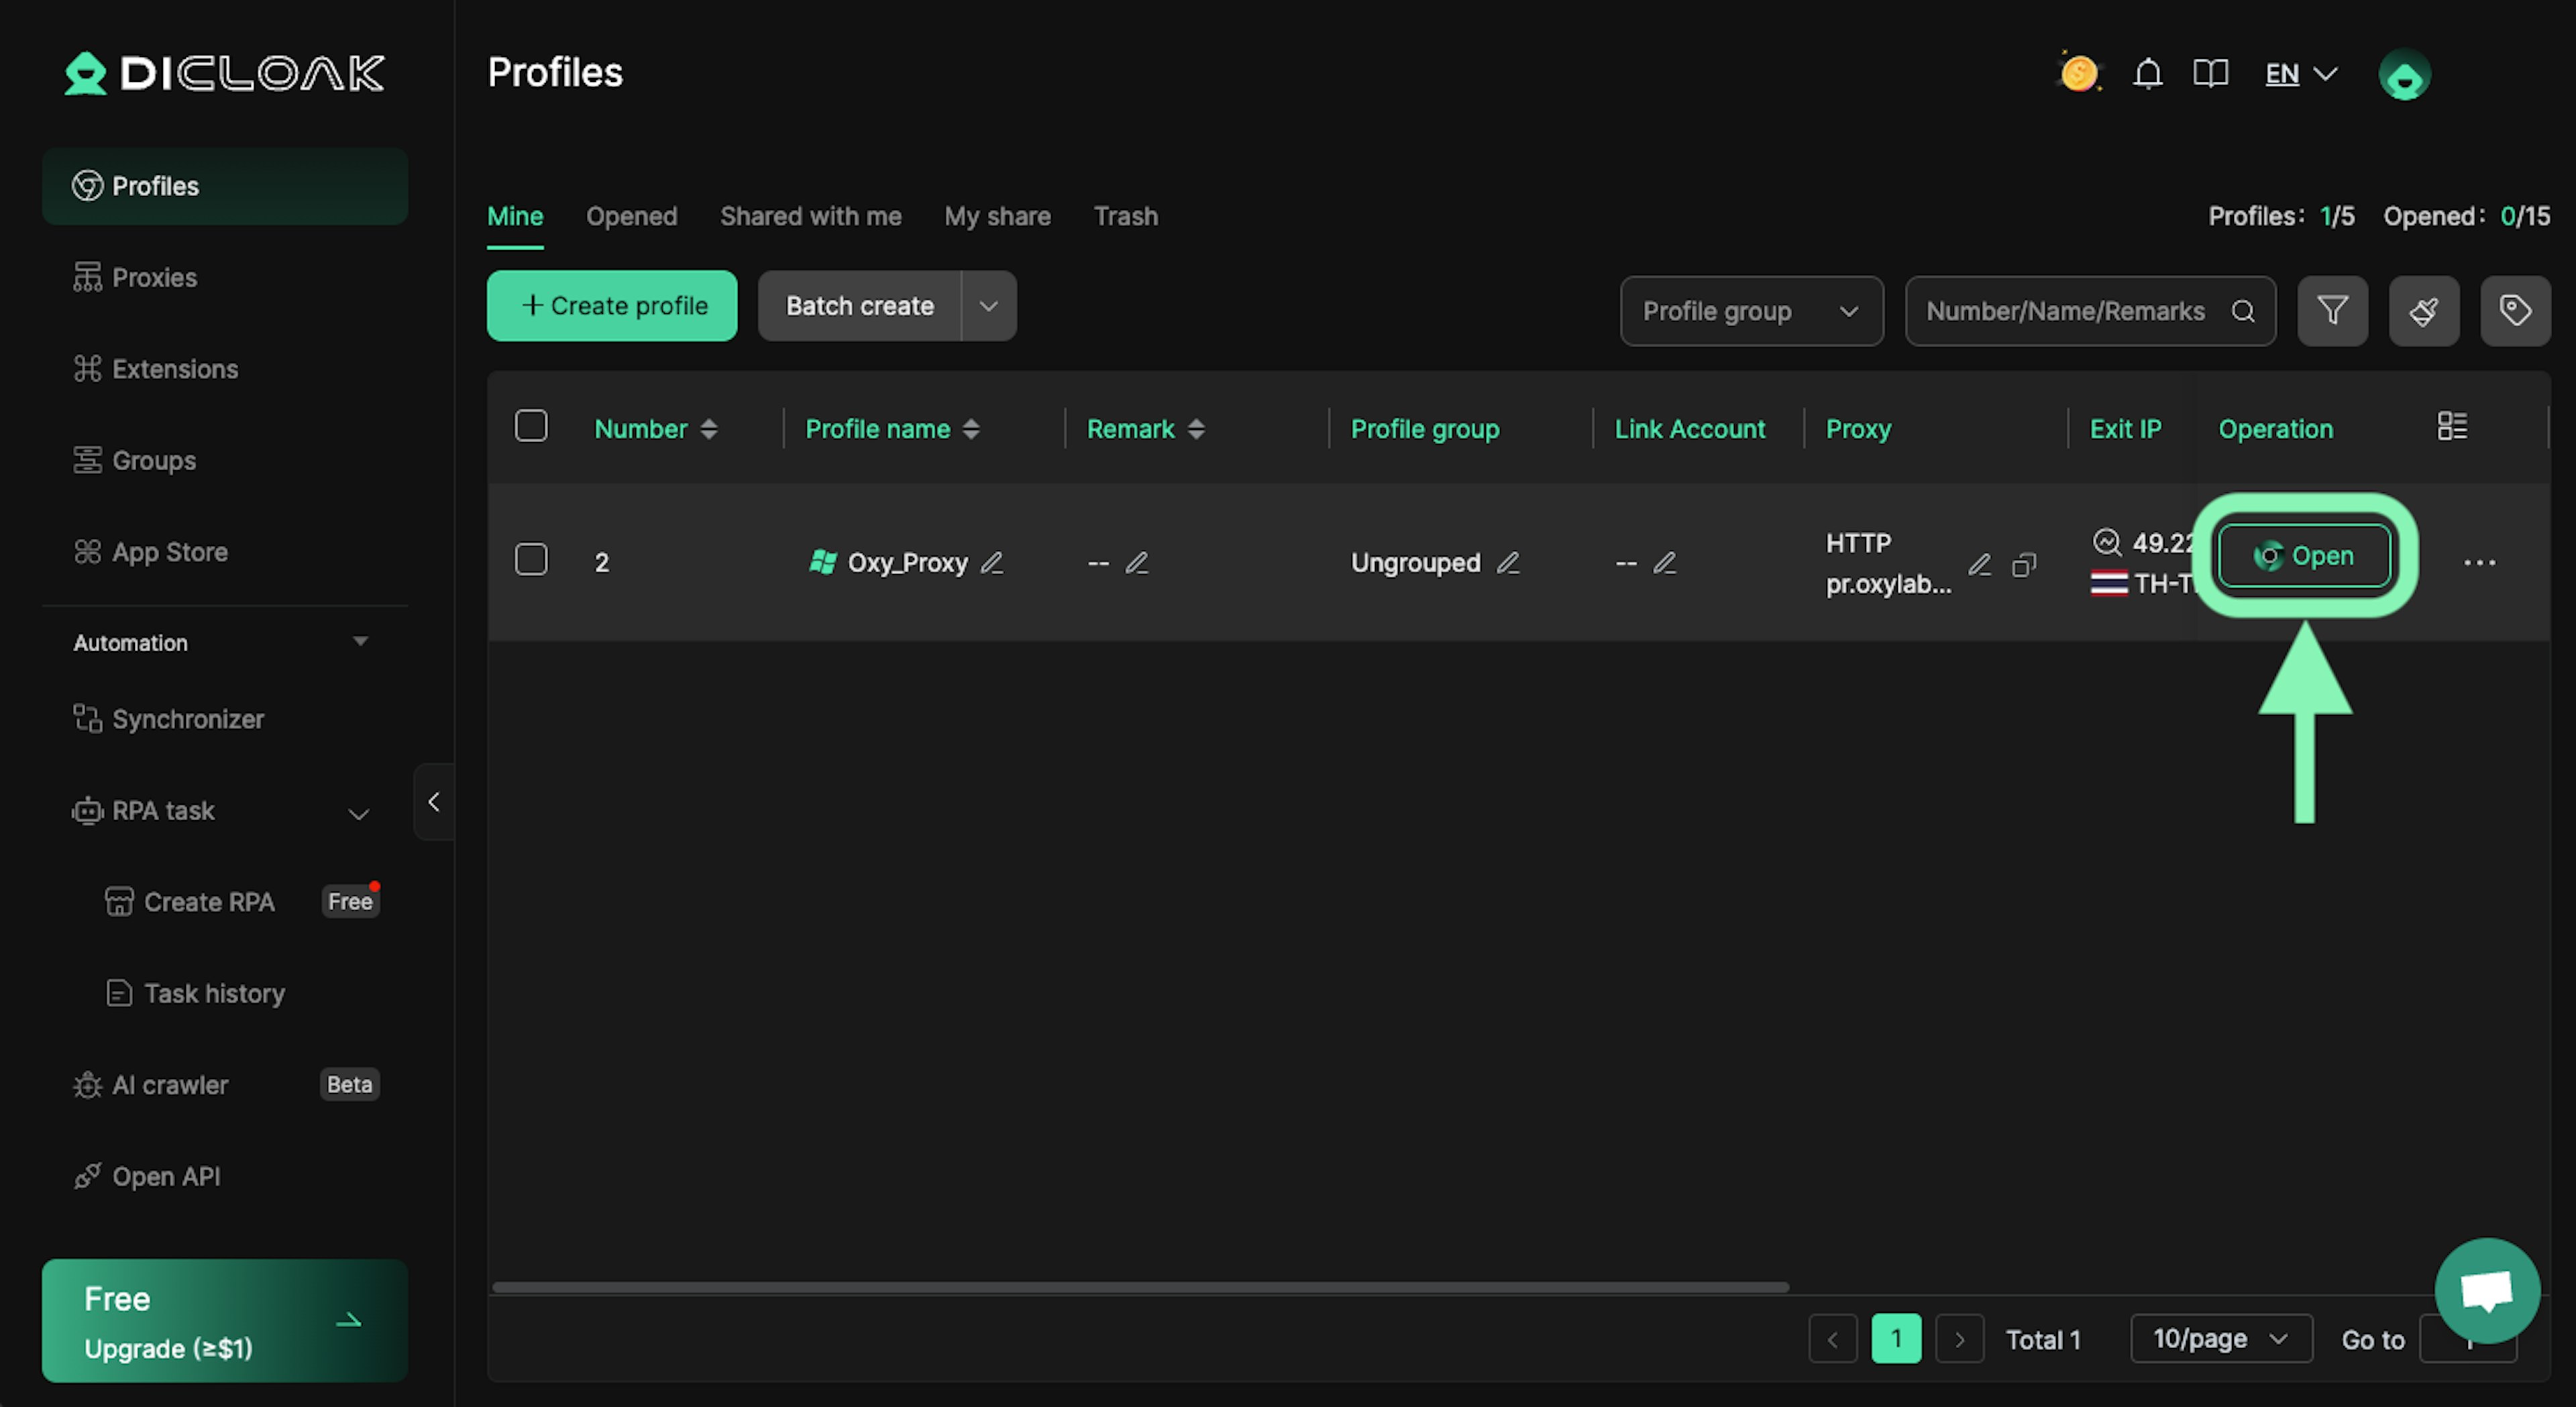
Step 6: Run new profile
Press Open in the Operation column of the profile to launch a private browser and carry on with your tasks.
And that’s it. You’ve successfully integrated your Oxylabs proxies with DICloak.
Final word
DICloak is a powerful and easy-to-set-up antidetect browser for managing digital identities and maintaining browser profiles across different tasks. When paired with quality proxies, it becomes significantly easier to avoid rate limits and IP blocks.
If you’re looking for similar setups or want to explore integrations for other tools, browsers, and automation platforms, visit our integrations hub.
For questions about Oxylabs proxies or the integration process, reach out via the live chat on our homepage or contact us at hello@oxylabs.io.
Please be aware that this is a third-party tool not owned or controlled by Oxylabs. Each third-party provider is responsible for its own software and services. Consequently, Oxylabs will have no liability or responsibility to you regarding those services. Please carefully review the third party's policies and practices and/or conduct due diligence before accessing or using third-party services.
Useful resources
What is Browser Automation? Definition and Examples
From routine task automation to web testing, the range of uses is vast. Read all about browser automation, its everyday use cases, its challenges, and how to get started with it.
Top AntiDetect Browsers of 2025
Learn how an antidetect browser helps with using several accounts for various marketing initiatives.
What Is a Rotating IP Address?
Rotating IP address is a widely used practice where assigned IP addresses are distributed to a device at random or at scheduled intervals.

Get the latest news from data gathering world
Proxies
Advanced proxy solutions
Data Collection
Datasets
Resources
Innovation hub